
US One Year LCD Monitor Warranty
Page 1
...advance replacement). • Return Merchandise Authorization Shipping: The Customer will pay shipping freight to BenQ or a BenQ Authorized Service Provider and BenQ will pay shipping freight to process the replacement. BenQ will , at its option, repair or replace the Product. Obtaining Depot Warranty Service If...remainder of the same or functionally equivalent model. Depot warranty service is not responsible for refurbished units which have purchased from BenQ or from the purchase date by the original retail purchaser (the "Customer") (except for the shipping damages reported after such...
...advance replacement). • Return Merchandise Authorization Shipping: The Customer will pay shipping freight to BenQ or a BenQ Authorized Service Provider and BenQ will pay shipping freight to process the replacement. BenQ will , at its option, repair or replace the Product. Obtaining Depot Warranty Service If...remainder of the same or functionally equivalent model. Depot warranty service is not responsible for refurbished units which have purchased from BenQ or from the purchase date by the original retail purchaser (the "Customer") (except for the shipping damages reported after such...

US One Year LCD Monitor Warranty
Page 2
... shipping or other delays beyond their control. You must be sent in secured packaging to avoid any Product not purchased from the BenQ authorized reseller. All Products must prepay any shipping charges, export taxes, custom duties and taxes, or any charges associated with an...; (e) as a result of use its best efforts to any shipping damages. 6. This limited warranty also does not extend to BenQ unless otherwise directed by BenQ's warranty; Exclusions This limited warranty does not extend to service Products within the continental United States, Hawaii, and Alaska for thirty ...
... shipping or other delays beyond their control. You must be sent in secured packaging to avoid any Product not purchased from the BenQ authorized reseller. All Products must prepay any shipping charges, export taxes, custom duties and taxes, or any charges associated with an...; (e) as a result of use its best efforts to any shipping damages. 6. This limited warranty also does not extend to BenQ unless otherwise directed by BenQ's warranty; Exclusions This limited warranty does not extend to service Products within the continental United States, Hawaii, and Alaska for thirty ...

US One Year LCD Monitor Warranty
Page 3
... fire, or acts of incidental or consequential damages for saving (backing up) any programs, data or removable storage media. IN NO EVENT SHALL BenQ BE LIABLE FOR ANY INDIRECT, INCIDENTAL, SPECIAL OR CONSEQUENTIAL DAMAGES OF ANY KIND, INCLUDING BUT NOT LIMITED TO LOSS OF BUSINESS, REVENUE, PROFITS,...SUCH DAMAGES. Some states or provinces/jurisdictions do not allow the exclusion or limitation of God. Please call Technical Support Center to BenQ or BenQ Authorized Service Provider without notice. ANY IMPLIED WARRANTIES THAT MAY BE IMPOSED BY APPLICABLE LAW ARE LIMITED TO THE TERMS OF THIS ...
... fire, or acts of incidental or consequential damages for saving (backing up) any programs, data or removable storage media. IN NO EVENT SHALL BenQ BE LIABLE FOR ANY INDIRECT, INCIDENTAL, SPECIAL OR CONSEQUENTIAL DAMAGES OF ANY KIND, INCLUDING BUT NOT LIMITED TO LOSS OF BUSINESS, REVENUE, PROFITS,...SUCH DAMAGES. Some states or provinces/jurisdictions do not allow the exclusion or limitation of God. Please call Technical Support Center to BenQ or BenQ Authorized Service Provider without notice. ANY IMPLIED WARRANTIES THAT MAY BE IMPOSED BY APPLICABLE LAW ARE LIMITED TO THE TERMS OF THIS ...

User Manual
Page 1
LCD Monitor User Manual M2700HD Welcome
LCD Monitor User Manual M2700HD Welcome

User Manual
Page 2
... for pluggable equipment. The socket outlet should be reproduced, transmitted, transcribed, stored in the contents hereof without the prior written permission of BenQ Corporation. Always unplug your monitor from time to time in a retrieval system or translated into this equipment from the type of power indicated...8226; Never push objects or spill liquid of any kind into any language or computer language, in any form or by BenQ Corporation. Copyright Copyright © 2009 by any means, electronic, mechanical, magnetic, optical, chemical, manual or otherwise, without obligation of...
... for pluggable equipment. The socket outlet should be reproduced, transmitted, transcribed, stored in the contents hereof without the prior written permission of BenQ Corporation. Always unplug your monitor from time to time in a retrieval system or translated into this equipment from the type of power indicated...8226; Never push objects or spill liquid of any kind into any language or computer language, in any form or by BenQ Corporation. Copyright Copyright © 2009 by any means, electronic, mechanical, magnetic, optical, chemical, manual or otherwise, without obligation of...

User Manual
Page 3
... view ...6 Back view ...6 Getting to know the remote control 7 Front view ...7 Installing the battery ...8 How to assemble your monitor hardware 9 Getting the most from your BenQ monitor 15 How to install the monitor on a new computer 16 How to upgrade the monitor on an existing computer 17 How to install on...
... view ...6 Back view ...6 Getting to know the remote control 7 Front view ...7 Installing the battery ...8 How to assemble your monitor hardware 9 Getting the most from your BenQ monitor 15 How to install the monitor on a new computer 16 How to upgrade the monitor on an existing computer 17 How to install on...
User Manual
Page 4
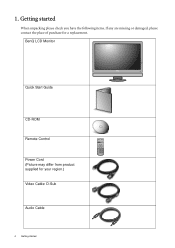
BenQ LCD Monitor Quick Start Guide CD-ROM Remote Control Power Cord (Picture may differ from product supplied for a replacement. Getting started When unpacking please check you have the following items. If any are missing or damaged, please contact the place of purchase for your region.) Video Cable: D-Sub Audio Cable 4 Getting started 1.
BenQ LCD Monitor Quick Start Guide CD-ROM Remote Control Power Cord (Picture may differ from product supplied for a replacement. Getting started When unpacking please check you have the following items. If any are missing or damaged, please contact the place of purchase for your region.) Video Cable: D-Sub Audio Cable 4 Getting started 1.
User Manual
Page 5
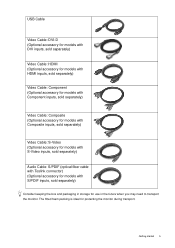
The fitted foam packing is ideal for use in storage for protecting the monitor during transport. USB Cable Video Cable: DVI-D (Optional accessory for models with DVI inputs, sold separately) Video Cable: HDMI (Optional accessory for models with HDMI inputs, sold separately) Video Cable: Component (Optional accessory for models with Component inputs, sold separately) Video Cable: Composite (Optional accessory for models with Composite inputs, sold separately) Video Cable: S-Video (Optional accessory for models with S-Video inputs, sold separately) Audio Cable: S/PDIF (optical fiber cable ...
The fitted foam packing is ideal for use in storage for protecting the monitor during transport. USB Cable Video Cable: DVI-D (Optional accessory for models with DVI inputs, sold separately) Video Cable: HDMI (Optional accessory for models with HDMI inputs, sold separately) Video Cable: Component (Optional accessory for models with Component inputs, sold separately) Video Cable: Composite (Optional accessory for models with Composite inputs, sold separately) Video Cable: S-Video (Optional accessory for models with S-Video inputs, sold separately) Audio Cable: S/PDIF (optical fiber cable ...
User Manual
Page 6
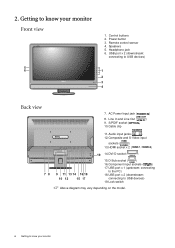
Power button 3. Speakers 5. Line In and Line Out ( ) 9. connecting to USB devices) 1 2 3 4 Back view 78 7. Control buttons 2. Headphone jack 6. Remote control sensor 4. AC Power Input jack ( ) 8. S/PDIF socket ( ) 10.Cable clip 11. connecting to USB devices) 19.Lock switch Above diagram may vary depending on the model. 6 Getting to know your monitor Front view 5 6 1. USB port x 2 (downstream; Audio input jacks ( ) 12.Composite and S-Video input sockets ( ) 13.HDMI socket x 2 ( / ) 9 11 13 14 16 18 10 12 15 17 19 14.DVI-D socket ( ) 15.D-...
Power button 3. Speakers 5. Line In and Line Out ( ) 9. connecting to USB devices) 1 2 3 4 Back view 78 7. Control buttons 2. Headphone jack 6. Remote control sensor 4. AC Power Input jack ( ) 8. S/PDIF socket ( ) 10.Cable clip 11. connecting to USB devices) 19.Lock switch Above diagram may vary depending on the model. 6 Getting to know your monitor Front view 5 6 1. USB port x 2 (downstream; Audio input jacks ( ) 12.Composite and S-Video input sockets ( ) 13.HDMI socket x 2 ( / ) 9 11 13 14 16 18 10 12 15 17 19 14.DVI-D socket ( ) 15.D-...
User Manual
Page 7
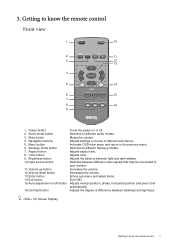
Navigation buttons 5. Senseye mode button 7. Aspect button 8. Volume up button 12.Volume down button 13.Enter button 14.Exit button 15.Auto adjustment on/off button 16.Contrast button Turns the power on or off. Adjusts the degree of difference between light and dark shades. Getting to different Senseye modes. Mute button 4. Mutes the volume. Switches to know the remote control 7 Adjusts aspect ratio. Adjusts the balance between darkness and lightness. Adjusts vertical position, phase, horizontal position and pixel clock automatically. Getting to different audio modes....
Navigation buttons 5. Senseye mode button 7. Aspect button 8. Volume up button 12.Volume down button 13.Enter button 14.Exit button 15.Auto adjustment on/off button 16.Contrast button Turns the power on or off. Adjusts the degree of difference between light and dark shades. Getting to different Senseye modes. Mute button 4. Mutes the volume. Switches to know the remote control 7 Adjusts aspect ratio. Adjusts the balance between darkness and lightness. Adjusts vertical position, phase, horizontal position and pixel clock automatically. Getting to different audio modes....

User Manual
Page 8
Place a 3V Lithium cell battery purchased separately onto the battery holder properly. Installing the battery 1. CR2025 CR2025 8 Getting to the right, and while holding the latch, pull the battery holder out. 2 1 2. Make sure that the positive terminal (+) faces upward. 3. Press the latch at the bottom of the remote control to know the remote control Turn over the remote control. The remote control is ready to the remote control. Push the battery holder back to use now.
Place a 3V Lithium cell battery purchased separately onto the battery holder properly. Installing the battery 1. CR2025 CR2025 8 Getting to the right, and while holding the latch, pull the battery holder out. 2 1 2. Make sure that the positive terminal (+) faces upward. 3. Press the latch at the bottom of the remote control to know the remote control Turn over the remote control. The remote control is ready to the remote control. Push the battery holder back to use now.
User Manual
Page 9
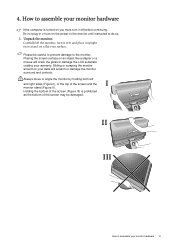
Holding the bottom of the screen (Figure III) is turned on you must turn it upright on its stand on an object like a stapler or a mouse will crack the glass or damage the LCD substrate voiding your desk will scratch or damage the monitor surround and controls. Placing the screen surface on a flat even surface. How to assemble your monitor hardware If the computer is prohibited as the bottom of the screen and the I monitor stand (Figure II). II III How to assemble your monitor hardware 9 Do not plug-in or turn it over and place it off before continuing....
Holding the bottom of the screen (Figure III) is turned on you must turn it upright on its stand on an object like a stapler or a mouse will crack the glass or damage the LCD substrate voiding your desk will scratch or damage the monitor surround and controls. Placing the screen surface on a flat even surface. How to assemble your monitor hardware If the computer is prohibited as the bottom of the screen and the I monitor stand (Figure II). II III How to assemble your monitor hardware 9 Do not plug-in or turn it over and place it off before continuing....
User Manual
Page 10
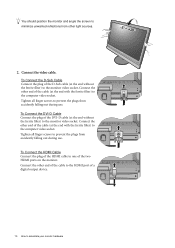
Connect the video cable. To Connect the D-Sub Cable Connect the plug of the DVI-D cable (at the end without the ferrite filter) to the monitor video socket. To Connect the DVI-D Cable Connect the plug of the D-Sub cable (at the end without the ferrite filter) to the monitor video socket. Tighten all finger screws to prevent the plugs from accidently falling out during use . Connect the other end of the cable to the HDMI port of a digital output device. 10 How to one of the cable (at the end with the ferrite filter) to the computer video socket. Connect the other end of...
Connect the video cable. To Connect the D-Sub Cable Connect the plug of the DVI-D cable (at the end without the ferrite filter) to the monitor video socket. To Connect the DVI-D Cable Connect the plug of the D-Sub cable (at the end without the ferrite filter) to the monitor video socket. Tighten all finger screws to prevent the plugs from accidently falling out during use . Connect the other end of the cable to the HDMI port of a digital output device. 10 How to one of the cable (at the end with the ferrite filter) to the computer video socket. Connect the other end of...
User Manual
Page 11
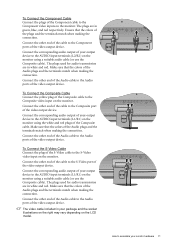
Make sure that the colors of the Audio plugs and the terminals match when making the connection. To Connect the S-Video Cable Connect the plug of the S-Video cable to the S-Video video input on the monitor. Connect the other end of the Audio cable to the Audio ports of the video output device. Connect the other end of the cable to the S-Video port of the video output device. The plugs are in your output device to the AUDIO input terminals (L1/R1) on the monitor using a suitable audio cable (or use the Composite cable). Connect the other end of the Audio cable to the Audio ...
Make sure that the colors of the Audio plugs and the terminals match when making the connection. To Connect the S-Video Cable Connect the plug of the S-Video cable to the S-Video video input on the monitor. Connect the other end of the Audio cable to the Audio ports of the video output device. Connect the other end of the cable to the S-Video port of the video output device. The plugs are in your output device to the AUDIO input terminals (L1/R1) on the monitor using a suitable audio cable (or use the Composite cable). Connect the other end of the Audio cable to the Audio ...

User Manual
Page 12
To Output Audio Signals You are S/PDIF compatible. If the video source is connecting to) to connect the S/PDIF socket on the monitor determine the order of the monitor. See picture on your monitor hardware III IV Connect the audio cable. I • You can output audio using external speakers, please also use another audio cable (usually supplied with the speakers) to connect the monitor (Line Out) to the input/Line In jack of the speaker. • Or you can use a suitable audio cable (usually purchased separately or came with the following options to output audio from ...
To Output Audio Signals You are S/PDIF compatible. If the video source is connecting to) to connect the S/PDIF socket on the monitor determine the order of the monitor. See picture on your monitor hardware III IV Connect the audio cable. I • You can output audio using external speakers, please also use another audio cable (usually supplied with the speakers) to connect the monitor (Line Out) to the input/Line In jack of the speaker. • Or you can use a suitable audio cable (usually purchased separately or came with the following options to output audio from ...
User Manual
Page 13
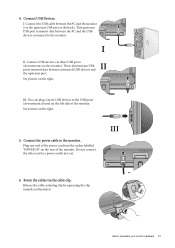
Connect USB devices via other end to a power outlet just yet. III. These downstream USB ports transmit data between the PC and the USB devices connected to the USB ports (downstream) found on the left side of the monitor. I II. See picture on the right. Connect USB Devices. See picture on the right. 5. Connect the power cable to assemble your monitor hardware 13 Do not connect the other USB ports II (downstream) on the rear of the monitor. How to the monitor. TV OUT SDIF-OUT PDIF-OUT 4. This upstream USB port transmits data between connected USB ...
Connect USB devices via other end to a power outlet just yet. III. These downstream USB ports transmit data between the PC and the USB devices connected to the USB ports (downstream) found on the left side of the monitor. I II. See picture on the right. Connect USB Devices. See picture on the right. 5. Connect the power cable to assemble your monitor hardware 13 Do not connect the other USB ports II (downstream) on the rear of the monitor. How to the monitor. TV OUT SDIF-OUT PDIF-OUT 4. This upstream USB port transmits data between connected USB ...
User Manual
Page 14
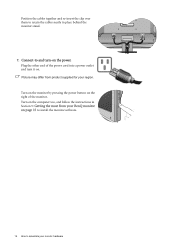
Plug the other end of the monitor. Connect-to and turn it on the power. Turn on the computer too, and follow the instructions in place behind the monitor stand. 7. Position the cables together and re-insert the clip over them to retain the cables neatly in Section 5: Getting the most from product supplied for your monitor hardware Turn on the monitor by pressing the power button on page 15 to install the monitor software. 14 How to assemble your region. Picture may differ from your BenQ monitor on the right of the power cord into a power outlet and turn -on .
Plug the other end of the monitor. Connect-to and turn it on the power. Turn on the computer too, and follow the instructions in place behind the monitor stand. 7. Position the cables together and re-insert the clip over them to retain the cables neatly in Section 5: Getting the most from product supplied for your monitor hardware Turn on the monitor by pressing the power button on page 15 to install the monitor software. 14 How to assemble your region. Picture may differ from your BenQ monitor on the right of the power cord into a power outlet and turn -on .
User Manual
Page 15
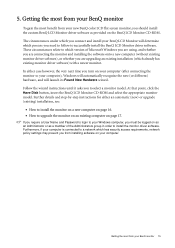
... software. 5. The circumstances under which you connect and install your computer is connected to a network which process you should install the custom BenQ LCD Monitor driver software as a member of Microsoft Windows you are using, and whether you are connecting the monitor and installing the software ...These circumstances relate to upgrade the monitor on an existing computer on as an Administrator or as provided on the BenQ LCD Monitor CD-ROM. Getting the most from your BenQ monitor To gain the most from installing software on your computer (after connecting the monitor to your...
... software. 5. The circumstances under which you connect and install your computer is connected to a network which process you should install the custom BenQ LCD Monitor driver software as a member of Microsoft Windows you are using, and whether you are connecting the monitor and installing the software ...These circumstances relate to upgrade the monitor on an existing computer on as an Administrator or as provided on the BenQ LCD Monitor CD-ROM. Getting the most from your BenQ monitor To gain the most from installing software on your computer (after connecting the monitor to your...
User Manual
Page 16
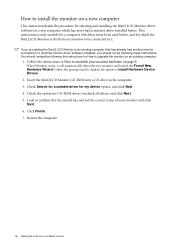
... the procedure for How to upgrade the monitor on an existing computer. 1. You should not be following the instructions for selecting and installing the BenQ LCD Monitor driver software on a new computer which has never been used before . Follow the instructions in How to it . Click Finish.... 7. Follow the prompts until it will automatically detect the new monitor and launch the Found New Hardware Wizard. Insert the BenQ LCD Monitor CD-ROM into a CD drive on page 9. If you should instead be connected to Install Hardware Device Drivers. 2. Look to...
... the procedure for How to upgrade the monitor on an existing computer. 1. You should not be following the instructions for selecting and installing the BenQ LCD Monitor driver software on a new computer which has never been used before . Follow the instructions in How to it . Click Finish.... 7. Follow the prompts until it will automatically detect the new monitor and launch the Found New Hardware Wizard. Insert the BenQ LCD Monitor CD-ROM into a CD drive on page 9. If you should instead be connected to Install Hardware Device Drivers. 2. Look to...
User Manual
Page 17
... task and guide you have connected, and letting Windows install the corresponding driver files from your BenQ monitor 17 It is currently tested as at the time of writing, BenQ has done no testing of this driver on other versions of Windows and cannot guarantee its operation... on those systems. Installing monitor driver software involves selecting an appropriate information file (.inf) on the BenQ LCD Monitor CD-ROM for the particular model monitor you through the file selection and installation process. Getting the most from the CD. ...
... task and guide you have connected, and letting Windows install the corresponding driver files from your BenQ monitor 17 It is currently tested as at the time of writing, BenQ has done no testing of this driver on other versions of Windows and cannot guarantee its operation... on those systems. Installing monitor driver software involves selecting an appropriate information file (.inf) on the BenQ LCD Monitor CD-ROM for the particular model monitor you through the file selection and installation process. Getting the most from the CD. ...
