
User Manual
Page 3
... view ...8 Controls and functions...9 Positioning your projector 11 Choosing a location ...11 Obtaining a preferred projected image size 12 Shifting the projection lens ...13 Mounting the projector ...13 Adjusting the projected image...15 Connection ...16 Operation ...17 Starting up the projector ...17 Using the menus ...19 Upgrading firmware ...19 Securing the projector ...20 Switching input signal ...21 Presenting from a Media Reader...22 Shutting down the projector ...22 Direct power off ...22 Menu operation ...23 PICTURE menu ...23 DISPLAY menu ...27 INSTALLATION menu...28 SYSTEM SETUP...
... view ...8 Controls and functions...9 Positioning your projector 11 Choosing a location ...11 Obtaining a preferred projected image size 12 Shifting the projection lens ...13 Mounting the projector ...13 Adjusting the projected image...15 Connection ...16 Operation ...17 Starting up the projector ...17 Using the menus ...19 Upgrading firmware ...19 Securing the projector ...20 Switching input signal ...21 Presenting from a Media Reader...22 Shutting down the projector ...22 Direct power off ...22 Menu operation ...23 PICTURE menu ...23 DISPLAY menu ...27 INSTALLATION menu...28 SYSTEM SETUP...
User Manual
Page 4
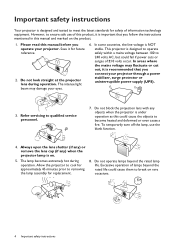
... projector lens during operation. However, to ensure safe use the blank function. 4. Please read this manual before you operate your eyes. 6. In some countries, the line voltage is important that you follow the instructions mentioned in this manual and marked on the product. 1. In areas where the mains voltage may damage your projector. Refer servicing to removing the lamp assembly for replacement. 8. Always open...
... projector lens during operation. However, to ensure safe use the blank function. 4. Please read this manual before you operate your eyes. 6. In some countries, the line voltage is important that you follow the instructions mentioned in this manual and marked on the product. 1. In areas where the mains voltage may damage your projector. Refer servicing to removing the lamp assembly for replacement. 8. Always open...

User Manual
Page 8
... screen or light control, etc. 19 20 2 2 21 20 22 20 2 12. HDMI 1/ HDMI 2 input port (Version 2.0b) 16. Audio output jack 19. AC power jack 20. Security bar 8 Introduction SPDIF output port 18. Vent (air exhaust) 22. Projector exterior view 1 2 3 4 2 20 4 6 5 7 8 9 2 10 12 14 11 13 15 16 17 18 2 20 22 20 2 1. Adjuster feet 3. Lens shift wheel 7. RS-232 control port 13. Projection lens 4. Zoom ring 8. USB Type-A port (USB 2.0: 2.5A power supply) 17. Lamp cover...
... screen or light control, etc. 19 20 2 2 21 20 22 20 2 12. HDMI 1/ HDMI 2 input port (Version 2.0b) 16. Audio output jack 19. AC power jack 20. Security bar 8 Introduction SPDIF output port 18. Vent (air exhaust) 22. Projector exterior view 1 2 3 4 2 20 4 6 5 7 8 9 2 10 12 14 11 13 15 16 17 18 2 20 22 20 2 1. Adjuster feet 3. Lens shift wheel 7. RS-232 control port 13. Projection lens 4. Zoom ring 8. USB Type-A port (USB 2.0: 2.5A power supply) 17. Lamp cover...

User Manual
Page 9
...used as directional arrows to select the desired menu items and to make adjustments. LUMI EXPERT Not operational on the On-Screen Display (OSD) menu. 5. SOURCE Displays the source selection bar. 8. Introduction 9 ON/ Off Toggles the projector between standby mode and on . 3. Keystone keys ( , ) Displays the keystone correction page. Keystone correction key Displays the Keystone correction menu. 9. OK Confirms the selected On-Screen Display (OSD) menu item. POWER Toggles the projector between standby mode and on . POWER indicator light/TEMPerature warning light/LAMP indicator...
...used as directional arrows to select the desired menu items and to make adjustments. LUMI EXPERT Not operational on the On-Screen Display (OSD) menu. 5. SOURCE Displays the source selection bar. 8. Introduction 9 ON/ Off Toggles the projector between standby mode and on . 3. Keystone keys ( , ) Displays the keystone correction page. Keystone correction key Displays the Keystone correction menu. 9. OK Confirms the selected On-Screen Display (OSD) menu item. POWER Toggles the projector between standby mode and on . POWER indicator light/TEMPerature warning light/LAMP indicator...

User Manual
Page 10
... default value for a few seconds. Displays the 3D menu. 14. PIC MODE Selects a suitable lamp power from among the 21. 3D provided modes. When Keystone OSD pops up, long press for adjustments of adjustment bars menu when doing adjustment. 23. The distance between the remote control and the IR sensor(s) on page 26. Displays the CinemaMaster menu. Press the key again to hide the screen picture. LIGHT Displays the Picture Mode menu. SOUND MODE 18. Displays the setting...
... default value for a few seconds. Displays the 3D menu. 14. PIC MODE Selects a suitable lamp power from among the 21. 3D provided modes. When Keystone OSD pops up, long press for adjustments of adjustment bars menu when doing adjustment. 23. The distance between the remote control and the IR sensor(s) on page 26. Displays the CinemaMaster menu. Press the key again to hide the screen picture. LIGHT Displays the Picture Mode menu. SOUND MODE 18. Displays the setting...
User Manual
Page 11
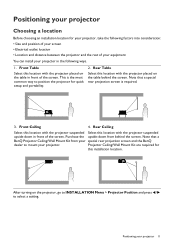
Note that a BenQ Projector Ceiling/Wall Mount Kit from behind the screen. Note that a special rear projection screen is the most common way to position the projector for quick setup and portability. 2. Front Table Select this installation location. This is required. 3. After turning on the projector, go to INSTALLATION Menu > Projector Position and press / to mount your projector 11 Projector Ceiling/Wall Mount Kit are required for this location with the projector placed on...
Note that a BenQ Projector Ceiling/Wall Mount Kit from behind the screen. Note that a special rear projection screen is the most common way to position the projector for quick setup and portability. 2. Front Table Select this installation location. This is required. 3. After turning on the projector, go to INSTALLATION Menu > Projector Position and press / to mount your projector 11 Projector Ceiling/Wall Mount Kit are required for this location with the projector placed on...

User Manual
Page 15
...; Using the remote control or projector Press on the remote control or / on . When Keystone OSD Press / . When Keystone OSD pops up , long press OK for 2 seconds to enable Auto Keystone. Fine-tuning the image size and clarity Adjust the projected image to the screen. It occurs when the projector is not perpendicular to the size that you can screw the adjuster feet to reset Keystone. Press / . To retract the feet, screw the adjuster...
...; Using the remote control or projector Press on the remote control or / on . When Keystone OSD Press / . When Keystone OSD pops up , long press OK for 2 seconds to enable Auto Keystone. Fine-tuning the image size and clarity Adjust the projected image to the screen. It occurs when the projector is not perpendicular to the size that you can screw the adjuster feet to reset Keystone. Press / . To retract the feet, screw the adjuster...

User Manual
Page 18
... setting. Step 4: Specify Auto Source. If the projector does not detect a valid signal, the message "No Signal" will search for input signals. Now you will run the cooling fan for approximately 90 seconds before energizing the lamp. • The Setup Wizard screenshots are prompted for 3 minutes, the projector automatically enters saving mode. 18 Operation The projector will continue displaying until an input signal is compatible with the projector's resolution or set the input signal...
... setting. Step 4: Specify Auto Source. If the projector does not detect a valid signal, the message "No Signal" will search for input signals. Now you will run the cooling fan for approximately 90 seconds before energizing the lamp. • The Setup Wizard screenshots are prompted for 3 minutes, the projector automatically enters saving mode. 18 Operation The projector will continue displaying until an input signal is compatible with the projector's resolution or set the input signal...
User Manual
Page 19
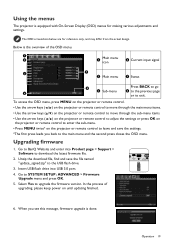
... remote control to adjust the settings or press OK on the projector or remote control to enter the sub-menu. • Press MENU twice* on until updating finished. 6. Go to exit. Operation 19 Upgrading firmware 1. When you back to the USB flash drive. 3. Insert USB flash drive into Product page > Support > Software to upgrade the firmware version. Using the menus The projector is done. Below is the overview of upgrading, please keep power on the projector or remote control...
... remote control to adjust the settings or press OK on the projector or remote control to enter the sub-menu. • Press MENU twice* on until updating finished. 6. Go to exit. Operation 19 Upgrading firmware 1. When you back to the USB flash drive. 3. Insert USB flash drive into Product page > Support > Software to upgrade the firmware version. Using the menus The projector is done. Below is the overview of upgrading, please keep power on the projector or remote control...
User Manual
Page 20
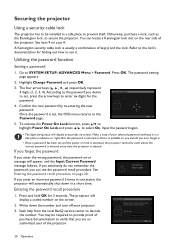
.... • Once a password has been set and the power on lock is activated, the projector cannot be installed in advance or right after the password is entered so that you enter an incorrect password 5 times in succession, the projector will display a coded number on page 20. Entering the password recall procedure 1. Seek help from the local BenQ service center to select On. You can use it in a safe...
.... • Once a password has been set and the power on lock is activated, the projector cannot be installed in advance or right after the password is entered so that you enter an incorrect password 5 times in succession, the projector will display a coded number on page 20. Entering the password recall procedure 1. Seek help from the local BenQ service center to select On. You can use it in a safe...
User Manual
Page 21
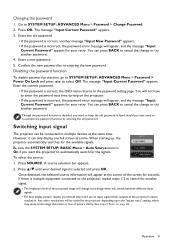
.... Any other resolutions will appear at a time. Enter the old password. • If the password is incorrect, the password error message will appear, and the message "Input Current Password" appears for your retry. You will not have to keep the old password in hand should select and use an input signal which may cause some image distortion or loss of the projected image will change or try another message "Input New Password" appears...
.... Any other resolutions will appear at a time. Enter the old password. • If the password is incorrect, the password error message will appear, and the message "Input Current Password" appears for your retry. You will not have to keep the old password in hand should select and use an input signal which may cause some image distortion or loss of the projected image will change or try another message "Input New Password" appears...

User Manual
Page 23
... as if in the DISPLAY menu. • 3D: Is appropriate for playing 3D images and 3D video clips. The menu items are accessible. PICTURE menu Picture Mode The projector is preset with accurate color and deepest contrast at Auto, and HLG content is no equipment connected to the projector or no signal detected, limited menu items are available when the projector detects at Auto, and HDR10 content is...
... as if in the DISPLAY menu. • 3D: Is appropriate for playing 3D images and 3D video clips. The menu items are accessible. PICTURE menu Picture Mode The projector is preset with accurate color and deepest contrast at Auto, and HLG content is no equipment connected to the projector or no signal detected, limited menu items are available when the projector detects at Auto, and HDR10 content is...

User Manual
Page 28
... state that the projected image is between 0°C and 35°C. Adjusts the image size and focus and check that this projector can be over -heating. See Choosing a location on page 11. We recommend you turn the mode on under such a condition. 28 Menu operation Operation under "High Altitude Mode" may display auto shut-down symptoms, which is turned on. INSTALLATION menu Projector Position Auto Keystone The projector can operate under any keystoning of increased fan speed necessary to...
... state that the projected image is between 0°C and 35°C. Adjusts the image size and focus and check that this projector can be over -heating. See Choosing a location on page 11. We recommend you turn the mode on under such a condition. 28 Menu operation Operation under "High Altitude Mode" may display auto shut-down symptoms, which is turned on. INSTALLATION menu Projector Position Auto Keystone The projector can operate under any keystoning of increased fan speed necessary to...
User Manual
Page 29
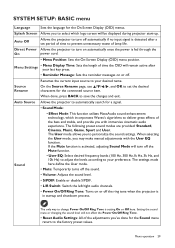
...) to adjust the levels according to change Power On/Off Ring Tone is fed through the On power cord. • Menu Position: Sets the On-Screen Display (OSD) menu position. Menu Settings • Menu Display Time: Sets the length of lamp life. Auto Source Allows the projector to automatically search for the Sound menu return to turn off . Splash Screen Allows you with the User EQ function. The User mode allows you 've done for a signal. • Sound Mode: Sound • Effect Mode...
...) to adjust the levels according to change Power On/Off Ring Tone is fed through the On power cord. • Menu Position: Sets the On-Screen Display (OSD) menu position. Menu Settings • Menu Display Time: Sets the length of lamp life. Auto Source Allows the projector to automatically search for the Sound menu return to turn off . Splash Screen Allows you with the User EQ function. The User mode allows you 've done for a signal. • Sound Mode: Sound • Effect Mode...

User Manual
Page 30
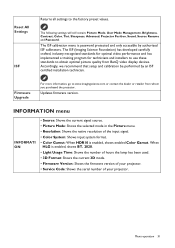
... can turn off the LED warning lights. The higher the setting, the stronger the gain value. SYSTEM SETUP: ADVANCED menu Lamp Settings • Reset Lamp Timer: See Resetting the lamp timer on page 36. • Lamp Timer: See Getting to know the lamp hour on page 32. • HDMI Format Selects a suitable color range to avoid any light disturbance when viewing images in a dark room. 30 Menu operation This is on, no control keys on the projector will...
... can turn off the LED warning lights. The higher the setting, the stronger the gain value. SYSTEM SETUP: ADVANCED menu Lamp Settings • Reset Lamp Timer: See Resetting the lamp timer on page 36. • Lamp Timer: See Getting to know the lamp hour on page 32. • HDMI Format Selects a suitable color range to avoid any light disturbance when viewing images in a dark room. 30 Menu operation This is on, no control keys on the projector will...
User Manual
Page 31
... firmware version of your projector. • Service Code: Shows the serial number of your projector. Menu operation 31 Accordingly, we recommend that setup and calibration be performed by authorized ISF calibrators. The ISF calibration menu is password protected and only accessible by an ISF certified installation technician. Updates firmware version. Reset All Settings ISF Returns all settings to www.imagingscience.com or contact the dealer or retailer from BenQ video display...
... firmware version of your projector. • Service Code: Shows the serial number of your projector. Menu operation 31 Accordingly, we recommend that setup and calibration be performed by authorized ISF calibrators. The ISF calibration menu is password protected and only accessible by an ISF certified installation technician. Updates firmware version. Reset All Settings ISF Returns all settings to www.imagingscience.com or contact the dealer or retailer from BenQ video display...

User Manual
Page 32
... mode = x hours Time used in Eco mode = y hours Time used in damage to the projector surface and cabinet material. Never use any type of abrasive pad, alkaline/acid cleaner, scouring powder, or volatile solvent, such as alcohol, benzene, thinner or insecticide. The method of calculating the equivalent lamp hour is as described in Shutting down completely before cleaning the lens. • Use a canister of compressed air to remove...
... mode = x hours Time used in Eco mode = y hours Time used in damage to the projector surface and cabinet material. Never use any type of abrasive pad, alkaline/acid cleaner, scouring powder, or volatile solvent, such as alcohol, benzene, thinner or insecticide. The method of calculating the equivalent lamp hour is as described in Shutting down completely before cleaning the lens. • Use a canister of compressed air to remove...
User Manual
Page 33
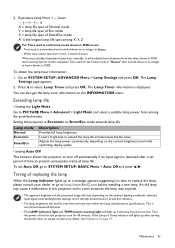
... you calculate Equivalent Lamp hour manually, it will light up or a message appears suggesting it shows 0 hours. Setting the projector in Economic or SmartEco mode extends lamp life. Timing of lamp life. Extending lamp life • Setting the Light Mode Go to prevent unnecessary waste of replacing the lamp When the Lamp indicator lights up if the lamp becomes too hot. Maintenance 33 This is time to SYSTEM SETUP: BASIC Menu > Auto Off and press / . 2. The Lamp Timer information is less...
... you calculate Equivalent Lamp hour manually, it will light up or a message appears suggesting it shows 0 hours. Setting the projector in Economic or SmartEco mode extends lamp life. Timing of lamp life. Extending lamp life • Setting the Light Mode Go to prevent unnecessary waste of replacing the lamp When the Lamp indicator lights up if the lamp becomes too hot. Maintenance 33 This is time to SYSTEM SETUP: BASIC Menu > Auto Off and press / . 2. The Lamp Timer information is less...

User Manual
Page 34
... message. The following Lamp warning displays will operate normally. Press OK to change the lamp. Replacing the lamp • To reduce the risk of electrical shock, always turn the projector off and disconnect the projector from the projector, it is suspended upside-down, make sure that vary depending on different models. Install a new lamp for approximately 45 minutes until the lamp has cooled. 34 Maintenance The lamp brightness diminishes with use...
... message. The following Lamp warning displays will operate normally. Press OK to change the lamp. Replacing the lamp • To reduce the risk of electrical shock, always turn the projector off and disconnect the projector from the projector, it is suspended upside-down, make sure that vary depending on different models. Install a new lamp for approximately 45 minutes until the lamp has cooled. 34 Maintenance The lamp brightness diminishes with use...

User Manual
Page 38
Attempting to the input signal device. No picture Cause The video source is switched on again during the cooling process. Remedy Turn the video source on and check that it is not turned on page 20. 38 Troubleshooting The projector and the screen are out of power. The password is an obstacle between the remote control and the projector. The lens cover is no power from the projector. Open the lens cover. Cause Remedy The batteries are...
Attempting to the input signal device. No picture Cause The video source is switched on again during the cooling process. Remedy Turn the video source on and check that it is not turned on page 20. 38 Troubleshooting The projector and the screen are out of power. The password is an obstacle between the remote control and the projector. The lens cover is no power from the projector. Open the lens cover. Cause Remedy The batteries are...


