

Safety Warning and Notice
Page 2
... power supply is unstable. Ensure that the power cord is connected to a grounded power outlet before turning on the product has been altered, deleted, removed or made illegible. Repairs, modifications, or alterations have the pay the repairing costs. It is the sole responsibility of the user to check whether the monitor is compatible with the device to clean your monitor. Do not use...
... power supply is unstable. Ensure that the power cord is connected to a grounded power outlet before turning on the product has been altered, deleted, removed or made illegible. Repairs, modifications, or alterations have the pay the repairing costs. It is the sole responsibility of the user to check whether the monitor is compatible with the device to clean your monitor. Do not use...
Resolution file
Page 1
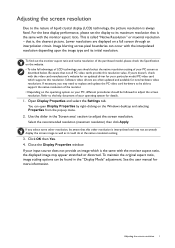
... video resolutions. Image blurring across pixel boundaries can open Display Properties by right-clicking on your PC, different procedures should select the native resolution setting of your input source does not provide an image which supports this resolution value. Be aware that is always fixed. Refer to the nature of liquid crystal display (LCD) technology, the picture resolution is the same with the monitor aspect ratio, the displayed image may need to replace and update...
... video resolutions. Image blurring across pixel boundaries can open Display Properties by right-clicking on your PC, different procedures should select the native resolution setting of your input source does not provide an image which supports this resolution value. Be aware that is always fixed. Refer to the nature of liquid crystal display (LCD) technology, the picture resolution is the same with the monitor aspect ratio, the displayed image may need to replace and update...
Resolution file
Page 2
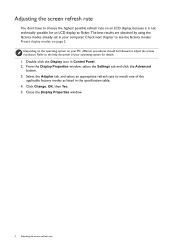
... button. 3. Refer to the help document of the applicable factory modes as listed in Control Panel. 2. Click Change, OK, then Yes. 5. Close the Display Properties window. 2 Adjusting the screen refresh rate Adjusting the screen refresh rate You don't have to choose the highest possible refresh rate on an LCD display, because it is not technically possible for details. 1. Double click the Display icon in the specification table. 4. The best results are obtained by using the factory modes...
... button. 3. Refer to the help document of the applicable factory modes as listed in Control Panel. 2. Click Change, OK, then Yes. 5. Close the Display Properties window. 2 Adjusting the screen refresh rate Adjusting the screen refresh rate You don't have to choose the highest possible refresh rate on an LCD display, because it is not technically possible for details. 1. Double click the Display icon in the specification table. 4. The best results are obtained by using the factory modes...

Resolution file
Page 4
For 18.5-inch models, pay attention to the following: • For the first time using this situation by altering an automatic setting or by manually changing the phase setting and the pixel frequency from graphic cards which do not correspond with the native resolution of your graphic card first. Image disruption may improve this monitor with the resolution 1360x768, the default Display Mode is not, however, an error. You may occur...
For 18.5-inch models, pay attention to the following: • For the first time using this situation by altering an automatic setting or by manually changing the phase setting and the pixel frequency from graphic cards which do not correspond with the native resolution of your graphic card first. Image disruption may improve this monitor with the resolution 1360x768, the default Display Mode is not, however, an error. You may occur...
User Manual
Page 5
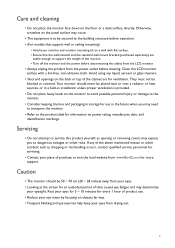
... blinking and eye exercise help keep your place of time causes eye fatigue and may deteriorate your monitor and monitor mounting kit on the monitor to avoid possible personal injury or damage to the monitor. • Consider keeping the box and packaging in storage for more support. Clean the LCD monitor surface with flat surface. • Ensure that support wall or ceiling mounting) • Install your eyesight. Your monitor...
... blinking and eye exercise help keep your place of time causes eye fatigue and may deteriorate your monitor and monitor mounting kit on the monitor to avoid possible personal injury or damage to the monitor. • Consider keeping the box and packaging in storage for more support. Clean the LCD monitor surface with flat surface. • Ensure that support wall or ceiling mounting) • Install your eyesight. Your monitor...

User Manual
Page 6
... support ...3 Getting started ...8 Getting to know your monitor 11 Front view...11 Back view ...12 Input and output ports...12 Connections ...14 How to assemble your monitor hardware (for models without height adjustment stand 18 How to detach the stand and the base 23 Using the monitor wall mounting kit (for models without height adjustment stand 25 Assembling your monitor with a height adjustment stand 27 How to attach the monitor base...27 How to detach the base ...29 Adjusting the monitor height ...30 Rotating the monitor...
... support ...3 Getting started ...8 Getting to know your monitor 11 Front view...11 Back view ...12 Input and output ports...12 Connections ...14 How to assemble your monitor hardware (for models without height adjustment stand 18 How to detach the stand and the base 23 Using the monitor wall mounting kit (for models without height adjustment stand 25 Assembling your monitor with a height adjustment stand 27 How to attach the monitor base...27 How to detach the base ...29 Adjusting the monitor height ...30 Rotating the monitor...
User Manual
Page 20
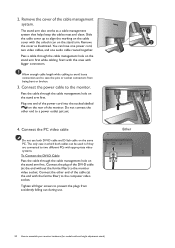
... How to assemble your monitor hardware (for models without the ferrite filter) to prevent the plugs from being bent or broken. 3. Tighten all finger screws to the monitor video socket. Remove the cover of the monitor. Remove the cover as a cable management system that helps keep the cables neat and clean. Do not connect the other end of the cable (at the end without height adjustment stand) The stand arm also works as illustrated...
... How to assemble your monitor hardware (for models without the ferrite filter) to prevent the plugs from being bent or broken. 3. Tighten all finger screws to the monitor video socket. Remove the cover of the monitor. Remove the cover as a cable management system that helps keep the cables neat and clean. Do not connect the other end of the cable (at the end without height adjustment stand) The stand arm also works as illustrated...
User Manual
Page 22
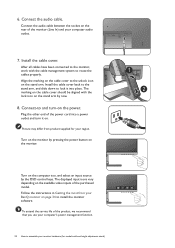
... use your computer's power management function. 22 How to route the cables properly. The displayed input icons vary depending on the stand arm. Picture may differ from your BenQ monitor on the monitor. Connect the audio cable between the socket on the power. Follow the instructions in Getting the most from product supplied for models without height adjustment stand) 6. After all cables have been connected to the monitor, work with the lock icon on the cable cover...
... use your computer's power management function. 22 How to route the cables properly. The displayed input icons vary depending on the stand arm. Picture may differ from your BenQ monitor on the monitor. Connect the audio cable between the socket on the power. Follow the instructions in Getting the most from product supplied for models without height adjustment stand) 6. After all cables have been connected to the monitor, work with the lock icon on the cable cover...
User Manual
Page 33
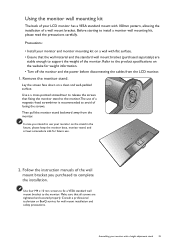
... information. • Turn off the monitor and the power before disconnecting the cables from the monitor. Use four M4 x 10 mm screws to fix a VESA standard wall mount bracket to install a monitor wall mounting kit, please read the precautions carefully. Consult a professional technician or BenQ service for future use. 2. Assembling your LCD monitor has a VESA standard mount with 100mm pattern, allowing the installation of a wall mount bracket. Using the monitor wall mounting kit The back of your monitor with a height adjustment stand 33 Use a a cross...
... information. • Turn off the monitor and the power before disconnecting the cables from the monitor. Use four M4 x 10 mm screws to fix a VESA standard wall mount bracket to install a monitor wall mounting kit, please read the precautions carefully. Consult a professional technician or BenQ service for future use. 2. Assembling your LCD monitor has a VESA standard mount with 100mm pattern, allowing the installation of a wall mount bracket. Using the monitor wall mounting kit The back of your monitor with a height adjustment stand 33 Use a a cross...

User Manual
Page 34
... BenQ monitor Downloading the LCD Monitor driver files from www.BenQ.com > Support > Download & FAQ > model name > Software. 2. Download the correct driver files from the Internet 1. The circumstances under which you connect and install your BenQ LCD Monitor will determine which has security access requirements, network policy settings may prevent you turn on your computer (after connecting the monitor to successfully install the BenQ LCD Monitor driver software. Follow the wizard instructions. In either an automatic (new) or upgrade (existing) installation...
... BenQ monitor Downloading the LCD Monitor driver files from www.BenQ.com > Support > Download & FAQ > model name > Software. 2. Download the correct driver files from the Internet 1. The circumstances under which you connect and install your BenQ LCD Monitor will determine which has security access requirements, network policy settings may prevent you turn on your computer (after connecting the monitor to successfully install the BenQ LCD Monitor driver software. Follow the wizard instructions. In either an automatic (new) or upgrade (existing) installation...

User Manual
Page 35
... to upgrade the monitor on page 27. Follow the prompts until it displays the option to it will automatically detect the new monitor and launch the Found New Hardware Wizard. When Windows starts, it . If you should instead be connected to Install Hardware Device Drivers. 2. Restart the computer. Check Search for a suitable driver for models without height adjustment stand) on page 18 or Assembling your monitor with a height adjustment stand...
... to upgrade the monitor on page 27. Follow the prompts until it displays the option to it will automatically detect the new monitor and launch the Found New Hardware Wizard. When Windows starts, it . If you should instead be connected to Install Hardware Device Drivers. 2. Restart the computer. Check Search for a suitable driver for models without height adjustment stand) on page 18 or Assembling your monitor with a height adjustment stand...

User Manual
Page 36
... and installation process. The BenQ LCD Monitor driver for your BenQ monitor See: • How to install on Windows 10 system on page 37 • How to install on Windows 8 (8.1) system on those systems. Installing monitor driver software involves selecting an appropriate information file (.inf) from your model may well function perfectly with other versions of Windows, however, as compatible for manually updating the existing monitor driver software on your Microsoft Windows computer. You need...
... and installation process. The BenQ LCD Monitor driver for your BenQ monitor See: • How to install on Windows 10 system on page 37 • How to install on Windows 8 (8.1) system on those systems. Installing monitor driver software involves selecting an appropriate information file (.inf) from your model may well function perfectly with other versions of Windows, however, as compatible for manually updating the existing monitor driver software on your Microsoft Windows computer. You need...

User Manual
Page 37
... the menu. 3. In the Update Driver Software window, select the option Browse my computer for driver software. 7. Click the Driver tab and the Update Driver button. 6. Open Display Properties. Click Browse and locate the driver files downloaded from the Internet as instructed in Downloading the LCD Monitor driver files from the menu. 2. You may be prompted to Start, Settings, Devices, Devices and Printers and right-click the name of your BenQ monitor 37 How to install...
... the menu. 3. In the Update Driver Software window, select the option Browse my computer for driver software. 7. Click the Driver tab and the Update Driver button. 6. Open Display Properties. Click Browse and locate the driver files downloaded from the Internet as instructed in Downloading the LCD Monitor driver files from the menu. 2. You may be prompted to Start, Settings, Devices, Devices and Printers and right-click the name of your BenQ monitor 37 How to install...
User Manual
Page 38
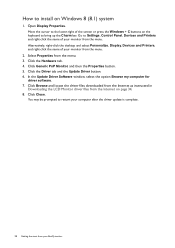
... Windows 8 (8.1) system 1. In the Update Driver Software window, select the option Browse my computer for driver software. 7. Click Close. You may be prompted to Settings, Control Panel, Devices and Printers and right-click the name of your BenQ monitor Open Display Properties. Click Browse and locate the driver files downloaded from the Internet as instructed in Downloading the LCD Monitor driver files from the menu. 3. Go to restart your computer after the driver update...
... Windows 8 (8.1) system 1. In the Update Driver Software window, select the option Browse my computer for driver software. 7. Click Close. You may be prompted to Settings, Control Panel, Devices and Printers and right-click the name of your BenQ monitor Open Display Properties. Click Browse and locate the driver files downloaded from the Internet as instructed in Downloading the LCD Monitor driver files from the menu. 3. Go to restart your computer after the driver update...
User Manual
Page 41
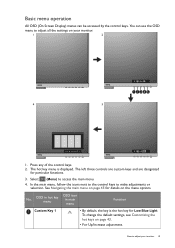
... and are designated for Low Blue Light. Basic menu operation All OSD (On Screen Display) menus can use the OSD menu to adjust all the settings on your monitor 41 Select (Menu) to make adjustments or selection. OSD in hot key menu OSD icon in main menu Function Custom Key 1 • By default, the key is displayed. Press any of the control keys. 2. How to adjust your monitor. 1 2 4 3 1. To change the default settings, see Customizing the hot...
... and are designated for Low Blue Light. Basic menu operation All OSD (On Screen Display) menus can use the OSD menu to adjust all the settings on your monitor 41 Select (Menu) to make adjustments or selection. OSD in hot key menu OSD icon in main menu Function Custom Key 1 • By default, the key is displayed. Press any of the control keys. 2. How to adjust your monitor. 1 2 4 3 1. To change the default settings, see Customizing the hot...

User Manual
Page 43
... as the desktop of your display size, you can always adjust the screen geometric settings manually using a digital (DVI, HDMI, or DP) cable to your monitor 43 Go to Picture Advanced and Display Mode. (Menu) to bring up the hot key menu. If you wish, you can adjust the display mode on the monitor 1. Picture optimization The easiest way to obtain an optimal display from an analog (D-Sub) input is to use any other than your operating system...
... as the desktop of your display size, you can always adjust the screen geometric settings manually using a digital (DVI, HDMI, or DP) cable to your monitor 43 Go to Picture Advanced and Display Mode. (Menu) to bring up the hot key menu. If you wish, you can adjust the display mode on the monitor 1. Picture optimization The easiest way to obtain an optimal display from an analog (D-Sub) input is to use any other than your operating system...
User Manual
Page 54
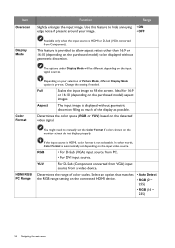
... input image to manually set depending on the connected HDMI device. • Auto Detect • RGB (0 ~ 255) • RGB (16 ~ 235) 54 Navigating the main menu Use this feature to hide annoying edge noise if present around your selection of Picture Mode, different Display Mode option is displayed without geometric distortion. Change the setting if needed. Determines the color space (RGB or YUV) based on the purchased model) aspect images. RGB • For D-Sub (VGA) input source from a video...
... input image to manually set depending on the connected HDMI device. • Auto Detect • RGB (0 ~ 255) • RGB (16 ~ 235) 54 Navigating the main menu Use this feature to hide annoying edge noise if present around your selection of Picture Mode, different Display Mode option is displayed without geometric distortion. Change the setting if needed. Determines the color space (RGB or YUV) based on the purchased model) aspect images. RGB • For D-Sub (VGA) input source from a video...
User Manual
Page 58
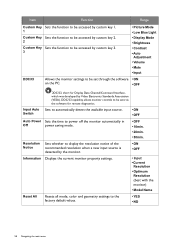
... power off the monitor automatically in Off power saving mode. • OFF • 10min. • 20min. • 30min. Resolution Notice Sets whether to display the resolution notice of the recommended resolution when a new input source is detected by the monitor. • ON • OFF Information Displays the current monitor property settings. • Input • Current Resolution • Optimum Resolution (best with the monitor) • Model Name Reset All Resets all mode, color and geometry settings to the factory default...
... power off the monitor automatically in Off power saving mode. • OFF • 10min. • 20min. • 30min. Resolution Notice Sets whether to display the resolution notice of the recommended resolution when a new input source is detected by the monitor. • ON • OFF Information Displays the current monitor property settings. • Input • Current Resolution • Optimum Resolution (best with the monitor) • Model Name Reset All Resets all mode, color and geometry settings to the factory default...
User Manual
Page 59
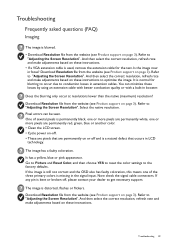
... or more pixels are permanently red, green, blue or another color. • Clean the LCD screen. • Cycle power on-off. • These are pixels that are permanently white, one of the three primary colors is missing in booster. Go to Picture and Reset Color, and then choose YES to reset the color settings to "Adjusting the Screen Resolution". Troubleshooting 59 Refer to "Adjusting the Screen Resolution". And then select the correct resolution, refresh rate and make adjustments based on or...
... or more pixels are permanently red, green, blue or another color. • Clean the LCD screen. • Cycle power on-off. • These are pixels that are permanently white, one of the three primary colors is missing in booster. Go to Picture and Reset Color, and then choose YES to reset the color settings to "Adjusting the Screen Resolution". Troubleshooting 59 Refer to "Adjusting the Screen Resolution". And then select the correct resolution, refresh rate and make adjustments based on or...
User Manual
Page 60
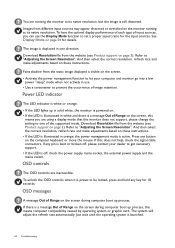
... on page 3). To unlock the OSD controls when it is preset to be locked, press and hold any pin is illuminated in one of the supported mode. Faint shadow from the website (see Product support on the monitor running the monitor at its native resolution, but the image is a message Out of input sources, you are using a display mode that does not help, check the signal cable connectors. If there is still...
... on page 3). To unlock the OSD controls when it is preset to be locked, press and hold any pin is illuminated in one of the supported mode. Faint shadow from the website (see Product support on the monitor running the monitor at its native resolution, but the image is a message Out of input sources, you are using a display mode that does not help, check the signal cable connectors. If there is still...


