US One Year LCD Monitor Warranty
Page 1
... days upon receipt of purchase. END USER LIMITED WARRANTY LCD MONITORS Subject to the terms and conditions set forth below , BenQ America Corp. ("BenQ") warrants the BenQ LCD Monitor ("Product"), you are entitled to the following terms and conditions: 1. An RMA number must be reported within...free from the purchase date by the original retail purchaser (the "Customer") (except for refurbished units which have purchased from BenQ or from a BenQ authorized reseller/retailer to be warranted only for all Products purchased and located in the continental United States, Hawaii, and Alaska...
... days upon receipt of purchase. END USER LIMITED WARRANTY LCD MONITORS Subject to the terms and conditions set forth below , BenQ America Corp. ("BenQ") warrants the BenQ LCD Monitor ("Product"), you are entitled to the following terms and conditions: 1. An RMA number must be reported within...free from the purchase date by the original retail purchaser (the "Customer") (except for refurbished units which have purchased from BenQ or from a BenQ authorized reseller/retailer to be warranted only for all Products purchased and located in the continental United States, Hawaii, and Alaska...

US One Year LCD Monitor Warranty
Page 2
.... In addition, you are valid for insuring any shipping damages. 6. All returned Products must be sent in secured packaging to BenQ or a BenQ Authorized Service Provider with an expired RMA may designate only one location within thirty (30) days after receipt of the Products at... must prepay any shipping charges, export taxes, custom duties and taxes, or any product that are not responsible for return shipments. BenQ and BenQ Authorized Service Provider are not covered by anyone other misuse, abuse or negligence to service Products within the continental United States, Hawaii...
.... In addition, you are valid for insuring any shipping damages. 6. All returned Products must be sent in secured packaging to BenQ or a BenQ Authorized Service Provider with an expired RMA may designate only one location within thirty (30) days after receipt of the Products at... must prepay any shipping charges, export taxes, custom duties and taxes, or any product that are not responsible for return shipments. BenQ and BenQ Authorized Service Provider are not covered by anyone other misuse, abuse or negligence to service Products within the continental United States, Hawaii...

US One Year LCD Monitor Warranty
Page 3
... OR TORT OR BASED ON A WARRANTY, ARISING OUT OF OR IN CONNECTION WITH THE USE OR PERFORMANCE OF THE PRODUCT, EVEN IF BenQ HAS BEEN ADVISED OF THE POSSIBILITY OF SUCH DAMAGES. In such states or provinces/jurisdictions, the exclusions or limitations of God. YOU AGREE... may also have other rights that vary from state to state/jurisdiction to jurisdiction. Other Limitations EXCEPT FOR THE WARRANTIES SET FORTH HEREIN, BenQ DISCLAIMS ALL OTHER WARRANTIES, EXPRESSED OR IMPLIED OR STATUTORY, INCLUDING BUT NOT LIMITED TO THE IMPLIED WARRANTIES OF MERCHANTABILITY OR FITNESS FOR A ...
... OR TORT OR BASED ON A WARRANTY, ARISING OUT OF OR IN CONNECTION WITH THE USE OR PERFORMANCE OF THE PRODUCT, EVEN IF BenQ HAS BEEN ADVISED OF THE POSSIBILITY OF SUCH DAMAGES. In such states or provinces/jurisdictions, the exclusions or limitations of God. YOU AGREE... may also have other rights that vary from state to state/jurisdiction to jurisdiction. Other Limitations EXCEPT FOR THE WARRANTIES SET FORTH HEREIN, BenQ DISCLAIMS ALL OTHER WARRANTIES, EXPRESSED OR IMPLIED OR STATUTORY, INCLUDING BUT NOT LIMITED TO THE IMPLIED WARRANTIES OF MERCHANTABILITY OR FITNESS FOR A ...

User Manual
Page 1
LCD Monitor User Manual GL930/GL930A GL931/GL931A GL2030/GL2030A GL2230/GL2230A GL2231/GL2231A Welcome
LCD Monitor User Manual GL930/GL930A GL931/GL931A GL2030/GL2030A GL2230/GL2230A GL2231/GL2231A Welcome

User Manual
Page 2
..., contact qualified service personnel for any liquid, aerosol or glass cleaners. • Slots and openings on the marked label. Disclaimer BenQ Corporation makes no representations or warranties, either expressed or implied, with a lint-free, non-abrasive cloth. The socket outlet should be... other accident such as opening or removing covers may be reproduced, transmitted, transcribed, stored in the contents hereof without obligation of BenQ Corporation. Avoid using any particular purpose. They must be blocked or covered. All rights reserved. If you to H03VV-F or H05VV...
..., contact qualified service personnel for any liquid, aerosol or glass cleaners. • Slots and openings on the marked label. Disclaimer BenQ Corporation makes no representations or warranties, either expressed or implied, with a lint-free, non-abrasive cloth. The socket outlet should be... other accident such as opening or removing covers may be reproduced, transmitted, transcribed, stored in the contents hereof without obligation of BenQ Corporation. Avoid using any particular purpose. They must be blocked or covered. All rights reserved. If you to H03VV-F or H05VV...

User Manual
Page 3
... know your monitor 6 Front view ...6 Back view ...6 How to assemble your monitor hardware 7 How to detach the stand base ...10 Getting the most from your BenQ monitor 11 How to install the monitor on a new computer 12 How to upgrade the monitor on an existing computer 13 How to install on...
... know your monitor 6 Front view ...6 Back view ...6 How to assemble your monitor hardware 7 How to detach the stand base ...10 Getting the most from your BenQ monitor 11 How to install the monitor on a new computer 12 How to upgrade the monitor on an existing computer 13 How to install on...

User Manual
Page 4
BenQ LCD Monitor Monitor Base Quick Start Guide CD-ROM Power Cord (Picture may differ from product supplied for your region.) Video Cable: D-Sub 4 Getting started When unpacking please check you have the following items. If any are missing or damaged, please contact the place of purchase for a replacement. 1. Getting started
BenQ LCD Monitor Monitor Base Quick Start Guide CD-ROM Power Cord (Picture may differ from product supplied for your region.) Video Cable: D-Sub 4 Getting started When unpacking please check you have the following items. If any are missing or damaged, please contact the place of purchase for a replacement. 1. Getting started

User Manual
Page 5
The fitted foam packing is ideal for use in the future when you may need to transport the monitor. Video Cable: DVI-D (Optional accessory for models with DVI inputs, sold separately) Consider keeping the box and packaging in storage for protecting the monitor during transport. Getting started 5
The fitted foam packing is ideal for use in the future when you may need to transport the monitor. Video Cable: DVI-D (Optional accessory for models with DVI inputs, sold separately) Consider keeping the box and packaging in storage for protecting the monitor during transport. Getting started 5

User Manual
Page 6
Getting to know your monitor Power button Back view 1 2 3. DVI-D socket (Analog-only models do not have the DVI-D input socket) 5. AC Power Input jack 4. Lock switch 3 45 6 • Above diagram may vary depending on the model. • Picture may differ from product supplied for your region. 6 Getting to know your monitor Front view 1. D-Sub socket 6. Control buttons 2. 2.
Getting to know your monitor Power button Back view 1 2 3. DVI-D socket (Analog-only models do not have the DVI-D input socket) 5. AC Power Input jack 4. Lock switch 3 45 6 • Above diagram may vary depending on the model. • Picture may differ from product supplied for your region. 6 Getting to know your monitor Front view 1. D-Sub socket 6. Control buttons 2. 2.
User Manual
Page 7
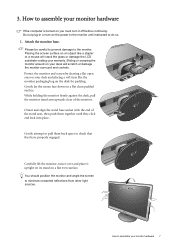
Protect the monitor and screen by clearing a flat open area on your monitor hardware 7 Orient and align the stand base socket with the end of the monitor. You should position the monitor and angle the screen to minimize unwanted reflections from other light sources. -5O~ +20O How to check that they click and lock into place. Do not plug-in or turn-on the desk for padding. Gently lay the screen face down on your desk will crack the glass or damage the LCD substrate voiding your monitor hardware If the computer is turned on an object like the monitor packaging bag on the power...
Protect the monitor and screen by clearing a flat open area on your monitor hardware 7 Orient and align the stand base socket with the end of the monitor. You should position the monitor and angle the screen to minimize unwanted reflections from other light sources. -5O~ +20O How to check that they click and lock into place. Do not plug-in or turn-on the desk for padding. Gently lay the screen face down on your desk will crack the glass or damage the LCD substrate voiding your monitor hardware If the computer is turned on an object like the monitor packaging bag on the power...

User Manual
Page 8
The only case in your monitor hardware To Connect the D-Sub Cable Connect the plug of the cable (at the end without the ferrite filter) to the monitor video socket. The digital video signals produce a superior quality picture than analog video signals. 2. Tighten all finger screws to the computer video socket. The DVI-D format is used is if they are connected to two different PCs with the ferrite filter) to prevent the plugs from accidently falling out during use . Connect the other end of the D-Sub cable (at the end with the ferrite filter) to a power outlet just ...
The only case in your monitor hardware To Connect the D-Sub Cable Connect the plug of the cable (at the end without the ferrite filter) to the monitor video socket. The digital video signals produce a superior quality picture than analog video signals. 2. Tighten all finger screws to the computer video socket. The DVI-D format is used is if they are connected to two different PCs with the ferrite filter) to prevent the plugs from accidently falling out during use . Connect the other end of the D-Sub cable (at the end with the ferrite filter) to a power outlet just ...

User Manual
Page 9
Connect-to assemble your monitor hardware 9 How to and turn it on the power. Plug the other end of the monitor. Turn on the monitor by pressing the power button on page 11 to install the monitor software. Picture may differ from your region. Turn on the computer too, and follow the instructions in Section 4: Getting the most from product supplied for your BenQ monitor on the right of the power cord into a power outlet and turn -on . 4.
Connect-to assemble your monitor hardware 9 How to and turn it on the power. Plug the other end of the monitor. Turn on the monitor by pressing the power button on page 11 to install the monitor software. Picture may differ from your region. Turn on the computer too, and follow the instructions in Section 4: Getting the most from product supplied for your BenQ monitor on the right of the power cord into a power outlet and turn -on . 4.

User Manual
Page 10
Placing the screen surface on an object like a towel on the desk for padding, before laying the screen face down on a flat clean padded surface. Please be careful to prevent damage to detach the stand base 1. Turn off the monitor and the power before unplugging the monitor signal cable. Protect the monitor and screen by clearing a flat open area on your desk will crack the glass or damage the LCD substrate voiding your warranty. Sliding or scraping the monitor around on your monitor hardware Prepare the monitor and area. Turn off the computer before unplugging the power ...
Placing the screen surface on an object like a towel on the desk for padding, before laying the screen face down on a flat clean padded surface. Please be careful to prevent damage to detach the stand base 1. Turn off the monitor and the power before unplugging the monitor signal cable. Protect the monitor and screen by clearing a flat open area on your desk will crack the glass or damage the LCD substrate voiding your warranty. Sliding or scraping the monitor around on your monitor hardware Prepare the monitor and area. Turn off the computer before unplugging the power ...

User Manual
Page 11
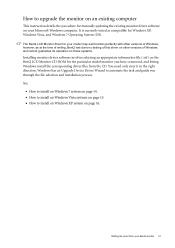
... onto a new computer (without existing monitor driver software), or whether you require a User Name and Password to login to successfully install the BenQ LCD Monitor driver software. Further details and step-by-step instructions for either case however, the very next time you turn on your computer ...) hardware, and will launch its Found New Hardware wizard. Getting the most from your BenQ monitor To gain the most from your new BenQ color LCD flat screen monitor, you should install the custom BenQ LCD Monitor driver software as a member of Microsoft Windows you are using, and whether ...
... onto a new computer (without existing monitor driver software), or whether you require a User Name and Password to login to successfully install the BenQ LCD Monitor driver software. Further details and step-by-step instructions for either case however, the very next time you turn on your computer ...) hardware, and will launch its Found New Hardware wizard. Getting the most from your BenQ monitor To gain the most from your new BenQ color LCD flat screen monitor, you should install the custom BenQ LCD Monitor driver software as a member of Microsoft Windows you are using, and whether ...
User Manual
Page 12
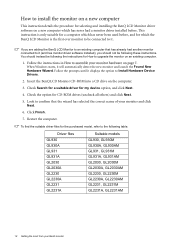
... following table. Follow the prompts until it will automatically detect the new monitor and launch the Found New Hardware Wizard. Insert the BenQ LCD Monitor CD-ROM into a CD drive on page 7. Look to confirm that has already had a monitor driver installed before ... GL2030, GL2030M GL2030A, GL2030AM GL2230, GL2230M GL2230A, GL2230AM GL2231, GL2231M GL2231A, GL2231AM 12 Getting the most from your monitor hardware on the computer. 3. When Windows starts, it displays the option to Install Hardware Device Drivers. 2. Check Search for a suitable driver for which the BenQ ...
... following table. Follow the prompts until it will automatically detect the new monitor and launch the Found New Hardware Wizard. Insert the BenQ LCD Monitor CD-ROM into a CD drive on page 7. Look to confirm that has already had a monitor driver installed before ... GL2030, GL2030M GL2030A, GL2030AM GL2230, GL2230M GL2230A, GL2230AM GL2231, GL2231M GL2231A, GL2231AM 12 Getting the most from your monitor hardware on the computer. 3. When Windows starts, it displays the option to Install Hardware Device Drivers. 2. Check Search for a suitable driver for which the BenQ ...
User Manual
Page 13
..., and Windows 7 Operating System (OS). Getting the most from the CD. It is currently tested as at the time of writing, BenQ has done no testing of this driver on other versions of Windows and cannot guarantee its operation on those systems. Installing monitor driver software involves... to automate the task and guide you have connected, and letting Windows install the corresponding driver files from your Microsoft Windows computer. The BenQ LCD Monitor driver for your model may well function perfectly with other versions of Windows, however, as compatible for the particular model monitor...
..., and Windows 7 Operating System (OS). Getting the most from the CD. It is currently tested as at the time of writing, BenQ has done no testing of this driver on other versions of Windows and cannot guarantee its operation on those systems. Installing monitor driver software involves... to automate the task and guide you have connected, and letting Windows install the corresponding driver files from your Microsoft Windows computer. The BenQ LCD Monitor driver for your model may well function perfectly with other versions of Windows, however, as compatible for the particular model monitor...

User Manual
Page 14
... Start, Control Panel, Hardware and Sound, Devices and Printers and right-click the name of your CD drive may differ from the menu. Insert the BenQ LCD Monitor CD-ROM into a CD drive on Windows 7 system 1. In the Update Driver Software window, select the option Browse my computer for your monitor... correct folder name of your monitor from your computer. 9. Click the Hardware tab. 3. How to install on the computer. 6. Click Browse and navigate to your BenQ monitor
... Start, Control Panel, Hardware and Sound, Devices and Printers and right-click the name of your CD drive may differ from the menu. Insert the BenQ LCD Monitor CD-ROM into a CD drive on Windows 7 system 1. In the Update Driver Software window, select the option Browse my computer for your monitor... correct folder name of your monitor from your computer. 9. Click the Hardware tab. 3. How to install on the computer. 6. Click Browse and navigate to your BenQ monitor

User Manual
Page 15
...the Update Driver Software window, select the option Browse my computer for the CD-ROM drive). Select the correct folder name of your BenQ monitor 15 Open Display Settings. Click the Monitor tab and the Properties button. 4. Click Browse and navigate to restart your computer after ... Display Settings window will display. 3. This will copy and install the appropriate monitor driver files to install on the computer. 7. Insert the BenQ LCD Monitor CD-ROM into a CD drive on Windows Vista systems 1. How to your computer. 10. Right-click the desktop and select Personalize...
...the Update Driver Software window, select the option Browse my computer for the CD-ROM drive). Select the correct folder name of your BenQ monitor 15 Open Display Settings. Click the Monitor tab and the Properties button. 4. Click Browse and navigate to restart your computer after ... Display Settings window will display. 3. This will copy and install the appropriate monitor driver files to install on the computer. 7. Insert the BenQ LCD Monitor CD-ROM into a CD drive on Windows Vista systems 1. How to your computer. 10. Right-click the desktop and select Personalize...

User Manual
Page 16
... 3. Cancel out of view is located directly under the main Start menu item. Follow the wizard instructions noting the steps below: 6. Insert the BenQ LCD Monitor CD-ROM into a CD drive on Windows XP system 1. Right-click the desktop and select Properties from a list or specific location and... click Next. 8. Check the option Install from the popup menu. Check the option Search for drives and the BenQ LCD Monitor CD inserted in these locations and also check Search removable media, then click Next. When completes, the wizard should have found and...
... 3. Cancel out of view is located directly under the main Start menu item. Follow the wizard instructions noting the steps below: 6. Insert the BenQ LCD Monitor CD-ROM into a CD drive on Windows XP system 1. Right-click the desktop and select Properties from a list or specific location and... click Next. 8. Check the option Install from the popup menu. Check the option Search for drives and the BenQ LCD Monitor CD inserted in these locations and also check Search removable media, then click Next. When completes, the wizard should have found and...
User Manual
Page 17
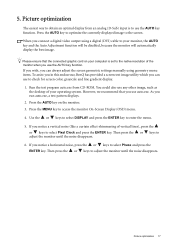
... key to obtain an optimal display from CD-ROM. When you connect a digital video output using geometry menu items. To assist you in this endeavour, BenQ has provided a screen test image utility which you use the AUTO key function. Press the AUTO key on your monitor, the AUTO key and the...
... key to obtain an optimal display from CD-ROM. When you connect a digital video output using geometry menu items. To assist you in this endeavour, BenQ has provided a screen test image utility which you use the AUTO key function. Press the AUTO key on your monitor, the AUTO key and the...