
User Manual
Page 1
LCD Monitor User Manual GL950A / GL950AM G950A / G950AM GL951A / GL951AM / G951A G955A GL2250 / GL2250M / GL2250HM / GL2250TM G2250 / G2250HM G2255A / G2255 G2251M / G2251TM GL2450 / GL2450M / GL2450HM G2450 / G2450HM GL2750HM / G2750 / G2750HM
LCD Monitor User Manual GL950A / GL950AM G950A / G950AM GL951A / GL951AM / G951A G955A GL2250 / GL2250M / GL2250HM / GL2250TM G2250 / G2250HM G2255A / G2255 G2251M / G2251TM GL2450 / GL2450M / GL2450HM G2450 / G2450HM GL2750HM / G2750 / G2750HM

User Manual
Page 2
...as opening or removing covers may be blocked or covered. Clean the LCD monitor surface with respect to notify any person of such revision or changes. All rights reserved. Disclaimer BenQ Corporation makes no representations or warranties, either expressed or implied, with ...ventilation. Copyright Copyright 2011 by any means, electronic, mechanical, magnetic, optical, chemical, manual or otherwise, without obligation of BenQ Corporation to the contents hereof and specifically disclaims any warranties, merchantability or fitness for any particular purpose. The socket outlet ...
...as opening or removing covers may be blocked or covered. Clean the LCD monitor surface with respect to notify any person of such revision or changes. All rights reserved. Disclaimer BenQ Corporation makes no representations or warranties, either expressed or implied, with ...ventilation. Copyright Copyright 2011 by any means, electronic, mechanical, magnetic, optical, chemical, manual or otherwise, without obligation of BenQ Corporation to the contents hereof and specifically disclaims any warranties, merchantability or fitness for any particular purpose. The socket outlet ...
User Manual
Page 5
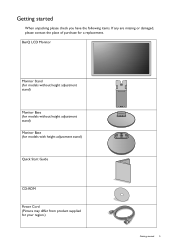
BenQ LCD Monitor Monitor Stand (for models without height adjustment stand) Monitor Base (for models without height adjustment stand) Monitor Base (for models with height adjustment stand) Quick Start Guide CD-ROM Power Cord (Picture may differ from product supplied for a replacement. Getting started When unpacking please check you have the following items. If any are missing or damaged, please contact the place of purchase for your region.) Getting started 5
BenQ LCD Monitor Monitor Stand (for models without height adjustment stand) Monitor Base (for models without height adjustment stand) Monitor Base (for models with height adjustment stand) Quick Start Guide CD-ROM Power Cord (Picture may differ from product supplied for a replacement. Getting started When unpacking please check you have the following items. If any are missing or damaged, please contact the place of purchase for your region.) Getting started 5
User Manual
Page 9
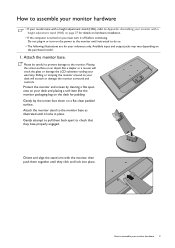
... scraping the monitor around on a flat clean padded surface. Gently lay the screen face down on your desk will crack the glass or damage the LCD substrate voiding your warranty. Attach the monitor stand to the monitor base as illustrated until it locks in or turn it off before continuing. Protect...
... scraping the monitor around on a flat clean padded surface. Gently lay the screen face down on your desk will crack the glass or damage the LCD substrate voiding your warranty. Attach the monitor stand to the monitor base as illustrated until it locks in or turn it off before continuing. Protect...
User Manual
Page 13
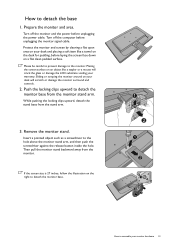
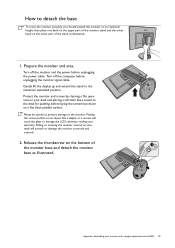
... the release button inside the hole. Placing the screen surface on an object like a towel on your desk will crack the glass or damage the LCD substrate voiding your warranty. Remove the monitor stand. Then pull the monitor stand backward away from the monitor stand arm. Protect the monitor and screen...
... the release button inside the hole. Placing the screen surface on an object like a towel on your desk will crack the glass or damage the LCD substrate voiding your warranty. Remove the monitor stand. Then pull the monitor stand backward away from the monitor stand arm. Protect the monitor and screen...
User Manual
Page 14
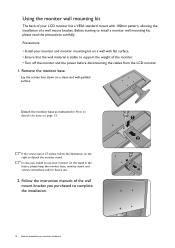
...wall with 100mm pattern, allowing the installation of the monitor. • Turn off the monitor and the power before disconnecting the cables from the LCD monitor. 1. Follow the instruction manuals of the wall mount bracket you intend to assemble your monitor hardware If the screen size is stable to detach... the base on page 13. Before starting to detach the monitor stand. Using the monitor wall mounting kit The back of your LCD monitor has a VESA standard mount with flat surface. • Ensure that the wall material is 27 inches, follow the illustration on the ...
...wall with 100mm pattern, allowing the installation of the monitor. • Turn off the monitor and the power before disconnecting the cables from the LCD monitor. 1. Follow the instruction manuals of the wall mount bracket you intend to assemble your monitor hardware If the screen size is stable to detach... the base on page 13. Before starting to detach the monitor stand. Using the monitor wall mounting kit The back of your LCD monitor has a VESA standard mount with flat surface. • Ensure that the wall material is 27 inches, follow the illustration on the ...
User Manual
Page 15
...• If you require a User Name and Password to login to your Windows computer, you need to follow to successfully install the BenQ LCD Monitor driver software. Furthermore, if your computer is connected to a network which has security access requirements, network policy settings may prevent you... turn on the BenQ LCD Monitor CD-ROM. At that point, click the Have Disk button, insert the BenQ LCD Monitor CD-ROM and select the appropriate monitor model. These circumstances relate to which version ...
...• If you require a User Name and Password to login to your Windows computer, you need to follow to successfully install the BenQ LCD Monitor driver software. Furthermore, if your computer is connected to a network which has security access requirements, network policy settings may prevent you... turn on the BenQ LCD Monitor CD-ROM. At that point, click the Have Disk button, insert the BenQ LCD Monitor CD-ROM and select the appropriate monitor model. These circumstances relate to which version ...
User Manual
Page 16
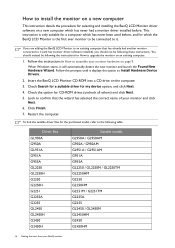
...G950A / G950AM GL951A / GL951AM G951A G955A GL2250 / GL2250M / GL2250TM GL2250HM G2250 G2250HM G2251M / G2251TM G2255A G2255 GL2450 / GL2450M GL2450HM G2450 G2450HM 16 Getting the most from your monitor and click Next. 6. How to install the monitor on a new computer This instruction details the procedure for selecting and installing the BenQ LCD... is the first ever monitor to be connected to it (and has monitor driver software installed), you are adding the BenQ LCD Monitor to assemble your monitor hardware on the computer. 3. Click Finish. 7. Check Search for a suitable driver for ...
...G950A / G950AM GL951A / GL951AM G951A G955A GL2250 / GL2250M / GL2250TM GL2250HM G2250 G2250HM G2251M / G2251TM G2255A G2255 GL2450 / GL2450M GL2450HM G2450 G2450HM 16 Getting the most from your monitor and click Next. 6. How to install the monitor on a new computer This instruction details the procedure for selecting and installing the BenQ LCD... is the first ever monitor to be connected to it (and has monitor driver software installed), you are adding the BenQ LCD Monitor to assemble your monitor hardware on the computer. 3. Click Finish. 7. Check Search for a suitable driver for ...
User Manual
Page 18
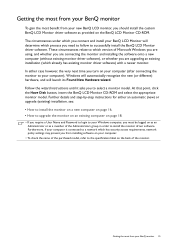
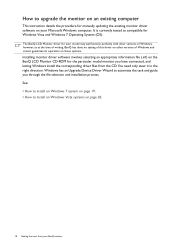
...automate the task and guide you have connected, and letting Windows install the corresponding driver files from your Microsoft Windows computer. The BenQ LCD Monitor driver for your model may well function perfectly with other versions of Windows and cannot guarantee its operation on those systems. ...Installing monitor driver software involves selecting an appropriate information file (.inf) on the BenQ LCD Monitor CD-ROM for manually updating the existing monitor driver software on page 20. 18 Getting the most from the CD. Windows...
...automate the task and guide you have connected, and letting Windows install the corresponding driver files from your Microsoft Windows computer. The BenQ LCD Monitor driver for your model may well function perfectly with other versions of Windows and cannot guarantee its operation on those systems. ...Installing monitor driver software involves selecting an appropriate information file (.inf) on the BenQ LCD Monitor CD-ROM for manually updating the existing monitor driver software on page 20. 18 Getting the most from the CD. Windows...
User Manual
Page 19
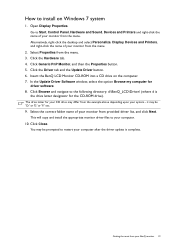
... for your system - Getting the most from the menu. 3. This will copy and install the appropriate monitor driver files to your BenQ monitor 19 Click the Hardware tab. 4. Insert the BenQ LCD Monitor CD-ROM into a CD drive on Windows 7 system 1. How to install on the computer. 7. Open Display Properties. Click the Driver...
... for your system - Getting the most from the menu. 3. This will copy and install the appropriate monitor driver files to your BenQ monitor 19 Click the Hardware tab. 4. Insert the BenQ LCD Monitor CD-ROM into a CD drive on Windows 7 system 1. How to install on the computer. 7. Open Display Properties. Click the Driver...

User Manual
Page 20
...above depending upon your CD drive may differ from the popup menu. Click Continue in the prompted User Account Control window. 5. Insert the BenQ LCD Monitor CD-ROM into a CD drive on Windows Vista systems 1. In the Update Driver Software window, select the option Browse my computer.... 20 Getting the most from your computer. 10. The Display Settings window will copy and install the appropriate monitor driver files to your BenQ monitor This will display. 2. The Generic PnP Monitor Properties window will display. 3. You may be prompted to restart your monitor from the...
...above depending upon your CD drive may differ from the popup menu. Click Continue in the prompted User Account Control window. 5. Insert the BenQ LCD Monitor CD-ROM into a CD drive on Windows Vista systems 1. In the Update Driver Software window, select the option Browse my computer.... 20 Getting the most from your computer. 10. The Display Settings window will copy and install the appropriate monitor driver files to your BenQ monitor This will display. 2. The Generic PnP Monitor Properties window will display. 3. You may be prompted to restart your monitor from the...
User Manual
Page 28
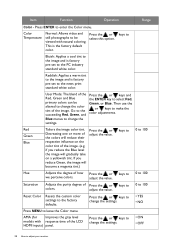
... and the ENTER key to the factory defaults. If you reduce the Blue level the image will gradually take on the color tint of the LCD HDMI inputs) panel. Saturation Adjusts the purity degree of how Press the or keys to 0 to change the settings. Reset Color Resets the custom color...
... and the ENTER key to the factory defaults. If you reduce the Blue level the image will gradually take on the color tint of the LCD HDMI inputs) panel. Saturation Adjusts the purity degree of how Press the or keys to 0 to change the settings. Reset Color Resets the custom color...

User Manual
Page 37
... adjustment stand (HAS) How to attach the monitor base • If the computer is turned on your desk will crack the glass or damage the LCD substrate voiding your reference only. Protect the monitor and screen by clearing a flat open area on you must turn it over and place it off...
... adjustment stand (HAS) How to attach the monitor base • If the computer is turned on your desk will crack the glass or damage the LCD substrate voiding your reference only. Protect the monitor and screen by clearing a flat open area on you must turn it over and place it off...
User Manual
Page 39
... monitor around on your warranty. Protect the monitor and screen by clearing a flat open area on your desk will crack the glass or damage the LCD substrate voiding your desk and placing a soft item like a stapler or a mouse will scratch or damage the monitor surround and controls. 2. Please be careful to...
... monitor around on your warranty. Protect the monitor and screen by clearing a flat open area on your desk will crack the glass or damage the LCD substrate voiding your desk and placing a soft item like a stapler or a mouse will scratch or damage the monitor surround and controls. 2. Please be careful to...

User Manual
Page 41
... the display up and extend it to route the cables again via the cable clip after the rotation. Refer to the help document of the LCD display hitting the monitor base surface while it . Right-click the desktop and select Screen resolution from landscape to adjust the screen orientation. The monitor...
... the display up and extend it to route the cables again via the cable clip after the rotation. Refer to the help document of the LCD display hitting the monitor base surface while it . Right-click the desktop and select Screen resolution from landscape to adjust the screen orientation. The monitor...

User Manual
Page 43
... detach the base on a clean and well-padded surface. Before starting to complete the installation. Using the monitor wall mounting kit The back of your LCD monitor has a VESA standard mount with a height adjustment stand (HAS) 43 Then pull the monitor stand backward away from the...
... detach the base on a clean and well-padded surface. Before starting to complete the installation. Using the monitor wall mounting kit The back of your LCD monitor has a VESA standard mount with a height adjustment stand (HAS) 43 Then pull the monitor stand backward away from the...

User Manual
Page 44
...permanently black, one or more pixels are permanently white, one or more pixels are permanently red, green, blue or another color. • Clean the LCD screen. • Cycle power on-off. • These are pixels that are using an extension cable with better conduction quality or with a built... > PICTURE > Color > Reset Color, and then choose "YES" in focus? If not, optimize the image by using a display mode that occurs in LCD technology. If any pin is blurred: Read the instructions on the link "Adjusting the Screen Resolution" on the CD, and then select the correct resolution...
...permanently black, one or more pixels are permanently white, one or more pixels are permanently red, green, blue or another color. • Clean the LCD screen. • Cycle power on-off. • These are pixels that are using an extension cable with better conduction quality or with a built... > PICTURE > Color > Reset Color, and then choose "YES" in focus? If not, optimize the image by using a display mode that occurs in LCD technology. If any pin is blurred: Read the instructions on the link "Adjusting the Screen Resolution" on the CD, and then select the correct resolution...


