
User Manual
Page 4
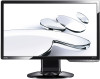
BenQ LCD Monitor Monitor Base Quick Start Guide CD-ROM Power Cord (Picture may differ from product supplied for a replacement. 1. Getting started When unpacking please check you have the following items. If any are missing or damaged, please contact the place of purchase for your region) Signal Cable: D-Sub 4 Getting started
BenQ LCD Monitor Monitor Base Quick Start Guide CD-ROM Power Cord (Picture may differ from product supplied for a replacement. 1. Getting started When unpacking please check you have the following items. If any are missing or damaged, please contact the place of purchase for your region) Signal Cable: D-Sub 4 Getting started

User Manual
Page 6
2. D-Sub input socket 6 Getting to know your monitor Front view Back view 1. Getting to know your monitor DVI-D input socket (Analog-only models do not have the DVI-D input socket) 3. AC power input jack 2.
2. D-Sub input socket 6 Getting to know your monitor Front view Back view 1. Getting to know your monitor DVI-D input socket (Analog-only models do not have the DVI-D input socket) 3. AC power input jack 2.
User Manual
Page 8
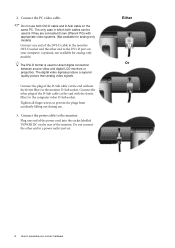
The digital video signals produce a superior quality picture than analog video signals. Tighten all finger screws to the computer video D-Sub socket. The only case in which both DVI-D cable and D-Sub cable on the rear of the monitor. Connect the power cable to assemble your computer. (optional, not available for analog-...the socket labelled 'POWER IN' on the same PC. Either Or 8 How to the monitor. Connect the PC video cable. Connect the plug of the D-Sub cable (at the end without the ferrite filter) to a power outlet just yet. Do not connect the other plug of the...
The digital video signals produce a superior quality picture than analog video signals. Tighten all finger screws to the computer video D-Sub socket. The only case in which both DVI-D cable and D-Sub cable on the rear of the monitor. Connect the power cable to assemble your computer. (optional, not available for analog-...the socket labelled 'POWER IN' on the same PC. Either Or 8 How to the monitor. Connect the PC video cable. Connect the plug of the D-Sub cable (at the end without the ferrite filter) to a power outlet just yet. Do not connect the other plug of the...

User Manual
Page 17
When you connect a digital video output using geometry menu items. To assist you in this endeavour, BenQ has provided a screen test image utility which you notice a horizontal noise, press the W or X keys to select Phase and press the ENTER key. As you ... function will be disabled, because the monitor will automatically display the best image. Picture optimization 17 Run the test program auto.exe from an analog (D-Sub) input is set to adjust the monitor until the noise disappears. 6. Press the AUTO key on your computer is to use to access the monitor...
When you connect a digital video output using geometry menu items. To assist you in this endeavour, BenQ has provided a screen test image utility which you notice a horizontal noise, press the W or X keys to select Phase and press the ENTER key. As you ... function will be disabled, because the monitor will automatically display the best image. Picture optimization 17 Run the test program auto.exe from an analog (D-Sub) input is set to adjust the monitor until the noise disappears. 6. Press the AUTO key on your computer is to use to access the monitor...

User Manual
Page 18
... to adjust your monitor "AUTO": Adjust vertical position, phase, horizontal position and pixel clock automatically. 2. X /Contrast/Brightness key: For Right/Increase adjustment. 6. "ENTER" key: Enter sub menus and select items. For models with DVI inputs, this key is the hot key for Input. 6. OSD = On Screen Display. W /Mode key: For Left...
... to adjust your monitor "AUTO": Adjust vertical position, phase, horizontal position and pixel clock automatically. 2. X /Contrast/Brightness key: For Right/Increase adjustment. 6. "ENTER" key: Enter sub menus and select items. For models with DVI inputs, this key is the hot key for Input. 6. OSD = On Screen Display. W /Mode key: For Left...

User Manual
Page 27
... models do not have the Input function. 1. How to that item. 4. Item Input Function Selects the D-sub (analog) or DVI (digital) input. Press the MENU key to make adjustments or selections. 5. Range • DVI • D-sub Analog-only models do not have the Input function. Press the W or X keys to select SYSTEM...
... models do not have the Input function. 1. How to that item. 4. Item Input Function Selects the D-sub (analog) or DVI (digital) input. Press the MENU key to make adjustments or selections. 5. Range • DVI • D-sub Analog-only models do not have the Input function. Press the W or X keys to select SYSTEM...