
US One Year LCD Monitor Warranty
Page 3
...apply to BenQ or BenQ Authorized Service Provider without notice. Please call Technical Support Center to consult applicable state and provincial/local laws for a full determination of any programs, data or removable storage media. or fluctuation of electrical power, lightning, ...REPAIR OR REPLACEMENT, AS APPLICABLE, UNDER THE WARRANTY SERVICES DESCRIBED HEREIN IS YOUR SOLE AND EXCLUSIVE REMEDY WITH RESPECT TO ANY BREACH OF THE BenQ LIMITED WARRANTY SET FORTH HEREIN. Hours: M-F 8:30am - 5:30pm PST Phone: 866-600-2367 To avoid delays, please DO NOT SEND ANY BenQ product to you specific...
...apply to BenQ or BenQ Authorized Service Provider without notice. Please call Technical Support Center to consult applicable state and provincial/local laws for a full determination of any programs, data or removable storage media. or fluctuation of electrical power, lightning, ...REPAIR OR REPLACEMENT, AS APPLICABLE, UNDER THE WARRANTY SERVICES DESCRIBED HEREIN IS YOUR SOLE AND EXCLUSIVE REMEDY WITH RESPECT TO ANY BREACH OF THE BenQ LIMITED WARRANTY SET FORTH HEREIN. Hours: M-F 8:30am - 5:30pm PST Phone: 866-600-2367 To avoid delays, please DO NOT SEND ANY BenQ product to you specific...

User Manual
Page 2
... for pluggable equipment. No part of any form or by BenQ Corporation. Please follow these safety instructions for best performance, and long life for your monitor from the AC supply. • The power supply cord serves as opening or removing covers may be reproduced, transmitted, transcribed, stored in a retrieval system or translated into any language or computer language, in installation unless proper ventilation is provided...
... for pluggable equipment. No part of any form or by BenQ Corporation. Please follow these safety instructions for best performance, and long life for your monitor from the AC supply. • The power supply cord serves as opening or removing covers may be reproduced, transmitted, transcribed, stored in a retrieval system or translated into any language or computer language, in installation unless proper ventilation is provided...
User Manual
Page 3
... monitor on a new computer 12 How to upgrade the monitor on an existing computer 13 How to install on Windows 7 system (selected models only 14 How to install on Windows Vista systems 15 How to install on Windows XP system 16 Picture optimization ...17 How to adjust your monitor 18 The control panel ...18 Hot key mode ...19 Main menu mode 20 Troubleshooting ...30 Frequently asked questions (FAQ 30 Need more help...
... monitor on a new computer 12 How to upgrade the monitor on an existing computer 13 How to install on Windows 7 system (selected models only 14 How to install on Windows Vista systems 15 How to install on Windows XP system 16 Picture optimization ...17 How to adjust your monitor 18 The control panel ...18 Hot key mode ...19 Main menu mode 20 Troubleshooting ...30 Frequently asked questions (FAQ 30 Need more help...
User Manual
Page 7
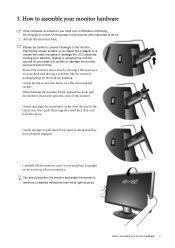
... the monitor base. While holding the monitor firmly against the desk, pull the monitor stand arm upwards clear of the stand arm, then push them back apart to the monitor. Please be careful to prevent damage to check that they click and lock into place. Sliding or scraping the monitor around on a flat clean padded surface. 3. Placing the screen surface on the power to assemble your...
... the monitor base. While holding the monitor firmly against the desk, pull the monitor stand arm upwards clear of the stand arm, then push them back apart to the monitor. Please be careful to prevent damage to check that they click and lock into place. Sliding or scraping the monitor around on a flat clean padded surface. 3. Placing the screen surface on the power to assemble your...
User Manual
Page 8
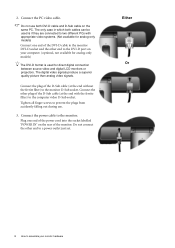
... end to the monitor D-Sub socket. Connect the PC video cable. Either Or 8 How to assemble your computer. (optional, not available for analog-only models) The DVI-D format is used is if they are connected to the computer video D-Sub socket. Connect the plug of the D-Sub cable (at the end without the ferrite filter) to a power outlet just yet. 2. The digital video signals produce a superior quality picture than analog video signals.
... end to the monitor D-Sub socket. Connect the PC video cable. Either Or 8 How to assemble your computer. (optional, not available for analog-only models) The DVI-D format is used is if they are connected to the computer video D-Sub socket. Connect the plug of the D-Sub cable (at the end without the ferrite filter) to a power outlet just yet. 2. The digital video signals produce a superior quality picture than analog video signals.
User Manual
Page 9
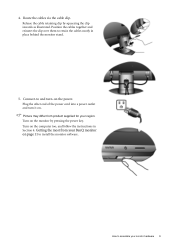
... clip over them to and turn it on the monitor by squeezing the clip inwards as illustrated. Connect-to retain the cables neatly in Section 4: Getting the most from product supplied for your BenQ monitor on the power. Turn on . Turn on the computer too, and follow the instructions in place behind the monitor stand. 5. 4. How to install the monitor software. Picture may differ from your region...
... clip over them to and turn it on the monitor by squeezing the clip inwards as illustrated. Connect-to retain the cables neatly in Section 4: Getting the most from product supplied for your BenQ monitor on the power. Turn on . Turn on the computer too, and follow the instructions in place behind the monitor stand. 5. 4. How to install the monitor software. Picture may differ from your region...

User Manual
Page 11
... you need to follow . Further details and step-by-step instructions for both an automatic (new) or upgrade (existing) installation follow to a network which already has existing monitor driver software) with a newer monitor. Getting the most benefit from your new BenQ color LCD flat screen monitor, you should install the custom BenQ LCD Monitor driver software as a member of Microsoft Windows you are using, and whether you are connecting the monitor and installing the software onto...
... you need to follow . Further details and step-by-step instructions for both an automatic (new) or upgrade (existing) installation follow to a network which already has existing monitor driver software) with a newer monitor. Getting the most benefit from your new BenQ color LCD flat screen monitor, you should install the custom BenQ LCD Monitor driver software as a member of Microsoft Windows you are using, and whether you are connecting the monitor and installing the software onto...

User Manual
Page 12
... the instructions for which has never been used before . When Windows starts, it displays the option to confirm that has already had a monitor driver installed before , and for How to an existing computer that the wizard has selected the correct name of your monitor and click Next. 6. If you are adding the BenQ LCD Monitor to upgrade the monitor on an existing computer. 1. Check Search...
... the instructions for which has never been used before . When Windows starts, it displays the option to confirm that has already had a monitor driver installed before , and for How to an existing computer that the wizard has selected the correct name of your monitor and click Next. 6. If you are adding the BenQ LCD Monitor to upgrade the monitor on an existing computer. 1. Check Search...
User Manual
Page 13
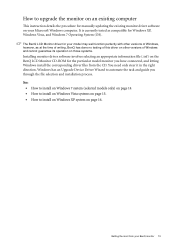
... instruction details the procedure for manually updating the existing monitor driver software on your BenQ monitor 13 You need only steer it in the right direction. See: • How to install on Windows 7 system (selected models only) on page 14 • How to install on Windows Vista systems on page 15. • How to automate the task and guide you have connected, and letting Windows install the corresponding driver...
... instruction details the procedure for manually updating the existing monitor driver software on your BenQ monitor 13 You need only steer it in the right direction. See: • How to install on Windows 7 system (selected models only) on page 14 • How to install on Windows Vista systems on page 15. • How to automate the task and guide you have connected, and letting Windows install the corresponding driver...

User Manual
Page 14
... designator for driver software. 7. Alternatively, right-click the desktop and select Personalize, Display, Devices and Printers, and right-click the name of your monitor from the menu. Click the Hardware tab. 3. Click the Driver tab and the Update Driver button. 5. Go to install on the computer. 6. it may be 'D:' or 'E:' or 'F:' etc. 8. Click Close. How to Start, Control Panel, Hardware and Sound, Devices and...
... designator for driver software. 7. Alternatively, right-click the desktop and select Personalize, Display, Devices and Printers, and right-click the name of your monitor from the menu. Click the Hardware tab. 3. Click the Driver tab and the Update Driver button. 5. Go to install on the computer. 6. it may be 'D:' or 'E:' or 'F:' etc. 8. Click Close. How to Start, Control Panel, Hardware and Sound, Devices and...
User Manual
Page 15
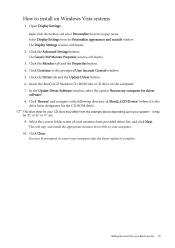
.... Open Display Settings. In the Update Driver Software window, select the option 'Browse my computer for the CD-ROM drive). it may differ from the example above depending upon your monitor from your computer. 10. Right-click the desktop and select Personalize from the Personalize appearance and sounds window. Select Display Settings from the popup menu. Click Continue in the prompted User Account Control window. 5. The...
.... Open Display Settings. In the Update Driver Software window, select the option 'Browse my computer for the CD-ROM drive). it may differ from the example above depending upon your monitor from your computer. 10. Right-click the desktop and select Personalize from the Personalize appearance and sounds window. Select Display Settings from the popup menu. Click Continue in the prompted User Account Control window. 5. The...

User Manual
Page 16
... Monitor tab and select the 'Plug and Play Monitor' from the popup menu. The Monitor Properties window will display. 2. Please wait while the wizard searches for the best driver in Control Panel. The Display Properties window will display. Follow the wizard instructions noting the steps below: 6. Select (single-click) the correct name of these instructions. 5. This will depend upon which type of your computer after the driver update...
... Monitor tab and select the 'Plug and Play Monitor' from the popup menu. The Monitor Properties window will display. 2. Please wait while the wizard searches for the best driver in Control Panel. The Display Properties window will display. Follow the wizard instructions noting the steps below: 6. Select (single-click) the correct name of these instructions. 5. This will depend upon which type of your computer after the driver update...

User Manual
Page 17
...-Screen Display (OSD) menu. 4. Press the MENU key to adjust the monitor until the noise disappears. When you connect a digital video output using geometry menu items. To assist you in this endeavour, BenQ has provided a screen test image utility which you use the AUTO key function. 5. Picture optimization The easiest way to your operating system. If you wish, you run auto.exe, a test pattern displays. 2. As you can always adjust the screen geometric settings manually using a digital (DVI) cable...
...-Screen Display (OSD) menu. 4. Press the MENU key to adjust the monitor until the noise disappears. When you connect a digital video output using geometry menu items. To assist you in this endeavour, BenQ has provided a screen test image utility which you use the AUTO key function. 5. Picture optimization The easiest way to your operating system. If you wish, you run auto.exe, a test pattern displays. 2. As you can always adjust the screen geometric settings manually using a digital (DVI) cable...
User Manual
Page 18
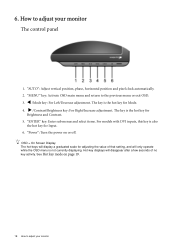
"AUTO": Adjust vertical position, phase, horizontal position and pixel clock automatically. 2. "ENTER" key: Enter sub menus and select items. For models with DVI inputs, this key is the hot key for Input. 6. How to adjust your monitor See Hot key mode on or off. "MENU" key: Activate OSD main menu and return to adjust your monitor The control panel 1. "Power": Turn the power on page 19. 18 How to the previous menu or exit OSD. 3. W /Mode key: For...
"AUTO": Adjust vertical position, phase, horizontal position and pixel clock automatically. 2. "ENTER" key: Enter sub menus and select items. For models with DVI inputs, this key is the hot key for Input. 6. How to adjust your monitor See Hot key mode on or off. "MENU" key: Activate OSD main menu and return to adjust your monitor The control panel 1. "Power": Turn the power on page 19. 18 How to the previous menu or exit OSD. 3. W /Mode key: For...
User Manual
Page 21
... X keys to select this function. Operation Press the ENTER key to make adjustment. The AUTO key is a 'hot-key' for you connect a digital video output using a digital (DVI) cable to display the main menu. 2. How to the previous menu, press the MENU key. To return to adjust your monitor, the AUTO key and the Auto Adjustment function will be disabled. Range When you . Press the W or X keys to move the highlight...
... X keys to select this function. Operation Press the ENTER key to make adjustment. The AUTO key is a 'hot-key' for you connect a digital video output using a digital (DVI) cable to display the main menu. 2. How to the previous menu, press the MENU key. To return to adjust your monitor, the AUTO key and the Auto Adjustment function will be disabled. Range When you . Press the W or X keys to move the highlight...

User Manual
Page 24
... distribution of an input visual signal, and then to change the settings. e.g. Reset Color Resets the User Mode custom color settings to select this option. Press the ENTER key to the factory defaults. If you reduce the Blue level the image will gradually take on the color tint of the colors will disable Brightness and Contrast controls. 24 How to change the settings. • Red (0 to 100) • Green (0 to 100) • Blue (0 to 100) •...
... distribution of an input visual signal, and then to change the settings. e.g. Reset Color Resets the User Mode custom color settings to select this option. Press the ENTER key to the factory defaults. If you reduce the Blue level the image will gradually take on the color tint of the colors will disable Brightness and Contrast controls. 24 How to change the settings. • Red (0 to 100) • Green (0 to 100) • Blue (0 to 100) •...
User Manual
Page 26
... adjust your monitor The input image is displayed without geometric distortion. • Full - Senseye Demo (available when the Picture Mode is set to Movie, Game, or Photo) Display Mode Displays the preview of screen images under the specified mode. The screen will be displayed without geometric distortion filling as much of Standard mode, while the right window presents the images under the selected mode from Picture Mode. the left window demonstrates images of the display...
... adjust your monitor The input image is displayed without geometric distortion. • Full - Senseye Demo (available when the Picture Mode is set to Movie, Game, or Photo) Display Mode Displays the preview of screen images under the specified mode. The screen will be displayed without geometric distortion filling as much of Standard mode, while the right window presents the images under the selected mode from Picture Mode. the left window demonstrates images of the display...
User Manual
Page 29
... via the software for remote diagnostics. To unlock the OSD controls when the OSD is activated, the OSD controls and hotkey operations will be locked, press and hold the "MENU" key for Display Data Channel/Command Interface, which was developed by Video Electronics Standards Association (VESA). DDC/CI* Allows the monitor settings to change the settings. When this option. Resets all OSD controls will be disabled. DDC/CI capability allows monitor controls to...
... via the software for remote diagnostics. To unlock the OSD controls when the OSD is activated, the OSD controls and hotkey operations will be locked, press and hold the "MENU" key for Display Data Channel/Command Interface, which was developed by Video Electronics Standards Association (VESA). DDC/CI* Allows the monitor settings to change the settings. When this option. Resets all OSD controls will be disabled. DDC/CI capability allows monitor controls to...
User Manual
Page 30
... resolution, refresh rate and make adjustments based on these losses by working through the instructions in the signal input. If any pin is bent or broken off and is visible on the link "Adjusting the Screen Resolution". Faint shadow from the link "Adjusting the Screen Resolution". Is the image now in the "Caution" message box to reset the color settings to prevent the occurrence of the supported mode. If not, optimize the image by using a display mode...
... resolution, refresh rate and make adjustments based on these losses by working through the instructions in the signal input. If any pin is bent or broken off and is visible on the link "Adjusting the Screen Resolution". Faint shadow from the link "Adjusting the Screen Resolution". Is the image now in the "Caution" message box to reset the color settings to prevent the occurrence of the supported mode. If not, optimize the image by using a display mode...
User Manual
Page 31
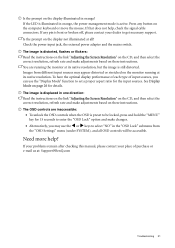
... "Adjusting the Screen Resolution" on the CD, and then select the correct resolution, refresh rate and make adjustments based on these instructions. Need more help , check the signal cable connectors. Press any pin is preset to be accessible. Check the power input jack, the external power adapter and the mains switch. See Display Mode on the computer keyboard or move the mouse. Is the prompt on the display not illuminated at all OSD controls will be locked, press...
... "Adjusting the Screen Resolution" on the CD, and then select the correct resolution, refresh rate and make adjustments based on these instructions. Need more help , check the signal cable connectors. Press any pin is preset to be accessible. Check the power input jack, the external power adapter and the mains switch. See Display Mode on the computer keyboard or move the mouse. Is the prompt on the display not illuminated at all OSD controls will be locked, press...


