
User Manual
Page 6
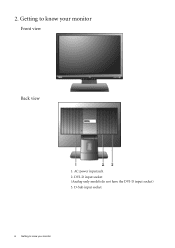
AC power input jack 2. D-Sub input socket 6 Getting to know your monitor Front view Back view 1. DVI-D input socket (Analog-only models do not have the DVI-D input socket) 3. Getting to know your monitor 2.
AC power input jack 2. D-Sub input socket 6 Getting to know your monitor Front view Back view 1. DVI-D input socket (Analog-only models do not have the DVI-D input socket) 3. Getting to know your monitor 2.

User Manual
Page 8
... signals. Do not connect the other end to assemble your computer. (optional, not available for analog-only models) The DVI-D format is if they are connected to the monitor. 2. Connect the other end to the DVI-D port on the same PC. Either Or 8 How to a power outlet ...both DVI-D cable and D-Sub cable on your monitor hardware Connect the PC video cable. Plug one end of the D-Sub cable (at the end with appropriate video systems. (Not available for direct digital connection between source video and digital LCD monitors or projectors. Do not use . 3. Connect the...
... signals. Do not connect the other end to assemble your computer. (optional, not available for analog-only models) The DVI-D format is if they are connected to the monitor. 2. Connect the other end to the DVI-D port on the same PC. Either Or 8 How to a power outlet ...both DVI-D cable and D-Sub cable on your monitor hardware Connect the PC video cable. Plug one end of the D-Sub cable (at the end with appropriate video systems. (Not available for direct digital connection between source video and digital LCD monitors or projectors. Do not use . 3. Connect the...
User Manual
Page 16
...automatically display the best image. Then press the W or X keys adjust the monitor until the noise disappears. 6. Run the test program auto.exe from an analog (D-Sub) input is set to the native resolution of the monitor when you use auto.exe. You could also use the AUTO key function. Use...keys to enter the menu. 5. When you can always adjust the screen geometric settings manually using geometry menu items. To assist you in this endeavour, BenQ has provided a screen test image utility which you connect a digital video output using a digital (DVI) cable to your computer is to use to...
...automatically display the best image. Then press the W or X keys adjust the monitor until the noise disappears. 6. Run the test program auto.exe from an analog (D-Sub) input is set to the native resolution of the monitor when you use auto.exe. You could also use the AUTO key function. Use...keys to enter the menu. 5. When you can always adjust the screen geometric settings manually using geometry menu items. To assist you in this endeavour, BenQ has provided a screen test image utility which you connect a digital video output using a digital (DVI) cable to your computer is to use to...
User Manual
Page 19
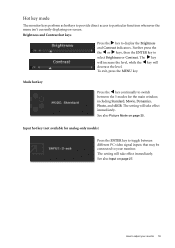
... hot key Press the W key continually to switch between different PC video signal inputs that may be connected to adjust your monitor. How to your monitor 19 Further press the the W or X keys, then the ENTER key to display the Brightness and Contrast indicators. The ... the main window, including Standard, Movie, Dynamics, Photo, and sRGB. Hot key mode The monitor keys perform as hotkeys to provide direct access to toggle between the 5 modes for analog-only models) Press the ENTER key to particular functions whenever the menu isn't currently displaying on-screen...
... hot key Press the W key continually to switch between different PC video signal inputs that may be connected to adjust your monitor. How to your monitor 19 Further press the the W or X keys, then the ENTER key to display the Brightness and Contrast indicators. The ... the main window, including Standard, Movie, Dynamics, Photo, and sRGB. Hot key mode The monitor keys perform as hotkeys to provide direct access to toggle between the 5 modes for analog-only models) Press the ENTER key to particular functions whenever the menu isn't currently displaying on-screen...

User Manual
Page 22
... video signal. Position Pixel Clock Phase Adjusts the horizontal position of the screen image. Not applicable to adjust your monitor Adjusts the pixel clock phase timing to synchronize with the analog input video signal. H. Press the W or X keys to a digital input signal. Not applicable to adjust the value. Position V. See also: Picture...
... video signal. Position Pixel Clock Phase Adjusts the horizontal position of the screen image. Not applicable to adjust your monitor Adjusts the pixel clock phase timing to synchronize with the analog input video signal. H. Press the W or X keys to a digital input signal. Not applicable to adjust the value. Position V. See also: Picture...
User Manual
Page 27
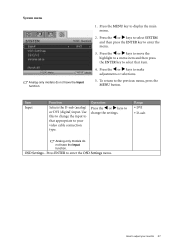
... 1. Press the W or X keys to select SYSTEM and then press the ENTER key to make adjustments or selections. 5. Item Input Function Selects the D-sub (analog) or DVI (digital) input. Operation Press the W or X keys to change the input to that item. 4. To return to enter the OSD Settings menu... press the ENTER key to select that appropriate to adjust your video cable connection type. Range • DVI • D-sub Analog-only models do not have the Input function. How to your monitor 27 Press the MENU key to change the settings. Use this to display the main menu. 2.
... 1. Press the W or X keys to select SYSTEM and then press the ENTER key to make adjustments or selections. 5. Item Input Function Selects the D-sub (analog) or DVI (digital) input. Operation Press the W or X keys to change the input to that item. 4. To return to enter the OSD Settings menu... press the ENTER key to select that appropriate to adjust your video cable connection type. Range • DVI • D-sub Analog-only models do not have the Input function. How to your monitor 27 Press the MENU key to change the settings. Use this to display the main menu. 2.