
User Manual
Page 2
... accessible. • This product should never be operated from the wall outlet before cleaning. Clean the LCD monitor surface with respect to time in any form or by BENQ Corporation. Please follow these safety instructions for best performance, and long life for ventilation. iv Care And... If you to notify any means, electronic, mechanical, magnetic, optical, chemical, manual or otherwise, without the prior written permission of BENQ Corporation to dangerous voltages or other accident such as opening or removing covers may be blocked or covered. If any kind into any ...
... accessible. • This product should never be operated from the wall outlet before cleaning. Clean the LCD monitor surface with respect to time in any form or by BENQ Corporation. Please follow these safety instructions for best performance, and long life for ventilation. iv Care And... If you to notify any means, electronic, mechanical, magnetic, optical, chemical, manual or otherwise, without the prior written permission of BENQ Corporation to dangerous voltages or other accident such as opening or removing covers may be blocked or covered. If any kind into any ...

User Manual
Page 5
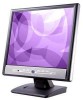
BenQ LCD Monitor Quick Start Guide CD-ROM Disk Power cord Signal cable Getting started When unpacking please check you have the following items. If they are missing or are damaged, please immediately contact the dealer at which you purchased the goods. 1 Getting started 5
BenQ LCD Monitor Quick Start Guide CD-ROM Disk Power cord Signal cable Getting started When unpacking please check you have the following items. If they are missing or are damaged, please immediately contact the dealer at which you purchased the goods. 1 Getting started 5

User Manual
Page 8
i ii 8 How to install your fingers into place. Do not insert your LCD monitor. 1. Please follow these five steps to install your monitor. Place the monitor into the base plate until it locks into the seam between base and monitor while installing the display. 2. ii.> Connect the signal cable to your monitor hardware Pull the base all the way back. i.> Connect the power cord to your monitor hardware Make sure that the computer and monitor's power are both turned off. There will be a clicking sound. 3. 3 How to install your monitor.
i ii 8 How to install your fingers into place. Do not insert your LCD monitor. 1. Please follow these five steps to install your monitor. Place the monitor into the base plate until it locks into the seam between base and monitor while installing the display. 2. ii.> Connect the signal cable to your monitor hardware Pull the base all the way back. i.> Connect the power cord to your monitor hardware Make sure that the computer and monitor's power are both turned off. There will be a clicking sound. 3. 3 How to install your monitor.
User Manual
Page 10
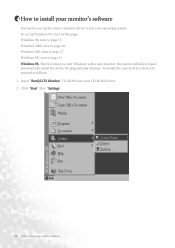
... driver for plug and play displays. Windows XP, turn to page 33. Click "Start" then "Settings". 10 How to install your CD-ROM Driver. 2. Insert "BenQ LCD Monitor" CD-ROM into your monitor's software
... driver for plug and play displays. Windows XP, turn to page 33. Click "Start" then "Settings". 10 How to install your CD-ROM Driver. 2. Insert "BenQ LCD Monitor" CD-ROM into your monitor's software
User Manual
Page 20
Insert "BenQ LCD Monitor" CD-ROM into your monitor's software Open the Control Panel and double click on the "Display" icon. 20 How to install your CD-ROM Driver. 2. Click "Start" then "Settings". 3. The first time you start Windows with a new monitor, the system will detect it and automatically start the "Add New Hardware Wizard". Carry out the instructions beginning at step 4. 1. Windows 2000.
Insert "BenQ LCD Monitor" CD-ROM into your monitor's software Open the Control Panel and double click on the "Display" icon. 20 How to install your CD-ROM Driver. 2. Click "Start" then "Settings". 3. The first time you start Windows with a new monitor, the system will detect it and automatically start the "Add New Hardware Wizard". Carry out the instructions beginning at step 4. 1. Windows 2000.

User Manual
Page 26
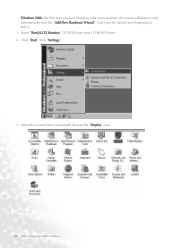
Select your monitor's software The new drivers are now installed on your computer. 26 How to install your LCD Mode (FP757 ver. 2) from the list in the next window then click "Next" twice. 12. 11. In the list of folders within the CD-ROM, select "Drivers" folder then click "Open" twice, then click "OK".
Select your monitor's software The new drivers are now installed on your computer. 26 How to install your LCD Mode (FP757 ver. 2) from the list in the next window then click "Next" twice. 12. 11. In the list of folders within the CD-ROM, select "Drivers" folder then click "Open" twice, then click "OK".
User Manual
Page 30
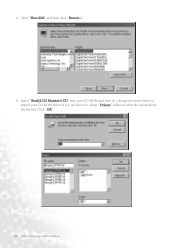
Enter "Drivers" folder to install your CD-ROM driver if it is not drive D). Click "Have disk" and then click "Browse...". 9. Insert "BenQ LCD Monitor's CD" into your CD-ROM and type d:\ (change the driver letter to match your monitor's software Click "OK". 30 How to select the model from the list left. 8.
Enter "Drivers" folder to install your CD-ROM driver if it is not drive D). Click "Have disk" and then click "Browse...". 9. Insert "BenQ LCD Monitor's CD" into your CD-ROM and type d:\ (change the driver letter to match your monitor's software Click "OK". 30 How to select the model from the list left. 8.

User Manual
Page 37
... native resolution. that is called "Native Resolution" or maximal resolution - From the "Display Properties" window, select the "Settings" tab. The best picture possible for your FP757 ver. 2 is always fixed. 5 Choosing the best picture resolution Due to have all the advantages of 1280x1024. However flaws do occur with a resolution of...
... native resolution. that is called "Native Resolution" or maximal resolution - From the "Display Properties" window, select the "Settings" tab. The best picture possible for your FP757 ver. 2 is always fixed. 5 Choosing the best picture resolution Due to have all the advantages of 1280x1024. However flaws do occur with a resolution of...

User Manual
Page 39
... as follows: 1. Double click the "Display" icon in the bottom right corner. Youc an choose 60, 70 and 75 Hertz, (but not 72Hz) for an LCD display to choose the right Refresh Rate 39 From the "Display Properties" window, select the "Settings" tab. button in the Control Panel. 2. 6 How to choose... the right Refresh Rate You don't have to choose the highest possible refresh rate on an LCD display, because it is a table with the factory modes in your computer.
... as follows: 1. Double click the "Display" icon in the bottom right corner. Youc an choose 60, 70 and 75 Hertz, (but not 72Hz) for an LCD display to choose the right Refresh Rate 39 From the "Display Properties" window, select the "Settings" tab. button in the Control Panel. 2. 6 How to choose... the right Refresh Rate You don't have to choose the highest possible refresh rate on an LCD display, because it is a table with the factory modes in your computer.


