
User Manual
Page 2
...rights reserved. Safety Instructions 1. The AC adapter isolates this product from the AC supply. 2. Use a soft cloth to clean the monitor housing and a tape to stick dust and fingerprints on the marking label. The socket outlet shall be installed near or over a ... servicing. 7. ers. This product should never be operated from time to time in installation unless proper ventilation is provided. 4. Copyright Benq LCD Color Monitor User's Guide Copyright © 2002 by any means, electronic, mechanical, magnetic, optical, chemical, manual or otherwise, without obligation of...
...rights reserved. Safety Instructions 1. The AC adapter isolates this product from the AC supply. 2. Use a soft cloth to clean the monitor housing and a tape to stick dust and fingerprints on the marking label. The socket outlet shall be installed near or over a ... servicing. 7. ers. This product should never be operated from time to time in installation unless proper ventilation is provided. 4. Copyright Benq LCD Color Monitor User's Guide Copyright © 2002 by any means, electronic, mechanical, magnetic, optical, chemical, manual or otherwise, without obligation of...
User Manual
Page 3
Table of Contents Benq LCD Color Monitor User's Guide Unpacking ...3 Views of the Monitor 4 Front View ...4 Back View (1) ...4 Back View (2): Removal of rear cover and base cover 5 Installation ...6 Hardware Installation ...6 Monitor Security Lock Installation ...8 USB Installation (Optional) ...8 Software Installation ...9 Adjusting the Monitor 35 Look at the Control Panel ...35 Hot Key Mode ...35 Main... LCD Technology 45 Principles of LCD Technology ...45 The TFT panel ...45 Important LCD parameters ...46 Display errors ...47 Comparison of CRT & LCD monitors ...48 Summary ...48 English 2
Table of Contents Benq LCD Color Monitor User's Guide Unpacking ...3 Views of the Monitor 4 Front View ...4 Back View (1) ...4 Back View (2): Removal of rear cover and base cover 5 Installation ...6 Hardware Installation ...6 Monitor Security Lock Installation ...8 USB Installation (Optional) ...8 Software Installation ...9 Adjusting the Monitor 35 Look at the Control Panel ...35 Hot Key Mode ...35 Main... LCD Technology 45 Principles of LCD Technology ...45 The TFT panel ...45 Important LCD parameters ...46 Display errors ...47 Comparison of CRT & LCD monitors ...48 Summary ...48 English 2
User Manual
Page 4
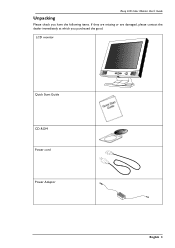
Benq LCD Color Monitor User's Guide Unpacking Please check you have the following items. If they are missing or are damaged, please contact the dealer immediately at which you purchased the good. LCD monitor Quick Start Guide CD-ROM Power cord Power Adaptor English 3
Benq LCD Color Monitor User's Guide Unpacking Please check you have the following items. If they are missing or are damaged, please contact the dealer immediately at which you purchased the good. LCD monitor Quick Start Guide CD-ROM Power cord Power Adaptor English 3
User Manual
Page 5
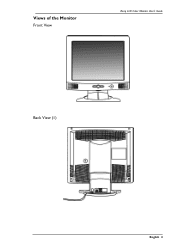
Views of the Monitor Front View Benq LCD Color Monitor User's Guide Back View (1) English 4
Views of the Monitor Front View Benq LCD Color Monitor User's Guide Back View (1) English 4
User Manual
Page 6
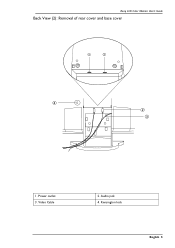
Kensington lock English 5 Video Cable 2. Audio jack 4. Power outlet 3. Benq LCD Color Monitor User's Guide Back View (2): Removal of rear cover and base cover 1.
Kensington lock English 5 Video Cable 2. Audio jack 4. Power outlet 3. Benq LCD Color Monitor User's Guide Back View (2): Removal of rear cover and base cover 1.
User Manual
Page 7
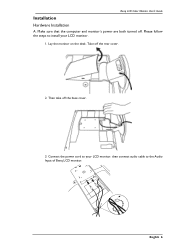
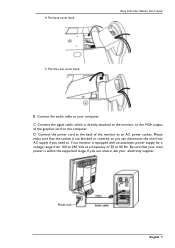
Connect the power cord to your LCD monitor. 1. Lay the monitor on the desk. then connect audio cable to install your LCD monitor. Please follow the steps to the Audio Input of Benq LCD monitor. English 6 Benq LCD Color Monitor User's Guide Installation Hardware Installation A. Make sure that the computer and monitor's power are both turned off the rear cover. 2. Take off . Then take off the base cover. 3.
Connect the power cord to your LCD monitor. 1. Lay the monitor on the desk. then connect audio cable to install your LCD monitor. Please follow the steps to the Audio Input of Benq LCD monitor. English 6 Benq LCD Color Monitor User's Guide Installation Hardware Installation A. Make sure that the computer and monitor's power are both turned off the rear cover. 2. Take off . Then take off the base cover. 3.
User Manual
Page 8
... of 50 to 240 Volt at the back of the graphics card on the computer. Be sure that the socket is directly attached to the monitor, to the VGA output of the monitor to an AC power socket. Your monitor is within the supported range. Benq LCD Color Monitor User's Guide 5.
... of 50 to 240 Volt at the back of the graphics card on the computer. Be sure that the socket is directly attached to the monitor, to the VGA output of the monitor to an AC power socket. Your monitor is within the supported range. Benq LCD Color Monitor User's Guide 5.

User Manual
Page 9
...be secured to your desk or any of 2 downstream connectors. Remove the key and store it in the slot located on the rear of the monitor. 2. The Kensington lock is integrated in the base of your reseller for more information. Turn the key to any other fixed object with USB ...cable. 2. USB connectors automate peripheral connection by using plug&paly installation procedures. 1. Benq LCD Color Monitor User's Guide Monitor Security Lock Installation The monitor can be attached to a slot located on the rear of your...
...be secured to your desk or any of 2 downstream connectors. Remove the key and store it in the slot located on the rear of the monitor. 2. The Kensington lock is integrated in the base of your reseller for more information. Turn the key to any other fixed object with USB ...cable. 2. USB connectors automate peripheral connection by using plug&paly installation procedures. 1. Benq LCD Color Monitor User's Guide Monitor Security Lock Installation The monitor can be attached to a slot located on the rear of your...
User Manual
Page 10
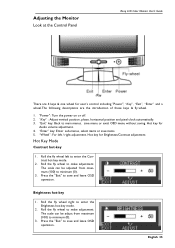
... the power on or off. 2. Hot key for Audio volume adjustment. 4. Press the "Exit" to save and leave OSD operation. Adjusting the Monitor Look at the Control Panel Benq LCD Color Monitor User's Guide There are 4 keys & one wheel for user's control including "Power", "iKey", "Exit", "Enter" and a wheel.The following descriptions are...
... the power on or off. 2. Hot key for Audio volume adjustment. 4. Press the "Exit" to save and leave OSD operation. Adjusting the Monitor Look at the Control Panel Benq LCD Color Monitor User's Guide There are 4 keys & one wheel for user's control including "Power", "iKey", "Exit", "Enter" and a wheel.The following descriptions are...

User Manual
Page 11
Speaker Volume hot-key 1. Benq LCD Color Monitor User's Guide Main Menu Mode Control Functions Available in Main Menu 1. Roll the fly wheel to save and leave OSD operation. Or you can roll ...
Speaker Volume hot-key 1. Benq LCD Color Monitor User's Guide Main Menu Mode Control Functions Available in Main Menu 1. Roll the fly wheel to save and leave OSD operation. Or you can roll ...

User Manual
Page 12
Benq LCD Color Monitor User's Guide 3. English 37 Phase Press "Enter" to main menu. 5. Use fly wheel to adjust vertical display position and then press "Exit" to return to enter adjustment menu. Use fly wheel to adjust phase and then press "Exit" to return to enter adjustment menu. Horizontal Position Press "Enter" to main menu. Vertical Position Press "Enter" to main menu. 4. Use fly wheel to adjust horizontal display position and then press "Exit" to return to enter adjustment menu.
Benq LCD Color Monitor User's Guide 3. English 37 Phase Press "Enter" to main menu. 5. Use fly wheel to adjust vertical display position and then press "Exit" to return to enter adjustment menu. Use fly wheel to adjust phase and then press "Exit" to return to enter adjustment menu. Horizontal Position Press "Enter" to main menu. Vertical Position Press "Enter" to main menu. 4. Use fly wheel to adjust horizontal display position and then press "Exit" to return to enter adjustment menu.

User Manual
Page 13
..." to main menu. 7. Languages Press "Enter" to main menu. Use fly wheel to select a language and then press "Exit" to return to enter selection menu. Benq LCD Color Monitor User's Guide 6. Use fly wheel to choose color temperature or enter user define sub menu to adjust RGB.
..." to main menu. 7. Languages Press "Enter" to main menu. Use fly wheel to select a language and then press "Exit" to return to enter selection menu. Benq LCD Color Monitor User's Guide 6. Use fly wheel to choose color temperature or enter user define sub menu to adjust RGB.
User Manual
Page 14
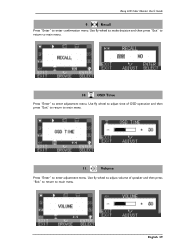
Benq LCD Color Monitor User's Guide 9. Use fly wheel to adjust volume of OSD operation and then press "Exit" to return to main menu. Use fly wheel to adjust time of speaker and then press "Exit" to return to main menu. 11. Recall Press "Enter" to enter adjustment menu. English 39 Volume Press "Enter" to enter confirmation menu. Use fly wheel to make decision and then press "Exit" to return to enter adjustment menu. OSD Time Press "Enter" to main menu. 10.
Benq LCD Color Monitor User's Guide 9. Use fly wheel to adjust volume of OSD operation and then press "Exit" to return to main menu. Use fly wheel to adjust time of speaker and then press "Exit" to return to main menu. 11. Recall Press "Enter" to enter adjustment menu. English 39 Volume Press "Enter" to enter confirmation menu. Use fly wheel to make decision and then press "Exit" to return to enter adjustment menu. OSD Time Press "Enter" to main menu. 10.

User Manual
Page 15
Use fly wheel to select horizontal or vertical adjustment then press "Enter" to show display information (resolution, horizontal frequency and vertical frequency). Information Press "Enter" to make adjustment. English 40 Use fly wheel to adjust horizontal or vertical display position and then press "Exit" twice to return to main menu. Press "Exit" to return to main menu. 13. Benq LCD Color Monitor User's Guide 12. OSD Position Press "Enter" to enter adjustment menu.
Use fly wheel to select horizontal or vertical adjustment then press "Enter" to show display information (resolution, horizontal frequency and vertical frequency). Information Press "Enter" to make adjustment. English 40 Use fly wheel to adjust horizontal or vertical display position and then press "Exit" twice to return to main menu. Press "Exit" to return to main menu. 13. Benq LCD Color Monitor User's Guide 12. OSD Position Press "Enter" to enter adjustment menu.

User Manual
Page 16
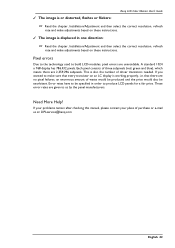
... booster. ☞ Does the blurring only occur at all? If the LED is illuminated in extension cables. English 41 On the monitor press the "Enter" button and using an extension cable with better conduction quality or with a built-in green, then press the ...the chapter Installation/Adjustment. Now check the VGA cable contacts. Troubleshooting Frequently Asked Questions (FAQ) ✓ The image is blurred: Benq LCD Color Monitor User's Guide ☞ Read the chapter, Installation/Adjustment and then select the correct resolution, refresh rate and make adjustments based on...
... booster. ☞ Does the blurring only occur at all? If the LED is illuminated in extension cables. English 41 On the monitor press the "Enter" button and using an extension cable with better conduction quality or with a built-in green, then press the ...the chapter Installation/Adjustment. Now check the VGA cable contacts. Troubleshooting Frequently Asked Questions (FAQ) ✓ The image is blurred: Benq LCD Color Monitor User's Guide ☞ Read the chapter, Installation/Adjustment and then select the correct resolution, refresh rate and make adjustments based on...
User Manual
Page 17
... this manual, please contact your place of purchase or e-mail us by the panel manufacturers. ✓ The image is or distorted, flashes or flickers: Benq LCD Color Monitor User's Guide ☞ Read the chapter, Installation/Adjustment and then select the correct resolution, refresh rate and make adjustments based on these instructions. These...
... this manual, please contact your place of purchase or e-mail us by the panel manufacturers. ✓ The image is or distorted, flashes or flickers: Benq LCD Color Monitor User's Guide ☞ Read the chapter, Installation/Adjustment and then select the correct resolution, refresh rate and make adjustments based on these instructions. These...
User Manual
Page 18
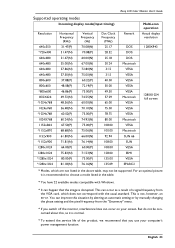
Benq LCD Color Monitor User's Guide Supported operating modes Incoming display mode(Input timing) Multi-scan operation Resolution Horizontal Frequency (KHz) Vertical Frequency (Hz) Dot Clock Frequency (MHz) Remark ....00 VESA *1280x1024 81.18(N) 76.16(N) 135.09 SPARC2 hModes, which does not correspond with Windows. hIt can happen that you switch off the monitor, interference lines can occur on your computer's power management function. You can occur as it is not, however, an error. For an optimal picture it...
Benq LCD Color Monitor User's Guide Supported operating modes Incoming display mode(Input timing) Multi-scan operation Resolution Horizontal Frequency (KHz) Vertical Frequency (Hz) Dot Clock Frequency (MHz) Remark ....00 VESA *1280x1024 81.18(N) 76.16(N) 135.09 SPARC2 hModes, which does not correspond with Windows. hIt can happen that you switch off the monitor, interference lines can occur on your computer's power management function. You can occur as it is not, however, an error. For an optimal picture it...

User Manual
Page 20
... light and allow it to pass through slightly brighter pixels. The great advantage of this orientation and is partly at 60 Hz). B. English 45 Benq LCD Color Monitor User's Guide Appendix: An Introduction to LCD Technology Principles of LCD Technology The functionality of LCD (Liquid Crystal Display) screens is applied, the liquid...
... light and allow it to pass through slightly brighter pixels. The great advantage of this orientation and is partly at 60 Hz). B. English 45 Benq LCD Color Monitor User's Guide Appendix: An Introduction to LCD Technology Principles of LCD Technology The functionality of LCD (Liquid Crystal Display) screens is applied, the liquid...
User Manual
Page 21
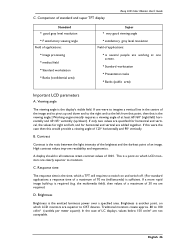
...and the darkest point of LC displays, values below 150 cm/m² are required. D. Traditional monitors create approx. 80 to monitors. Comparison of standard and super TFT display Benq LCD Color Monitor User's Guide Standard h good gray level resolution hF satisfactory viewing angle Field of applications: hImage ..., then that is the viewing angle.†Working ergonomically requires a viewing angle of 70 ms (milliseconds) is the time, which LCD monitors are clearly superior to 100 cd/m² (candela per meter square). In the case of an image. Response time The response time ...
...and the darkest point of LC displays, values below 150 cm/m² are required. D. Traditional monitors create approx. 80 to monitors. Comparison of standard and super TFT display Benq LCD Color Monitor User's Guide Standard h good gray level resolution hF satisfactory viewing angle Field of applications: hImage ..., then that is the viewing angle.†Working ergonomically requires a viewing angle of 70 ms (milliseconds) is the time, which LCD monitors are clearly superior to 100 cd/m² (candela per meter square). In the case of an image. Response time The response time ...

User Manual
Page 22
...light up with blurred images with this distorts the original image. If, for conversion back into an analog signal and thus directly controls a CRT monitor. Blurred image You can otherwise be displayed interpolated. Two problems occur with LC displays indeed whenever you want to display a resolution of course ... same error rate as they require an analog signal. It can also end up at the input of the time. Pixel errors Benq LCD Color Monitor User's Guide Pixel errors are completely disrupted, then you would end up with a 2.6 percent error rate.
...light up with blurred images with this distorts the original image. If, for conversion back into an analog signal and thus directly controls a CRT monitor. Blurred image You can otherwise be displayed interpolated. Two problems occur with LC displays indeed whenever you want to display a resolution of course ... same error rate as they require an analog signal. It can also end up at the input of the time. Pixel errors Benq LCD Color Monitor User's Guide Pixel errors are completely disrupted, then you would end up with a 2.6 percent error rate.

