
User Manual
Page 2
...or local power company. Further, BenQ Corporation reserves the right to revise this product yourself, as opening or removing covers may be operated from the wall outlet before cleaning. iv Care And Cleaning • Cleaning. Clean the LCD monitor surface with respect to the ...contents hereof and specifically disclaims any kind into this equipment from time to time in the contents hereof without the prior written permission of BenQ Corporation. Avoid using any particular purpose. i Copyright ...
...or local power company. Further, BenQ Corporation reserves the right to revise this product yourself, as opening or removing covers may be operated from the wall outlet before cleaning. iv Care And Cleaning • Cleaning. Clean the LCD monitor surface with respect to the ...contents hereof and specifically disclaims any kind into this equipment from time to time in the contents hereof without the prior written permission of BenQ Corporation. Avoid using any particular purpose. i Copyright ...
User Manual
Page 3
...of Contents Getting started ...4 Getting to know your monitor 5 Front View ...5 Back View ...5 How to install your monitor hardware 6 Viewing Angle Adjustment 9 Getting the most from your BenQ monitor 10 How to install the monitor on a new computer 11 How to upgrade the monitor on an existing computer 12 How to install on...adjust the screen resolution 18 How to adjust the screen refresh rate 19 How to set the picture optimization 20 How to adjust your monitor 21 A Look at the Control Panel 21 Hot Key Mode ...21 Main Menu Mode ...22 Troubleshooting ...31 Frequently Asked Questions (FAQ...
...of Contents Getting started ...4 Getting to know your monitor 5 Front View ...5 Back View ...5 How to install your monitor hardware 6 Viewing Angle Adjustment 9 Getting the most from your BenQ monitor 10 How to install the monitor on a new computer 11 How to upgrade the monitor on an existing computer 12 How to install on...adjust the screen resolution 18 How to adjust the screen refresh rate 19 How to set the picture optimization 20 How to adjust your monitor 21 A Look at the Control Panel 21 Hot Key Mode ...21 Main Menu Mode ...22 Troubleshooting ...31 Frequently Asked Questions (FAQ...

User Manual
Page 4
BenQ LCD Monitor Quick Start Guide CD-ROM Power Cord Signal Cable: D-Sub Signal Cable: DVI-D 02 P/N:53.L900 3 .0 Getting started When unpacking please check you have the following items. If any are missing or damaged, please contact the place of purchase for a replacement. 1111Getting started 4
BenQ LCD Monitor Quick Start Guide CD-ROM Power Cord Signal Cable: D-Sub Signal Cable: DVI-D 02 P/N:53.L900 3 .0 Getting started When unpacking please check you have the following items. If any are missing or damaged, please contact the place of purchase for a replacement. 1111Getting started 4
User Manual
Page 5
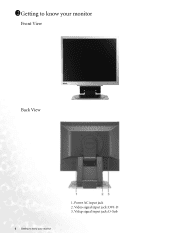
Video signal input jack: DVI-D 3. 1211Getting to know your monitor Front View Back View 5 Getting to know your monitor 1. Videp signal input jack: D-Sub Power AC input jack 2.
Video signal input jack: DVI-D 3. 1211Getting to know your monitor Front View Back View 5 Getting to know your monitor 1. Videp signal input jack: D-Sub Power AC input jack 2.
User Manual
Page 6
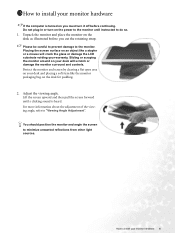
... desk and placing a soft item like the monitor packaging bag on an object like a stapler or a mouse will scratch or damage the monitor surround and controls. You should position the monitor and angle the screen to install your monitor hardware 6 How to minimize unwanted reflections from ...retaining strap. Please be careful to prevent damage to "Viewing Angle Adjustment". 1311How to install your monitor hardware If the computer is turned on the power to the monitor until a clicking sound is heard. For more information about the adjustment of the viewing angle, refer...
... desk and placing a soft item like the monitor packaging bag on an object like a stapler or a mouse will scratch or damage the monitor surround and controls. You should position the monitor and angle the screen to install your monitor hardware 6 How to minimize unwanted reflections from ...retaining strap. Please be careful to prevent damage to "Viewing Angle Adjustment". 1311How to install your monitor hardware If the computer is turned on the power to the monitor until a clicking sound is heard. For more information about the adjustment of the viewing angle, refer...
User Manual
Page 7
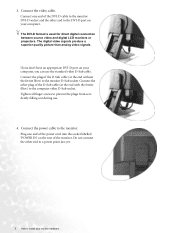
... socket. Connect the power cable to the computer video D-Sub socket. Plug one end of the DVI-D cable to the monitor DVI-D socket and the other and to the DVI-D port on the rear of the D-Sub cable (at the end without the ferrite filter) to ...prevent the plugs from accidently falling out during use the standard video D-Sub cable. Do not connect the other plug of the monitor. The digital video signals produce a superior quality picture than analog video signals. If you can use . 4. Connect the plug of the power cord into the...
... socket. Connect the power cable to the computer video D-Sub socket. Plug one end of the DVI-D cable to the monitor DVI-D socket and the other and to the DVI-D port on the rear of the D-Sub cable (at the end without the ferrite filter) to ...prevent the plugs from accidently falling out during use the standard video D-Sub cable. Do not connect the other plug of the monitor. The digital video signals produce a superior quality picture than analog video signals. If you can use . 4. Connect the plug of the power cord into the...

User Manual
Page 8
Turn on the monitor by pressing the power button on the power. The power point and plug shown are indicative only, and may differ from that used in Section 4: Getting the most from your region. Turn on . How to install the monitor software. Connect-to and turn it on the computer too, and follow the instructions in your BenQ monitor to install your monitor hardware 8 Plug the other end of the power cord into a power point and turn -on the front of the monitor. 5.
Turn on the monitor by pressing the power button on the power. The power point and plug shown are indicative only, and may differ from that used in Section 4: Getting the most from your region. Turn on . How to install the monitor software. Connect-to and turn it on the computer too, and follow the instructions in your BenQ monitor to install your monitor hardware 8 Plug the other end of the power cord into a power point and turn -on the front of the monitor. 5.

User Manual
Page 9
Viewing Angle Adjustment You may position the screen to the desired angle with -5° to +20° monitor tilt, 360° monitor swivel, and 72 mm monitor height. 9 How to install your monitor hardware
Viewing Angle Adjustment You may position the screen to the desired angle with -5° to +20° monitor tilt, 360° monitor swivel, and 72 mm monitor height. 9 How to install your monitor hardware

User Manual
Page 10
... installing software on the BenQ LCD Monitor CD-ROM. At that point, click the Have Disk button, insert the BenQ LCD Monitor CD-ROM and select the appropriate monitor model. 1411Getting the most from your BenQ monitor How do I gain the most from your BenQ monitor 10 To gain the ...most benefit from your new BenQ color LCD flat screen monitor, you should install the custom BenQ LCD Monitor driver software ...
... installing software on the BenQ LCD Monitor CD-ROM. At that point, click the Have Disk button, insert the BenQ LCD Monitor CD-ROM and select the appropriate monitor model. 1411Getting the most from your BenQ monitor How do I gain the most from your BenQ monitor 10 To gain the ...most benefit from your new BenQ color LCD flat screen monitor, you should install the custom BenQ LCD Monitor driver software ...

User Manual
Page 11
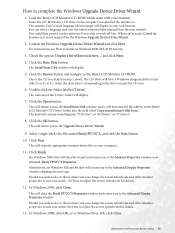
... Next. 5. Follow the instructions in How to an existing computer that the wizard has selected the correct name of your monitor as "BenQ FP72G+S" and click Next. 6. Look to confirm that has already had a monitor driver installed before , and for which has never been used before . You should not be following these instructions. How...
... Next. 5. Follow the instructions in How to an existing computer that the wizard has selected the correct name of your monitor as "BenQ FP72G+S" and click Next. 6. Look to confirm that has already had a monitor driver installed before , and for which has never been used before . You should not be following these instructions. How...
User Manual
Page 12
...on Windows XP systems. • How to install on Windows 2000, ME, & 98 systems. Getting the most from the CD. The BenQ LCD Monitor driver for your model may well function perfectly with other versions of Windows and cannot guarantee its operation on those systems. Installing... monitor driver software involves selecting an appropriate information file (.inf) on the BenQ LCD Monitor CD-ROM for the particular model monitor you through the file selection and installation process. You need only steer it...
...on Windows XP systems. • How to install on Windows 2000, ME, & 98 systems. Getting the most from the CD. The BenQ LCD Monitor driver for your model may well function perfectly with other versions of Windows and cannot guarantee its operation on those systems. Installing... monitor driver software involves selecting an appropriate information file (.inf) on the BenQ LCD Monitor CD-ROM for the particular model monitor you through the file selection and installation process. You need only steer it...

User Manual
Page 13
... the CD appropriate to your computer. 10. When complete, the wizard should have found and selected the BenQ driver on the computer you to the Monitor Properties window, now renamed BenQ FP72G+S Properties. 11. How to install on the CD, and click the Next button. Open Display Properties....the option 'Install from the popup menu. Please wait while the wizard searches for your new monitor, the proper drivers are already installed, and you . 4. Select (single-click) the file named 'BenQ FP72G+S' on Windows XP systems 1. This will close the wizard and return you attached the...
... the CD appropriate to your computer. 10. When complete, the wizard should have found and selected the BenQ driver on the computer you to the Monitor Properties window, now renamed BenQ FP72G+S Properties. 11. How to install on the CD, and click the Next button. Open Display Properties....the option 'Install from the popup menu. Please wait while the wizard searches for your new monitor, the proper drivers are already installed, and you . 4. Select (single-click) the file named 'BenQ FP72G+S' on Windows XP systems 1. This will close the wizard and return you attached the...

User Manual
Page 14
Getting the most from your BenQ monitor 14 This will operate immediately with no further action required by you. You do not need to restart Windows XP, as the BenQ LCD monitor drivers will close the Display Properties windows.
Getting the most from your BenQ monitor 14 This will operate immediately with no further action required by you. You do not need to restart Windows XP, as the BenQ LCD monitor drivers will close the Display Properties windows.

User Manual
Page 15
...desktop and select Properties from your BenQ monitor Click Start | Settings | Control Panel | Display. The Display Properties window will display. The Upgrade Device Driver Wizard will display. 2. In that case, see the instructions at How to install on Windows ME or 98, click the Monitor tab and the Change button. ... Control Panel. In Windows 2000, ME, & 98 versions, Control Panel is located under the Settings menu item. In Windows 2000, click the Monitor tab and the Properties button. How to install on Windows 2000, ME, & 98 systems You do not need to follow this instruction if you...
...desktop and select Properties from your BenQ monitor Click Start | Settings | Control Panel | Display. The Display Properties window will display. The Upgrade Device Driver Wizard will display. 2. In that case, see the instructions at How to install on Windows ME or 98, click the Monitor tab and the Change button. ... Control Panel. In Windows 2000, ME, & 98 versions, Control Panel is located under the Settings menu item. In Windows 2000, click the Monitor tab and the Properties button. How to install on Windows 2000, ME, & 98 systems You do not need to follow this instruction if you...
User Manual
Page 16
... folder labelled 'Driver'. Click Next. Load the BenQ LCD Monitor CD-ROM which came with your web browser. The contents of the 'Driver' folder will display. 5. In Windows 2000, click Close. This will close the BenQ FP72G+S Properties window and return you can change the ...screen refresh rate and other monitor properties to the BenQ LCD Monitor CD-ROM. You could then print it will copy the appropriate monitor driver files to the Monitor Properties window, now renamed 'BenQ FP72G+S Properties'. When you loaded in Windows 98 or ME, click...
... folder labelled 'Driver'. Click Next. Load the BenQ LCD Monitor CD-ROM which came with your web browser. The contents of the 'Driver' folder will display. 5. In Windows 2000, click Close. This will close the BenQ FP72G+S Properties window and return you can change the ...screen refresh rate and other monitor properties to the BenQ LCD Monitor CD-ROM. You could then print it will copy the appropriate monitor driver files to the Monitor Properties window, now renamed 'BenQ FP72G+S Properties'. When you loaded in Windows 98 or ME, click...

User Manual
Page 17
... reboot. Should you wish to do so, this causes Windows to load the new drivers when it next restarts. 17 Getting the most from your BenQ monitor Click OK and Yes respectively. You should select the reboot option as this is where you can change the screen resolution (area and color). Click...
... reboot. Should you wish to do so, this causes Windows to load the new drivers when it next restarts. 17 Getting the most from your BenQ monitor Click OK and Yes respectively. You should select the reboot option as this is where you can change the screen resolution (area and color). Click...
User Manual
Page 20
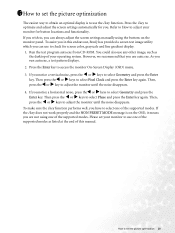
...select one of the supported modes. If you . If the i key does not work properly and the NON PRESET MODE message is to adjust your monitor for screen color, grayscale and line gradient display. 1. Please set your operating system. Press the i key to optimize and adjust the screen settings ..., press theW or X keys to check for button locations and functionality. If you can always adjust the screen settings manually using one of this endeavour, BenQ has provided a screen test image utility which you notice a vertical noise, press the W or X keys to , you are not using the buttons ...
...select one of the supported modes. If you . If the i key does not work properly and the NON PRESET MODE message is to adjust your monitor for screen color, grayscale and line gradient display. 1. Please set your operating system. Press the i key to optimize and adjust the screen settings ..., press theW or X keys to check for button locations and functionality. If you can always adjust the screen settings manually using one of this endeavour, BenQ has provided a screen test image utility which you notice a vertical noise, press the W or X keys to , you are not using the buttons ...
User Manual
Page 21
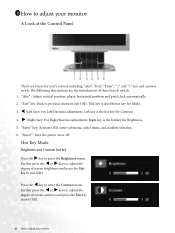
... OSD. "Enter" key: Activate OSD, enter sub menu, select items, and confirm selection. 6. "Power": Turn the power on or off. 1811How to adjust your monitor Further press the W or X keys to adjust the degree of these keys & switch. 1. "Exit" key: Back to enter the Brightness menu. Hot Key Mode ...2. Further press the W or X keys to adjust the degree of screen contrast and press the Exit key to exit OSD. 21 How to adjust your monitor A Look at the Control Panel There are the introduction of screen brightness and press the Exit key to enter the Contrast menu. X (Right) key:...
... OSD. "Enter" key: Activate OSD, enter sub menu, select items, and confirm selection. 6. "Power": Turn the power on or off. 1811How to adjust your monitor Further press the W or X keys to adjust the degree of these keys & switch. 1. "Exit" key: Back to enter the Brightness menu. Hot Key Mode ...2. Further press the W or X keys to adjust the degree of screen contrast and press the Exit key to exit OSD. 21 How to adjust your monitor A Look at the Control Panel There are the introduction of screen brightness and press the Exit key to enter the Contrast menu. X (Right) key:...
User Manual
Page 22
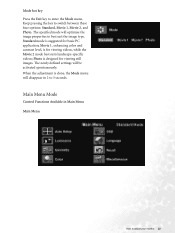
... Press the Exit key to best suit the image type. The newly defined settings will disappear in Main Menu Main Menu How to adjust your monitor 22 Photo is suggested for basic PC application; When the adjustment is for viewing still images. Keep pressing the key to 3 seconds. Standard mode is...
... Press the Exit key to best suit the image type. The newly defined settings will disappear in Main Menu Main Menu How to adjust your monitor 22 Photo is suggested for basic PC application; When the adjustment is for viewing still images. Keep pressing the key to 3 seconds. Standard mode is...
User Manual
Page 23
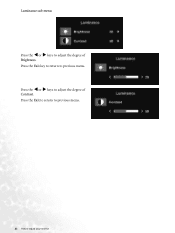
Press the W or X keys to adjust the degree of Brightness. Press the Exit to return to previous menu. 23 How to previous menu. Press the Exit key to return to adjust your monitor Luminance sub menu Press the W or X keys to adjust the degree of Contrast.
Press the W or X keys to adjust the degree of Brightness. Press the Exit to return to previous menu. 23 How to previous menu. Press the Exit key to return to adjust your monitor Luminance sub menu Press the W or X keys to adjust the degree of Contrast.

