

User Manual
Page 2
Clean the LCD monitor surface with respect to notify any person of such revision or changes. If any of the above mentioned misuse or other risks. Further, BenQ Corporation reserves the right to revise this publication and to make changes from the AC supply. • The power supply cord serves as a power disconnect device for servicing. 2 The socket outlet should be installed near or over...
Clean the LCD monitor surface with respect to notify any person of such revision or changes. If any of the above mentioned misuse or other risks. Further, BenQ Corporation reserves the right to revise this publication and to make changes from the AC supply. • The power supply cord serves as a power disconnect device for servicing. 2 The socket outlet should be installed near or over...
User Manual
Page 3
... to install on Windows 2000, ME, & 98 systems 15 How to complete the Windows Upgrade Device Driver Wizard 16 How to adjust the screen resolution 18 How to adjust the screen refresh rate 19 How to set the picture optimization 20 How to adjust your monitor 21 A Look at the Control Panel 21 Hot Key Mode ...21 Main Menu Mode ...22 Troubleshooting ...31 Frequently Asked Questions (FAQ 31 Need More Help? ...32 Supported operating modes 33 Specifications ...34...
... to install on Windows 2000, ME, & 98 systems 15 How to complete the Windows Upgrade Device Driver Wizard 16 How to adjust the screen resolution 18 How to adjust the screen refresh rate 19 How to set the picture optimization 20 How to adjust your monitor 21 A Look at the Control Panel 21 Hot Key Mode ...21 Main Menu Mode ...22 Troubleshooting ...31 Frequently Asked Questions (FAQ 31 Need More Help? ...32 Supported operating modes 33 Specifications ...34...
User Manual
Page 6
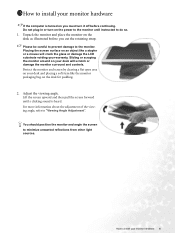
... the monitor surround and controls. For more information about the adjustment of the viewing angle, refer to do so. 1. Protect the monitor and screen by clearing a flat open area on the desk as illustrated before continuing. Do not plug-in or turn-on the power to the monitor until a clicking sound is turned on your desk will crack the glass or damage the LCD substrate...
... the monitor surround and controls. For more information about the adjustment of the viewing angle, refer to do so. 1. Protect the monitor and screen by clearing a flat open area on the desk as illustrated before continuing. Do not plug-in or turn-on the power to the monitor until a clicking sound is turned on your desk will crack the glass or damage the LCD substrate...
User Manual
Page 7
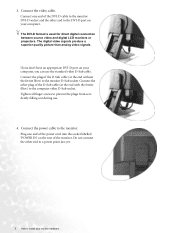
... the plugs from accidently falling out during use the standard video D-Sub cable. Tighten all finger screws to the monitor D-Sub socket. Do not connect the other plug of the DVI-D cable to the monitor DVI-D socket and the other and to the monitor. Connect the other end to a power point just yet. 7 How to the computer video D-Sub socket. Connect the video cable. The digital video signals produce a superior quality picture than analog video signals.
... the plugs from accidently falling out during use the standard video D-Sub cable. Tighten all finger screws to the monitor D-Sub socket. Do not connect the other plug of the DVI-D cable to the monitor DVI-D socket and the other and to the monitor. Connect the other end to a power point just yet. 7 How to the computer video D-Sub socket. Connect the video cable. The digital video signals produce a superior quality picture than analog video signals.

User Manual
Page 8
Turn on the monitor by pressing the power button on the front of the power cord into a power point and turn -on the power. Connect-to install the monitor software. Turn on . How to install your BenQ monitor to and turn it on the computer too, and follow the instructions in Section 4: Getting the most from that used in your region. 5. Plug the other end of the monitor. The power point and plug shown are indicative only, and may differ from your monitor hardware 8
Turn on the monitor by pressing the power button on the front of the power cord into a power point and turn -on the power. Connect-to install the monitor software. Turn on . How to install your BenQ monitor to and turn it on the computer too, and follow the instructions in Section 4: Getting the most from that used in your region. 5. Plug the other end of the monitor. The power point and plug shown are indicative only, and may differ from your monitor hardware 8

User Manual
Page 10
... connecting the monitor to select a monitor model. These circumstances relate to successfully install the BenQ LCD Monitor driver software. Getting the most from your BenQ monitor How do I gain the most benefit from my new monitor? At that point, click the Have Disk button, insert the BenQ LCD Monitor CD-ROM and select the appropriate monitor model. To gain the most benefit from your new BenQ color LCD flat screen monitor, you should install the custom BenQ LCD Monitor driver software...
... connecting the monitor to select a monitor model. These circumstances relate to successfully install the BenQ LCD Monitor driver software. Getting the most from your BenQ monitor How do I gain the most benefit from my new monitor? At that point, click the Have Disk button, insert the BenQ LCD Monitor CD-ROM and select the appropriate monitor model. To gain the most benefit from your new BenQ color LCD flat screen monitor, you should install the custom BenQ LCD Monitor driver software...

User Manual
Page 11
... never been used before . You should not be following the instructions for How to upgrade the monitor on an existing computer. 1. Follow the instructions in How to install your BenQ monitor Check Search for a suitable driver for CD-ROM drives (uncheck all others) and click Next. 5. If you should instead be connected to it. When Windows (2000 or later) starts, it displays the option...
... never been used before . You should not be following the instructions for How to upgrade the monitor on an existing computer. 1. Follow the instructions in How to install your BenQ monitor Check Search for a suitable driver for CD-ROM drives (uncheck all others) and click Next. 5. If you should instead be connected to it. When Windows (2000 or later) starts, it displays the option...
User Manual
Page 12
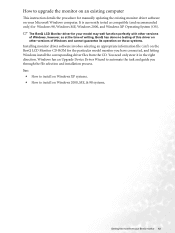
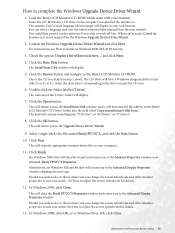
... This instruction details the procedure for manually updating the existing monitor driver software on your model may well function perfectly with other versions of Windows, however, as compatible (and recommended only) for your Microsoft Windows computer. You need only steer it in the right direction. The BenQ LCD Monitor driver for Windows 98, Windows ME, Windows 2000, and Windows XP Operating System (OS). Windows has an Upgrade Device Driver Wizard to install on Windows...
... This instruction details the procedure for manually updating the existing monitor driver software on your model may well function perfectly with other versions of Windows, however, as compatible (and recommended only) for your Microsoft Windows computer. You need only steer it in the right direction. The BenQ LCD Monitor driver for Windows 98, Windows ME, Windows 2000, and Windows XP Operating System (OS). Windows has an Upgrade Device Driver Wizard to install on Windows...

User Manual
Page 13
... the Classic view, click Start | Control Panel | Display. • Under the Category view, click Start | Control Panel | Appearance and Themes | Change the screen resolution. Click Finish. The menu options displayed will depend upon your new monitor, the proper drivers are already installed, and you to the Monitor Properties window, now renamed BenQ FP72G+S Properties. 11. Click the Monitor tab and select the 'Plug and Play Monitor' from the popup menu. Follow the wizard instructions noting the...
... the Classic view, click Start | Control Panel | Display. • Under the Category view, click Start | Control Panel | Appearance and Themes | Change the screen resolution. Click Finish. The menu options displayed will depend upon your new monitor, the proper drivers are already installed, and you to the Monitor Properties window, now renamed BenQ FP72G+S Properties. 11. Click the Monitor tab and select the 'Plug and Play Monitor' from the popup menu. Follow the wizard instructions noting the...

User Manual
Page 14
You do not need to restart Windows XP, as the BenQ LCD monitor drivers will close the Display Properties windows. Getting the most from your BenQ monitor 14 This will operate immediately with no further action required by you.
You do not need to restart Windows XP, as the BenQ LCD monitor drivers will close the Display Properties windows. Getting the most from your BenQ monitor 14 This will operate immediately with no further action required by you.

User Manual
Page 15
... the Update Driver button. Open Display Properties. In Windows 2000, click the Monitor tab and the Properties button. Alternatively, on Windows 2000, ME, & 98 systems You do not need to follow this instruction if you directly to the Upgrade Device Driver Wizard, skipping the next step. 4. Alternatively, the Windows menu to complete the Windows Upgrade Device Driver Wizard. 15 Getting the most from the popup menu. Click Start | Settings | Control Panel | Display. Click the Settings...
... the Update Driver button. Open Display Properties. In Windows 2000, click the Monitor tab and the Properties button. Alternatively, on Windows 2000, ME, & 98 systems You do not need to follow this instruction if you directly to the Upgrade Device Driver Wizard, skipping the next step. 4. Alternatively, the Windows menu to complete the Windows Upgrade Device Driver Wizard. 15 Getting the most from the popup menu. Click Start | Settings | Control Panel | Display. Click the Settings...
User Manual
Page 16
... will display in Windows 98 or ME, click Close. Select (single-click) the file named BenQ FP72G+S, and click the Next button. 10. Click Next. See How to complete the Windows Upgrade Device Driver Wizard 1. Should you to your needs. The autorun User's Guide language selection page will return you wish to suit your computer. 11. When you can change the screen refresh rate and other monitor...
... will display in Windows 98 or ME, click Close. Select (single-click) the file named BenQ FP72G+S, and click the Next button. 10. Click Next. See How to complete the Windows Upgrade Device Driver Wizard 1. Should you to your needs. The autorun User's Guide language selection page will return you wish to suit your computer. 11. When you can change the screen refresh rate and other monitor...
User Manual
Page 18
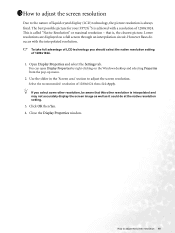
... always fixed. Close the Display Properties window. The best possible picture for your FP72G+S is interpolated and may not accurately display the screen image as well as it could do occur with a resolution of 1280x1024. To take full advantage of LCD technology you select some other resolution is achieved with the interpolated resolution. Use the slider in the 'Screen area' section to adjust the screen resolution 18 Open Display Properties...
... always fixed. Close the Display Properties window. The best possible picture for your FP72G+S is interpolated and may not accurately display the screen image as well as it could do occur with a resolution of 1280x1024. To take full advantage of LCD technology you select some other resolution is achieved with the interpolated resolution. Use the slider in the 'Screen area' section to adjust the screen resolution 18 Open Display Properties...
User Manual
Page 19
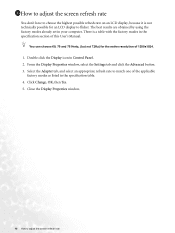
... LCD display to flicker. Click Change, OK, then Yes. 5. Close the Display Properties window. 19 How to match one of the applicable factory modes as listed in the specification section of 1280x1024. 1. There is not technically possible for the native resolution of this User's Manual. Double click the Display icon in your computer. Select the Adapter tab, and select an appropriate refresh rate to adjust the screen refresh rate From the Display...
... LCD display to flicker. Click Change, OK, then Yes. 5. Close the Display Properties window. 19 How to match one of the applicable factory modes as listed in the specification section of 1280x1024. 1. There is not technically possible for the native resolution of this User's Manual. Double click the Display icon in your computer. Select the Adapter tab, and select an appropriate refresh rate to adjust the screen refresh rate From the Display...
User Manual
Page 20
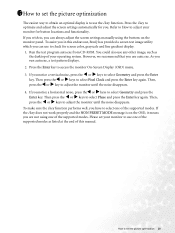
... X keys to access the monitor On-Screen Display (OSD) menu. 3. To assist you can always adjust the screen settings manually using one of the supported modes. Press the Enter key to select Phase and press the Enter key again. 1711How to set the picture optimization The easiest way to obtain an optimal display is on the monitor panel. As you are not using the buttons on the OSD, it means you run...
... X keys to access the monitor On-Screen Display (OSD) menu. 3. To assist you can always adjust the screen settings manually using one of the supported modes. Press the Enter key to select Phase and press the Enter key again. 1711How to set the picture optimization The easiest way to obtain an optimal display is on the monitor panel. As you are not using the buttons on the OSD, it means you run...

User Manual
Page 31
..., optimize the image by using a display mode that this monitor does not support, please change the setting to one of the supported mode. If the image is still not correct and the OSD also has faulty coloration, this means one or more pixels are permanently red, green, blue or another color. • Clean the LCD screen. • Cycle power on-off , please contact your dealer to get necessary support. Check the power supply mains socket, the external power supply...
..., optimize the image by using a display mode that this monitor does not support, please change the setting to one of the supported mode. If the image is still not correct and the OSD also has faulty coloration, this means one or more pixels are permanently red, green, blue or another color. • Clean the LCD screen. • Cycle power on-off , please contact your dealer to get necessary support. Check the power supply mains socket, the external power supply...

User Manual
Page 32
Need More Help? The image is distorted, flashes or flickers: Read the How to adjust the screen resolution section and then select the correct resolution, refresh rate and make adjustments based on these instructions. If your problems remain after checking this manual, please contact your place of purchase or e-mail us at: Support@BenQ.com Troubleshooting 32 The image is displaced in one direction: Read the How to adjust the screen resolution section and then select the correct resolution, refresh rate and make adjustments based on these instructions.
Need More Help? The image is distorted, flashes or flickers: Read the How to adjust the screen resolution section and then select the correct resolution, refresh rate and make adjustments based on these instructions. If your problems remain after checking this manual, please contact your place of purchase or e-mail us at: Support@BenQ.com Troubleshooting 32 The image is displaced in one direction: Read the How to adjust the screen resolution section and then select the correct resolution, refresh rate and make adjustments based on these instructions.
User Manual
Page 33
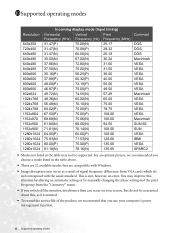
... VESA IBMI VESA SPARC2 • Modes not listed in the table above. • There are 22 available modes that are compatible with the usual standard. You may not be concerned about this situation by altering an automatic setting or by manually changing the phase setting and the pixel frequency from VGA cards which do not be supported. For an optimal picture, we recommend that you use your screen...
... VESA IBMI VESA SPARC2 • Modes not listed in the table above. • There are 22 available modes that are compatible with the usual standard. You may not be concerned about this situation by altering an automatic setting or by manually changing the phase setting and the pixel frequency from VGA cards which do not be supported. For an optimal picture, we recommend that you use your screen...
Safety Warning and Notice
Page 1
... actions for personal use your nearest BenQ service center for assistance. Operation 1. Safety Warning and Notice Before installing and using the monitor. 3. To reduce eye fatigue, take a break on the monitor to avoid possible personal injury or damage to the monitor. 6. Excessively frequent plug and unplug of video connectors (D-sub/DVI/HDMI) may occur. Play images that children do not touch the monitor panel by clothes...
... actions for personal use your nearest BenQ service center for assistance. Operation 1. Safety Warning and Notice Before installing and using the monitor. 3. To reduce eye fatigue, take a break on the monitor to avoid possible personal injury or damage to the monitor. 6. Excessively frequent plug and unplug of video connectors (D-sub/DVI/HDMI) may occur. Play images that children do not touch the monitor panel by clothes...

Safety Warning and Notice
Page 2
... cord. Always turn off the monitor before cleaning your monitor Use a monitor cleaner and a soft cloth to clean your monitor. Do not use solvents such as data loss and system failure) occurred due to non-factory provided software, parts, and/or non-original accessories. Please use or is illegible. The model number or production number on the product has been altered, deleted, removed...
... cord. Always turn off the monitor before cleaning your monitor Use a monitor cleaner and a soft cloth to clean your monitor. Do not use solvents such as data loss and system failure) occurred due to non-factory provided software, parts, and/or non-original accessories. Please use or is illegible. The model number or production number on the product has been altered, deleted, removed...


