
User Manual
Page 2
... this publication may expose you are for pluggable equipment. Further, BENQ Corporation reserves the right to revise this product yourself, as dropping or mishandling occurs, contact qualified service personnel for any particular purpose. Care And Cleaning • Cleaning. Clean the LCD monitor surface with respect to service this publication and to make changes...
... this publication may expose you are for pluggable equipment. Further, BENQ Corporation reserves the right to revise this product yourself, as dropping or mishandling occurs, contact qualified service personnel for any particular purpose. Care And Cleaning • Cleaning. Clean the LCD monitor surface with respect to service this publication and to make changes...

User Manual
Page 5
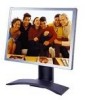
1Getting started 5 BenQ LCD Monitor Monitor stand Quick Start Guide CD-ROM Disk Power cord Signal cable: D-Sub 1.001 P/N:53.L0A0 Getting started When unpacking please check you have the following items. If they are missing or are damaged, please immediately contact the dealer at which you purchased the goods.
1Getting started 5 BenQ LCD Monitor Monitor stand Quick Start Guide CD-ROM Disk Power cord Signal cable: D-Sub 1.001 P/N:53.L0A0 Getting started When unpacking please check you have the following items. If they are missing or are damaged, please immediately contact the dealer at which you purchased the goods.

User Manual
Page 9
Align the slots on the monitor against the notches on the monitor stand and push it forward until you hear a clicking sound. Unpack the package and place the monitor stand firmly. 2. How to install your monitor hardware Make sure that the computer and monitor's power are both turned off. Place the monitor on the monitor stand. 3. 3 How to install your monitor hardware 9 Please go along with the following steps to install your LCD monitor. 1.
Align the slots on the monitor against the notches on the monitor stand and push it forward until you hear a clicking sound. Unpack the package and place the monitor stand firmly. 2. How to install your monitor hardware Make sure that the computer and monitor's power are both turned off. Place the monitor on the monitor stand. 3. 3 How to install your monitor hardware 9 Please go along with the following steps to install your LCD monitor. 1.
User Manual
Page 13
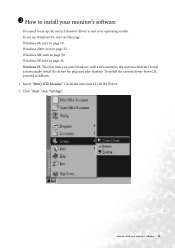
4 How to install your monitor's software You need to set up the correct monitor driver to suit your monitor's software 13 Windows 95. Click "Start" then "Settings". Windows 2000, turn to page 30. To install the current driver from CD, proceed as follows: 1. How ... system will detect it and automatically install the driver for plug and play displays. The first time you start on this page. Insert "BenQ LCD Monitor" CD-ROM into your CD-ROM Driver. 2. Windows ME turn to install your operating system. Windows XP turn to page 36. Windows 98, turn to ...
4 How to install your monitor's software You need to set up the correct monitor driver to suit your monitor's software 13 Windows 95. Click "Start" then "Settings". Windows 2000, turn to page 30. To install the current driver from CD, proceed as follows: 1. How ... system will detect it and automatically install the driver for plug and play displays. The first time you start on this page. Insert "BenQ LCD Monitor" CD-ROM into your CD-ROM Driver. 2. Windows ME turn to install your operating system. Windows XP turn to page 36. Windows 98, turn to ...
User Manual
Page 23
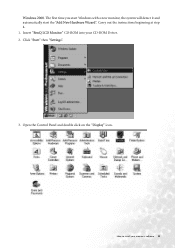
How to install your CD-ROM Driver. 2. Insert "BenQ LCD Monitor" CD-ROM into your monitor's software 23 Open the Control Panel and double click on the "Display" icon. The first time you start Windows with a new monitor, the system will detect it and automatically start the "Add New Hardware Wizard". Carry out the instructions beginning at step 4. 1. Click "Start" then "Settings". 3. Windows 2000.
How to install your CD-ROM Driver. 2. Insert "BenQ LCD Monitor" CD-ROM into your monitor's software 23 Open the Control Panel and double click on the "Display" icon. The first time you start Windows with a new monitor, the system will detect it and automatically start the "Add New Hardware Wizard". Carry out the instructions beginning at step 4. 1. Click "Start" then "Settings". 3. Windows 2000.

User Manual
Page 29
The new drivers are now installed on your LCD Mode (FP2091) from the list in the next window then click "Next" twice. 12. Select your computer. How to install your monitor's software 29 In the list of folders within the CD-ROM, select "Drivers" folder then click "Open" twice, then click "OK". 11.
The new drivers are now installed on your LCD Mode (FP2091) from the list in the next window then click "Next" twice. 12. Select your computer. How to install your monitor's software 29 In the list of folders within the CD-ROM, select "Drivers" folder then click "Open" twice, then click "OK". 11.

User Manual
Page 33
Insert "BenQ LCD Monitor's CD" into your CD-ROM and type d:\ (change the driver letter to match your monitor's software 33 Click "OK". Click "Have disk" and then click "Browse...". 9. 8. Enter "Drivers" folder to install your CD-ROM driver if it is not drive D). How to select the model from the list left.
Insert "BenQ LCD Monitor's CD" into your CD-ROM and type d:\ (change the driver letter to match your monitor's software 33 Click "OK". Click "Have disk" and then click "Browse...". 9. 8. Enter "Drivers" folder to install your CD-ROM driver if it is not drive D). How to select the model from the list left.

User Manual
Page 40
... Properties" window, select the "Settings" tab. 5 Choosing the best picture resolution Due to have all the advantages of LCD technology you must use the native resolution. The best picture possible for your FP2091 is , the clearest picture. You can change the picture resolution as follows: 1. that is achieved with the interpolated resolution...
... Properties" window, select the "Settings" tab. 5 Choosing the best picture resolution Due to have all the advantages of LCD technology you must use the native resolution. The best picture possible for your FP2091 is , the clearest picture. You can change the picture resolution as follows: 1. that is achieved with the interpolated resolution...

User Manual
Page 42
There is not technically possible for the native resolution of 1600x1200. Youc an choose 60, 70 and 75 Hertz, (but not 72Hz) for an LCD display to choose the right Refresh Rate In Windows 95/98/2000/ME/XP you can change the refresh rate as follows: 1. 6 How to choose ...the right Refresh Rate You don't have to choose the highest possible refresh rate on an LCD display, because it is a table with the factory modes in your computer. The best results are obtained by using the factory modes already set in...
There is not technically possible for the native resolution of 1600x1200. Youc an choose 60, 70 and 75 Hertz, (but not 72Hz) for an LCD display to choose the right Refresh Rate In Windows 95/98/2000/ME/XP you can change the refresh rate as follows: 1. 6 How to choose ...the right Refresh Rate You don't have to choose the highest possible refresh rate on an LCD display, because it is a table with the factory modes in your computer. The best results are obtained by using the factory modes already set in...


