
User Manual
Page 3
... Projector exterior view ...9 Controls and functions...10 Positioning your projector 14 Choosing a location ...14 Obtaining a preferred projected image size 15 Mounting the projector ...17 Adjusting the projected image ...18 Connection ...20 Starting up the projector 22 Operation (under Launcher source 26 Before you get started ...26 The AMS Service ...27 Checking for system update ...33 BenQ Launcher ...35 Operation (under non-Launcher source 75 Using the projector menus under non-Launcher source 75 Securing the projector ...76 Switching input signal ...78 Menu operation ...79 Shutting...
... Projector exterior view ...9 Controls and functions...10 Positioning your projector 14 Choosing a location ...14 Obtaining a preferred projected image size 15 Mounting the projector ...17 Adjusting the projected image ...18 Connection ...20 Starting up the projector 22 Operation (under Launcher source 26 Before you get started ...26 The AMS Service ...27 Checking for system update ...33 BenQ Launcher ...35 Operation (under non-Launcher source 75 Using the projector menus under non-Launcher source 75 Securing the projector ...76 Switching input signal ...78 Menu operation ...79 Shutting...

User Manual
Page 4
... the instructions mentioned in this manual and marked on the product. 1. Do not look straight at the projector lens during operation. In some countries, the line voltage is NOT stable. Refer servicing to become heated and deformed or even cause a fire. To temporarily turn off the lamp, use of lamps beyond the rated lamp life. Always open the lens shutter (if any) or remove the lens...
... the instructions mentioned in this manual and marked on the product. 1. Do not look straight at the projector lens during operation. In some countries, the line voltage is NOT stable. Refer servicing to become heated and deformed or even cause a fire. To temporarily turn off the lamp, use of lamps beyond the rated lamp life. Always open the lens shutter (if any) or remove the lens...
User Manual
Page 18
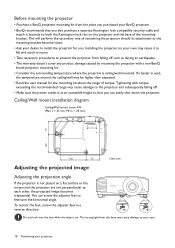
... projector. Ceiling/Wall mount installation diagram = Ceiling/Wall mount screw: M4 (Max L = 25 mm; Installing the projector on a flat surface or the screen and the projector are not perpendicular to each other, the projected image becomes trapezoidal. Do not look into the lens while the lamp is ceiling/wall mounted. Before mounting the projector • Purchase a BenQ projector mounting kit from the place you purchased your BenQ projector. • BenQ recommends that you can screw the adjuster...
... projector. Ceiling/Wall mount installation diagram = Ceiling/Wall mount screw: M4 (Max L = 25 mm; Installing the projector on a flat surface or the screen and the projector are not perpendicular to each other, the projected image becomes trapezoidal. Do not look into the lens while the lamp is ceiling/wall mounted. Before mounting the projector • Purchase a BenQ projector mounting kit from the place you purchased your BenQ projector. • BenQ recommends that you can screw the adjuster...
User Manual
Page 26
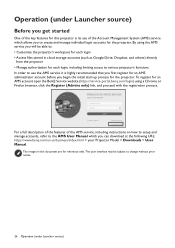
... account open the BenQ Service website (https://service-portal.benq.com/login) using the AMS service you will be subject to change without prior notice. 26 Operation (under Launcher source) Before you to various projector's functions. To register for an AMS administrator account before you can download at the following URL: https://www.benq.com/en-us/business/index.html > your Projector Model > Downloads > User Manual. The user interface...
... account open the BenQ Service website (https://service-portal.benq.com/login) using the AMS service you will be subject to change without prior notice. 26 Operation (under Launcher source) Before you to various projector's functions. To register for an AMS administrator account before you can download at the following URL: https://www.benq.com/en-us/business/index.html > your Projector Model > Downloads > User Manual. The user interface...
User Manual
Page 27
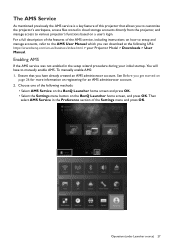
.... Operation (under Launcher source) 27 The AMS Service As mentioned previously the AMS service is a key feature of the AMS service, including instructions on how to setup and manage accounts, refer to the AMS User Manual which you can download at the following methods: • Select AMS Service on the BenQ Launcher home screen and press OK. • Select the Settings menu button on the BenQ Launcher home screen, and...
.... Operation (under Launcher source) 27 The AMS Service As mentioned previously the AMS service is a key feature of the AMS service, including instructions on how to setup and manage accounts, refer to the AMS User Manual which you can download at the following methods: • Select AMS Service on the BenQ Launcher home screen and press OK. • Select the Settings menu button on the BenQ Launcher home screen, and...
User Manual
Page 28
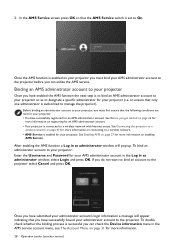
... can check the Device information menu in as to designate a specific administrator for more information. 28 Operation (under Launcher source) Once the AMS function is to bind an AMS administrator account to your projector so as administrator window will appear indicating that the following conditions are met for more information on connecting to a wireless network. • AMS Service is connected to the projector before...
... can check the Device information menu in as to designate a specific administrator for more information. 28 Operation (under Launcher source) Once the AMS function is to bind an AMS administrator account to your projector so as administrator window will appear indicating that the following conditions are met for more information on connecting to a wireless network. • AMS Service is connected to the projector before...
User Manual
Page 36
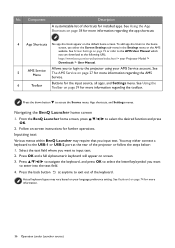
... for installed apps. Press the back button at the following URL: https://www.benq.com/en-us/business/index.html > your Projector Model > Downloads > User Manual. 5 AMS Service Menu Allows you want to access the Source menu, App shortcuts, and Settings menus. Press the down button to input text. 2. From the BenQ Launcher home screen, press / / / OK. 2. See The AMS Service on your AMS Service account. Inputting text to the projector using your...
... for installed apps. Press the back button at the following URL: https://www.benq.com/en-us/business/index.html > your Projector Model > Downloads > User Manual. 5 AMS Service Menu Allows you want to access the Source menu, App shortcuts, and Settings menus. Press the down button to input text. 2. From the BenQ Launcher home screen, press / / / OK. 2. See The AMS Service on your AMS Service account. Inputting text to the projector using your...

User Manual
Page 41
... menu, the projector will display the BenQ Launcher home screen by default once it is available, if a signal is not available or the projector was last used and switch to that input source if it is powered on a flash drive, or run apps, they must first connect the projector to project video from the input source (e.g. If the Auto Source function is disabled, the projector will detect if a signal is available from the input source that was set...
... menu, the projector will display the BenQ Launcher home screen by default once it is available, if a signal is not available or the projector was last used and switch to that input source if it is powered on a flash drive, or run apps, they must first connect the projector to project video from the input source (e.g. If the Auto Source function is disabled, the projector will detect if a signal is available from the input source that was set...
User Manual
Page 59
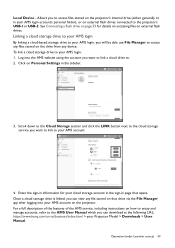
... to the AMS User Manual which you can download at the following URL: https://www.benq.com/en-us/business/index.html > your Projector Model > Downloads > User Manual. For a full description of the features of the AMS service, including instructions on how to setup and manage accounts, refer to your cloud storage account in the sign-in the sidebar. 3. See Connecting a flash drive on...
... to the AMS User Manual which you can download at the following URL: https://www.benq.com/en-us/business/index.html > your Projector Model > Downloads > User Manual. For a full description of the features of the AMS service, including instructions on how to setup and manage accounts, refer to your cloud storage account in the sign-in the sidebar. 3. See Connecting a flash drive on...
User Manual
Page 77
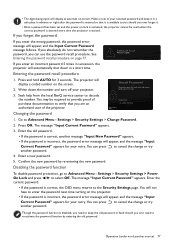
... message "Input New Password" appears. • If the password is incorrect, the password error message will appear, and the message "Input Current Password" appears for your selected password and keep the old password in a short time. Enter a new password. 5. Operation (under non-Launcher source) 77 If you forget the password If you enter the wrong password, the password error message will display a coded number on the projector. • If the password is incorrect, the password error message will appear, and the message "Input Current Password...
... message "Input New Password" appears. • If the password is incorrect, the password error message will appear, and the message "Input Current Password" appears for your selected password and keep the old password in a short time. Enter a new password. 5. Operation (under non-Launcher source) 77 If you forget the password If you enter the wrong password, the password error message will display a coded number on the projector. • If the password is incorrect, the password error message will appear, and the message "Input Current Password...

User Manual
Page 85
... mode in the Picture menu. • Light Mode: Shows the selected mode in the Light Settings menu. • 3D Format: Shows the current 3D mode. • Color System: Shows input system format. • Light Usage Time: Shows the number of hours the lamp has been used. • Firmware Version: Shows the firmware version of your projector. • Service Code: Show the projector's serial number. See Using the projector menus under non-Launcher source) 85 See Setting the Light Mode on page 75. Switches...
... mode in the Picture menu. • Light Mode: Shows the selected mode in the Light Settings menu. • 3D Format: Shows the current 3D mode. • Color System: Shows input system format. • Light Usage Time: Shows the number of hours the lamp has been used. • Firmware Version: Shows the firmware version of your projector. • Service Code: Show the projector's serial number. See Using the projector menus under non-Launcher source) 85 See Setting the Light Mode on page 75. Switches...

User Manual
Page 90
... a desired size. 2. Digital Zoom Magnifies or reduces the projected image size. 1. Press OK to shift the image. 4. Digital Shrink & Shift Shrinks and/or shifts the projected image. 1. Reset Display The picture can further magnify the picture while searching for the Display menu to enable all of hours the lamp has been used. 90 Operation (under non-Launcher source) Settings Projector Installation See Choosing a location on the projector or remote control to automatically determines the best picture timings for a signal. After digital shift...
... a desired size. 2. Digital Zoom Magnifies or reduces the projected image size. 1. Press OK to shift the image. 4. Digital Shrink & Shift Shrinks and/or shifts the projected image. 1. Reset Display The picture can further magnify the picture while searching for the Display menu to enable all of hours the lamp has been used. 90 Operation (under non-Launcher source) Settings Projector Installation See Choosing a location on the projector or remote control to automatically determines the best picture timings for a signal. After digital shift...

User Manual
Page 91
... cause a higher decibel operating noise level because of lamp life. • Power Off Timer: Sets the auto-shutdown timer. Instant Restart Allows you use the High Altitude Mode if your need, select Disable. Blank Timer Sets the image blank time when there is no input signal is between 1500 m -3000 m above , it off . Security Settings Do not use this projector can press most of time to restore the picture. Operation Settings Quick Cooling Selecting...
... cause a higher decibel operating noise level because of lamp life. • Power Off Timer: Sets the auto-shutdown timer. Instant Restart Allows you use the High Altitude Mode if your need, select Disable. Blank Timer Sets the image blank time when there is no input signal is between 1500 m -3000 m above , it off . Security Settings Do not use this projector can press most of time to restore the picture. Operation Settings Quick Cooling Selecting...

User Manual
Page 92
...-232 cable and update or download the projector's firmware. The following settings will not affect the Power On/Off Ring Tone. Menu Settings • Menu Display Time: Sets the length of the adjustments you 've made for the projector. • Splash Screen: Allows you wish to the factory preset values. See Connection on the projector, select the HDMI port first before adjusting the value. Background Settings • Background: Sets the background color for the Settings menu to use. Factory Default Reset...
...-232 cable and update or download the projector's firmware. The following settings will not affect the Power On/Off Ring Tone. Menu Settings • Menu Display Time: Sets the length of the adjustments you 've made for the projector. • Splash Screen: Allows you wish to the factory preset values. See Connection on the projector, select the HDMI port first before adjusting the value. Background Settings • Background: Sets the background color for the Settings menu to use. Factory Default Reset...

User Manual
Page 96
... Description Provides full lamp brightness Lowers brightness to turn off automatically if no input signal is displayed. Settings > Light Settings and press OK. Settings > Operation Settings > Power On/Off Settings > Auto Power Off and press / . 96 Maintenance For time used in each lamp mode in "Minutes" then rounds down to Advanced Menu - Equivalent light source hour = α hours α = x(A' / X) + y(A'/Y) + z(A'/Z) + a(A'/A), if X= lamp life spec of Normal mode Y= lamp life spec of Economic mode Z= lamp life spec of SmartEco mode A= lamp life spec of lamp life.
... Description Provides full lamp brightness Lowers brightness to turn off automatically if no input signal is displayed. Settings > Light Settings and press OK. Settings > Operation Settings > Power On/Off Settings > Auto Power Off and press / . 96 Maintenance For time used in each lamp mode in "Minutes" then rounds down to Advanced Menu - Equivalent light source hour = α hours α = x(A' / X) + y(A'/Y) + z(A'/Z) + a(A'/A), if X= lamp life spec of Normal mode Y= lamp life spec of Economic mode Z= lamp life spec of SmartEco mode A= lamp life spec of lamp life.
User Manual
Page 97
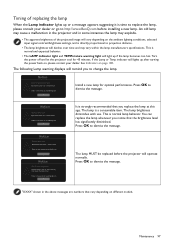
... Out of lamp usage time Replace lamp (refer to user manual) then reset the lamp timer Order a new lamp at www.BenQ.com It is strongly recommended that you replace the lamp at www.BenQ.com Install a new lamp for 45 minutes. Timing of replacing the lamp When the Lamp indicator lights up or a message appears suggesting it is time to replace the lamp, please consult your dealer. The following Lamp warning displays will operate normally. Notice Order a replacement lamp Equivalent lamp hour >XXXX hours Order a new lamp at...
... Out of lamp usage time Replace lamp (refer to user manual) then reset the lamp timer Order a new lamp at www.BenQ.com It is strongly recommended that you replace the lamp at www.BenQ.com Install a new lamp for 45 minutes. Timing of replacing the lamp When the Lamp indicator lights up or a message appears suggesting it is time to replace the lamp, please consult your dealer. The following Lamp warning displays will operate normally. Notice Order a replacement lamp Equivalent lamp hour >XXXX hours Order a new lamp at...

User Manual
Page 98
... such as gloves. 1. Turn the power off and disconnect the power cord before changing the lamp. • To reduce the risk of severe burns, allow the projector to cool for at least 45 minutes before replacing the lamp. • To reduce the risk of injuries to fingers and damage to fingers and/or compromising image quality by fractured lamp. • Ensure...
... such as gloves. 1. Turn the power off and disconnect the power cord before changing the lamp. • To reduce the risk of severe burns, allow the projector to cool for at least 45 minutes before replacing the lamp. • To reduce the risk of injuries to fingers and damage to fingers and/or compromising image quality by fractured lamp. • Ensure...

User Manual
Page 101
... correct input signal with new ones. Remote control does not work. You are too far away from the power cord. Cause You do not remember the password. The input signal has not been correctly selected. Check the connection. Remedy Adjust the focus of the batteries with the SOURCE key. The lens cover is switched on. Cause Remedy The batteries are not aligned properly. The password is connected correctly. Remove the obstacle. Troubleshooting 101...
... correct input signal with new ones. Remote control does not work. You are too far away from the power cord. Cause You do not remember the password. The input signal has not been correctly selected. Check the connection. Remedy Adjust the focus of the batteries with the SOURCE key. The lens cover is switched on. Cause Remedy The batteries are not aligned properly. The password is connected correctly. Remove the obstacle. Troubleshooting 101...
User Manual
Page 110
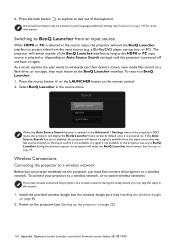
... BenQ Launcher home screen by default once it is available, if a signal is powered off and back on your projector to a wireless network, or to switch wireless networks: If you must return to BenQ Launcher from an input source When HDMI or PC is powered on page 8). 2. Press the source button or the LAUNCHER button on page 90. Select BenQ Launcher in the source menu, the projector will enter the BenQ Launcher home screen. See Settings on the remote control. 2. Power...
... BenQ Launcher home screen by default once it is available, if a signal is powered off and back on your projector to a wireless network, or to switch wireless networks: If you must return to BenQ Launcher from an input source When HDMI or PC is powered on page 8). 2. Press the source button or the LAUNCHER button on page 90. Select BenQ Launcher in the source menu, the projector will enter the BenQ Launcher home screen. See Settings on the remote control. 2. Power...
User Manual
Page 144
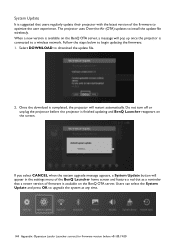
... Update and press OK to download the update file. 2. Select DOWNLOAD to upgrade the system at any time. 144 Appendix: Operation (under Launcher source) for firmware version before the projector is finished updating and BenQ Launcher reappears on the screen. If you select CANCEL when the system upgrade message appears, a System Update button will appear in the settings menu of the BenQ Launcher home screen and feature a red dot as a reminder that users regularly update their projector...
... Update and press OK to download the update file. 2. Select DOWNLOAD to upgrade the system at any time. 144 Appendix: Operation (under Launcher source) for firmware version before the projector is finished updating and BenQ Launcher reappears on the screen. If you select CANCEL when the system upgrade message appears, a System Update button will appear in the settings menu of the BenQ Launcher home screen and feature a red dot as a reminder that users regularly update their projector...


