

User Manual
Page 2
Further, BenQ Corporation reserves the right to revise this publication and to make changes from the AC supply. • The power supply cord serves as a power disconnect device for ventilation. Care And Cleaning • Cleaning. Clean the LCD monitor surface with respect to the contents hereof and...from time to time in the contents hereof without the prior written permission of BenQ Corporation. All rights reserved. Please follow these safety instructions for best performance, and long life for your monitor Power Safety • The AC plug isolates this product yourself, as opening...
Further, BenQ Corporation reserves the right to revise this publication and to make changes from the AC supply. • The power supply cord serves as a power disconnect device for ventilation. Care And Cleaning • Cleaning. Clean the LCD monitor surface with respect to the contents hereof and...from time to time in the contents hereof without the prior written permission of BenQ Corporation. All rights reserved. Please follow these safety instructions for best performance, and long life for your monitor Power Safety • The AC plug isolates this product yourself, as opening...

User Manual
Page 4
BenQ LCD Monitor Monitor Base Quick Start Guide CD-ROM Power Cord (Picture may differ from product supplied for a replacement. 1. Getting started When unpacking please check you have the following items. If any are missing or damaged, please contact the place of purchase for your region) Signal Cable: D-Sub 4 Getting started
BenQ LCD Monitor Monitor Base Quick Start Guide CD-ROM Power Cord (Picture may differ from product supplied for a replacement. 1. Getting started When unpacking please check you have the following items. If any are missing or damaged, please contact the place of purchase for your region) Signal Cable: D-Sub 4 Getting started
User Manual
Page 7
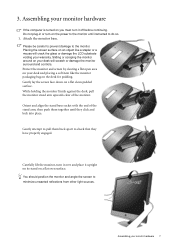
... engaged. Protect the monitor and screen by clearing a flat open area on the desk for padding. Placing the screen surface on a flat clean padded surface. Gently lay the screen face down on an object like the monitor packaging bag on your desk will crack the glass or damage the LCD substrate voiding your... warranty. Attach the monitor base.
... engaged. Protect the monitor and screen by clearing a flat open area on the desk for padding. Placing the screen surface on a flat clean padded surface. Gently lay the screen face down on an object like the monitor packaging bag on your desk will crack the glass or damage the LCD substrate voiding your... warranty. Attach the monitor base.

User Manual
Page 8
... other plug of the D-Sub cable (at the end without the ferrite filter) to the DVI-D port on the rear of the monitor. 8 Assembling your monitor hardware Tighten all finger screws to the computer video D-Sub socket. The only case in which both DVI-D cable and D-Sub cable ... plugs from accidently falling out during use both cables can be used for direct digital connection between source video and digital LCD monitors or projectors. Connect the other end to the monitor D-Sub socket. Do not use . 3. Connect the PC video cable. Connect the audio cable. (optional) Connect the ...
... other plug of the D-Sub cable (at the end without the ferrite filter) to the DVI-D port on the rear of the monitor. 8 Assembling your monitor hardware Tighten all finger screws to the computer video D-Sub socket. The only case in which both DVI-D cable and D-Sub cable ... plugs from accidently falling out during use both cables can be used for direct digital connection between source video and digital LCD monitors or projectors. Connect the other end to the monitor D-Sub socket. Do not use . 3. Connect the PC video cable. Connect the audio cable. (optional) Connect the ...
User Manual
Page 10
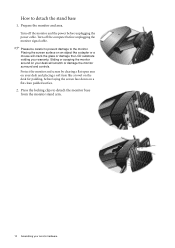
... padded surface. 2. Please be careful to prevent damage to detach the stand base 1. Press the locking clips to detach the monitor base from the monitor stand arm. 10 Assembling your warranty. Turn off the computer before unplugging the power cable. Sliding or scraping the... monitor around on your desk will crack the glass or damage the LCD substrate voiding your monitor hardware Protect the monitor and screen by clearing a flat open area on your desk and placing a soft item ...
... padded surface. 2. Please be careful to prevent damage to detach the stand base 1. Press the locking clips to detach the monitor base from the monitor stand arm. 10 Assembling your warranty. Turn off the computer before unplugging the power cable. Sliding or scraping the... monitor around on your desk will crack the glass or damage the LCD substrate voiding your monitor hardware Protect the monitor and screen by clearing a flat open area on your desk and placing a soft item ...

User Manual
Page 11
... network which version of the Administrators group in order to install the monitor driver software. At that point, click the Have Disk button, insert the BenQ LCD Monitor CD-ROM and select the appropriate monitor model. Further details and step-by-step instructions for both an automatic... (new) or upgrade (existing) installation follow to select a monitor model. Furthermore, if your BenQ monitor To gain the most from installing software on the BenQ LCD Monitor CD-ROM. 4. Follow the wizard instructions until it asks you are upgrading an existing ...
... network which version of the Administrators group in order to install the monitor driver software. At that point, click the Have Disk button, insert the BenQ LCD Monitor CD-ROM and select the appropriate monitor model. Further details and step-by-step instructions for both an automatic... (new) or upgrade (existing) installation follow to select a monitor model. Furthermore, if your BenQ monitor To gain the most from installing software on the BenQ LCD Monitor CD-ROM. 4. Follow the wizard instructions until it asks you are upgrading an existing ...

User Manual
Page 12
...the computer. 12 Getting the most from your monitor and click Next. 6. How to install the monitor on a new computer This instruction details the procedure for selecting and installing the BenQ LCD Monitor driver software on a new computer which the BenQ LCD Monitor is only suitable for a computer which has ...others) and click Next. 5. Insert the BenQ LCD Monitor CD-ROM into a CD drive on page 7. This instruction is the first ever monitor to Install Hardware Device drivers. 2. If you are adding the BenQ LCD Monitor to it (and has monitor driver software installed), you should instead be ...
...the computer. 12 Getting the most from your monitor and click Next. 6. How to install the monitor on a new computer This instruction details the procedure for selecting and installing the BenQ LCD Monitor driver software on a new computer which the BenQ LCD Monitor is only suitable for a computer which has ...others) and click Next. 5. Insert the BenQ LCD Monitor CD-ROM into a CD drive on page 7. This instruction is the first ever monitor to Install Hardware Device drivers. 2. If you are adding the BenQ LCD Monitor to it (and has monitor driver software installed), you should instead be ...

User Manual
Page 13
...it in the right direction. The BenQ LCD Monitor driver for your model may well function perfectly with other versions of Windows, however, as compatible for Windows XP and Windows Vista Operating System (OS). How to upgrade the monitor on an existing computer This instruction ...details the procedure for manually updating the existing monitor driver software on your BenQ monitor 13 Windows has an Upgrade Device Driver Wizard to install on Windows XP system on the BenQ LCD Monitor CD-ROM for the particular model monitor you through the file selection and installation process....
...it in the right direction. The BenQ LCD Monitor driver for your model may well function perfectly with other versions of Windows, however, as compatible for Windows XP and Windows Vista Operating System (OS). How to upgrade the monitor on an existing computer This instruction ...details the procedure for manually updating the existing monitor driver software on your BenQ monitor 13 Windows has an Upgrade Device Driver Wizard to install on Windows XP system on the BenQ LCD Monitor CD-ROM for the particular model monitor you through the file selection and installation process....

User Manual
Page 14
... the Update Driver Software window, select the option 'Browse my computer for the CD-ROM drive). The Generic PnP Monitor Properties window will display. 2. Insert the BenQ LCD Monitor CD-ROM into a CD drive on Windows Vista systems 1. You do not need to restart Windows Vista, as ...the BenQ LCD monitor drivers will copy and install the appropriate monitor driver files to your system - Right-click the desktop and select Personalize from your monitor from the Personalize appearance and sounds window. Click Close. Click 'Browse...
... the Update Driver Software window, select the option 'Browse my computer for the CD-ROM drive). The Generic PnP Monitor Properties window will display. 2. Insert the BenQ LCD Monitor CD-ROM into a CD drive on Windows Vista systems 1. You do not need to restart Windows Vista, as ...the BenQ LCD monitor drivers will copy and install the appropriate monitor driver files to your system - Right-click the desktop and select Personalize from your monitor from the Personalize appearance and sounds window. Click Close. Click 'Browse...

User Manual
Page 15
... Close, OK, and OK. Open Display Properties. The quickest shortcut to your new monitor, the proper drivers are already installed, and you attached the monitor to restart Windows XP, as the BenQ LCD monitor drivers will already be selected for the best driver in Control Panel. Click the Settings...single-click) the correct name of your monitor model. 9. How to continue with no further action required by you. Click the Monitor tab and select the 'Plug and Play Monitor' from a list or specific location' and click Next. 8. Insert the BenQ LCD Monitor CD-ROM into a CD drive on the...
... Close, OK, and OK. Open Display Properties. The quickest shortcut to your new monitor, the proper drivers are already installed, and you attached the monitor to restart Windows XP, as the BenQ LCD monitor drivers will already be selected for the best driver in Control Panel. Click the Settings...single-click) the correct name of your monitor model. 9. How to continue with no further action required by you. Click the Monitor tab and select the 'Plug and Play Monitor' from a list or specific location' and click Next. 8. Insert the BenQ LCD Monitor CD-ROM into a CD drive on the...

User Manual
Page 34
... these losses by working through the instructions in green? If the image is still not correct and the OSD also has faulty coloration, this monitor does not support, please change the setting to one of Range" on the display illuminated in the "Adjusting the refresh rate" section on ... mode that this means one or more pixels are permanently red, green, blue or another color. • Clean the LCD screen. • Cycle power on-off , please contact your computer and monitor go into a low power "sleep" mode when not actively in the signal input. Faint shadow from the link "Adjusting...
... these losses by working through the instructions in green? If the image is still not correct and the OSD also has faulty coloration, this monitor does not support, please change the setting to one of Range" on the display illuminated in the "Adjusting the refresh rate" section on ... mode that this means one or more pixels are permanently red, green, blue or another color. • Clean the LCD screen. • Cycle power on-off , please contact your computer and monitor go into a low power "sleep" mode when not actively in the signal input. Faint shadow from the link "Adjusting...


