User Manual
Page 8
......23 Navigating the OSD Menu 24 Audio Menu ...25 Picture Menu...27 Picture Mode Settings...28 Selecting a Picture Mode ...28 Feature Menu ...29 TV Menu ...32 Performing Manual Installation 33 Editing Channels...33 Naming a Channel ...33 Swapping Channels ...34 Locking (Preventing a Channel from Selection)/Unlocking a Channel 34 Deleting a Channel ...34 Child...
......23 Navigating the OSD Menu 24 Audio Menu ...25 Picture Menu...27 Picture Mode Settings...28 Selecting a Picture Mode ...28 Feature Menu ...29 TV Menu ...32 Performing Manual Installation 33 Editing Channels...33 Naming a Channel ...33 Swapping Channels ...34 Locking (Preventing a Channel from Selection)/Unlocking a Channel 34 Deleting a Channel ...34 Child...
User Manual
Page 32
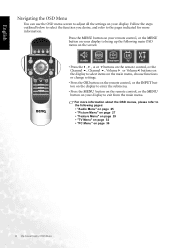
... following pages: • "Audio Menu" on page 25 • "Picture Menu" on page 27 • "Feature Menu" on page 29 • "TV Menu" on page 32 • "PC Menu" on page 36 24 On-Screen Display (OSD) Menu
... following pages: • "Audio Menu" on page 25 • "Picture Menu" on page 27 • "Feature Menu" on page 29 • "TV Menu" on page 32 • "PC Menu" on page 36 24 On-Screen Display (OSD) Menu

User Manual
Page 35
... level for a sharper image, of the image. Use the and buttons on the remote control or the Volume and Volume buttons on the display to 32 Brightness Colour Adjust image black level. for redder tones, for greener tones. 0 to enter the submenu. 3. On-Screen Display (OSD) Menu 27 Advanced Picture Settings...
... level for a sharper image, of the image. Use the and buttons on the remote control or the Volume and Volume buttons on the display to 32 Brightness Colour Adjust image black level. for redder tones, for greener tones. 0 to enter the submenu. 3. On-Screen Display (OSD) Menu 27 Advanced Picture Settings...

User Manual
Page 40
...; Austria • Belgium • Luxemburg • Switzerland • Portugal • New Zealand • Australia • Others • UK • FR • B/G/H • EURO • DK 32 On-Screen Display (OSD) Menu Channel Edit Refer to "Editing Channels" on the display to start auto installation. Press the MENU button on the remote...
...; Austria • Belgium • Luxemburg • Switzerland • Portugal • New Zealand • Australia • Others • UK • FR • B/G/H • EURO • DK 32 On-Screen Display (OSD) Menu Channel Edit Refer to "Editing Channels" on the display to start auto installation. Press the MENU button on the remote...

User Manual
Page 48
It is suggested that you select appropriate settings from this product are as listed above. English Supported Modes Resolution 720 × 400 640 × 480 640 × 480 640 × 480 800 × 600 800 × 600 1024 × 768 Horizontal Freq. (khz) Vertical Freq. (Hz) Bandwidth (Mhz) 31.47 70.08 28.32 31.47 60.00 25.18 37.50 75.00 31.50 37.86 72.80 31.50 37.88 60.32 40.00 46.86 75.00 49.50 48.36 60.00 65.00 Notes DOS mode DOS mode VESA VESA VESA VESA VESA Optimal settings for this table to obtain optimal performance. 40 Supported Modes
It is suggested that you select appropriate settings from this product are as listed above. English Supported Modes Resolution 720 × 400 640 × 480 640 × 480 640 × 480 800 × 600 800 × 600 1024 × 768 Horizontal Freq. (khz) Vertical Freq. (Hz) Bandwidth (Mhz) 31.47 70.08 28.32 31.47 60.00 25.18 37.50 75.00 31.50 37.86 72.80 31.50 37.88 60.32 40.00 46.86 75.00 49.50 48.36 60.00 65.00 Notes DOS mode DOS mode VESA VESA VESA VESA VESA Optimal settings for this table to obtain optimal performance. 40 Supported Modes