
US Digital Signage 3 Year Warranty
Page 1
... conditions set forth below , BenQ America Corp. ("BenQ") warrants the BenQ Digital Signage ("Product") you are entitled to repair the Product, or replace the Product with a brand new replacement. BenQ may use during the warranty period. DOA (Dead On Arrival): Must be warranted only for all Products purchased and located in materials or workmanship under normal consumer use new or reconditioned components or parts...
... conditions set forth below , BenQ America Corp. ("BenQ") warrants the BenQ Digital Signage ("Product") you are entitled to repair the Product, or replace the Product with a brand new replacement. BenQ may use during the warranty period. DOA (Dead On Arrival): Must be warranted only for all Products purchased and located in materials or workmanship under normal consumer use new or reconditioned components or parts...

US Digital Signage 3 Year Warranty
Page 2
... improper temperature or humidity); Exclusions This limited warranty does not extend to any Product not purchased from the BenQ authorized reseller, nor to BenQ or a BenQ Authorized Service Provider with missing or altered service tags or serial numbers from the original manufacturer. BenQ or BenQ Authorized Service Provider will then issue a Return Merchandise Authorization ("RMA") number to be refused and returned, without prior...
... improper temperature or humidity); Exclusions This limited warranty does not extend to any Product not purchased from the BenQ authorized reseller, nor to BenQ or a BenQ Authorized Service Provider with missing or altered service tags or serial numbers from the original manufacturer. BenQ or BenQ Authorized Service Provider will then issue a Return Merchandise Authorization ("RMA") number to be refused and returned, without prior...
US Digital Signage 3 Year Warranty
Page 3
...not apply to BenQ or BenQ Authorized Service Provider without notice. Thursday: 8AM-6PM Friday: 9AM-5PM Toll Free: 866-600-2367 To avoid delays, please DO NOT SEND ANY BenQ product to you specific legal rights. BenQ is not responsible...programs, data or removable storage media. YOU AGREE THAT REPAIR OR REPLACEMENT, AS APPLICABLE, UNDER THE WARRANTY SERVICES DESCRIBED HEREIN IS YOUR SOLE AND EXCLUSIVE REMEDY WITH RESPECT TO ANY BREACH OF THE BenQ LIMITED WARRANTY SET FORTH HEREIN. Some states or provinces/jurisdictions do not allow the exclusion or limitation of Operation (Central Time...
...not apply to BenQ or BenQ Authorized Service Provider without notice. Thursday: 8AM-6PM Friday: 9AM-5PM Toll Free: 866-600-2367 To avoid delays, please DO NOT SEND ANY BenQ product to you specific legal rights. BenQ is not responsible...programs, data or removable storage media. YOU AGREE THAT REPAIR OR REPLACEMENT, AS APPLICABLE, UNDER THE WARRANTY SERVICES DESCRIBED HEREIN IS YOUR SOLE AND EXCLUSIVE REMEDY WITH RESPECT TO ANY BREACH OF THE BenQ LIMITED WARRANTY SET FORTH HEREIN. Some states or provinces/jurisdictions do not allow the exclusion or limitation of Operation (Central Time...

Dx550C User Manual
Page 3
... 6 Unpacking 6 Packing list 8 Overview 9 Setting up the display 11 Tearing down the bottom housing 11 Placing the dual side display into the bottom housing ......... 12 Connecting the LVDS and 24V 13 Reinstalling the bottom housing covers 14 Opening the user door for HDMI connector & AC switch (power cord 15 Full size stand installation 16 Using the remote control 18 OSD menu 19 Troubleshooting 23 Specifications 24 Product Dimensions 25 10...
... 6 Unpacking 6 Packing list 8 Overview 9 Setting up the display 11 Tearing down the bottom housing 11 Placing the dual side display into the bottom housing ......... 12 Connecting the LVDS and 24V 13 Reinstalling the bottom housing covers 14 Opening the user door for HDMI connector & AC switch (power cord 15 Full size stand installation 16 Using the remote control 18 OSD menu 19 Troubleshooting 23 Specifications 24 Product Dimensions 25 10...

Dx550C User Manual
Page 4
... set, do not put excessive pressure on the power box. • When positioning the display, make sure the power plug and outlet are not going to use it for normal operation. • Ensure the use of an approved power cord provided by detaching the power cord, wait 6 seconds before the mains plug is off immediately and disconnect the power cord. Read and follow these instructions when connecting and using...
... set, do not put excessive pressure on the power box. • When positioning the display, make sure the power plug and outlet are not going to use it for normal operation. • Ensure the use of an approved power cord provided by detaching the power cord, wait 6 seconds before the mains plug is off immediately and disconnect the power cord. Read and follow these instructions when connecting and using...
Dx550C User Manual
Page 5
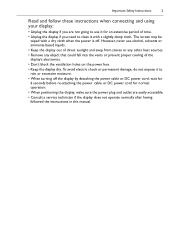
... the power box. • Keep the display dry. The screen may be wiped with a slightly damp cloth. Important Safety Instructions 2 Read and follow these instructions when connecting and using your display: • Unplug the display if you need to use alcohol, solvents or ammonia-based liquids. • Keep the display out of direct sunlight and away from stoves or any other heat sources. • Remove any...
... the power box. • Keep the display dry. The screen may be wiped with a slightly damp cloth. Important Safety Instructions 2 Read and follow these instructions when connecting and using your display: • Unplug the display if you need to use alcohol, solvents or ammonia-based liquids. • Keep the display out of direct sunlight and away from stoves or any other heat sources. • Remove any...

Dx550C User Manual
Page 6
the other functions work at the front side. Power connection to the device: • The display shall be installed nearby the socketes for easy access to the front side of the remote controller works only when pointing to the power. 3 Important Safety Instructions Usage Remote controller precautions: • Power function of the display; Front Side (450 nits) Back Side(700 nits) There is a user door at either side.
the other functions work at the front side. Power connection to the device: • The display shall be installed nearby the socketes for easy access to the front side of the remote controller works only when pointing to the power. 3 Important Safety Instructions Usage Remote controller precautions: • Power function of the display; Front Side (450 nits) Back Side(700 nits) There is a user door at either side.

Dx550C User Manual
Page 7
You can choose proper screw holes to your IPC. • The relative position of IPC space: 270*181*26.5mm screws (M3x6.5mm) Please put the IPC I/O interface down the IPC fixed sheet metal first. Tear down . 1. Important Safety Instructions 4 IPC (Industrial PC) installation: • This display (DH550C/DL550C) contains a plate metal to be attached to apply. • The dimension of the screw holes is shown below.
You can choose proper screw holes to your IPC. • The relative position of IPC space: 270*181*26.5mm screws (M3x6.5mm) Please put the IPC I/O interface down the IPC fixed sheet metal first. Tear down . 1. Important Safety Instructions 4 IPC (Industrial PC) installation: • This display (DH550C/DL550C) contains a plate metal to be attached to apply. • The dimension of the screw holes is shown below.

Dx550C User Manual
Page 8
Set & fix the IPC (Don't need reinstall the IPC fixed sheet metal.) with 4 screws (M3x6.5mm). 3. Set & fix the IPC & Reinstall the IPC fixed sheet metal with 4 screws (M3x6.5mm). 5 Important Safety Instructions 2.
Set & fix the IPC (Don't need reinstall the IPC fixed sheet metal.) with 4 screws (M3x6.5mm). 3. Set & fix the IPC & Reinstall the IPC fixed sheet metal with 4 screws (M3x6.5mm). 5 Important Safety Instructions 2.

Dx550C User Manual
Page 14
11 Setting up the display Setting up the display Tearing down the bottom housing Putting the bottom housing straight, and remove 20 screws (M3x6mm) to tear down its covers.
11 Setting up the display Setting up the display Tearing down the bottom housing Putting the bottom housing straight, and remove 20 screws (M3x6mm) to tear down its covers.

Dx550C User Manual
Page 16
13 Setting up the display Connecting the LVDS and 24V LVDS Connector LVDS 24V 24V Connector LVDS 10pin 14pin 10pin 14pin
13 Setting up the display Connecting the LVDS and 24V LVDS Connector LVDS 24V 24V Connector LVDS 10pin 14pin 10pin 14pin
Dx550C User Manual
Page 18
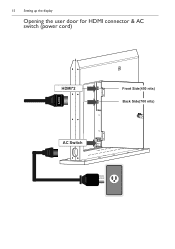
HDMI*2 AC Switch Front Side(450 nits) Back Side(700 nits) 15 Setting up the display Opening the user door for HDMI connector & AC switch (power cord) HDMI!
HDMI*2 AC Switch Front Side(450 nits) Back Side(700 nits) 15 Setting up the display Opening the user door for HDMI connector & AC switch (power cord) HDMI!
Dx550C User Manual
Page 19
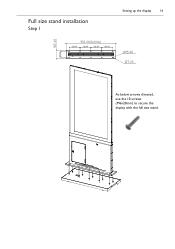
Full size stand installation Step 1 Setting up the display 16 As below arrows directed, use the 10 screws (M6x20mm) to secure the display with the full size stand.
Full size stand installation Step 1 Setting up the display 16 As below arrows directed, use the 10 screws (M6x20mm) to secure the display with the full size stand.

Dx550C User Manual
Page 20
17 Setting up the display Step 2 Fixed wheel: to the ground. As below arrows directed, use the 4 screws (M10x100mm) to secure the product to fix by the brake.
17 Setting up the display Step 2 Fixed wheel: to the ground. As below arrows directed, use the 4 screws (M10x100mm) to secure the product to fix by the brake.
Dx550C User Manual
Page 21
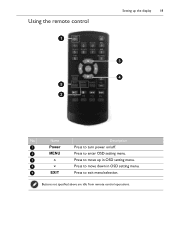
Buttons not specified above are idle from remote control operations. Using the remote control 1 5 2 Setting up the display 18 3 4 No Name Description 1 Power Press to turn power on/off. 2 MENU Press to enter OSD setting menu. 3 Press to move up in OSD setting menu. 4 Press to move down in OSD setting menu. 5 EXIT Press to exit menu/selection.
Buttons not specified above are idle from remote control operations. Using the remote control 1 5 2 Setting up the display 18 3 4 No Name Description 1 Power Press to turn power on/off. 2 MENU Press to enter OSD setting menu. 3 Press to move up in OSD setting menu. 4 Press to move down in OSD setting menu. 5 EXIT Press to exit menu/selection.
Dx550C User Manual
Page 23
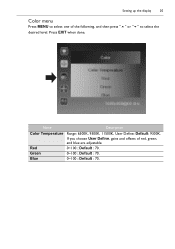
Default: 9300K. Default : 70. 0~100 ; Default : 70. 0~100 ; Default : 70. Press EXIT when done. Name Color Temperature Red Green Blue Description Range: 6500K, 9300K, 11500K, User Define; If you choose User Define, gains and offsets of the following, and then press "" or "" to select the desired level. Setting up the display 20 Color menu Press MENU to select one of red, green, and blue are adjustable. 0~100 ;
Default: 9300K. Default : 70. 0~100 ; Default : 70. 0~100 ; Default : 70. Press EXIT when done. Name Color Temperature Red Green Blue Description Range: 6500K, 9300K, 11500K, User Define; If you choose User Define, gains and offsets of the following, and then press "" or "" to select the desired level. Setting up the display 20 Color menu Press MENU to select one of red, green, and blue are adjustable. 0~100 ;
Dx550C User Manual
Page 25
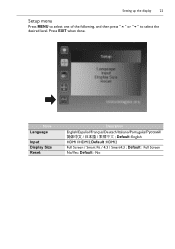
Default : No Default : Full Screen No/Yes; Setting up the display 22 Setup menu Press MENU to select one of the following, and then press "" or "" to select the desired level. Name Language Input Display Size Reset: Description English/Español/Français/Deutsch/Italiano/Português Default :English HDMI1/HDMI2;Default :HDMI2 Full Screen / Smart Fit / 4:3 / Smart4:3 ; Press EXIT when done.
Default : No Default : Full Screen No/Yes; Setting up the display 22 Setup menu Press MENU to select one of the following, and then press "" or "" to select the desired level. Name Language Input Display Size Reset: Description English/Español/Français/Deutsch/Italiano/Português Default :English HDMI1/HDMI2;Default :HDMI2 Full Screen / Smart Fit / 4:3 / Smart4:3 ; Press EXIT when done.

Dx550C User Manual
Page 26
... video signal source to see if the interference is attached firmly to the jack on the display. Color is powered off. Move the display to another location to the display. Make sure that the signal cable is reduced. The input signal is beyond the capabilities of time. The signal cable is displayed. 23 Troubleshooting Troubleshooting Symptom No picture is not connected properly. 2. A still picture is not switched on the back of the display is displayed...
... video signal source to see if the interference is attached firmly to the jack on the display. Color is powered off. Move the display to another location to the display. Make sure that the signal cable is reduced. The input signal is beyond the capabilities of time. The signal cable is displayed. 23 Troubleshooting Troubleshooting Symptom No picture is not connected properly. 2. A still picture is not switched on the back of the display is displayed...
Dx550C User Manual
Page 27
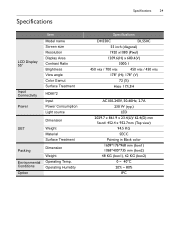
Specifications LCD Display 55" Input Connectivity Power Item Model name Screen size Resolution Display Area Contrast Ratio Brightness View angle Color Gamut Surface Treatment HDMI*2 Input Power Consumption Light source Dimension SET Weight Material Surface Treatment Packing Environmental Conditions Option Dimension Weight Operating Temp. Operating Humidity Specifications 24 Specifications DH550C DL550C 55 inch (diagonal) 1920 x1080 (Pixel) 1209.6(H) x 680.4(V) 3000:1 450 nits / 700 nits 450 nits / 450 nits 178° (H); 178° (V) 72 (%) Haze 11%,3H AC100-240V, ...
Specifications LCD Display 55" Input Connectivity Power Item Model name Screen size Resolution Display Area Contrast Ratio Brightness View angle Color Gamut Surface Treatment HDMI*2 Input Power Consumption Light source Dimension SET Weight Material Surface Treatment Packing Environmental Conditions Option Dimension Weight Operating Temp. Operating Humidity Specifications 24 Specifications DH550C DL550C 55 inch (diagonal) 1920 x1080 (Pixel) 1209.6(H) x 680.4(V) 3000:1 450 nits / 700 nits 450 nits / 450 nits 178° (H); 178° (V) 72 (%) Haze 11%,3H AC100-240V, ...
Spec Sheet
Page 1
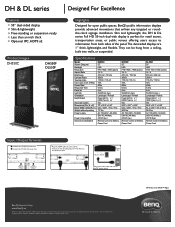
... cable plugs are 1" thick, lightweight, and flexible. All rights reserved. Specifications Model: Screen Diagonal Backlight Resolution Aspect Ratio Brightness Contrast Ratio Viewing Angle Color gamut (x% NTSC) Frame Rate Response Time Panel bit Light life Orientation Input/Output AC power switch Dimensions(W x H x D) Bezel Width (T/B/L/R) mm Weight without notice. They can be hung from both sides of BenQ Corp. Slim and lightweight, the DH & DL series Full HD 55-inch dual-side display...
... cable plugs are 1" thick, lightweight, and flexible. All rights reserved. Specifications Model: Screen Diagonal Backlight Resolution Aspect Ratio Brightness Contrast Ratio Viewing Angle Color gamut (x% NTSC) Frame Rate Response Time Panel bit Light life Orientation Input/Output AC power switch Dimensions(W x H x D) Bezel Width (T/B/L/R) mm Weight without notice. They can be hung from both sides of BenQ Corp. Slim and lightweight, the DH & DL series Full HD 55-inch dual-side display...


