User Manual
Page 7
... nearby that can inhibit wireless communication include: • Refrigerators 4 • Washers and/or dryers • Metal cabinets 5 • Large aquariums • Metallic-based UV tinted windows 6 If your wireless signal seems weak in the Wireless Utility of your wireless network is impaired after attending to the above issues, and you have...
... nearby that can inhibit wireless communication include: • Refrigerators 4 • Washers and/or dryers • Metal cabinets 5 • Large aquariums • Metallic-based UV tinted windows 6 If your wireless signal seems weak in the Wireless Utility of your wireless network is impaired after attending to the above issues, and you have...
User Manual
Page 8
... which require a username and password to sleep; Should you to sleep." The simplest solution to cover an even wider area, we suggest the Belkin Wireless Range Extender/Access Point. 5. Secure connections include: • Virtual Private Network (VPN) connections, often used where security is to change... may not be interrupted by re-logging into the secure website. A second alternative is important. To change your power management setting under Windows, see your wireless adapter's user manual), and move your Router (or Access Point) and computers to a channel as far away from...
... which require a username and password to sleep; Should you to sleep." The simplest solution to cover an even wider area, we suggest the Belkin Wireless Range Extender/Access Point. 5. Secure connections include: • Virtual Private Network (VPN) connections, often used where security is to change... may not be interrupted by re-logging into the secure website. A second alternative is important. To change your power management setting under Windows, see your wireless adapter's user manual), and move your Router (or Access Point) and computers to a channel as far away from...
User Manual
Page 10
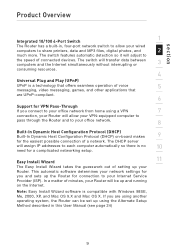
... easily through your web browser, without having to install additional software onto the computer. Web-Based Advanced User Interface You can make your new Belkin Wireless Pre-N Router an ideal solution for your home or small office network. LED Display Lighted LEDs on the network quickly and easily. There...) to share the single IP address assigned to you will protect your network from any computer on the top of networking environments including Linux®, Windows® 95, 98, Me, NT®, 2000, and XP, and others. All that is needed is a list of features that will be able ...
... easily through your web browser, without having to install additional software onto the computer. Web-Based Advanced User Interface You can make your new Belkin Wireless Pre-N Router an ideal solution for your home or small office network. LED Display Lighted LEDs on the network quickly and easily. There...) to share the single IP address assigned to you will protect your network from any computer on the top of networking environments including Linux®, Windows® 95, 98, Me, NT®, 2000, and XP, and others. All that is needed is a list of features that will be able ...
User Manual
Page 11
... , four-port network switch to allow your VPN-equipped computer to pass through the Router and to each computer automatically so there is compatible with Windows 98SE, Me, 2000, XP, and Mac OS 9.X and Mac OS X. In a matter of minutes, your Router will allow your wired computers to your Internet Service...
... , four-port network switch to allow your VPN-equipped computer to pass through the Router and to each computer automatically so there is compatible with Windows 98SE, Me, 2000, XP, and Mac OS 9.X and Mac OS X. In a matter of minutes, your Router will allow your wired computers to your Internet Service...
User Manual
Page 13
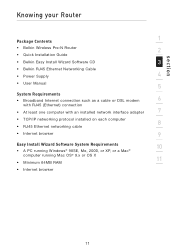
section Knowing your Router Package Contents 1 • Belkin Wireless Pre-N Router 2 • Quick Installation Guide • Belkin Easy Install Wizard Software CD 3 • Belkin RJ45 Ethernet Networking Cable • Power Supply 4 • User Manual 5 System Requirements • Broadband Internet ...each computer 8 • RJ45 Ethernet networking cable • Internet browser 9 Easy Install Wizard Software System Requirements 10 • A PC running Windows® 98SE, Me, 2000, or XP, or a Mac® computer running Mac OS® 9.x or OS X 11 • Minimum...
section Knowing your Router Package Contents 1 • Belkin Wireless Pre-N Router 2 • Quick Installation Guide • Belkin Easy Install Wizard Software CD 3 • Belkin RJ45 Ethernet Networking Cable • Power Supply 4 • User Manual 5 System Requirements • Broadband Internet ...each computer 8 • RJ45 Ethernet networking cable • Internet browser 9 Easy Install Wizard Software System Requirements 10 • A PC running Windows® 98SE, Me, 2000, or XP, or a Mac® computer running Mac OS® 9.x or OS X 11 • Minimum...
User Manual
Page 18
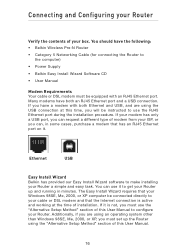
... Networking Cable (for connecting the Router to the computer) • Power Supply • Belkin Easy Install Wizard Software CD • User Manual Modem Requirements Your cable or DSL modem must be instructed to your Windows 98SE, Me, 2000, or XP computer be connected directly to use the "Alternative Setup ...use the RJ45 Ethernet port during the installation procedure. If you have both Ethernet and USB, and are using an operating system other than Windows 98SE, Me, 2000, or XP, you can request a different type of modem from your Router up the Router using the USB connection...
... Networking Cable (for connecting the Router to the computer) • Power Supply • Belkin Easy Install Wizard Software CD • User Manual Modem Requirements Your cable or DSL modem must be instructed to your Windows 98SE, Me, 2000, or XP computer be connected directly to use the "Alternative Setup ...use the RJ45 Ethernet port during the installation procedure. If you have both Ethernet and USB, and are using an operating system other than Windows 98SE, Me, 2000, or XP, you can request a different type of modem from your Router up the Router using the USB connection...

User Manual
Page 19
Note for Windows Users: If the Easy Install Wizard does not start the Network Setup Utility. 17 DO NOT CONNECT 6 THE ROUTER AT THIS TIME. • The Easy ... Router • The Router Power Supply • Category 5 Networking Cable 8 • This User Manual 9 1.3 Turn off any programs that are running on your computer. 10 Windows User: Insert the Easy Install Wizard software CD into your CD-ROM drive. The Network Setup Utility screen 11 will automatically appear on the screen...
Note for Windows Users: If the Easy Install Wizard does not start the Network Setup Utility. 17 DO NOT CONNECT 6 THE ROUTER AT THIS TIME. • The Easy ... Router • The Router Power Supply • Category 5 Networking Cable 8 • This User Manual 9 1.3 Turn off any programs that are running on your computer. 10 Windows User: Insert the Easy Install Wizard software CD into your CD-ROM drive. The Network Setup Utility screen 11 will automatically appear on the screen...
User Manual
Page 28
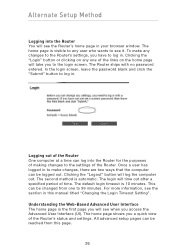
The second method is 10 minutes. The home page shows you have to log in your browser window. To make changes, there are two ways that the computer can be changed from this manual titled "Changing the Login Timeout Setting". Clicking the "Login" ...
The second method is 10 minutes. The home page shows you have to log in your browser window. To make changes, there are two ways that the computer can be changed from this manual titled "Changing the Login Timeout Setting". Clicking the "Login" ...
User Manual
Page 44
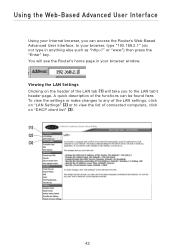
...-Based Advanced User Interface Using your Internet browser, you to view the list of connected computers, click on "DHCP client list" (3). (1) (2) (3) 42 In your browser window. To view the settings or make changes to any of the LAN settings, click on the header of the LAN tab (1) will see the Router...
...-Based Advanced User Interface Using your Internet browser, you to view the list of connected computers, click on "DHCP client list" (3). (1) (2) (3) 42 In your browser window. To view the settings or make changes to any of the LAN settings, click on the header of the LAN tab (1) will see the Router...

User Manual
Page 53
... is known as a pre-shared key as the security key. For "Encryption Technique", select "TKIP" or "AES". This patch woks only with Windows XP. 8 1. This patch woks only with Windows XP. 3 Your Router supports WPA-PSK (no server)". 9 2. It can be used in a home environment. 6 Setting WPA-PSK Note: To use WPA...
... is known as a pre-shared key as the security key. For "Encryption Technique", select "TKIP" or "AES". This patch woks only with Windows XP. 8 1. This patch woks only with Windows XP. 3 Your Router supports WPA-PSK (no server)". 9 2. It can be used in a home environment. 6 Setting WPA-PSK Note: To use WPA...
User Manual
Page 68
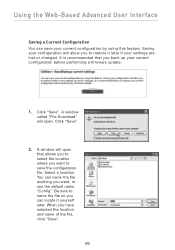
Click "Save". 2. A window will open that you to save your current configuration by using this feature. Using the Web-Based Advanced User Interface Saving a Current Configuration You can ... selected the location and name of the file, click "Save". 66 When you can locate it later if your current configuration before performing a firmware update. 1. A window called "File Download" will open . Saving your configuration will allow you back up your settings are lost or changed. Click "Save". It is recommended that...
Click "Save". 2. A window will open that you to save your current configuration by using this feature. Using the Web-Based Advanced User Interface Saving a Current Configuration You can ... selected the location and name of the file, click "Save". 66 When you can locate it later if your current configuration before performing a firmware update. 1. A window called "File Download" will open . Saving your configuration will allow you back up your settings are lost or changed. Click "Save". It is recommended that...
User Manual
Page 69
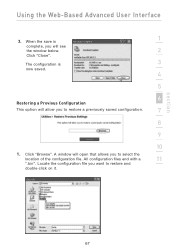
section 67 When the save is 3 now saved. 4 5 6 Restoring a Previous Configuration This option will allow you will open that allows you want to restore and double-click on it. Using the Web-Based Advanced User Interface 1 3. All configuration files end with a 11 ".bin". Locate the configuration file you to restore a previously saved configuration. 7 8 9 10 1. Click "Browse". A window will see the window below. 2 Click "Close". The configuration is complete, you to select the location of the configuration file.
section 67 When the save is 3 now saved. 4 5 6 Restoring a Previous Configuration This option will allow you will open that allows you want to restore and double-click on it. Using the Web-Based Advanced User Interface 1 3. All configuration files end with a 11 ".bin". Locate the configuration file you to restore a previously saved configuration. 7 8 9 10 1. Click "Browse". A window will see the window below. 2 Click "Close". The configuration is complete, you to select the location of the configuration file.

User Manual
Page 70
You will be restored. A 60-second countdown will take up to 60 seconds for the configuration restoration to continue. Click "OK". 3. When the countdown reaches zero, the Router's configuration will appear. It will appear on the screen. Click "OK". 4. Using the Web-Based Advanced User Interface 2. A reminder window will be asked if you want to complete. The Router home page should appear automatically. If not, type in the Router's address (default = 192.168.2.1) into the navigation bar of your browser. 68
You will be restored. A 60-second countdown will take up to 60 seconds for the configuration restoration to continue. Click "OK". 3. When the countdown reaches zero, the Router's configuration will appear. It will appear on the screen. Click "OK". 4. Using the Web-Based Advanced User Interface 2. A reminder window will be asked if you want to complete. The Router home page should appear automatically. If not, type in the Router's address (default = 192.168.2.1) into the navigation bar of your browser. 68
User Manual
Page 71
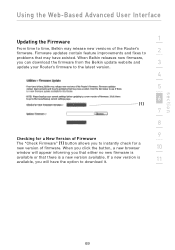
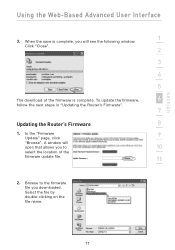
... Advanced User Interface 1 Updating the Firmware From time to download it. 11 section 69 When you click the button, a new browser 10 window will have existed. When Belkin releases new firmware, you that either no new firmware is available or that may have the option to time..."Check Firmware" (1) button allows you to 2 problems that there is available, you will appear informing you can download the firmware from the Belkin update website and 3 update your Router's firmware to the latest version. 4 5 6 (1) 7 8 9 Checking for a new version of the Router's firmware...
... Advanced User Interface 1 Updating the Firmware From time to download it. 11 section 69 When you click the button, a new browser 10 window will have existed. When Belkin releases new firmware, you that either no new firmware is available or that may have the option to time..."Check Firmware" (1) button allows you to 2 problems that there is available, you will appear informing you can download the firmware from the Belkin update website and 3 update your Router's firmware to the latest version. 4 5 6 (1) 7 8 9 Checking for a new version of the Router's firmware...
User Manual
Page 72
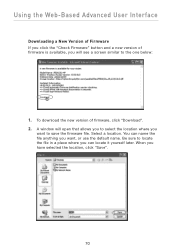
... the Web-Based Advanced User Interface Downloading a New Version of Firmware If you click the "Check Firmware" button and a new version of firmware, click "Download". 2. A window will see a screen similar to the one below: 1. Be sure to save the firmware file. When you want to locate the file in a place where...
... the Web-Based Advanced User Interface Downloading a New Version of Firmware If you click the "Check Firmware" button and a new version of firmware, click "Download". 2. A window will see a screen similar to the one below: 1. Be sure to save the firmware file. When you want to locate the file in a place where...
User Manual
Page 73
When the save is complete, you to the firmware file you downloaded. A window will open that allows you will see the following window. 1 Click "Close". 2 3 4 5 The download of the firmware update file. 11 2. To update the firmware, 6 follow the next steps in "Updating the Router's Firmware". 7 Updating the Router's Firmware 8 1. In the "Firmware 9 Update" page, click "Browse". section Using the Web-Based Advanced User Interface 3. Browse to 10 select the location of the firmware is complete. Select the file by double-clicking on the file name. 71
When the save is complete, you to the firmware file you downloaded. A window will open that allows you will see the following window. 1 Click "Close". 2 3 4 5 The download of the firmware update file. 11 2. To update the firmware, 6 follow the next steps in "Updating the Router's Firmware". 7 Updating the Router's Firmware 8 1. In the "Firmware 9 Update" page, click "Browse". section Using the Web-Based Advanced User Interface 3. Browse to 10 select the location of the firmware is complete. Select the file by double-clicking on the file name. 71

User Manual
Page 82
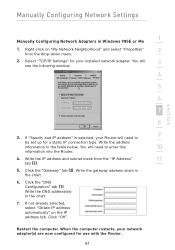
In the "Local Area Connection Properties" window, click "Internet Protocol (TCP/IP)" and click the "Properties" button. Your network settings are...your Router will appear: 5. If "Use the following screen will (1) (2) (3) need to be set up connections" icon (Windows 2000) or the "Network" icon (Windows XP). 3. If not already selected, select "Obtain an IP address automatically" (1) and "Obtain DNS server address automatically" (3).... with the Router. 80 Manually Configuring Network Settings Manually Configuring Network Settings in Windows 2000, NT, or XP 1. Click "OK".
In the "Local Area Connection Properties" window, click "Internet Protocol (TCP/IP)" and click the "Properties" button. Your network settings are...your Router will appear: 5. If "Use the following screen will (1) (2) (3) need to be set up connections" icon (Windows 2000) or the "Network" icon (Windows XP). 3. If not already selected, select "Obtain an IP address automatically" (1) and "Obtain DNS server address automatically" (3).... with the Router. 80 Manually Configuring Network Settings Manually Configuring Network Settings in Windows 2000, NT, or XP 1. Click "OK".
User Manual
Page 83
... configured for your Router will need to enter this 10 information into the Router. 4. You will 3 see the following window. 4 5 6 7 8 3. Write the IP address and subnet mask from the drop-down in Windows 98SE or Me 1 1. Click the "Gateway" tab (2). Manually Configuring Network Settings section Manually Configuring Network Adapters in the chart...
... configured for your Router will need to enter this 10 information into the Router. 4. You will 3 see the following window. 4 5 6 7 8 3. Write the IP address and subnet mask from the drop-down in Windows 98SE or Me 1 1. Click the "Gateway" tab (2). Manually Configuring Network Settings section Manually Configuring Network Adapters in the chart...

User Manual
Page 85
Start Netscape. Click "OK". In the "Proxies" window, select "Direct connection 11 to any of the displayed options: "Automatically detect settings", "Use automatic configuration script", and "Use a proxy server". section 83 Click on "Advanced" then select "Proxies". Then 2 click "OK" again in the "Internet Options" page. 3 4 5 6 7 8 Netscape Navigator 4.0 or Higher 9 1. Recommended Web Browser Settings 1 4. Make sure there are no check marks next to the Internet". In the "Preferences" window, click on "Edit" then "Preferences". 10 2.
Start Netscape. Click "OK". In the "Proxies" window, select "Direct connection 11 to any of the displayed options: "Automatically detect settings", "Use automatic configuration script", and "Use a proxy server". section 83 Click on "Advanced" then select "Proxies". Then 2 click "OK" again in the "Internet Options" page. 3 4 5 6 7 8 Netscape Navigator 4.0 or Higher 9 1. Recommended Web Browser Settings 1 4. Make sure there are no check marks next to the Internet". In the "Preferences" window, click on "Edit" then "Preferences". 10 2.
User Manual
Page 87
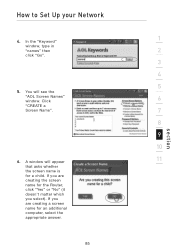
You will appear 11 that asks whether the screen name is for a child. If you are creating a screen name for the Router, click "Yes" or "No" (it doesn't matter which you are creating the screen name for an additional computer, select the appropriate answer. If you select). In the "Keyword" 1 window, type in "names" then 2 click "Go". 3 4 5 5. Click 6 "CREATE a Screen Name". 7 8 9 10 6. A window will see the "AOL Screen Names" window. section 85 How to Set Up your Network 4.
You will appear 11 that asks whether the screen name is for a child. If you are creating a screen name for the Router, click "Yes" or "No" (it doesn't matter which you are creating the screen name for an additional computer, select the appropriate answer. If you select). In the "Keyword" 1 window, type in "names" then 2 click "Go". 3 4 5 5. Click 6 "CREATE a Screen Name". 7 8 9 10 6. A window will see the "AOL Screen Names" window. section 85 How to Set Up your Network 4.


