
User Manual
Page 3
... and Advantages 2 Product Specifications 3 Knowing your Wireless Ethernet Bridge 4 Connecting the Hardware 5 Connecting the Bridge Using the Setup Wizard 6 Setting Up your Computer to Use Web-Based Setup Interface 13 Connecting the Bridge Using Web-Based Setup Interface 14 Status 14 Bridge Settings 16 Site Survey 19 Restart the Wireless Bridge 19 Restore Factory...
... and Advantages 2 Product Specifications 3 Knowing your Wireless Ethernet Bridge 4 Connecting the Hardware 5 Connecting the Bridge Using the Setup Wizard 6 Setting Up your Computer to Use Web-Based Setup Interface 13 Connecting the Bridge Using Web-Based Setup Interface 14 Status 14 Bridge Settings 16 Site Survey 19 Restart the Wireless Bridge 19 Restore Factory...
User Manual
Page 4
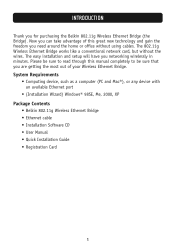
...great new technology and gain the freedom you can take advantage of your Wireless Ethernet Bridge. The easy installation and setup will have you for purchasing the Belkin 802.11g Wireless Ethernet Bridge (the Bridge). System Requirements • Computing device, such as a computer (PC ...and Mac®), or any device with an available Ethernet port • (Installation Wizard) Windows® 98SE, Me, 2000, XP Package Contents • Belkin 802.11g Wireless Ethernet Bridge • Ethernet cable • Installation Software CD • User Manual • Quick ...
...great new technology and gain the freedom you can take advantage of your Wireless Ethernet Bridge. The easy installation and setup will have you for purchasing the Belkin 802.11g Wireless Ethernet Bridge (the Bridge). System Requirements • Computing device, such as a computer (PC ...and Mac®), or any device with an available Ethernet port • (Installation Wizard) Windows® 98SE, Me, 2000, XP Package Contents • Belkin 802.11g Wireless Ethernet Bridge • Ethernet cable • Installation Software CD • User Manual • Quick ...

User Manual
Page 8
...set up the Bridge for advanced setup. 5 Non-Windows users, please refer to the "Setting Up your Computer to Use Web-Based Setup" section in this manual for special settings, you need to your Bridge by connecting the power supply cable to run the setup wizard from a PC or configure ...it using a web-based setup. Connect the included Ethernet network cable into a power outlet. 3. Then plug the other Ethernet-enabled device. 2. In ...
...set up the Bridge for advanced setup. 5 Non-Windows users, please refer to the "Setting Up your Computer to Use Web-Based Setup" section in this manual for special settings, you need to your Bridge by connecting the power supply cable to run the setup wizard from a PC or configure ...it using a web-based setup. Connect the included Ethernet network cable into a power outlet. 3. Then plug the other Ethernet-enabled device. 2. In ...
User Manual
Page 9
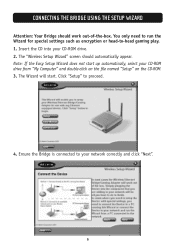
...-ROM drive from "My Computer" and double-click on the file named "Setup" on the CD-ROM. 3. Note: If the Easy Setup Wizard does not start . The Wizard will start up automatically, select your CD-ROM drive. 2. CONNECTING THE BRIDGE USING THE SETUP WIZARD Attention: Your Bridge should automatically appear. Ensure the Bridge is connected to...
...-ROM drive from "My Computer" and double-click on the file named "Setup" on the CD-ROM. 3. Note: If the Easy Setup Wizard does not start . The Wizard will start up automatically, select your CD-ROM drive. 2. CONNECTING THE BRIDGE USING THE SETUP WIZARD Attention: Your Bridge should automatically appear. Ensure the Bridge is connected to...
User Manual
Page 10
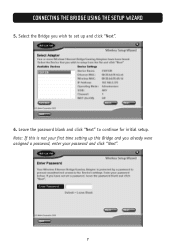
Leave the password blank and click "Next" to set up this is not your password and click "Next". 7 Select the Bridge you already were assigned a password, enter your first time setting up and click "Next". 6. CONNECTING THE BRIDGE USING THE SETUP WIZARD 5. Note: If this Bridge and you wish to continue for initial setup.
Leave the password blank and click "Next" to set up this is not your password and click "Next". 7 Select the Bridge you already were assigned a password, enter your first time setting up and click "Next". 6. CONNECTING THE BRIDGE USING THE SETUP WIZARD 5. Note: If this Bridge and you wish to continue for initial setup.

User Manual
Page 11
... this option is selected, the Bridge will attempt to connect to continue. 8. Access points will attempt to connect to continue. a b 8 CONNECTING THE BRIDGE USING THE SETUP WIZARD 7. Click "Next" to an available computer or device in the area. Select "Access point" or "Ad-Hoc" and click "Next" to an available network (access...
... this option is selected, the Bridge will attempt to connect to continue. 8. Access points will attempt to connect to continue. a b 8 CONNECTING THE BRIDGE USING THE SETUP WIZARD 7. Click "Next" to an available computer or device in the area. Select "Access point" or "Ad-Hoc" and click "Next" to an available network (access...
User Manual
Page 12
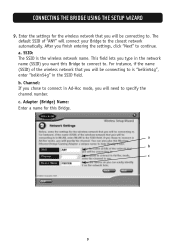
CONNECTING THE BRIDGE USING THE SETUP WIZARD 9. After you will connect your Bridge to . Adapter (Bridge) Name: Enter a name for the wireless network that you will be connecting to . b. a b c 9 c. The default SSID ...
CONNECTING THE BRIDGE USING THE SETUP WIZARD 9. After you will connect your Bridge to . Adapter (Bridge) Name: Enter a name for the wireless network that you will be connecting to . b. a b c 9 c. The default SSID ...
User Manual
Page 13
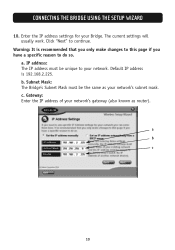
b. Subnet Mask: The Bridge's Subnet Mask must be the same as router). Enter the IP address settings for your network's gateway (also known as your network. Warning: It is 192.168.2.225. IP address: The IP address must be unique to your network's subnet mask. a. Gateway: Enter the IP address of your Bridge. a b c 10 Click "Next" to do so. The current settings will usually work. Default IP address is recommended that you only make changes to this page if you have a specific reason to continue. CONNECTING THE BRIDGE USING THE SETUP WIZARD 10. c.
b. Subnet Mask: The Bridge's Subnet Mask must be the same as router). Enter the IP address settings for your network's gateway (also known as your network. Warning: It is 192.168.2.225. IP address: The IP address must be unique to your network's subnet mask. a. Gateway: Enter the IP address of your Bridge. a b c 10 Click "Next" to do so. The current settings will usually work. Default IP address is recommended that you only make changes to this page if you have a specific reason to continue. CONNECTING THE BRIDGE USING THE SETUP WIZARD 10. c.
User Manual
Page 14
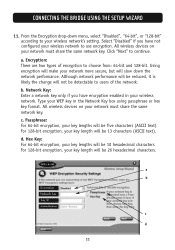
... Key box using passphrase or hex key format. All wireless devices on your network must share the same network key. CONNECTING THE BRIDGE USING THE SETUP WIZARD 11. Encryption: There are two types of the network. Using encryption will make your key length will not be 13 characters (ASCII text). For 128...
... Key box using passphrase or hex key format. All wireless devices on your network must share the same network key. CONNECTING THE BRIDGE USING THE SETUP WIZARD 11. Encryption: There are two types of the network. Using encryption will make your key length will not be 13 characters (ASCII text). For 128...
User Manual
Page 15
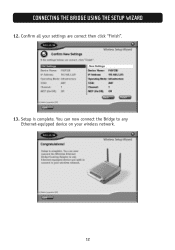
Setup is complete. Confirm all your wireless network. 12 CONNECTING THE BRIDGE USING THE SETUP WIZARD 12. You can now connect the Bridge to any Ethernet-equipped device on your settings are correct then click "Finish". 13.
Setup is complete. Confirm all your wireless network. 12 CONNECTING THE BRIDGE USING THE SETUP WIZARD 12. You can now connect the Bridge to any Ethernet-equipped device on your settings are correct then click "Finish". 13.


