
User Manual
Page 3
This automatic software determines your network settings for you for purchasing the Belkin Cable/DSL Gateway Router (the Router). Front-Panel Connected LED Display Lighted LEDs on the front of the Router indicate which functions are no disks to install or keep track of and, best of the Internet).... environments including Mac® OS 8.x, 9.x, X v10.x, AppleTalk®, Linux®, Windows® 95, 98, Me, NT®, 2000, and XP, and others. You'll know at-a-glance whether your Router. In minutes you are using the Alternative Method described in operation. Works with...
This automatic software determines your network settings for you for purchasing the Belkin Cable/DSL Gateway Router (the Router). Front-Panel Connected LED Display Lighted LEDs on the front of the Router indicate which functions are no disks to install or keep track of and, best of the Internet).... environments including Mac® OS 8.x, 9.x, X v10.x, AppleTalk®, Linux®, Windows® 95, 98, Me, NT®, 2000, and XP, and others. You'll know at-a-glance whether your Router. In minutes you are using the Alternative Method described in operation. Works with...
User Manual
Page 5
... Package Contents • Belkin Cable/DSL Gateway Router • Vertical Mounting Base (optional use) • Category 5 Networking Cable • Power Supply • Belkin Easy Install Wizard Software CD • User Manual System Requirements • Broadband Internet connection such as a cable or DSL modem with RJ45 (Ethernet... installed on each computer • CAT5 networking cable (or better) • Microsoft® Internet Explorer 4.0 or later, or Netscape® 4.0 or later Easy Install Wizard Software System Requirements • A PC running Windows 98, Me, 2000, or XP •...
... Package Contents • Belkin Cable/DSL Gateway Router • Vertical Mounting Base (optional use) • Category 5 Networking Cable • Power Supply • Belkin Easy Install Wizard Software CD • User Manual System Requirements • Broadband Internet connection such as a cable or DSL modem with RJ45 (Ethernet... installed on each computer • CAT5 networking cable (or better) • Microsoft® Internet Explorer 4.0 or later, or Netscape® 4.0 or later Easy Install Wizard Software System Requirements • A PC running Windows 98, Me, 2000, or XP •...

User Manual
Page 9
...Windows 98, Me, 2000, or XP computer be instructed to your Router. The Easy Install Wizard requires that your ISP, or you will be connected directly to use the RJ45 Ethernet port during the installation procedure. You can , in minutes. CONNECTING AND CONFIGURING YOUR CABLE/DSL GATEWAY ROUTER... Verify the contents of your Router a simple and easy task. Many modems have the following: • Belkin Cable/DSL Gateway Router • Vertical Mounting Base (optional use it is active and...
...Windows 98, Me, 2000, or XP computer be instructed to your Router. The Easy Install Wizard requires that your ISP, or you will be connected directly to use the RJ45 Ethernet port during the installation procedure. You can , in minutes. CONNECTING AND CONFIGURING YOUR CABLE/DSL GATEWAY ROUTER... Verify the contents of your Router a simple and easy task. Many modems have the following: • Belkin Cable/DSL Gateway Router • Vertical Mounting Base (optional use it is active and...

User Manual
Page 11
If you have not connected the Router at this point. When you are finished, select "I disagree" if you are ready to move on . 2.3 License Agreement Please read the license agreement in the window. Click "Next" to continue. Make sure you want to move on . CORPORATION Corporation 9 Click "Next" when you do not want to the modem. CONNECTING AND CONFIGURING YOUR CABLE/DSL GATEWAY ROUTER 2.2 Welcome Screen The Wizard welcome screen will appear. Click "I agree" if you have connected your Router, please reconnect your computer directly to continue using the software.
If you have not connected the Router at this point. When you are finished, select "I disagree" if you are ready to move on . 2.3 License Agreement Please read the license agreement in the window. Click "Next" to continue. Make sure you want to move on . CORPORATION Corporation 9 Click "Next" when you do not want to the modem. CONNECTING AND CONFIGURING YOUR CABLE/DSL GATEWAY ROUTER 2.2 Welcome Screen The Wizard welcome screen will appear. Click "I agree" if you have connected your Router, please reconnect your computer directly to continue using the software.
User Manual
Page 22
... make any changes to the Router's settings, you to log in this manual titled "Changing the Login Timeout Setting". 20 The default login time out is automatic. The home page is visible to any one of time. This can be logged out. In your browser window. Clicking the "Login" button... or clicking on the home page will see the section in . Clicking the "Logout" button will time out after a specified period of the links on any user who wants to 99 minutes. For more information, see the Router's home page in ...
... make any changes to the Router's settings, you to log in this manual titled "Changing the Login Timeout Setting". 20 The default login time out is automatic. The home page is visible to any one of time. This can be logged out. In your browser window. Clicking the "Login" button... or clicking on the home page will see the section in . Clicking the "Logout" button will time out after a specified period of the links on any user who wants to 99 minutes. For more information, see the Router's home page in ...

User Manual
Page 34
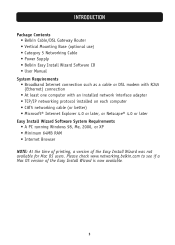
...Internet browser, you to view the list of connected computers, click on the header of the LAN tab (A) will see the Router's home page in anything else such as "http://" or "www") then press the "Enter" key. Viewing the LAN Settings..."DHCP client list" (C). (A) (B) (C) 32 To view the settings or make changes to any of the functions can access the Router's Web-Based Advanced User Interface. A quick description of the LAN settings, click on "LAN Settings" (B) or to the LAN ... your browser, type "192.168.2.1" (do not type in your browser window. You will take you can be found here.
...Internet browser, you to view the list of connected computers, click on the header of the LAN tab (A) will see the Router's home page in anything else such as "http://" or "www") then press the "Enter" key. Viewing the LAN Settings..."DHCP client list" (C). (A) (B) (C) 32 To view the settings or make changes to any of the functions can access the Router's Web-Based Advanced User Interface. A quick description of the LAN settings, click on "LAN Settings" (B) or to the LAN ... your browser, type "192.168.2.1" (do not type in your browser window. You will take you can be found here.

User Manual
Page 49
Click "Save". Saving your configuration will open. USING THE WEB-BASED ADVANCED USER INTERFACE Saving a Current Configuration You can save your settings are lost or changed. A window called "File Download" will allow you back up your current configuration before performing a firmware update. 1. It is recommended that you to restore it later if your current configuration by using this feature. Click "Save". 47
Click "Save". Saving your configuration will open. USING THE WEB-BASED ADVANCED USER INTERFACE Saving a Current Configuration You can save your settings are lost or changed. A window called "File Download" will allow you back up your current configuration before performing a firmware update. 1. It is recommended that you to restore it later if your current configuration by using this feature. Click "Save". 47

User Manual
Page 50
You can locate it yourself later. When you want to name the file so you can name the file anything you have selected the location and name of the file, click "Save". 3. When the save is now saved. 48 Be sure to save the configuration file. Click "Close". Select a location. The configuration is complete, you will open that allows you to select the location where you want , or use the default name "Config". USING THE WEB-BASED ADVANCED USER INTERFACE 2. A window will see the window below.
You can locate it yourself later. When you want to name the file so you can name the file anything you have selected the location and name of the file, click "Save". 3. When the save is now saved. 48 Be sure to save the configuration file. Click "Close". Select a location. The configuration is complete, you will open that allows you to select the location where you want , or use the default name "Config". USING THE WEB-BASED ADVANCED USER INTERFACE 2. A window will see the window below.

User Manual
Page 51
Click "Browse". A window will open that allows you to restore a previously saved configuration. 1. USING THE WEB-BASED ADVANCED USER INTERFACE Restoring a Previous Configuration This option will allow you to select the location of the configuration file. All configuration files end with a ".bin". Locate the configuration file you want to continue. You will be asked if you want to restore and double-click on it. 2. Click "OK". 49
Click "Browse". A window will open that allows you to restore a previously saved configuration. 1. USING THE WEB-BASED ADVANCED USER INTERFACE Restoring a Previous Configuration This option will allow you to select the location of the configuration file. All configuration files end with a ".bin". Locate the configuration file you want to continue. You will be asked if you want to restore and double-click on it. 2. Click "OK". 49

User Manual
Page 52
Click "OK". 4. A 60-second countdown will take up to 60 seconds for the configuration restoration to complete. If not, type in the Router's address (default = 192.168.2.1) into the navigation bar of your browser. 50 It will appear on the screen. When the countdown reaches zero, the Router's configuration will appear. USING THE WEB-BASED ADVANCED USER INTERFACE 3. The Router home page should appear automatically. A reminder window will be restored.
Click "OK". 4. A 60-second countdown will take up to 60 seconds for the configuration restoration to complete. If not, type in the Router's address (default = 192.168.2.1) into the navigation bar of your browser. 50 It will appear on the screen. When the countdown reaches zero, the Router's configuration will appear. USING THE WEB-BASED ADVANCED USER INTERFACE 3. The Router home page should appear automatically. A reminder window will be restored.

User Manual
Page 53
..., you will appear informing you click the button, a new browser window will have existed. Downloading a New Version of Firmware If you can download the firmware from the Belkin update website and update your Router's firmware to the latest version. To download the new version of firmware.... USING THE WEB-BASED ADVANCED USER INTERFACE Updating Firmware From time to time, Belkin may have the option to download it....
..., you will appear informing you click the button, a new browser window will have existed. Downloading a New Version of Firmware If you can download the firmware from the Belkin update website and update your Router's firmware to the latest version. To download the new version of firmware.... USING THE WEB-BASED ADVANCED USER INTERFACE Updating Firmware From time to time, Belkin may have the option to download it....

User Manual
Page 54
When you will open that allows you to select the location where you want to locate the file in "Updating the Router's Firmware". 52 To update the firmware, follow the next steps in a place where you want, or use the default name. Be sure to save is complete. When the save the firmware file. You can name the file anything you can locate it yoursellater. Click "Close". A window will see the following window. Select a location. The download of the firmware is complete, you have selected the location, click "Save". 3. USING THE WEB-BASED ADVANCED USER INTERFACE 2.
When you will open that allows you to select the location where you want to locate the file in "Updating the Router's Firmware". 52 To update the firmware, follow the next steps in a place where you want, or use the default name. Be sure to save is complete. When the save the firmware file. You can name the file anything you can locate it yoursellater. Click "Close". A window will see the following window. Select a location. The download of the firmware is complete, you have selected the location, click "Save". 3. USING THE WEB-BASED ADVANCED USER INTERFACE 2.

User Manual
Page 55
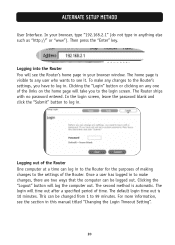
USING THE WEB-BASED ADVANCED USER INTERFACE Updating the Router's Firmware 1. All firmware files end with a ".dlf". 2. Select the file by double-clicking on the file name. 3. Click "OK". 53 Browse to continue. Click "Update". 4. You will be asked if you are sure you want to the firmware file you just selected. The "Update Firmware" box will open that allows you to select the location of the firmware file you downloaded. In the "Firmware Update" page, click "Browse" (2). A window will now display the location and name of the firmware update file.
USING THE WEB-BASED ADVANCED USER INTERFACE Updating the Router's Firmware 1. All firmware files end with a ".dlf". 2. Select the file by double-clicking on the file name. 3. Click "OK". 53 Browse to continue. Click "Update". 4. You will be asked if you are sure you want to the firmware file you just selected. The "Update Firmware" box will open that allows you to select the location of the firmware file you downloaded. In the "Firmware Update" page, click "Browse" (2). A window will now display the location and name of the firmware update file.

User Manual
Page 61
... the "Connect via:" drop-down the Apple menu. Write the address information in Mac OS up to obtain an IP address from the Router. 5. This will need to be set up for use these steps. Pull down menu (1). (1) (2) 3. Click "Save". When the computer restarts, your...for a static IP connection type. If you made any changes, the following window will see the TCP/IP control panel. Manually Configuring Network Settings in the table below. Next to "Configure" (2), if "Manually" is connected to the cable or DSL modem FIRST using these steps to add computers to the Internet.
... the "Connect via:" drop-down the Apple menu. Write the address information in Mac OS up to obtain an IP address from the Router. 5. This will need to be set up for use these steps. Pull down menu (1). (1) (2) 3. Click "Save". When the computer restarts, your...for a static IP connection type. If you made any changes, the following window will see the TCP/IP control panel. Manually Configuring Network Settings in the table below. Next to "Configure" (2), if "Manually" is connected to the cable or DSL modem FIRST using these steps to add computers to the Internet.

User Manual
Page 64
...Settings", then "Control Panel". 2. In the "Local Area Connection Properties" window, click "Internet Protocol (TCP/IP)" and click the "Properties" button. If "Use the following screen will need to enter this information into the Router. 6. Write the address information the table below. Double-click on the ..., NT, or XP 1. Right-click on the "Network and dial-up for use with your Router will need to be set up connections" icon (Windows 2000) or the "Network" icon (Windows XP). 3. The following IP address" (2) is selected, your network adapter and select "Properties" from...
...Settings", then "Control Panel". 2. In the "Local Area Connection Properties" window, click "Internet Protocol (TCP/IP)" and click the "Properties" button. If "Use the following screen will need to enter this information into the Router. 6. Write the address information the table below. Double-click on the ..., NT, or XP 1. Right-click on the "Network and dial-up for use with your Router will need to be set up connections" icon (Windows 2000) or the "Network" icon (Windows XP). 3. The following IP address" (2) is selected, your network adapter and select "Properties" from...

User Manual
Page 65
... for a static IP connection type. Write the gateway address down menu. 2. Click the "DNS Configuration" tab (1). You will need to enter this window. (1) (3) (2) 3. After restarting, your network settings are now configured for your Router will see this information into the Router. 4. Write the address information in Windows 98 or Me 1. MANUALLY CONFIGURING NETWORK SETTINGS Configuring...
... for a static IP connection type. Write the gateway address down menu. 2. Click the "DNS Configuration" tab (1). You will need to enter this window. (1) (3) (2) 3. After restarting, your network settings are now configured for your Router will see this information into the Router. 4. Write the address information in Windows 98 or Me 1. MANUALLY CONFIGURING NETWORK SETTINGS Configuring...

User Manual
Page 68
Click on "Advanced" then select "Proxies". In the "Preferences" window, click on "Edit" then "Preferences". 2. In the "Proxies" window, select "Direct connection to the Internet". 66 Start Netscape. RECOMMENDED WEB BROWSER SETTINGS Netscape Navigator 4.0 or Higher 1.
Click on "Advanced" then select "Proxies". In the "Preferences" window, click on "Edit" then "Preferences". 2. In the "Proxies" window, select "Direct connection to the Internet". 66 Start Netscape. RECOMMENDED WEB BROWSER SETTINGS Netscape Navigator 4.0 or Higher 1.