

Installation Guide
Page 1
VOH681A Drop Down Video Monitor VOH682A Drop Down TV / Video Monitor ON OFF AUTO OPEN Installation Guide
VOH681A Drop Down Video Monitor VOH682A Drop Down TV / Video Monitor ON OFF AUTO OPEN Installation Guide

Installation Guide
Page 2
Please note that is located in a motor vehicle. Important Notice It is unlawful in most jurisdictions for a person to drive a motor vehicle which is equipped with a television viewer or screen that is visible directly or indirectly to the operator of such a device in the motor vehicle at any point forward of the back of the driver's seat, or that the state of Rhode Island forbids the installation of the motor vehicle.
Please note that is located in a motor vehicle. Important Notice It is unlawful in most jurisdictions for a person to drive a motor vehicle which is equipped with a television viewer or screen that is visible directly or indirectly to the operator of such a device in the motor vehicle at any point forward of the back of the driver's seat, or that the state of Rhode Island forbids the installation of the motor vehicle.

Installation Guide
Page 3
... verify 12 volt DC and continuity: Do not use a test light or logic probe) Marker pen - MATERIALS INCLUDED IN THIS PACKAGE: 1) VOH681A Video Monitor with out TV Tuner / VOH682A Video Monitor with TV Tuner (1 pc) 2) Accessory Harness (P/N 8010730) (1 pc) 3) 12 Pin Power / Signal harness (P/N 112B2821) (1 pc) 4) 2 Pin Power Wire Harness with choke (P/N 112B2824... Razor Knife or Shears Wire Strippers Upholstery hook tool (for removal of panels as necessary) Electrical Tape Masking Tape Multimeter (to verify system operation after installation) -1-
... verify 12 volt DC and continuity: Do not use a test light or logic probe) Marker pen - MATERIALS INCLUDED IN THIS PACKAGE: 1) VOH681A Video Monitor with out TV Tuner / VOH682A Video Monitor with TV Tuner (1 pc) 2) Accessory Harness (P/N 8010730) (1 pc) 3) 12 Pin Power / Signal harness (P/N 112B2821) (1 pc) 4) 2 Pin Power Wire Harness with choke (P/N 112B2824... Razor Knife or Shears Wire Strippers Upholstery hook tool (for removal of panels as necessary) Electrical Tape Masking Tape Multimeter (to verify system operation after installation) -1-

Installation Guide
Page 4
... component) -Same as follows: a) Remote headphone jacks can be added to a VOH682A system using the speaker outputs. Refer to the wiring diagram on p7. -The VOH681A and VOH 682A video systems are fully installed. b) Additional speakers can be added as system 1 but TV antenna must be ... to the Wiring Diagrams on pages 6 and 7 of this package. -Headphones are possible with the VOH681A and VOH 682A series Drop Down Video Systems: System 1: Video Monitor without tuner (VOH681A), VCP. -All wiring necessary is protected from their respective locations. 7) Connect all components together...
... component) -Same as follows: a) Remote headphone jacks can be added to a VOH682A system using the speaker outputs. Refer to the wiring diagram on p7. -The VOH681A and VOH 682A video systems are fully installed. b) Additional speakers can be added as system 1 but TV antenna must be ... to the Wiring Diagrams on pages 6 and 7 of this package. -Headphones are possible with the VOH681A and VOH 682A series Drop Down Video Systems: System 1: Video Monitor without tuner (VOH681A), VCP. -All wiring necessary is protected from their respective locations. 7) Connect all components together...

Installation Guide
Page 5
... is in the headliner. Refer to cut out the headliner, the box that the video monitor rests on and trace the opening onto the headliner for cutting Figure 3 4 FULL SIZE CONSOLE INSTALLATION There are several additional features, and are particularly useful if the vehicle you to the...vehicle to vehicle, so this manual will only focus on the installation of the video monitor and related console accessories. 3) Generally, the best location for the video monitor is where the vehicle's factory dome light is installed. The monitor should be located in this manual. THIS IS NOT ONLY DANGEROUS,...
... is in the headliner. Refer to cut out the headliner, the box that the video monitor rests on and trace the opening onto the headliner for cutting Figure 3 4 FULL SIZE CONSOLE INSTALLATION There are several additional features, and are particularly useful if the vehicle you to the...vehicle to vehicle, so this manual will only focus on the installation of the video monitor and related console accessories. 3) Generally, the best location for the video monitor is where the vehicle's factory dome light is installed. The monitor should be located in this manual. THIS IS NOT ONLY DANGEROUS,...
Installation Guide
Page 6
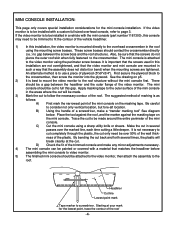
..., but fore-aft location. There should be attached to the video monitor, then attach the assembly to the overhead crossmember in a vehicle with the mini console (part number 1181300), this console may need be installed with a material that the assembly does not distort (or bend) ...of the plastic. By bending the cut only need to be trimmed to fit the contour of the vehicle headliner. 1) In this installation, the video monitor is to be a gap between the screw boss and the roof structure). Stacrotinnsgoleatto yviodeuorpmodaarnkd video pod to cut completely through the plastic...
..., but fore-aft location. There should be attached to the video monitor, then attach the assembly to the overhead crossmember in a vehicle with the mini console (part number 1181300), this console may need be installed with a material that the assembly does not distort (or bend) ...of the plastic. By bending the cut only need to be trimmed to fit the contour of the vehicle headliner. 1) In this installation, the video monitor is to be a gap between the screw boss and the roof structure). Stacrotinnsgoleatto yviodeuorpmodaarnkd video pod to cut completely through the plastic...

Installation Guide
Page 8
... the 12 pin harness to the mating connector on the Video Monitor. 6) Connect the wired RF Modulator and / or the remote headphone jacks to the video monitor if those options are being included. 7) Connect power harness to the video monitor system using the 2 screws. 9) Verify all functions of the... FM Modulator Output 12 VDC Power and Ground Left Am/Fm Input Antenna FM Modulator Dash Radio 1070610 Right *Refer to Instructions with Non-Stereo Installations Item# 35b 1) Make the connections to IR Window on main PCB) 2= 2nd VCP (or game or DVD, etc..... A/V Source Definitions: 1= ...
... the 12 pin harness to the mating connector on the Video Monitor. 6) Connect the wired RF Modulator and / or the remote headphone jacks to the video monitor if those options are being included. 7) Connect power harness to the video monitor system using the 2 screws. 9) Verify all functions of the... FM Modulator Output 12 VDC Power and Ground Left Am/Fm Input Antenna FM Modulator Dash Radio 1070610 Right *Refer to Instructions with Non-Stereo Installations Item# 35b 1) Make the connections to IR Window on main PCB) 2= 2nd VCP (or game or DVD, etc..... A/V Source Definitions: 1= ...

Installation Guide
Page 9
...#5 3b 1) Make the connections to the mating connector on the Face of the monitor). A/V Source Definitions: 1= VCP (right Mini Din on the main PCB as shown. Note: Installation Guide covers models : VOH682A. -7- This second harness would plug into the Mini-Din Connector on the main PCB. 4) Pull ...the wire tie loop tight and cut off the excess. 5) Connect the Power Harness to the vehicle for further details. VOH682A Note: cables exiting the...
...#5 3b 1) Make the connections to the mating connector on the Face of the monitor). A/V Source Definitions: 1= VCP (right Mini Din on the main PCB as shown. Note: Installation Guide covers models : VOH682A. -7- This second harness would plug into the Mini-Din Connector on the main PCB. 4) Pull ...the wire tie loop tight and cut off the excess. 5) Connect the Power Harness to the vehicle for further details. VOH682A Note: cables exiting the...

