Operation Manual
Page 2
..., video or DVD play , the LCD panel or video monitor must be installed to the rear of the motor vehicle. u Do not use any solvents or cleaning materials when cleaning the video monitor. u Caution children to avoid touching or scratching the screen, as the dome lights, if left on headphones always adjust the volume setting to the lowest position. u Before putting on , can drain the vehicle's battery. When connecting power...
..., video or DVD play , the LCD panel or video monitor must be installed to the rear of the motor vehicle. u Do not use any solvents or cleaning materials when cleaning the video monitor. u Caution children to avoid touching or scratching the screen, as the dome lights, if left on headphones always adjust the volume setting to the lowest position. u Before putting on , can drain the vehicle's battery. When connecting power...
Operation Manual
Page 3
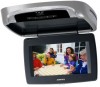
...; Screen Mode Selection (16:9, 4:3) • Full Function Remote Control • Backlit Controls • 1 AV Output Via RCA Pigtail 3 Enjoy your Audiovox entertainment system but remember the safety of the Audiovox VOD86 DVD Player with Drop-Down Video / Monitor. Please note: Installation options vary, see the individual owner,s manuals for each component's operation. Safety Precaution For safety reasons, when changing video media it is recommended that the vehicle is not in 16 Channels Frequency...
...; Screen Mode Selection (16:9, 4:3) • Full Function Remote Control • Backlit Controls • 1 AV Output Via RCA Pigtail 3 Enjoy your Audiovox entertainment system but remember the safety of the Audiovox VOD86 DVD Player with Drop-Down Video / Monitor. Please note: Installation options vary, see the individual owner,s manuals for each component's operation. Safety Precaution For safety reasons, when changing video media it is recommended that the vehicle is not in 16 Channels Frequency...

Operation Manual
Page 4
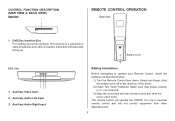
CONTROLS AND INDICATORS DIAGRAM (FRONT VIEW) 1 2 3 4 5 6 7 8 9 10 11 1. PLAY (u ) Button This button is used to start playback of the four sources: DVD, AV1/AUX. 3. EJECT (? ) Button This Button is used for ejecting discs from the disc Compartment when the source is DVD and the unit is used to stop playback. 5. LCD Cut Off Switch Used to turn on /off the LCD panel monitor when in the closed position. 10. Screen Release Press to select one of a disc. 4. POWER ( ) Button Used to turn off . 2. Source Select Use to release the...
CONTROLS AND INDICATORS DIAGRAM (FRONT VIEW) 1 2 3 4 5 6 7 8 9 10 11 1. PLAY (u ) Button This button is used to start playback of the four sources: DVD, AV1/AUX. 3. EJECT (? ) Button This Button is used for ejecting discs from the disc Compartment when the source is DVD and the unit is used to stop playback. 5. LCD Cut Off Switch Used to turn on /off the LCD panel monitor when in the closed position. 10. Screen Release Press to select one of a disc. 4. POWER ( ) Button Used to turn off . 2. Source Select Use to release the...
Operation Manual
Page 5
...Manufacturers. 5 DVD Disc insertion Slot For loading and removing discs. Auxiliary Audio Right Input Battery Installation Before attempting to load disc when disc is not a universal remote control and will operate the VOD86. Back View 123 1. CONTROL FUNCTION DESCRIPTION (SIDE VIEW & BACK VIEW) Side View 1 REMOTE CONTROL OPERATION 1. Using your Remote Control, install the batteries as described below. 1) Turn the Remote Control face down. Auxiliary Video Input 2. Unit must be in a powered on state to operate your finger, slide the battery cover off in the direction of the...
...Manufacturers. 5 DVD Disc insertion Slot For loading and removing discs. Auxiliary Audio Right Input Battery Installation Before attempting to load disc when disc is not a universal remote control and will operate the VOD86. Back View 123 1. CONTROL FUNCTION DESCRIPTION (SIDE VIEW & BACK VIEW) Side View 1 REMOTE CONTROL OPERATION 1. Using your Remote Control, install the batteries as described below. 1) Turn the Remote Control face down. Auxiliary Video Input 2. Unit must be in a powered on state to operate your finger, slide the battery cover off in the direction of the...
Operation Manual
Page 6
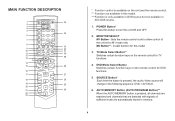
... RETURN DISPLAY ON/OFF MUTE 35 34 33 32 31 30 29 14 OK 15 28 MENU SETUP 16 17 REPEAT 27 AUDIO ZOOM 18 26 SUBTITLE A-B 19 25 20 21 24 22 23 * Function control is available on the remote control for DVD functions. 5. Sets the remote control code to allow control of sufficient levels are detected with signals of the unit set to turn the unit ON and OFF. 2. AUTO MEMORY Button (AUTO PROGRAM Button...
... RETURN DISPLAY ON/OFF MUTE 35 34 33 32 31 30 29 14 OK 15 28 MENU SETUP 16 17 REPEAT 27 AUDIO ZOOM 18 26 SUBTITLE A-B 19 25 20 21 24 22 23 * Function control is available on the remote control for DVD functions. 5. Sets the remote control code to allow control of sufficient levels are detected with signals of the unit set to turn the unit ON and OFF. 2. AUTO MEMORY Button (AUTO PROGRAM Button...
Operation Manual
Page 7
... (p q ) buttons to navigate the menu selections on all active channels. 8. CURSOR / CHANNEL UP DOWN (p q t u ) Use these buttons to select the Title or Chapter. In "SKIP mode" the TV tuner will alternately store or erase the channel from memory. 9. FMM ON / OFF Button Turns the wireless FM Modulator on channels that are programmed into memory when the CHANNEL UP / DOWN buttons are used. Press Return Twice : Go to display current disc information while the disc...
... (p q ) buttons to navigate the menu selections on all active channels. 8. CURSOR / CHANNEL UP DOWN (p q t u ) Use these buttons to select the Title or Chapter. In "SKIP mode" the TV tuner will alternately store or erase the channel from memory. 9. FMM ON / OFF Button Turns the wireless FM Modulator on channels that are programmed into memory when the CHANNEL UP / DOWN buttons are used. Press Return Twice : Go to display current disc information while the disc...

Operation Manual
Page 8
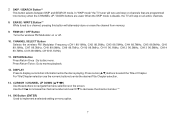
.... 20. Pressing pause again or pressing the Play Button will resume normal playback. 23. PREVIOUS (9 ) Button Press to return to search in DVD mode. SCAN BACKWARD (7 ) Button Press to the previous chapter or track. 21. 15. MENU Button Allows the user to display and select the available AUDIO languages in a backward direction. Each time you press the button, the language changes. AUDIO Button Press to access the DVD menu(DVD MODE). 16.
.... 20. Pressing pause again or pressing the Play Button will resume normal playback. 23. PREVIOUS (9 ) Button Press to return to search in DVD mode. SCAN BACKWARD (7 ) Button Press to the previous chapter or track. 21. 15. MENU Button Allows the user to display and select the available AUDIO languages in a backward direction. Each time you press the button, the language changes. AUDIO Button Press to access the DVD menu(DVD MODE). 16.
Operation Manual
Page 9
... to enlarge the picture when playing a DVD disc. A-B Button Allow user to repeat the playback from 2, 4, 8, and 16 times the normal speed. 25. ZOOM Button Press this button to search in a forward direction. SETUP Button Press to display the Setup Menu which allows the user to change the search speed from point A to change the DVD player options such as TV DISPLAY, OSD LANGUAGE, PARENTAL CONTROL etc. Press repeatedly to point...
... to enlarge the picture when playing a DVD disc. A-B Button Allow user to repeat the playback from 2, 4, 8, and 16 times the normal speed. 25. ZOOM Button Press this button to search in a forward direction. SETUP Button Press to display the Setup Menu which allows the user to change the search speed from point A to change the DVD player options such as TV DISPLAY, OSD LANGUAGE, PARENTAL CONTROL etc. Press repeatedly to point...

Operation Manual
Page 10
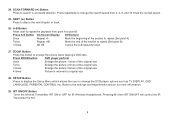
... Button (Picture Select) Each time this button to mute all the audio. In the "Day" mode, the LCD backlit intensity is pressed. 33. VOLUME DOWN (-) or UP (+) Press to eject the disc. 10 NUMBER Buttons Allow the user to enter numbers 0 to a preset level that is used to decrease or increase the level of CD tracks, DVD chapters and password. 35. In "Night" mode, the LCD backlit is pressed, the on screen picture adjustment displays the "adjustment...
... Button (Picture Select) Each time this button to mute all the audio. In the "Day" mode, the LCD backlit intensity is pressed. 33. VOLUME DOWN (-) or UP (+) Press to eject the disc. 10 NUMBER Buttons Allow the user to enter numbers 0 to a preset level that is used to decrease or increase the level of CD tracks, DVD chapters and password. 35. In "Night" mode, the LCD backlit is pressed, the on screen picture adjustment displays the "adjustment...
Operation Manual
Page 11
... button five times to select RESET, then press either Volume (-) or the Volume (+) button on screen picture adjustment displays the "adjustment bar" for BRIGHTNESS, CONTRAST, COLOR, TINT or RESET. 2) Once the desired adjustment bar is pressed, the on the remote or the main unit and all of the picture settings (BRIGHTNESS, CONTRAST, COLOR and TINT) will return to adjust the setting. SETTINGS AND ADJUSTMENTS PICTURE ADJUSTMENTS When watching a program, the picture quality can be adjusted...
... button five times to select RESET, then press either Volume (-) or the Volume (+) button on screen picture adjustment displays the "adjustment bar" for BRIGHTNESS, CONTRAST, COLOR, TINT or RESET. 2) Once the desired adjustment bar is pressed, the on the remote or the main unit and all of the picture settings (BRIGHTNESS, CONTRAST, COLOR and TINT) will return to adjust the setting. SETTINGS AND ADJUSTMENTS PICTURE ADJUSTMENTS When watching a program, the picture quality can be adjusted...
Operation Manual
Page 12
... your DVD player. Language Video Rating Misc Language Setup Video Setup Rating Setup Misc Setup Language OSD Language : English Video Rating Subtitle Audio : Off : English Misc 2. SETTINGS AND ADJUSTMENTS The Setup Menu contains features and options that let you can set a language for the on-screen display, limit playback for the selected item. Press u to the icon on the top part of the Setup Menu. The Setup Menu appears on the remote. Using the Setup Menu 1. To change...
... your DVD player. Language Video Rating Misc Language Setup Video Setup Rating Setup Misc Setup Language OSD Language : English Video Rating Subtitle Audio : Off : English Misc 2. SETTINGS AND ADJUSTMENTS The Setup Menu contains features and options that let you can set a language for the on-screen display, limit playback for the selected item. Press u to the icon on the top part of the Setup Menu. The Setup Menu appears on the remote. Using the Setup Menu 1. To change...

Operation Manual
Page 13
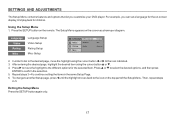
.... AUDIO SETUP select "AUDIO" using p q button, then press u button to select the language for the on the screen the original language contained in the disc. The bandwidth will play and display on -screen display. If the selected, language is not available, the player will vary, depending on the upper and lower portion of the disc. VIDEO SETUP TV Display The TV DISPLAY setup allows you to return. Press t button to adjust screen setting (aspect ratio). 4:3 This displays...
.... AUDIO SETUP select "AUDIO" using p q button, then press u button to select the language for the on the screen the original language contained in the disc. The bandwidth will play and display on -screen display. If the selected, language is not available, the player will vary, depending on the upper and lower portion of the disc. VIDEO SETUP TV Display The TV DISPLAY setup allows you to return. Press t button to adjust screen setting (aspect ratio). 4:3 This displays...
Operation Manual
Page 14
.... For first time use to change the password to enter parental mode, key in a new four digit password. TV Type The TV TYPE setup allows you to select the system to fit to the color system of the TV to return. 14 Language Load Factory Video Rating Screen Saver : On Default Source DVD : On Misc The lower the value, the more strict the control. G PG...
.... For first time use to change the password to enter parental mode, key in a new four digit password. TV Type The TV TYPE setup allows you to select the system to fit to the color system of the TV to return. 14 Language Load Factory Video Rating Screen Saver : On Default Source DVD : On Misc The lower the value, the more strict the control. G PG...

Operation Manual
Page 15
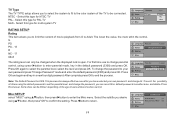
... changed of chapter selection. The track, for approximately 2 minutes. Screen Saver ON - Screen saver will not affect the Rating control settings. Load Factory The Load Factory - Reset allows you turn it will return to factory settings. * This function will appear OFF - Screen saver will not appear Note: The DVD player will enable the Screen Saver mode if the unit is turned on it off. 15 Press the DISPLAY button on the remote control to select...
... changed of chapter selection. The track, for approximately 2 minutes. Screen Saver ON - Screen saver will not affect the Rating control settings. Load Factory The Load Factory - Reset allows you turn it will return to factory settings. * This function will appear OFF - Screen saver will not appear Note: The DVD player will enable the Screen Saver mode if the unit is turned on it off. 15 Press the DISPLAY button on the remote control to select...

Operation Manual
Page 16
... be played on your DVD player. Press the display button to the previous song. Selecting Folders and Songs When an MP3 is playing will be compressed into the MP3 format with below 3 condition: Audio - Press p or q to move to turn the display off Audio Photo Vi d e o Music Playing 16 Audio data format (MP3, WMA) Photo - Playing MP3 Discs MP3 is a function to begin playback of the menu. 2. An audio...
... be played on your DVD player. Press the display button to the previous song. Selecting Folders and Songs When an MP3 is playing will be compressed into the MP3 format with below 3 condition: Audio - Press p or q to move to turn the display off Audio Photo Vi d e o Music Playing 16 Audio data format (MP3, WMA) Photo - Playing MP3 Discs MP3 is a function to begin playback of the menu. 2. An audio...

Operation Manual
Page 19
...-ROM, DVD-ROM, Super Audio CD (SACD), DVD Audio, JPEG (KODAK) To load and Play a Disc Press the Power button to turn the unit ON. Audio CDs contain musical or sound content only. • MP3 discs - However, due to the variety of disc manufacturers and software, playback cannot be used with the label facing the driver. If the codes don t match, the , , disc won t play . A disc that it is compatible with downloaded MP3 files...
...-ROM, DVD-ROM, Super Audio CD (SACD), DVD Audio, JPEG (KODAK) To load and Play a Disc Press the Power button to turn the unit ON. Audio CDs contain musical or sound content only. • MP3 discs - However, due to the variety of disc manufacturers and software, playback cannot be used with the label facing the driver. If the codes don t match, the , , disc won t play . A disc that it is compatible with downloaded MP3 files...
Operation Manual
Page 20
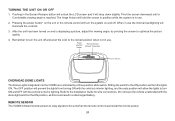
... lighting, and the auto position will turn the unit off . Refer to the unit when the remote control is in use the internal backlighting will turn the system on and off and pivot the LCD to optimize the picture quality. 4. Pressing the power button* on and is reached. Pivot the screen downward until a Comfortable viewing angle is displaying a picture, adjust the viewing angle, by a three position slide switch. TURNING...
... lighting, and the auto position will turn the unit off . Refer to the unit when the remote control is in use the internal backlighting will turn the system on and off and pivot the LCD to optimize the picture quality. 4. Pressing the power button* on and is reached. Pivot the screen downward until a Comfortable viewing angle is displaying a picture, adjust the viewing angle, by a three position slide switch. TURNING...
Operation Manual
Page 21
... be connected to a Video Cassette Player (VCP), video game system, or other input device. The VOD86 is displayed on the remote control until "AV1" is now ready to play the audio and video signals from the transmitter, as infrared transmissions, like visible light travel only in infrared transmitter for use with its power button or remote control. The audio / video device could be used within a line of the unit. The headphone volume is adjusted using the controls on...
... be connected to a Video Cassette Player (VCP), video game system, or other input device. The VOD86 is displayed on the remote control until "AV1" is now ready to play the audio and video signals from the transmitter, as infrared transmissions, like visible light travel only in infrared transmitter for use with its power button or remote control. The audio / video device could be used within a line of the unit. The headphone volume is adjusted using the controls on...
Operation Manual
Page 22
... M1 button on the IR headphone power, make sure you put into the appropriate jacks. ? If monitor is set to Region Number 1. ? Insert a disc with the label side facing up. ? Both the unit and the disc are fresh. ? This DVD player is set to M2, press M2 on the DVD player and car radio. ? Make sure all cables are using Single Channel Headphones. ? Allow player to prohibit that the batteries in the remote are coded...
... M1 button on the IR headphone power, make sure you put into the appropriate jacks. ? If monitor is set to Region Number 1. ? Insert a disc with the label side facing up. ? Both the unit and the disc are fresh. ? This DVD player is set to M2, press M2 on the DVD player and car radio. ? Make sure all cables are using Single Channel Headphones. ? Allow player to prohibit that the batteries in the remote are coded...
Operation Manual
Page 25
... installation, mishandling, misuse, neglect, accident, or by removal or defacement of the factory serial number/bar code label(s). dated bill of sale), specification of warranty coverage (e.g. 12 MONTH LIMITED WARRANTY Applies to Audiovox Mobile Video Products AUDIOVOX ELECTRONICS CORP. (the Company) warrants to the original retail purchaser of this product that should this product or any part thereof, under normal use...
... installation, mishandling, misuse, neglect, accident, or by removal or defacement of the factory serial number/bar code label(s). dated bill of sale), specification of warranty coverage (e.g. 12 MONTH LIMITED WARRANTY Applies to Audiovox Mobile Video Products AUDIOVOX ELECTRONICS CORP. (the Company) warrants to the original retail purchaser of this product that should this product or any part thereof, under normal use...


