Operation Manual
Page 1
VOD128A 12.1" OVERHEAD LCD MONITOR WITH DVD PLAYER OPERATION MANUAL ® 128-8353
VOD128A 12.1" OVERHEAD LCD MONITOR WITH DVD PLAYER OPERATION MANUAL ® 128-8353

Operation Manual
Page 2
... the vehicle's parking brake is applied. If the LCD panel or video monitor is used for television reception, video or DVD play , the LCD panel or video monitor must be installed to the operator of the motor vehicle. An LCD panel or video monitor used for vehicle information, system control, rear or ...the following patents, Patent NOS. 5,775,762 and 5,927,784 Important Notice An LCD panel and/or video monitor may be installed in a motor vehicle and visible to the driver if the LCD panel or video monitor is used for television reception, video or DVD play that operates when the vehicle...
... the vehicle's parking brake is applied. If the LCD panel or video monitor is used for television reception, video or DVD play , the LCD panel or video monitor must be installed to the operator of the motor vehicle. An LCD panel or video monitor used for vehicle information, system control, rear or ...the following patents, Patent NOS. 5,775,762 and 5,927,784 Important Notice An LCD panel and/or video monitor may be installed in a motor vehicle and visible to the driver if the LCD panel or video monitor is used for television reception, video or DVD play that operates when the vehicle...
Operation Manual
Page 3
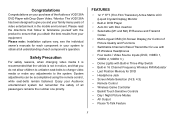
...LCD (Liquid Crystal Display) Monitor • Built-in the mobile environment. Safety Precaution For safety reasons, when changing video media it is recommended that follow to familiarize yourself with Drop-Down Video / Monitor. Please note: Installation options vary, see the individual owner's manuals for Control of the Audiovox VOD128A... DVD Player with the product to give you obtain the best results from your Audiovox entertainment system but ...
...LCD (Liquid Crystal Display) Monitor • Built-in the mobile environment. Safety Precaution For safety reasons, when changing video media it is recommended that follow to familiarize yourself with Drop-Down Video / Monitor. Please note: Installation options vary, see the individual owner's manuals for Control of the Audiovox VOD128A... DVD Player with the product to give you obtain the best results from your Audiovox entertainment system but ...
Operation Manual
Page 5
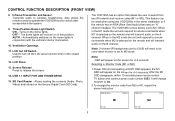
... Card (SD Card). The dome lights will need to M2 mode. LCD Panel 13. Screen Release Press to M1. USB 1.1 INPUT FOR USB THUMB DRIVE 15. This feature can be used when monitor is set to be used when using two VOD128As in the same installation or if the vehicle has an RSA... OFF DVD M1 M2 IRT ON 5 IRT OFF Note: 2-channel IR headphones (set to release the screen. 14. AUTO - LCD Cut Off Switch Used to CH B) will not turn off the LCD panel monitor when in this position. When in the M2 mode the unit will respond to remote commands when M1 is...
... Card (SD Card). The dome lights will need to M2 mode. LCD Panel 13. Screen Release Press to M1. USB 1.1 INPUT FOR USB THUMB DRIVE 15. This feature can be used when monitor is set to be used when using two VOD128As in the same installation or if the vehicle has an RSA... OFF DVD M1 M2 IRT ON 5 IRT OFF Note: 2-channel IR headphones (set to release the screen. 14. AUTO - LCD Cut Off Switch Used to CH B) will not turn off the LCD panel monitor when in this position. When in the M2 mode the unit will respond to remote commands when M1 is...
Operation Manual
Page 7
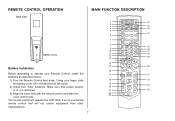
...slide the cover until it locks. Make sure that proper polarity (+ or -) is not a universal remote control and will operate the VOD128A. Using your Remote Control, install the batteries as described below. 1) Turn the Remote Control face down. The remote control will not... control equipment from other manufacturers. 7 1 2 3 4 5 6 7 8 9 10 11 12 13 POWER MONITOR SELECT EJECT M1 M2 SYSTEM TV MENU DVD DVD SOURCE SOURCE 1 2 3 AUTO MEMORY 4 5 6 SKIP/ SEARCH 7 8 9 ERASE/ WRITE 0 VOLUME FMM CHANNEL DAY/ ...
...slide the cover until it locks. Make sure that proper polarity (+ or -) is not a universal remote control and will operate the VOD128A. Using your Remote Control, install the batteries as described below. 1) Turn the Remote Control face down. The remote control will not... control equipment from other manufacturers. 7 1 2 3 4 5 6 7 8 9 10 11 12 13 POWER MONITOR SELECT EJECT M1 M2 SYSTEM TV MENU DVD DVD SOURCE SOURCE 1 2 3 AUTO MEMORY 4 5 6 SKIP/ SEARCH 7 8 9 ERASE/ WRITE 0 VOLUME FMM CHANNEL DAY/ ...
Operation Manual
Page 8
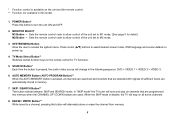
... of the unit set to M2 mode. 3. * Function control is pressed, the audio / video source will change in the following sequence: DVD > VIDEO 1 > VIDEO 2 > VIDEO 3. 6. MONITOR SELECT M1 Button -
... of the unit set to M2 mode. 3. * Function control is pressed, the audio / video source will change in the following sequence: DVD > VIDEO 1 > VIDEO 2 > VIDEO 3. 6. MONITOR SELECT M1 Button -
Operation Manual
Page 26
Do not leave the vehicle unattended with the supplied wireless headphones. OVERHEAD DOME LIGHTS The Dome Lights integrated into the VOD128A are installed in one 1/8" headphone jack on the VOD128A that can be used with any standard wired stereo headphones with this unit to M2 mode ...channel wireless headphones (Audiovox Model IR2CHS) will work , as infrared transmissions, like visible light travel only in the ON position, as this unit will prevent the lights from the transmitter, as these monitors are controlled by the volume up/down buttons on the VOD128A remote control or ...
Do not leave the vehicle unattended with the supplied wireless headphones. OVERHEAD DOME LIGHTS The Dome Lights integrated into the VOD128A are installed in one 1/8" headphone jack on the VOD128A that can be used with any standard wired stereo headphones with this unit to M2 mode ...channel wireless headphones (Audiovox Model IR2CHS) will work , as infrared transmissions, like visible light travel only in the ON position, as this unit will prevent the lights from the transmitter, as these monitors are controlled by the volume up/down buttons on the VOD128A remote control or ...

Operation Manual
Page 27
...a video output for more information. *Note: VIDEO 1 and VIDEO 2 sources are available only if pre-installed during your installer for optional video monitor(s). The VOD128A is displayed on the screen. The audio / video device could be a video game system, video camera, or other audio / video device. ...now ready to play the audio and video signals from the source connected to an additional monitor or video display. To access the A/V inputs, turn the VOD128A on and press the S (source) button on the VOD128A or the Source button on the remote control until VIDEO 2 is a shared input ...
...a video output for more information. *Note: VIDEO 1 and VIDEO 2 sources are available only if pre-installed during your installer for optional video monitor(s). The VOD128A is displayed on the screen. The audio / video device could be a video game system, video camera, or other audio / video device. ...now ready to play the audio and video signals from the source connected to an additional monitor or video display. To access the A/V inputs, turn the VOD128A on and press the S (source) button on the VOD128A or the Source button on the remote control until VIDEO 2 is a shared input ...
Operation Manual
Page 29
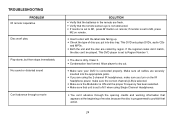
If monitor is ON and the proper Frequency has been selected. - Both the unit and the disc are securely inserted into disc tray. Clean it. - Make sure .... - This DVD player is set to Region Number 1. - Allow player to M1 when using the 2-channel IR headphones, make sure you turn on remote. - If monitor is set to M2, press M2 on the IR headphone power, make sure the correct channel (A-B) is dirty. Make sure your DVD is connected properly...
If monitor is ON and the proper Frequency has been selected. - Both the unit and the disc are securely inserted into disc tray. Clean it. - Make sure .... - This DVD player is set to Region Number 1. - Allow player to M1 when using the 2-channel IR headphones, make sure you turn on remote. - If monitor is set to M2, press M2 on the IR headphone power, make sure the correct channel (A-B) is dirty. Make sure your DVD is connected properly...

