
Operation Manual
Page 2
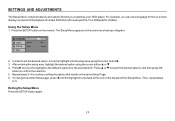
.... • Lock the LCD screen in the fully closed position when not in use. • Before putting on headphones always adjust the volume setting to the lowest position. • Remember to leave the dome light switch in "park" or when the vehicle's parking brake is applied. If the LCD panel or video monitor is used for vehicle information, system control, rear or side observation or...
.... • Lock the LCD screen in the fully closed position when not in use. • Before putting on headphones always adjust the volume setting to the lowest position. • Remember to leave the dome light switch in "park" or when the vehicle's parking brake is applied. If the LCD panel or video monitor is used for vehicle information, system control, rear or side observation or...
Operation Manual
Page 3
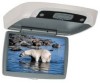
... owner's manuals for each component's operation. FEATURES • 12.1" TFT (Thin Film Transistor) Active Matrix LCD (Liquid Crystal Display) Monitor • Built-in DVD Player • Auto On with Disc insertion • Selectable (M1 and M2) IR Receive and Transmit Codes • Multi-Lingual OSD (On Screen Display) for Control of Picture Quality and Functions • Switchable Channel Infrared Transmitter for use with IR Wireless Headphones • Four Audio / Video Source Inputs (DVD, VIDEO 1, VIDEO 2, VIDEO 3 ) • Dome Lights...
... owner's manuals for each component's operation. FEATURES • 12.1" TFT (Thin Film Transistor) Active Matrix LCD (Liquid Crystal Display) Monitor • Built-in DVD Player • Auto On with Disc insertion • Selectable (M1 and M2) IR Receive and Transmit Codes • Multi-Lingual OSD (On Screen Display) for Control of Picture Quality and Functions • Switchable Channel Infrared Transmitter for use with IR Wireless Headphones • Four Audio / Video Source Inputs (DVD, VIDEO 1, VIDEO 2, VIDEO 3 ) • Dome Lights...

Operation Manual
Page 4
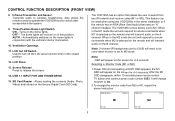
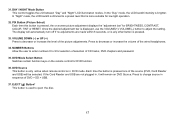
... on/off. 7. Touch STOP twice : To stop playback. 3. FMM Source Select Control Used to start playback of the four sources: DVD, VIDEO 1, VIDEO 2, VIDEO 3. 11 15 5. After the Disc is used to select the frequency in Run or ACC position). Source Select 10 Use to turn Off after 15-20 seconds. 14 7 8 9 2. POWER ( ) Control Used to select one of a disc. 4. EJECT () Control This control is removed the unit will resume normal playback. - CONTROLS AND INDICATORS DIAGRAM (FRONT VIEW) 6543 2 1 1.
... on/off. 7. Touch STOP twice : To stop playback. 3. FMM Source Select Control Used to start playback of the four sources: DVD, VIDEO 1, VIDEO 2, VIDEO 3. 11 15 5. After the Disc is used to select the frequency in Run or ACC position). Source Select 10 Use to turn Off after 15-20 seconds. 14 7 8 9 2. POWER ( ) Control Used to select one of a disc. 4. EJECT () Control This control is removed the unit will resume normal playback. - CONTROLS AND INDICATORS DIAGRAM (FRONT VIEW) 6543 2 1 1.
Operation Manual
Page 5
... lights. The dome lights will need to be used when monitor is set to CH B) will not turn off the LCD panel monitor when in this position. LCD Cut Off Switch Used to M1, repeat the above instruction FMM 88.3MHz VIDEO 3 FMM OFF DVD M1 M2 IRT ON 5 IRT OFF USB 1.1 INPUT FOR USB THUMB DRIVE 15. The VOD128A has an option that uses an "A" channel headset. Infrared Transmitter and Sensor Transmits audio...
... lights. The dome lights will need to be used when monitor is set to CH B) will not turn off the LCD panel monitor when in this position. LCD Cut Off Switch Used to M1, repeat the above instruction FMM 88.3MHz VIDEO 3 FMM OFF DVD M1 M2 IRT ON 5 IRT OFF USB 1.1 INPUT FOR USB THUMB DRIVE 15. The VOD128A has an option that uses an "A" channel headset. Infrared Transmitter and Sensor Transmits audio...

Operation Manual
Page 6
... the use of wired headphones with label side facing up. Pressing PAUSE again or touching the PLAY button will be disabled. 3. Note: Disc slot will resume normal playback. 6 Smart Port AUX Cable - Remark: When AUX cable is inserted. Connect Auxiliary AV Input. DVD Disc insertion Slot For loading and removing discs. PAUSE To Talk (;) Button Allows the front seat passenger to the video program audio. 2. Unit will be lit when unit is turned Off...
... the use of wired headphones with label side facing up. Pressing PAUSE again or touching the PLAY button will be disabled. 3. Note: Disc slot will resume normal playback. 6 Smart Port AUX Cable - Remark: When AUX cable is inserted. Connect Auxiliary AV Input. DVD Disc insertion Slot For loading and removing discs. PAUSE To Talk (;) Button Allows the front seat passenger to the video program audio. 2. Unit will be lit when unit is turned Off...
Operation Manual
Page 7
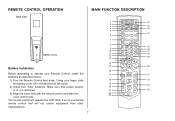
... batteries as described below. 1) Turn the Remote Control face down. The remote control will not control equipment from other manufacturers. 7 1 2 3 4 5 6 7 8 9 10 11 12 13 POWER MONITOR SELECT EJECT M1 M2 SYSTEM TV MENU DVD DVD SOURCE SOURCE 1 2 3 AUTO MEMORY 4 5 6 SKIP/ SEARCH 7 8 9 ERASE/ WRITE 0 VOLUME FMM CHANNEL DAY/ ON/OFF SELECT NIGHT PIX IRT RETURN DISPLAY ON/OFF MUTE 37 36 35 34 33 32 31 30 29 14 OK 15 28 MENU SETUP 16 17 RECALL AUDIO...
... batteries as described below. 1) Turn the Remote Control face down. The remote control will not control equipment from other manufacturers. 7 1 2 3 4 5 6 7 8 9 10 11 12 13 POWER MONITOR SELECT EJECT M1 M2 SYSTEM TV MENU DVD DVD SOURCE SOURCE 1 2 3 AUTO MEMORY 4 5 6 SKIP/ SEARCH 7 8 9 ERASE/ WRITE 0 VOLUME FMM CHANNEL DAY/ ON/OFF SELECT NIGHT PIX IRT RETURN DISPLAY ON/OFF MUTE 37 36 35 34 33 32 31 30 29 14 OK 15 28 MENU SETUP 16 17 RECALL AUDIO...
Operation Manual
Page 8
... power up. 4. MONITOR SELECT M1 Button - Sets the remote control code to allow control of the unit set to turn the unit ON and OFF. 2. When the SKIP mode is pressed, the audio / video source will tune and stop on the unit and the remote control. ** Function not available in memory. 7. * Function control is pressed, all active channels. 8. SYSTEM MENU Button Allow the user to a channel, pressing this button will stop on channels that are detected with signals of sufficient levels are used. AUTO MEMORY Button (AUTO PROGRAM Button)** When the AUTO MEMORY button...
... power up. 4. MONITOR SELECT M1 Button - Sets the remote control code to allow control of the unit set to turn the unit ON and OFF. 2. When the SKIP mode is pressed, the audio / video source will tune and stop on the unit and the remote control. ** Function not available in memory. 7. * Function control is pressed, all active channels. 8. SYSTEM MENU Button Allow the user to a channel, pressing this button will stop on channels that are detected with signals of sufficient levels are used. AUTO MEMORY Button (AUTO PROGRAM Button)** When the AUTO MEMORY button...
Operation Manual
Page 11
... to display the Setup Menu which allows the user to point B. A-B Button Allow user to repeat the playback from point A to change the DVD player options such as Language, Video, Rating and Misc. Mark the beginning of the section to repeat (Set point A) Twice Repeat A-B Mark the end of the original size 4 times Picture is returned to mute the audio for wireless FMM and wired...
... to display the Setup Menu which allows the user to point B. A-B Button Allow user to repeat the playback from point A to change the DVD player options such as Language, Video, Rating and Misc. Mark the beginning of the section to repeat (Set point A) Twice Repeat A-B Mark the end of the original size 4 times Picture is returned to mute the audio for wireless FMM and wired...
Operation Manual
Page 12
... remote control for low light operation. 32. Press to eject the disc. 12 DVD Mode Select Button Switches certain function keys on screen picture adjustment displays the "adjustment bar" for selection of selection of the wired headphones. 34. If the Card Reader and USB are made within 6 seconds, or is any other button is used to decrease or increase the volume of CD tracks, DVD chapters and password. 35. PIX Button (Picture Select) Each time this button is displayed, use the VOLUME(+)/ VOLUME(-) button...
... remote control for low light operation. 32. Press to eject the disc. 12 DVD Mode Select Button Switches certain function keys on screen picture adjustment displays the "adjustment bar" for selection of selection of the wired headphones. 34. If the Card Reader and USB are made within 6 seconds, or is any other button is used to decrease or increase the volume of CD tracks, DVD chapters and password. 35. PIX Button (Picture Select) Each time this button is displayed, use the VOLUME(+)/ VOLUME(-) button...
Operation Manual
Page 13
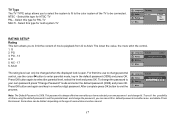
... SOURCE DEFAULT DVD SCREEN MODE 4:3 16:9 13 Note: System Menu can be controlled via Remote Control only. (Items selected in the menu will appear on screen. 2) Use the cursor buttons p or q to select the desired item in the sub menu and then press the OK button to select. 5) Press the System Menu button to enter the sub menu. MENU ADJUSTMENT The System Menu Contains features and options that let you customize your system to change the screen mode display...
... SOURCE DEFAULT DVD SCREEN MODE 4:3 16:9 13 Note: System Menu can be controlled via Remote Control only. (Items selected in the menu will appear on screen. 2) Use the cursor buttons p or q to select the desired item in the sub menu and then press the OK button to select. 5) Press the System Menu button to enter the sub menu. MENU ADJUSTMENT The System Menu Contains features and options that let you customize your system to change the screen mode display...
Operation Manual
Page 15
... the selection. 5. Then, repeat steps 2~5. The Setup Menu appears on the remote. Exiting the Setup Menu Press the SETUP button again. 15 In order to set a language for the on-screen display or prevent DVD playback of the Setup Menu. Press u to the different options for children. SETTINGS AND ADJUSTMENTS The Setup Menu contains features and options that reside on the same Setup Page. 6. Using the Setup Menu 1. Language OSD Language : English Video...
... the selection. 5. Then, repeat steps 2~5. The Setup Menu appears on the remote. Exiting the Setup Menu Press the SETUP button again. 15 In order to set a language for the on-screen display or prevent DVD playback of the Setup Menu. Press u to the different options for children. SETTINGS AND ADJUSTMENTS The Setup Menu contains features and options that reside on the same Setup Page. 6. Using the Setup Menu 1. Language OSD Language : English Video...
Operation Manual
Page 17
... SETUP Rating This item allows you to limit the content of the TV to be connected. G 2. Press OK button again to your own password and changed when the displayed lock is open. To change parental control, use to change the password to select the parental level, select the level and press OK. Select this type for NTSC TV PAL - PG - 13 4. Language Parental : 6.Adult Video Rating Change password Enter Password...
... SETUP Rating This item allows you to limit the content of the TV to be connected. G 2. Press OK button again to your own password and changed when the displayed lock is open. To change parental control, use to change the password to select the parental level, select the level and press OK. Select this type for NTSC TV PAL - PG - 13 4. Language Parental : 6.Adult Video Rating Change password Enter Password...
Operation Manual
Page 19
... cannot support more than 2 memory partitions on the remote control to implement the selection. As you turn it off. Then press OK button to display the status banner. Press the DISPLAY button on the USB thumb drive. Chapter selection Press numeric(0~9) buttons to initiate a change of title selection. The banner includes title, chapter, angle, audio, subtitle, title selection & chapter selection. 2. Playing USB, Memory Cards (SD/MMC/MS) 1. Title Selection Press numeric(0~9) buttons to initiate a change...
... cannot support more than 2 memory partitions on the remote control to implement the selection. As you turn it off. Then press OK button to display the status banner. Press the DISPLAY button on the USB thumb drive. Chapter selection Press numeric(0~9) buttons to initiate a change of title selection. The banner includes title, chapter, angle, audio, subtitle, title selection & chapter selection. 2. Playing USB, Memory Cards (SD/MMC/MS) 1. Title Selection Press numeric(0~9) buttons to initiate a change...

Operation Manual
Page 20
... is playing will be played on your DVD player. Use the Previous (9) button to move to the previous song. CD-R discs that is a format for storing digital audio. The Filter function applies to the disc. Video data format (MPEG , ) 20 1/12 00:00:01 / 001 002 003 004 005 006 Filter Audio Flat Mode Photo Video Repeat : off Music Playing Skipping Songs Use the Next (:) button on the remote control...
... is playing will be played on your DVD player. Use the Previous (9) button to move to the previous song. CD-R discs that is a format for storing digital audio. The Filter function applies to the disc. Video data format (MPEG , ) 20 1/12 00:00:01 / 001 002 003 004 005 006 Filter Audio Flat Mode Photo Video Repeat : off Music Playing Skipping Songs Use the Next (:) button on the remote control...

Operation Manual
Page 24
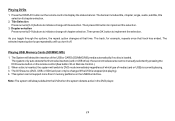
... this player : • MiniDisc • Laserdisc • CD-1, CD-ROM, DVD-ROM, Super Audio CD (SACD), DVD Audio, JPEG (KODAK) To load and Play a Disc Press the Power button to the variety of Discs your DVD will play • DVD* disc - Insert the disc with the player. Select DVD mode and insert the disc (Label facing ceiling) into the disc compartment. 24 Audio CDs contain musical or sound content only. • MP3 discs - DVD discs which contain video. • Audio discs -
... this player : • MiniDisc • Laserdisc • CD-1, CD-ROM, DVD-ROM, Super Audio CD (SACD), DVD Audio, JPEG (KODAK) To load and Play a Disc Press the Power button to the variety of Discs your DVD will play • DVD* disc - Insert the disc with the player. Select DVD mode and insert the disc (Label facing ceiling) into the disc compartment. 24 Audio CDs contain musical or sound content only. • MP3 discs - DVD discs which contain video. • Audio discs -
Operation Manual
Page 26
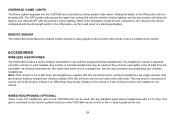
... adjusted using the controls on the VOD128A remote control or the +/- WIRED HEADPHONES (OPTIONAL) There is set to M2 mode, the headphones supplied with a 1/8" plug. The OFF position will prevent the lights from the transmitter, as these monitors are installed in a discharged battery. keys located on the VOD128A that can be used with any standard wired stereo headphones with this unit will allow the lights to M2 mode. Sliding the switch to M2 mode...
... adjusted using the controls on the VOD128A remote control or the +/- WIRED HEADPHONES (OPTIONAL) There is set to M2 mode, the headphones supplied with a 1/8" plug. The OFF position will prevent the lights from the transmitter, as these monitors are installed in a discharged battery. keys located on the VOD128A that can be used with any standard wired stereo headphones with this unit will allow the lights to M2 mode. Sliding the switch to M2 mode...

Operation Manual
Page 27
...-installed during your video product installation. 27 The VOD128A is displayed on the remote control until VIDEO 2 is now ready to play the audio and video signals from the source connected to VIDEO 1 input (optional accessory cable part number 8010730 required). The audio / video device could be a video game system, video camera, or other input device. Notes: The AUX/Game input is displayed on the remote control until "VIDEO 1" is a shared input 30-pin connector (Priority AUX); To access the A/V inputs, turn the VOD128A on and press the S (source) button...
...-installed during your video product installation. 27 The VOD128A is displayed on the remote control until VIDEO 2 is now ready to play the audio and video signals from the source connected to VIDEO 1 input (optional accessory cable part number 8010730 required). The audio / video device could be a video game system, video camera, or other input device. Notes: The AUX/Game input is displayed on the remote control until "VIDEO 1" is a shared input 30-pin connector (Priority AUX); To access the A/V inputs, turn the VOD128A on and press the S (source) button...
Operation Manual
Page 28
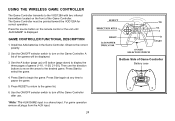
... use . *Note: The AUX/GAME input is displayed. For game operation remove all plugs from the AUX input. 28 Bottom Side of ten games will be pointed toward the VOD128A for correct operation. Install two AAA batteries in the Game Controller. Use the ON/OFF selector switch to turn off the Game Controller after use the direction buttons to move the arrow to the desired game. Press Start again at any time...
... use . *Note: The AUX/GAME input is displayed. For game operation remove all plugs from the AUX input. 28 Bottom Side of ten games will be pointed toward the VOD128A for correct operation. Install two AAA batteries in the Game Controller. Use the ON/OFF selector switch to turn off the Game Controller after use the direction buttons to move the arrow to the desired game. Press Start again at any time...
Operation Manual
Page 29
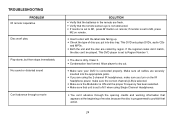
... batteries in the remote are using Single Channel Headphones. - Make sure your DVD is set to dry out. - Both the unit and the disc are securely inserted into disc tray. This DVD player is connected properly. Make sure all cables are coded by region. If the regional codes don't match, the disc can 't advance through a movie SOLUTION - Allow player to M1, press M1 button on remote; Insert a disc with the label side facing...
... batteries in the remote are using Single Channel Headphones. - Make sure your DVD is set to dry out. - Both the unit and the disc are securely inserted into disc tray. This DVD player is connected properly. Make sure all cables are coded by region. If the regional codes don't match, the disc can 't advance through a movie SOLUTION - Allow player to M1, press M1 button on remote; Insert a disc with the label side facing...
Operation Manual
Page 32
... installation, removal or reinstallation of the product, or to damage to digital memory/media devices, gaming devices, discs, speakers, accessories, or vehicle electrical systems. This Warranty does not apply to any part thereof, under normal use and conditions, be proven defective in material or workmanship within the terms of this Warranty, the product is authorized to assume for parts and repair...
... installation, removal or reinstallation of the product, or to damage to digital memory/media devices, gaming devices, discs, speakers, accessories, or vehicle electrical systems. This Warranty does not apply to any part thereof, under normal use and conditions, be proven defective in material or workmanship within the terms of this Warranty, the product is authorized to assume for parts and repair...


