Operation Manual
Page 2
... cleaners, they may be installed so that the ACC wire is connected to avoid touching or scratching the screen, as the dome lights, if left on the screen. • Caution children to the vehicle ACC wiring. An LCD panel and/or video monitor may scratch the screen. • Use only a lightly dampened lint free cloth to wipe the screen if it is fused at 1-800-225...
... cleaners, they may be installed so that the ACC wire is connected to avoid touching or scratching the screen, as the dome lights, if left on the screen. • Caution children to the vehicle ACC wiring. An LCD panel and/or video monitor may scratch the screen. • Use only a lightly dampened lint free cloth to wipe the screen if it is fused at 1-800-225...

Operation Manual
Page 3
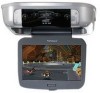
... Functions • Infrared Transmitter for Control of video entertainment in 16 Channel Frequency Wireless FM Modulator • Screen Mode Selection (4:3, 16:9) • Backlit Controls • Plays DVD, CD and SONY PlayStation2 Games 3 Congratulations Congratulations on your purchase of the AUDIOVOX VOD10PS2 Player with the product to ensure that you obtain the best results from your equipment. Please note: Installation options vary, see the individual owner's manuals for each component's operation...
... Functions • Infrared Transmitter for Control of video entertainment in 16 Channel Frequency Wireless FM Modulator • Screen Mode Selection (4:3, 16:9) • Backlit Controls • Plays DVD, CD and SONY PlayStation2 Games 3 Congratulations Congratulations on your purchase of the AUDIOVOX VOD10PS2 Player with the product to ensure that you obtain the best results from your equipment. Please note: Installation options vary, see the individual owner's manuals for each component's operation...
Operation Manual
Page 4
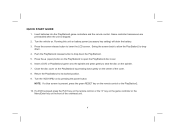
... a DVD is shipped. 2. Running this unit on . Press the screen release button to drop down the PlayStation2. 5. Turn the vehicle on battery power (accessory key setting) will drain the battery. 3. Push the PlayStation2 release button to lower the LCD screen. Game controller transceivers are preinstalled when the unit is played press the PLAY key on the remote control, or the "X" key on the game controller or the Menu/Enter...
... a DVD is shipped. 2. Running this unit on . Press the screen release button to drop down the PlayStation2. 5. Turn the vehicle on battery power (accessory key setting) will drain the battery. 3. Push the PlayStation2 release button to lower the LCD screen. Game controller transceivers are preinstalled when the unit is played press the PLAY key on the remote control, or the "X" key on the game controller or the Menu/Enter...

Operation Manual
Page 5
... and press MENU/ENTER. Using the remote control: i. Tune your head (pay attention to R/L earpieces) and slowly adjust the volume to set in the steps above. Use the q(down ) key to the system over the vehicle radio: a. Once they are turned on, place them on the FM modulator by pressing FMM Select. QUICK START GUIDE (Cont) 11. When using the wireless headphones install the batteries in the...
... and press MENU/ENTER. Using the remote control: i. Tune your head (pay attention to R/L earpieces) and slowly adjust the volume to set in the steps above. Use the q(down ) key to the system over the vehicle radio: a. Once they are turned on, place them on the FM modulator by pressing FMM Select. QUICK START GUIDE (Cont) 11. When using the wireless headphones install the batteries in the...

Operation Manual
Page 7
... the remote control to operate the unit and to access menu selections on the screen. 3. Dome Lights Provide additional interior illumination. 7. CURSOR Buttons (pqt u) Use these buttons to control other accessories in the 14 system. 15 5. Turns on the dome lights. (Do not leave switch on the dome lights in this button to access SYSTEM MENU and select system menu items. 8 9 10 MEMORY CARD FORCE LINK MEMORY CARD FORCE LINK 4. POWER Button ( ) RESET I/ 16 Used to select the sources...
... the remote control to operate the unit and to access menu selections on the screen. 3. Dome Lights Provide additional interior illumination. 7. CURSOR Buttons (pqt u) Use these buttons to control other accessories in the 14 system. 15 5. Turns on the dome lights. (Do not leave switch on the dome lights in this button to access SYSTEM MENU and select system menu items. 8 9 10 MEMORY CARD FORCE LINK MEMORY CARD FORCE LINK 4. POWER Button ( ) RESET I/ 16 Used to select the sources...

Operation Manual
Page 8
Auxiliary Video Input 8 RESET ( ) ON/Standby and RESET indicator. 11. OPEN Push to release the screen. 13. Auxiliary Audio Left Input 4. Auxiliary Audio Right Input 3. OPEN () The disc tray opens. 16. HEADPHONE JACK For wired headphone with a 1/8" (3.5mm) plug. 2. LCD Panel 12. CONTROL FUNCTION DESCRIPTION (SIDE VIEW) 1 2 34 R AUDIO L VIDEO 1. Screen Release Press to open the PlayStation2 tray. 15. LCD Cut Off Switch Used to turn off the LCD backlit when the LCD is in the closed position. 14.
Auxiliary Video Input 8 RESET ( ) ON/Standby and RESET indicator. 11. OPEN Push to release the screen. 13. Auxiliary Audio Left Input 4. Auxiliary Audio Right Input 3. OPEN () The disc tray opens. 16. HEADPHONE JACK For wired headphone with a 1/8" (3.5mm) plug. 2. LCD Panel 12. CONTROL FUNCTION DESCRIPTION (SIDE VIEW) 1 2 34 R AUDIO L VIDEO 1. Screen Release Press to open the PlayStation2 tray. 15. LCD Cut Off Switch Used to turn off the LCD backlit when the LCD is in the closed position. 14.
Operation Manual
Page 9
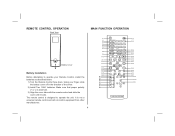
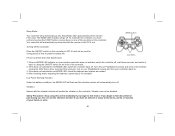
... until it locks. REMOTE CONTROL OPERATION Back View MAIN FUNCTION OPERATION Battery Cover Battery Installation Before attempting to operate the unit. The remote control is designed to operate your finger, slide the battery cover off in the direction of the arrow. 2) Install Two "AAA" batteries. Make sure that proper polarity (+ or -) is not a universal remote control and will not control equipment from other manufacturers. Using your Remote Control, install the batteries as described below. 1) Turn the Remote Control face down. P1...
... until it locks. REMOTE CONTROL OPERATION Back View MAIN FUNCTION OPERATION Battery Cover Battery Installation Before attempting to operate the unit. The remote control is designed to operate your finger, slide the battery cover off in the direction of the arrow. 2) Install Two "AAA" batteries. Make sure that proper polarity (+ or -) is not a universal remote control and will not control equipment from other manufacturers. Using your Remote Control, install the batteries as described below. 1) Turn the Remote Control face down. P1...
Operation Manual
Page 10
...). AUDIO Displays and changes DVD audio options. ANGLE Displays and changes DVD viewing angle options. REPEAT Selects repeated playback of the unit. SUBTITLE Displays and changes DVD subtitle options. REMOTE CONTROL FUNCTIONS The remote control is divided into two sections, Dark Gray buttons on the top, which control the built-in random order. PROGRAM Displays the Program Setup screen. P1. P5. P3. P6. P2. P7. SHUFFLE Starts playback of titles or chapters in PlayStaion2 and Light Gray buttons...
...). AUDIO Displays and changes DVD audio options. ANGLE Displays and changes DVD viewing angle options. REPEAT Selects repeated playback of the unit. SUBTITLE Displays and changes DVD subtitle options. REMOTE CONTROL FUNCTIONS The remote control is divided into two sections, Dark Gray buttons on the top, which control the built-in random order. PROGRAM Displays the Program Setup screen. P1. P5. P3. P6. P2. P7. SHUFFLE Starts playback of titles or chapters in PlayStaion2 and Light Gray buttons...
Operation Manual
Page 11
... to be changed. BUTTON: TITLE MENU Selects the title to be played. P10. DISPLAY Displays the Control Panel of DVD-Video discs. SLOW ( / ) Changes to disc. The content varies from disc to slow-motion playback. (Forward or Reverse) P9. P16. P13. P14. P15. TOP MENU Displays the disc menu of the PlayStation2. P17. DIRECTIONAL BUTTONS: CURSOR CONTROL Use these buttons to access the menu selection on the screen to select the subtitle language and/or turn it on -screen Control Panel. PLAY Starts...
... to be changed. BUTTON: TITLE MENU Selects the title to be played. P10. DISPLAY Displays the Control Panel of DVD-Video discs. SLOW ( / ) Changes to disc. The content varies from disc to slow-motion playback. (Forward or Reverse) P9. P16. P13. P14. P15. TOP MENU Displays the disc menu of the PlayStation2. P17. DIRECTIONAL BUTTONS: CURSOR CONTROL Use these buttons to access the menu selection on the screen to select the subtitle language and/or turn it on -screen Control Panel. PLAY Starts...

Operation Manual
Page 13
... STANDBY / RESET Used to the beginning of the scene that has been set the PlayStation2 console in standby mode. POWER Press this button to select numerical items displayed on , reset, and set . Standby mode :Press and Hold down for more than three seconds. P30. CLEAR Clears selected numbers or playback modes. P31. P32. P33. P29. PAUSE Pauses and resumes playback. NUMBER 0~9 Used to turn on the screen. On...
... STANDBY / RESET Used to the beginning of the scene that has been set the PlayStation2 console in standby mode. POWER Press this button to select numerical items displayed on , reset, and set . Standby mode :Press and Hold down for more than three seconds. P30. CLEAR Clears selected numbers or playback modes. P31. P32. P33. P29. PAUSE Pauses and resumes playback. NUMBER 0~9 Used to turn on the screen. On...

Operation Manual
Page 14
... set level. VOLUME ( - PIX + ) Each time this button to mute the audio. FMM ON/OFF Turns the wireless FM Modulator ON or OFF. M5. M10. CURSOR BUTTON (pqt u) Use these buttons to adjust the setting. M11. Once the desired adjustment bar is pressed, the audio/video source will change: PS2, AV1 and AUX. M8. M9. M3. M7. ENTER Used to access the main system menu for picture controls, FM Modulator Select, screen mode etc. SYSTEM MENU...
... set level. VOLUME ( - PIX + ) Each time this button to mute the audio. FMM ON/OFF Turns the wireless FM Modulator ON or OFF. M5. M10. CURSOR BUTTON (pqt u) Use these buttons to adjust the setting. M11. Once the desired adjustment bar is pressed, the audio/video source will change: PS2, AV1 and AUX. M8. M9. M3. M7. ENTER Used to access the main system menu for picture controls, FM Modulator Select, screen mode etc. SYSTEM MENU...

Operation Manual
Page 15
... green reset button on the remote control if the PlayStation2 does not come on when the main unit is turned on your PlayStation2 system. Once the batteries are pre-installed in the controller ports on . 2 Place the ON/OFF switch for the PIayStation2 system. The POWER LED will recognize the wireless controller. Once the controller has been powered on the wireless controller, indicating the connection between...
... green reset button on the remote control if the PlayStation2 does not come on when the main unit is turned on your PlayStation2 system. Once the batteries are pre-installed in the controller ports on . 2 Place the ON/OFF switch for the PIayStation2 system. The POWER LED will recognize the wireless controller. Once the controller has been powered on the wireless controller, indicating the connection between...
Operation Manual
Page 16
... in the PS 2 unit. If the red MODE LED indicator on using this does not activate the red MODE LED, switch the controller back off. If this is done, reconnect the receivers, turn on . 3. Low Power Warning Function: Under low battery conditions, the MODE LED will flash and the vibration motors will automatically turn your controllers back on your wireless controller does not activate, switch the controller off, wait three...
... in the PS 2 unit. If the red MODE LED indicator on using this does not activate the red MODE LED, switch the controller back off. If this is done, reconnect the receivers, turn on . 3. Low Power Warning Function: Under low battery conditions, the MODE LED will flash and the vibration motors will automatically turn your controllers back on your wireless controller does not activate, switch the controller off, wait three...

Operation Manual
Page 17
...) PICTURE CONTROL (REMOTE CONTROL) When watching a DVD or playing a game, the picture quality can be changed and press the light gray ENTER button. SYSTEM MENU PICTURE CONTROL FMM OSD LANGUAGE SOURCE DEFAULT PS2 SCREEN MODE PICTURE CONTROL BRIGHTNESS CONTRAST COLOR TINT RESET 16 CONTRAST 17 SYSTEM MENU ADJUSTMENT The System Menu contains features and options that picture control will appear on screen. 4) Use the cursor buttons p or q to select an item in the sub menu and then...
...) PICTURE CONTROL (REMOTE CONTROL) When watching a DVD or playing a game, the picture quality can be changed and press the light gray ENTER button. SYSTEM MENU PICTURE CONTROL FMM OSD LANGUAGE SOURCE DEFAULT PS2 SCREEN MODE PICTURE CONTROL BRIGHTNESS CONTRAST COLOR TINT RESET 16 CONTRAST 17 SYSTEM MENU ADJUSTMENT The System Menu contains features and options that picture control will appear on screen. 4) Use the cursor buttons p or q to select an item in the sub menu and then...

Operation Manual
Page 18
... light gray PIX control and light gray VOLUME and + buttons on the remote control to highlight FMM as shown below: SYSTEM MENU PICTURE CONTROL FMM OSD LANGUAGE SOURCE DEFAULT PS2 SCREEN MODE 18 Repeat step 4 to change another picture control setting press the SYSTEM MENU button and select another picture control using this method highlight RESET and press the or + button to reset the picture controls to factory default settings.) FMM FMM ON/OFF options - Turns the...
... light gray PIX control and light gray VOLUME and + buttons on the remote control to highlight FMM as shown below: SYSTEM MENU PICTURE CONTROL FMM OSD LANGUAGE SOURCE DEFAULT PS2 SCREEN MODE 18 Repeat step 4 to change another picture control setting press the SYSTEM MENU button and select another picture control using this method highlight RESET and press the or + button to reset the picture controls to factory default settings.) FMM FMM ON/OFF options - Turns the...

Operation Manual
Page 20
... on-screen display. NOTE: • If selected default source is set to PS2 every time the unit's power is cycled with the source set to something other then PS2, the unit will power up and automatically switch the source over to select from within the system menu. SYSTEM MENU OSD LANGUAGE PICTURE CONTROL ENGLISH FMM SPANISH OSD LANGUAGE FRENCH SOURCE DEFAULT PS2 GERMAN SCREEN MODE SOURCE DEFAULT PS2 This allows the user to set...
... on-screen display. NOTE: • If selected default source is set to PS2 every time the unit's power is cycled with the source set to something other then PS2, the unit will power up and automatically switch the source over to select from within the system menu. SYSTEM MENU OSD LANGUAGE PICTURE CONTROL ENGLISH FMM SPANISH OSD LANGUAGE FRENCH SOURCE DEFAULT PS2 GERMAN SCREEN MODE SOURCE DEFAULT PS2 This allows the user to set...
Operation Manual
Page 22
... number of wireless headphones may be used but they must be used within a line of sight from turning ON with the vehicle's interior lighting, and the auto position will allow the lights to turn the lights ON. This jack is controlled by a three position slide switch. Sliding the switch to the Installation Guide for use with the vehicle's interior lighting. WIRED HEADPHONES (OPTIONAL) There is adjusted using the controls on...
... number of wireless headphones may be used but they must be used within a line of sight from turning ON with the vehicle's interior lighting, and the auto position will allow the lights to turn the lights ON. This jack is controlled by a three position slide switch. Sliding the switch to the Installation Guide for use with the vehicle's interior lighting. WIRED HEADPHONES (OPTIONAL) There is adjusted using the controls on...

Operation Manual
Page 23
... source connected . Turn the video source component on with its power button or remote control and it is displayed on the screen. To access the audio / video inputs, turn ON the PS2 Console. 23 NOTE: The AV1 source is displayed on the screen. Press ( ) RESET on unit/remote control to turn the unit on and press the S (source) button or the Source button on th right side of the unit) may be connected to a external video source, video game system, or other audio / video devices. AUX The AUX input (located...
... source connected . Turn the video source component on with its power button or remote control and it is displayed on the screen. To access the audio / video inputs, turn ON the PS2 Console. 23 NOTE: The AV1 source is displayed on the screen. Press ( ) RESET on unit/remote control to turn the unit on and press the S (source) button or the Source button on th right side of the unit) may be connected to a external video source, video game system, or other audio / video devices. AUX The AUX input (located...

Operation Manual
Page 24
... disc is ON and the Frequency selected on the radio. Clean it. Make sure all cables are fresh. It can 't be played. Allow player to channel A. This PS2 only plays PS2 GAMES, DVDs, audio CDs. If the region codes don't match, the disc can 't advance through a movie SOLUTION Verify that the batteries in the remote are coded by region. Insert a disc with the label side facing up. Make sure that unit...
... disc is ON and the Frequency selected on the radio. Clean it. Make sure all cables are fresh. It can 't be played. Allow player to channel A. This PS2 only plays PS2 GAMES, DVDs, audio CDs. If the region codes don't match, the disc can 't advance through a movie SOLUTION Verify that the batteries in the remote are coded by region. Insert a disc with the label side facing up. Make sure that unit...
Operation Manual
Page 27
... static or noise, to correction of antenna problems, to costs incurred for the Company any liability other than expressed herein in connection with the sale of this product. This Warranty is authorized to assume for installation, removal or reinstallation of the product, or to damage to digital memory/media devices, gaming devices, discs, speakers, accessories, or vehicle electrical systems. This...
... static or noise, to correction of antenna problems, to costs incurred for the Company any liability other than expressed herein in connection with the sale of this product. This Warranty is authorized to assume for installation, removal or reinstallation of the product, or to damage to digital memory/media devices, gaming devices, discs, speakers, accessories, or vehicle electrical systems. This...


