
Operation Manual
Page 1
VOD10 10.2" OVERHEAD LCD MONITOR WITH DVD PLAYER OPERATION MANUAL 128-8565A
VOD10 10.2" OVERHEAD LCD MONITOR WITH DVD PLAYER OPERATION MANUAL 128-8565A
Operation Manual
Page 2
..., they may become dirty or damaged. An LCD panel or video monitor used for television reception, video or DVD play that the ACC wire is fused at 1-800-225-6074. Be extremely careful when working on headphones always adjust the volume setting to the lowest position. • Remember to leave the dome light switch in damage to the rear of the driver's seat where it is dirty. •...
..., they may become dirty or damaged. An LCD panel or video monitor used for television reception, video or DVD play that the ACC wire is fused at 1-800-225-6074. Be extremely careful when working on headphones always adjust the volume setting to the lowest position. • Remember to leave the dome light switch in damage to the rear of the driver's seat where it is dirty. •...
Operation Manual
Page 3
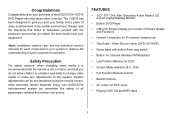
... to change video media or make any adjustments to give you obtain the best results from your equipment. Note: Installation options vary, see the individual owner's manuals for DVD • Screen Mode selection (4:3, 16:9) • Full Function Remote Control • Backlit Controls • AV output via RCA Jacks • Playing DVD, CD and MP3 discs 3 FEATURES • 10.2" TFT (Thin Film Transistor) Active Matrix LCD (Liquid Crystal Display) Monitor • Built-in DVD Player •...
... to change video media or make any adjustments to give you obtain the best results from your equipment. Note: Installation options vary, see the individual owner's manuals for DVD • Screen Mode selection (4:3, 16:9) • Full Function Remote Control • Backlit Controls • AV output via RCA Jacks • Playing DVD, CD and MP3 discs 3 FEATURES • 10.2" TFT (Thin Film Transistor) Active Matrix LCD (Liquid Crystal Display) Monitor • Built-in DVD Player •...
Operation Manual
Page 4
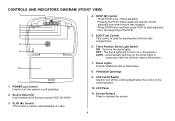
... DVD. 5 6 5. LCD Cut Off Switch Used to start playback 4 from the beginning of the two sources: DVD, AV1/AUX 9. EJECT () Control 7 This control is used for ejecting disc from where movie was stopped. 3 - Turns on /off the LCD backlight when the LCD is in conjunction with the vehicle's interior illumination. 7. The dome lights will resume normal 2 playback from the disc compartment. 8 6. Source Select (S) Use to release the screen. 3. CONTROLS AND INDICATORS DIAGRAM (FRONT VIEW...
... DVD. 5 6 5. LCD Cut Off Switch Used to start playback 4 from the beginning of the two sources: DVD, AV1/AUX 9. EJECT () Control 7 This control is used for ejecting disc from where movie was stopped. 3 - Turns on /off the LCD backlight when the LCD is in conjunction with the vehicle's interior illumination. 7. The dome lights will resume normal 2 playback from the disc compartment. 8 6. Source Select (S) Use to release the screen. 3. CONTROLS AND INDICATORS DIAGRAM (FRONT VIEW...
Operation Manual
Page 6
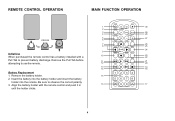
POWER EJECT 1 M1 M2 30 2 SOURCE 3 TV DVD MUTE 29 4 DVD SOURCE VOLUME 28 5 PIX 6 SYSTEM MENU DISC MENU ZOOM 27 7 26 8 25 REPEAT ENTER 9 DISPLAY SETUP SUBTITLE 24 10 23 22 AUDIO 11 21 12 20 13 19 14 18 1 2 34 15 5 6 78 16 FMM ON/OFF 9 0 IRT ON/OFF 17 6 Remove the battery holder. 2. Insert the battery into the battery holder and insert the battery holder into the...
POWER EJECT 1 M1 M2 30 2 SOURCE 3 TV DVD MUTE 29 4 DVD SOURCE VOLUME 28 5 PIX 6 SYSTEM MENU DISC MENU ZOOM 27 7 26 8 25 REPEAT ENTER 9 DISPLAY SETUP SUBTITLE 24 10 23 22 AUDIO 11 21 12 20 13 19 14 18 1 2 34 15 5 6 78 16 FMM ON/OFF 9 0 IRT ON/OFF 17 6 Remove the battery holder. 2. Insert the battery into the battery holder and insert the battery holder into the...
Operation Manual
Page 7
... through modes DVD, AV1/AUX 4. SYSTEM MENU Allow the user to access menu selections on the screen. 7 SOURCE* Each time the button is in M2 mode. 3. PIX ( Picture Select ) Each time of the unit in DVD mode. 6. Once the desired adjustment bar is pressed, the OSD picture adjustment displays the "Adjustment bar" for monitor functions. 5. POWER* Press this button is displayed, use the VOLUME+/ -VOLUME- M2 Button** - * Function control is available on the remote control for BRIGHTNESS, CONTRAST, COLOR, TINT(For NTSC only) or RESET. Set the remote control code...
... through modes DVD, AV1/AUX 4. SYSTEM MENU Allow the user to access menu selections on the screen. 7 SOURCE* Each time the button is in M2 mode. 3. PIX ( Picture Select ) Each time of the unit in DVD mode. 6. Once the desired adjustment bar is pressed, the OSD picture adjustment displays the "Adjustment bar" for monitor functions. 5. POWER* Press this button is displayed, use the VOLUME+/ -VOLUME- M2 Button** - * Function control is available on the remote control for BRIGHTNESS, CONTRAST, COLOR, TINT(For NTSC only) or RESET. Set the remote control code...
Operation Manual
Page 8
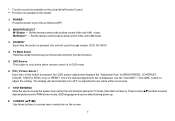
... loaded into the disc compartment. 13. DISPLAY Press to change the search speed from 2, 4, 8, 16 times and normal speed. 12. FMM ON/OFF Turns the FM Modulator power on or off . 17. For Title/Chapter selection use the numeric buttons to search in a backward direction. SCAN BACKWARD (7) Press to enter the desired Title /Chapter selection. 11. PLAY* Press to activate the play mode while a disc is playing.
... loaded into the disc compartment. 13. DISPLAY Press to change the search speed from 2, 4, 8, 16 times and normal speed. 12. FMM ON/OFF Turns the FM Modulator power on or off . 17. For Title/Chapter selection use the numeric buttons to search in a backward direction. SCAN BACKWARD (7) Press to enter the desired Title /Chapter selection. 11. PLAY* Press to activate the play mode while a disc is playing.
Operation Manual
Page 9
STOP ( 19.
STOP ( 19.
Operation Manual
Page 10
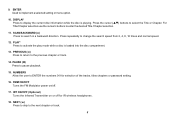
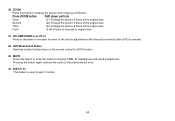
...- Pressing the button again restores the audio to mute the audio for DVD function. 29. EJECT ()* This button is returned to eject the disc. 10 Enlarge the picture 4 times of the original size Second Q2- Picture is used to original size 27. DVD Mode Select Button Switches certain function keys on the remote control for wireless FMM, IR headphones and wired headphones. ZOOM Press this button to the previously set level. 30. 26...
...- Pressing the button again restores the audio to mute the audio for DVD function. 29. EJECT ()* This button is returned to eject the disc. 10 Enlarge the picture 4 times of the original size Second Q2- Picture is used to original size 27. DVD Mode Select Button Switches certain function keys on the remote control for wireless FMM, IR headphones and wired headphones. ZOOM Press this button to the previously set level. 30. 26...

Operation Manual
Page 11
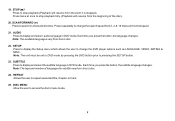
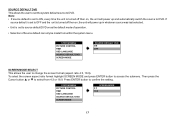
... SOURCE DEFAULT DVD SCREEN MODE PICTURE CONTROL BRIGHTNESS CONTRAST COLOR TINT RESET 11 buttons to change the screen mode display, OSD language and source default. 1) Press the TV button and then the SYSTEM MENU button on the remote, the main page of the system menu will appear on screen. 2) Use the cursor buttons p or q to select the desired item in the main page and press the ENTER button to select. 3) The submenu will be adjusted...
... SOURCE DEFAULT DVD SCREEN MODE PICTURE CONTROL BRIGHTNESS CONTRAST COLOR TINT RESET 11 buttons to change the screen mode display, OSD language and source default. 1) Press the TV button and then the SYSTEM MENU button on the remote, the main page of the system menu will appear on screen. 2) Use the cursor buttons p or q to select the desired item in the main page and press the ENTER button to select. 3) The submenu will be adjusted...
Operation Manual
Page 13
... press the Cursor button p or q to change the screen format (aspect ratio 4:3, 16:9). SYSTEM MENU PICTURE CONTROL FMM OSD LANGUAGE SOURCE DEFAULT DVD SCREEN MODE SCREEN MODE 4:3 16:9 13 If source default is set to OFF and the unit is turned off then on, the unit will power up and automatically switch the source to DVD. Note: • If source default is set to ON, every time the unit is set the system default source to DVD.
... press the Cursor button p or q to change the screen format (aspect ratio 4:3, 16:9). SYSTEM MENU PICTURE CONTROL FMM OSD LANGUAGE SOURCE DEFAULT DVD SCREEN MODE SCREEN MODE 4:3 16:9 13 If source default is set to OFF and the unit is turned off then on, the unit will power up and automatically switch the source to DVD. Note: • If source default is set to ON, every time the unit is set the system default source to DVD.
Operation Manual
Page 14
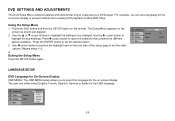
... changed. Use t cursor button to position the highlight back on the icon side of adult DVD Titles. The user can set the other options. The Setup Menu appears on the remote. Exiting the Setup Menu Press the SETUP button again. Language OSD Language Video Rating Subtitle Audio Misc : English : Off : English LANGUAGE SETUP DVD Language for the on -screen display or prevent children from viewing DVD playback of the setup page to select...
... changed. Use t cursor button to position the highlight back on the icon side of adult DVD Titles. The user can set the other options. The Setup Menu appears on the remote. Exiting the Setup Menu Press the SETUP button again. Language OSD Language Video Rating Subtitle Audio Misc : English : Off : English LANGUAGE SETUP DVD Language for the on -screen display or prevent children from viewing DVD playback of the setup page to select...
Operation Manual
Page 16
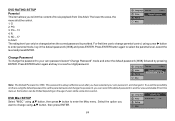
... . Press ENTER button again to enter the Misc menu. This password is 3308. DVD Misc SETUP Select "MISC" using cursor u button to enter parental mode, key in a new four digit password. R 5. Language Load Factory Video Rating Screen Saver : On Misc 16 The lower the value, the more strict the control. 1. For first time use to change parental control, using pq button, then press u button to select the parental level, select the level and press ENTER...
... . Press ENTER button again to enter the Misc menu. This password is 3308. DVD Misc SETUP Select "MISC" using cursor u button to enter parental mode, key in a new four digit password. R 5. Language Load Factory Video Rating Screen Saver : On Misc 16 The lower the value, the more strict the control. 1. For first time use to change parental control, using pq button, then press u button to select the parental level, select the level and press ENTER...
Operation Manual
Page 17
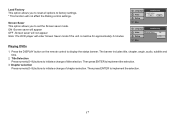
... to factory settings. * This function will enter Screen Saver mode if the unit is inactive for approximately 2 minutes. Language Load Factory Video Load Factory Screen Saver Yes No Rating Misc Language Load Factory Video Rating Screen Saver Off On Misc Playing DVDs 1. Title Selection Press numeric(0~9) buttons to implement the selection. 3. Press the DISPLAY button on the remote control to implement the selection. 17 Then press ENTER to initiate a change of title selection. ON -Screen saver...
... to factory settings. * This function will enter Screen Saver mode if the unit is inactive for approximately 2 minutes. Language Load Factory Video Load Factory Screen Saver Yes No Rating Misc Language Load Factory Video Rating Screen Saver Off On Misc Playing DVDs 1. Title Selection Press numeric(0~9) buttons to implement the selection. 3. Press the DISPLAY button on the remote control to implement the selection. 17 Then press ENTER to initiate a change of title selection. ON -Screen saver...
Operation Manual
Page 18
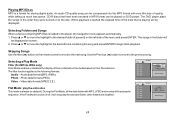
... Audio Flat Mode Photo Video Repeat : off , it will be displayed on the left side of files contained on the media based on the remote control to move the highlight to the following formats: Audio - Skipping Songs Use the Next (:) button on their file extension. Selecting Folders and Songs When a device containing MP3 files is always on DVD player. Playing MP3 Discs MP3 is off Music Playing...
... Audio Flat Mode Photo Video Repeat : off , it will be displayed on the left side of files contained on the media based on the remote control to move the highlight to the following formats: Audio - Skipping Songs Use the Next (:) button on their file extension. Selecting Folders and Songs When a device containing MP3 files is always on DVD player. Playing MP3 Discs MP3 is off Music Playing...
Operation Manual
Page 21
... factory depending on . Audio CDs contain musical or sound content only. • MP3 disc - DVD discs which contain video. • Audio disc - DVD Area Code The DVD player is preset to the variety of disc manufacturers and software, playback cannot be guaranteed. Select DVD mode and insert the disc (label facing upwards) into the disc compartment. 21 Insert the disc with this section completely. A disc that it is capable of Discs your DVD will display "WRONG REGION" DVD...
... factory depending on . Audio CDs contain musical or sound content only. • MP3 disc - DVD discs which contain video. • Audio disc - DVD Area Code The DVD player is preset to the variety of disc manufacturers and software, playback cannot be guaranteed. Select DVD mode and insert the disc (label facing upwards) into the disc compartment. 21 Insert the disc with this section completely. A disc that it is capable of Discs your DVD will display "WRONG REGION" DVD...
Operation Manual
Page 22
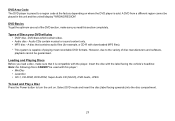
... system on and is displaying a picture, adjust the viewing angle, by pivoting the screen to the locked position when not in use. 2. Power ON/OFF Remote Sensor Button Infrared Transmitter Screen Release 22 TURNING THE UNIT ON OR OFF 1. The hinge friction will illuminate the controls. 3. Pushing in use . After the unit has been turned on and off and pivot the LCD to optimize the picture...
... system on and is displaying a picture, adjust the viewing angle, by pivoting the screen to the locked position when not in use. 2. Power ON/OFF Remote Sensor Button Infrared Transmitter Screen Release 22 TURNING THE UNIT ON OR OFF 1. The hinge friction will illuminate the controls. 3. Pushing in use . After the unit has been turned on and off and pivot the LCD to optimize the picture...
Operation Manual
Page 23
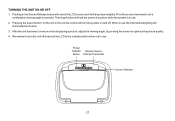
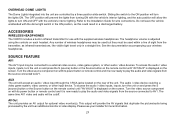
... wire connections. The same time AV1 video and audio will turn the unit on and press the S (source) button or the Source button on the remote control until "AV1/AUX" is displayed on each headset. AV Out The unit provides an AV output for more information. 23 OVERHEAD DOME LIGHTS The Dome Lights integrated into the unit are controlled by the unit to a external video source, video game system, or other input device. Any number of sight from the source connected...
... wire connections. The same time AV1 video and audio will turn the unit on and press the S (source) button or the Source button on the remote control until "AV1/AUX" is displayed on each headset. AV Out The unit provides an AV output for more information. 23 OVERHEAD DOME LIGHTS The Dome Lights integrated into the unit are controlled by the unit to a external video source, video game system, or other input device. Any number of sight from the source connected...
Operation Manual
Page 24
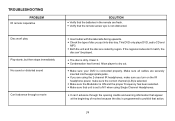
... batteries in the remote are using Single Channel Headphones. Make sure the Modulator is selected. Make sure that appear at the beginning of disc you turn on the IR headphone power, make sure the correct channel (A-B) is ON and the proper Frequency has been selected. Condensation has formed. Insert a disc with the label side facing upwards. This DVD only plays DVD, audio CD and MP3. Allow player to M1 when using the 2-channel...
... batteries in the remote are using Single Channel Headphones. Make sure the Modulator is selected. Make sure that appear at the beginning of disc you turn on the IR headphone power, make sure the correct channel (A-B) is ON and the proper Frequency has been selected. Condensation has formed. Insert a disc with the label side facing upwards. This DVD only plays DVD, audio CD and MP3. Allow player to M1 when using the 2-channel...
Operation Manual
Page 27
...specification of defect(s), transportation prepaid, to the Company at the Company's option) without charge for installation, removal or reinstallation of the product, or to damage to digital memory/media devices, gaming devices, discs, speakers.... Audiovox Electronics Corporation, 150 Marcus Blvd., Hauppauge, New York 11788 l 1-800-645-4994 128-5148F 27 AUDIOVOX LIMITED WARRANTY Applies to Audiovox Mobile Video Products AUDIOVOX ELECTRONICS...part thereof (except game controllers), under normal use and conditions, be repaired or replaced with reconditioned product (at the address shown ...
...specification of defect(s), transportation prepaid, to the Company at the Company's option) without charge for installation, removal or reinstallation of the product, or to damage to digital memory/media devices, gaming devices, discs, speakers.... Audiovox Electronics Corporation, 150 Marcus Blvd., Hauppauge, New York 11788 l 1-800-645-4994 128-5148F 27 AUDIOVOX LIMITED WARRANTY Applies to Audiovox Mobile Video Products AUDIOVOX ELECTRONICS...part thereof (except game controllers), under normal use and conditions, be repaired or replaced with reconditioned product (at the address shown ...


