Operation Manual
Page 3
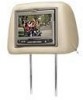
...screen, use the CH A switch setting. MMD7HRPKG The MMD7HRPKG contains two headrests. When sitting in front of the unit. Select AV1 using the power button on the bottom right hand side of the screen. 2. Each monitor has an AUX input and wired headphone jack on the front of the M1 ...monitor, tilt the screen forward using the cursor keys and press the Enter or Play button. 7. The master unit M1 (MMD7HRM) has a built-in DVD player and the satellite unit M2 (MMD7HRS) has a monitor that is used to a comfortable viewing position (the headrest itself can operate either watch the...
...screen, use the CH A switch setting. MMD7HRPKG The MMD7HRPKG contains two headrests. When sitting in front of the unit. Select AV1 using the power button on the bottom right hand side of the screen. 2. Each monitor has an AUX input and wired headphone jack on the front of the M1 ...monitor, tilt the screen forward using the cursor keys and press the Enter or Play button. 7. The master unit M1 (MMD7HRM) has a built-in DVD player and the satellite unit M2 (MMD7HRS) has a monitor that is used to a comfortable viewing position (the headrest itself can operate either watch the...
Operation Manual
Page 4
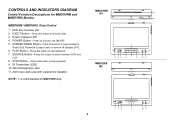
...disc. 3. AUX Input Jack (use with supplied AV adaptor) NOTE : 1, 2, 6 & 8 function for MMD7HRM and MMD7HRS Monitor MMD7HRM / MMD7HRS Panel Control 1. DVD disc insertion slot 2. Press this button to stop playback. 9. MMD7HRM M1 1 EJECT 2 MMD7HRS M2 9 S 3 45 6 7 8 10 11 9 S 3 ...11 4 Power Indicator LED 4. Press this button to select between DVD and AUX. 8. Press this button to select between Wide(16:9), Normal(4:3) aspect ratio or screen off (display OFF). 6. POWER Button - Wired Headphone Jack 11. IR Transmitter LEDS 10. SCREEN MODE Button- SOURCE ...
...disc. 3. AUX Input Jack (use with supplied AV adaptor) NOTE : 1, 2, 6 & 8 function for MMD7HRM and MMD7HRS Monitor MMD7HRM / MMD7HRS Panel Control 1. DVD disc insertion slot 2. Press this button to stop playback. 9. MMD7HRM M1 1 EJECT 2 MMD7HRS M2 9 S 3 45 6 7 8 10 11 9 S 3 ...11 4 Power Indicator LED 4. Press this button to select between DVD and AUX. 8. Press this button to select between Wide(16:9), Normal(4:3) aspect ratio or screen off (display OFF). 6. POWER Button - Wired Headphone Jack 11. IR Transmitter LEDS 10. SCREEN MODE Button- SOURCE ...
Operation Manual
Page 5
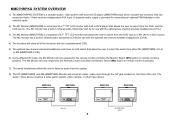
MMD7HRPKG SYSTEM OVERVIEW 1) The MMD7HRPKG SYSTEM is a versatile audio / video system with built-in DVD player that allows the user to the...TFT LCD monitor with built-in DVD player (MMD7HRM only) which includes two monitors, that can accept an Audio / Video input and independent AUX input. MMD7HRS MMD7HRM MMD7HRS MMD7HRM AUX IN 5 HEADPHONE JACK The M1 monitor has a... (MMD7HRM) and M2 (MMD7HRS) Monitor will show all of the functions with the optional two-channel wireless headphones (CH A). 3) The M2 Monitor (MMD7HRS) is comprised of the unit. The audio / video device could...
MMD7HRPKG SYSTEM OVERVIEW 1) The MMD7HRPKG SYSTEM is a versatile audio / video system with built-in DVD player that allows the user to the...TFT LCD monitor with built-in DVD player (MMD7HRM only) which includes two monitors, that can accept an Audio / Video input and independent AUX input. MMD7HRS MMD7HRM MMD7HRS MMD7HRM AUX IN 5 HEADPHONE JACK The M1 monitor has a... (MMD7HRM) and M2 (MMD7HRS) Monitor will show all of the functions with the optional two-channel wireless headphones (CH A). 3) The M2 Monitor (MMD7HRS) is comprised of the unit. The audio / video device could...
Operation Manual
Page 10
... turn off if no adjustments are made within 6 seconds, or if any other button is also used to enable the control of the wired headphone jack. Each time you press the button, the language changes. Press repeatedly to select the available sources. PAUSE (II) Button - Allows the...setting. Once the desired adjustment bar is pressed, the on screen picture adjustment displays the "adjustment bar" for audio vary from disc to search in DVD mode. Monitor Select (M1) - Change the remote control code to resume normal playback. 22. SOURCE Button* - Press the Play button to ...
... turn off if no adjustments are made within 6 seconds, or if any other button is also used to enable the control of the wired headphone jack. Each time you press the button, the language changes. Press repeatedly to select the available sources. PAUSE (II) Button - Allows the...setting. Once the desired adjustment bar is pressed, the on screen picture adjustment displays the "adjustment bar" for audio vary from disc to search in DVD mode. Monitor Select (M1) - Change the remote control code to resume normal playback. 22. SOURCE Button* - Press the Play button to ...
Operation Manual
Page 21
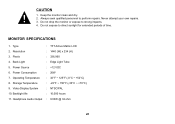
... 2. Power Consumption : 26W 7. Storage Temperature : -22°F ~ 150°F (-30°C ~ +70°C) 9. Backlight life : 10,000 hours 11. Video Display System : NTSC/PAL 10. Headphone Audio Output : 0.03W @ 32 ohm 20 Resolution : 1440 (W) x 234 (H) 3. Operating Temperature : 32°F ~ 125°F (-0°C ~ +52°C) 8. Always seek qualified personnel to direct sunlight...
... 2. Power Consumption : 26W 7. Storage Temperature : -22°F ~ 150°F (-30°C ~ +70°C) 9. Backlight life : 10,000 hours 11. Video Display System : NTSC/PAL 10. Headphone Audio Output : 0.03W @ 32 ohm 20 Resolution : 1440 (W) x 234 (H) 3. Operating Temperature : 32°F ~ 125°F (-0°C ~ +52°C) 8. Always seek qualified personnel to direct sunlight...