
Operation Manual
Page 1
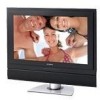
FPE2306 LCD TV Operating Manual Before connecting, operating or adjusting this product, please read the manual completely. FOR ASSISTANCE CALL 1-800-619-3848 OR VISIT US AT WWW.AUDIOVOX.COM 1287614
FPE2306 LCD TV Operating Manual Before connecting, operating or adjusting this product, please read the manual completely. FOR ASSISTANCE CALL 1-800-619-3848 OR VISIT US AT WWW.AUDIOVOX.COM 1287614
Operation Manual
Page 2
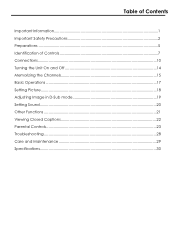
Table of Contents Important Information 1 Important Safety Precautions 2 Preparations ...5 Identification of Controls 7 Connections...10 Turning the Unit On and Off 14 Memorizing the Channels 15 Basic Operations ...17 Setting Picture ...18 Adjusting Image in D-Sub mode 19 Setting Sound ...20 Other Functions ...21 Viewing Closed Captions 22 Parental Controls ...23 Troubleshooting ...28 Care and Maintenance 29 Specifications...30
Table of Contents Important Information 1 Important Safety Precautions 2 Preparations ...5 Identification of Controls 7 Connections...10 Turning the Unit On and Off 14 Memorizing the Channels 15 Basic Operations ...17 Setting Picture ...18 Adjusting Image in D-Sub mode 19 Setting Sound ...20 Other Functions ...21 Viewing Closed Captions 22 Parental Controls ...23 Troubleshooting ...28 Care and Maintenance 29 Specifications...30
Operation Manual
Page 3
... to radio communications. For disposal or recycling information, please contact your local authorities or the Electronic Industries Alliance: www.eia.org FCC STATEMENT FCC Notice LCD TV: A CLASS B digital device This equipment has been tested and found to comply with the limits for proper grounding and, in particular, specifies that contained in...
... to radio communications. For disposal or recycling information, please contact your local authorities or the Electronic Industries Alliance: www.eia.org FCC STATEMENT FCC Notice LCD TV: A CLASS B digital device This equipment has been tested and found to comply with the limits for proper grounding and, in particular, specifies that contained in...
Operation Manual
Page 4
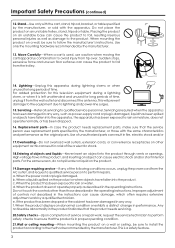
.... 2. Follow all warnings---All warnings on safety. The vents and other . Heed all instructions---All operating instructions must be kept in a safe place for your LCD TV product, please read and understood before cleaning. Do not use attachments not recommended by the manufacturer. A polarized plug has two blades with one wider than...
.... 2. Follow all warnings---All warnings on safety. The vents and other . Heed all instructions---All operating instructions must be kept in a safe place for your LCD TV product, please read and understood before cleaning. Do not use attachments not recommended by the manufacturer. A polarized plug has two blades with one wider than...
Operation Manual
Page 5
Stand---Use only with the cart, stand, tripod, bracket, or table specified by the manufacturer, or sold with the same characteristics and performance as the original parts. Do not place the product on an unstable base can result in fire, electric shock and/or 17.Overloading---Do not overload wall outlets, extension cords, or convenience receptacles on other than those with the apparatus. Placing the product on an unstable trolley, stand, tripod or table. For added protection for this television equipment during lightning storms or when unused for long periods of service or repair ...
Stand---Use only with the cart, stand, tripod, bracket, or table specified by the manufacturer, or sold with the same characteristics and performance as the original parts. Do not place the product on an unstable base can result in fire, electric shock and/or 17.Overloading---Do not overload wall outlets, extension cords, or convenience receptacles on other than those with the apparatus. Placing the product on an unstable trolley, stand, tripod or table. For added protection for this television equipment during lightning storms or when unused for long periods of service or repair ...
Operation Manual
Page 6
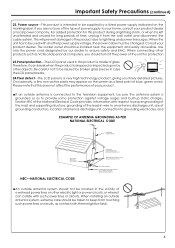
... this product during a lightning storm, or when it can break when the product is intended to be used in case the LCD panel breaks. 24.Pixel defect---The LCD panel is a very high technology product, giving you should be changed. Important Safety Precautions (continued) 22. When connecting other ...other products such as a fixed point of glass. Therefore, it is made of blue, green or red. For added protection for protection 23.Panel protection---The LCD panel used with another power supply voltage, the power cable must be installed near the equipment and easily accessible.
... this product during a lightning storm, or when it can break when the product is intended to be used in case the LCD panel breaks. 24.Pixel defect---The LCD panel is a very high technology product, giving you should be changed. Important Safety Precautions (continued) 22. When connecting other ...other products such as a fixed point of glass. Therefore, it is made of blue, green or red. For added protection for protection 23.Panel protection---The LCD panel used with another power supply voltage, the power cable must be installed near the equipment and easily accessible.
Operation Manual
Page 7
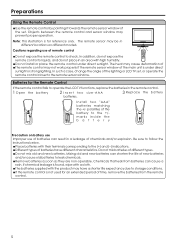
Preparations Using the Remote Control
Preparations Using the Remote Control
Operation Manual
Page 8
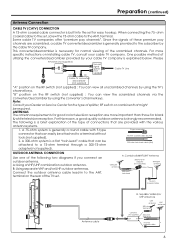
... tools (not supplied). 75-ohm coaxial cable (round) 2. A: Using a VHF/UHF combination outdoor antenna. terminal on installing cable TV, consult your cable TV company. Since the signals of these premium pay channels". Please RF switch (not supplied) OUT Two-set signal splitter (not supplied)... for black & white television reception. Connect the outdoor antenna cable lead-in to the ANT. Some cable TV companies offer "premium pay channels are scrambled, a cable TV converter/descrambler is generally provided to a 75-ohm terminal through a 300-75-ohm 300-ohm twin-lead ...
... tools (not supplied). 75-ohm coaxial cable (round) 2. A: Using a VHF/UHF combination outdoor antenna. terminal on installing cable TV, consult your cable TV company. Since the signals of these premium pay channels". Please RF switch (not supplied) OUT Two-set signal splitter (not supplied)... for black & white television reception. Connect the outdoor antenna cable lead-in to the ANT. Some cable TV companies offer "premium pay channels are scrambled, a cable TV converter/descrambler is generally provided to a 75-ohm terminal through a 300-75-ohm 300-ohm twin-lead ...
Operation Manual
Page 9
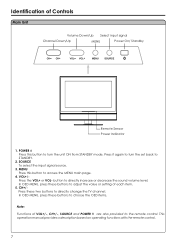
... the unit ON from STANDBY mode. Identification of VOL+/-, CH+/-, SOURCE and POWER are also provided to turn the set back to directly change the TV channel; CH+/Press these two buttons to STANDBY. 2. POWER Press this button to access the MENU main page. 4. In OSD MENU, press these buttons to...
... the unit ON from STANDBY mode. Identification of VOL+/-, CH+/-, SOURCE and POWER are also provided to turn the set back to directly change the TV channel; CH+/Press these two buttons to STANDBY. 2. POWER Press this button to access the MENU main page. 4. In OSD MENU, press these buttons to...
Operation Manual
Page 10
Speaker output jacks Connect the speaker audio cable to the audio and component output jacks of the cable with color. 8 Component inputs (Y, Pb/Cb, Pr/Cr, Audio L, R) Connect to the speaker output jacks on your PC. 2. Main Unit Identification of Controls (continued) 1. D-Sub input /Audio Line in Connect to connect cable or outdoor antenna. 4. S-Video input Receive a S-Video signal from external sources such as VCR or DVD player. 5. Antenna input Allows you to the D-Sub/audio output jacks on the unit matching the "+" and "-" ends of a DVD player or Set-Top Box. 3. AV ...
Speaker output jacks Connect the speaker audio cable to the audio and component output jacks of the cable with color. 8 Component inputs (Y, Pb/Cb, Pr/Cr, Audio L, R) Connect to the speaker output jacks on your PC. 2. Main Unit Identification of Controls (continued) 1. D-Sub input /Audio Line in Connect to connect cable or outdoor antenna. 4. S-Video input Receive a S-Video signal from external sources such as VCR or DVD player. 5. Antenna input Allows you to the D-Sub/audio output jacks on the unit matching the "+" and "-" ends of a DVD player or Set-Top Box. 3. AV ...

Operation Manual
Page 11
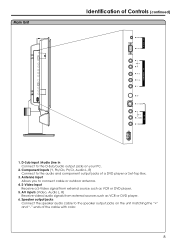
To adjust volume; In MENU operation, use CH+/- In MENU operation, use ENTER or VOL+/- to adjust selected item To confirm your operation To set sleep timer Audio mode select 9 to select menu item To select input signal source Picture mode select To quickly jump between current channel and last selected channel. Identification of Controls (continued) Remote Control To display channel status or signal information Turn the unit on or off To select Stereo mode Sound mute [0-9] number buttons: Direct channel To access the MENU main page or exit menu operation To switch channels;
To adjust volume; In MENU operation, use CH+/- In MENU operation, use ENTER or VOL+/- to adjust selected item To confirm your operation To set sleep timer Audio mode select 9 to select menu item To select input signal source Picture mode select To quickly jump between current channel and last selected channel. Identification of Controls (continued) Remote Control To display channel status or signal information Turn the unit on or off To select Stereo mode Sound mute [0-9] number buttons: Direct channel To access the MENU main page or exit menu operation To switch channels;
Operation Manual
Page 12
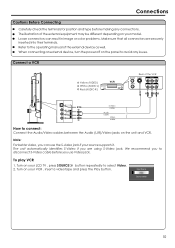
... connecting an external device, turn the power off on the panel to connect: Connect the Audio/Video cables between the Audio (L/R)/Video jacks on your LCD TV , press SOURCE button repeatedly to disconnect S-Video cable before making any issues. Connect a VCR Y Yellow (VIDEO) W White (AUDIO L) R Red (AUDIO R ) VCR Rear of the external...
... connecting an external device, turn the power off on the panel to connect: Connect the Audio/Video cables between the Audio (L/R)/Video jacks on your LCD TV , press SOURCE button repeatedly to disconnect S-Video cable before making any issues. Connect a VCR Y Yellow (VIDEO) W White (AUDIO L) R Red (AUDIO R ) VCR Rear of the external...
Operation Manual
Page 13
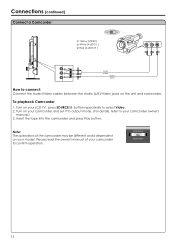
Turn on your camcorder and set it to output mode. (For details, refer to select Video. 2. Turn on your LCD TV , press SOURCE button repeatedly to your model. Note: The operations of your camcorder to connect: Connect the Audio/Video cables between the Audio (L/R)/Video jacks ...
Turn on your camcorder and set it to output mode. (For details, refer to select Video. 2. Turn on your LCD TV , press SOURCE button repeatedly to your model. Note: The operations of your camcorder to connect: Connect the Audio/Video cables between the Audio (L/R)/Video jacks ...
Operation Manual
Page 14
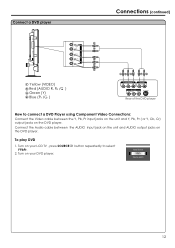
... DVD player. Connect the Audio cable between the Y, Pb, Pr input jacks on the unit and Y, Pb, Pr ( or Y, Cb, Cr) output jacks on your LCD TV , press SOURCE YPbPr. 2. Turn on the DVD player. Connect a DVD player Connections (continued) RW GB R Y Yellow (VIDEO) R Red (AUDIO R, PR /CR ) G Green (Y) B Blue (PB /CB...
... DVD player. Connect the Audio cable between the Y, Pb, Pr input jacks on the unit and Y, Pb, Pr ( or Y, Cb, Cr) output jacks on your LCD TV , press SOURCE YPbPr. 2. Turn on the DVD player. Connect a DVD player Connections (continued) RW GB R Y Yellow (VIDEO) R Red (AUDIO R, PR /CR ) G Green (Y) B Blue (PB /CB...
Operation Manual
Page 15
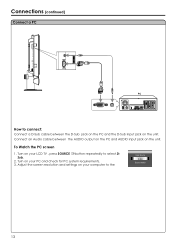
Adjust the screen resolution and settings on your computer to select DSub. 2. Turn on your PC and check for PC system requirements. 3. Connections (continued) Connect a PC How to connect: Connect a D-Sub cable between the AUDIO output on the PC and AUDIO input jack on the unit. Turn on the unit. Connect an Audio cable between the D-Sub jack on the PC and the D-Sub input jack on your LCD TV , press SOURCE button repeatedly to the Input Source D-Sub Source-switch 13 To Watch the PC screen 1.
Adjust the screen resolution and settings on your computer to select DSub. 2. Turn on your PC and check for PC system requirements. 3. Connections (continued) Connect a PC How to connect: Connect a D-Sub cable between the AUDIO output on the PC and AUDIO input jack on the unit. Turn on the unit. Connect an Audio cable between the D-Sub jack on the PC and the D-Sub input jack on your LCD TV , press SOURCE button repeatedly to the Input Source D-Sub Source-switch 13 To Watch the PC screen 1.
Operation Manual
Page 16
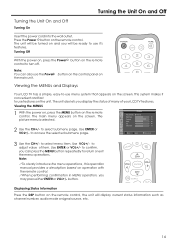
... ready to use menu system that appears on the remote control to -use it convenient and fast to adjust value of your LCD TV features. Viewing the MENUs and Displays Your LCD TV has a simple, easy-to turn off. Picture Picture Mode Normal Brightness 50 Contrast 75 Color 60 Tint 50 Sharpness 12 Move...
... ready to use menu system that appears on the remote control to -use it convenient and fast to adjust value of your LCD TV features. Viewing the MENUs and Displays Your LCD TV has a simple, easy-to turn off. Picture Picture Mode Normal Brightness 50 Contrast 75 Color 60 Tint 50 Sharpness 12 Move...
Operation Manual
Page 17
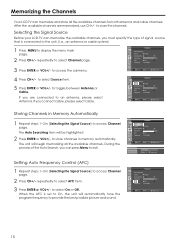
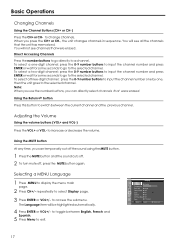
...unit. (i.e., an antenna or cable system) 1 Press MENU to provide the best possible picture and sound. Selecting the Signal Source Before your LCD TV can memorize the available channels, you connect cable, please select cable. to select On or Off. Channel Auto Searching Source Cable Channel Skip... On Off Fine Tune AFC On Off Frequency 55.25 MHz 3 Press ENTER or VOL+/- Memorizing the Channels Your LCD TV can memorize and store all the available channels. to toggle between Antenna or Cable. to exit 15 Channel Auto Searching Source Cable ...
...unit. (i.e., an antenna or cable system) 1 Press MENU to provide the best possible picture and sound. Selecting the Signal Source Before your LCD TV can memorize the available channels, you connect cable, please select cable. to select On or Off. Channel Auto Searching Source Cable Channel Skip... On Off Fine Tune AFC On Off Frequency 55.25 MHz 3 Press ENTER or VOL+/- Memorizing the Channels Your LCD TV can memorize and store all the available channels. to toggle between Antenna or Cable. to exit 15 Channel Auto Searching Source Cable ...

Operation Manual
Page 18
repeatedly to fine tune till the best possible picture and sound are obtained. to select Fine Tune item. 3 Press VOL+/- repeatedly to exit 4 Press ENTER or VOL+/- If you use number buttons to input channel number directly. 16 Channel Auto Searching Source Cable Channel Skip On Off Fine Tune AFC On Off Frequency 55.25 MHz Move Select Menu to select Channel Skip item. The erased channels can not be added. When the item is set to on, the selected channel will be added or erased. 2 Repeat steps 1~3 in [Selecting the Signal Source] to access Channel page. 2 ...
repeatedly to fine tune till the best possible picture and sound are obtained. to select Fine Tune item. 3 Press VOL+/- repeatedly to exit 4 Press ENTER or VOL+/- If you use number buttons to input channel number directly. 16 Channel Auto Searching Source Cable Channel Skip On Off Fine Tune AFC On Off Frequency 55.25 MHz Move Select Menu to select Channel Skip item. The erased channels can not be added. When the item is set to on, the selected channel will be added or erased. 2 Repeat steps 1~3 in [Selecting the Signal Source] to access Channel page. 2 ...
Operation Manual
Page 19
To select a two-digit channel: press the 0-9 number buttons to input the channel number and press ENTER or wait for some seconds to go directly to change channels. Adjusting the Volume Using the volume buttons (VOL+ and VOL-) Press the VOL + or VOL- You will see channels that were erased. To select a three-digit channel: press the 0-9 number buttons to input the channel number one by one -digit channel: press the 0-9 number buttons to input the channel number and press ENTER or wait for some seconds to go to exit. Using the Return button Press this button to ...
To select a two-digit channel: press the 0-9 number buttons to input the channel number and press ENTER or wait for some seconds to go directly to change channels. Adjusting the Volume Using the volume buttons (VOL+ and VOL-) Press the VOL + or VOL- You will see channels that were erased. To select a three-digit channel: press the 0-9 number buttons to input the channel number one by one -digit channel: press the 0-9 number buttons to input the channel number and press ENTER or wait for some seconds to go to exit. Using the Return button Press this button to ...
Operation Manual
Page 20
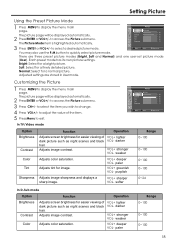
... also use the P.M button to access the Picture submenu. 3 Press CH+/- Each preset mode has its own picture settings. to quickly select picture mode. In TV/Video mode Picture Picture Mode User Brightness 55 Contrast 90 Color 50 Tint 49 Sharpness 12 Move Select Menu to exit Option Brightness Contrast Color...
... also use the P.M button to access the Picture submenu. 3 Press CH+/- Each preset mode has its own picture settings. to quickly select picture mode. In TV/Video mode Picture Picture Mode User Brightness 55 Contrast 90 Color 50 Tint 49 Sharpness 12 Move Select Menu to exit Option Brightness Contrast Color...