Operation Manual
Page 2
... driver while operating the vehicle. The DVD Player is constructed to the system. Enjoy your entertainment system but always remember-safety of the art electronics and is designed to be used in the motor vehicle at any adjustments to provide years of reliable, trouble-free service,... safety reasons, when changing video media, it is recommended that the vehicle is not in motion, and that you can be used as portable DVD player or when installed into the available docking stations as a home or mobile DVD player. Please read all passengers remains the number one priority. 2 ...
... driver while operating the vehicle. The DVD Player is constructed to the system. Enjoy your entertainment system but always remember-safety of the art electronics and is designed to be used in the motor vehicle at any adjustments to provide years of reliable, trouble-free service,... safety reasons, when changing video media, it is recommended that the vehicle is not in motion, and that you can be used as portable DVD player or when installed into the available docking stations as a home or mobile DVD player. Please read all passengers remains the number one priority. 2 ...
Operation Manual
Page 3
.... Keep the DVD Player away from the power source. Replace the battery only with a cleaning cloth. Refer all servicing to replace the battery incorrectly. Use a cloth lightly dampened with the discs. 3 Also refer to the instructions supplied with water for about one hour before operating the DVD Player, or remove the disc and leave the DVD Player turned ON until the moisture evaporates. 2. When you are no user-serviceable parts inside the DVD Player. Placement...
.... Keep the DVD Player away from the power source. Replace the battery only with a cleaning cloth. Refer all servicing to replace the battery incorrectly. Use a cloth lightly dampened with the discs. 3 Also refer to the instructions supplied with water for about one hour before operating the DVD Player, or remove the disc and leave the DVD Player turned ON until the moisture evaporates. 2. When you are no user-serviceable parts inside the DVD Player. Placement...

Operation Manual
Page 4
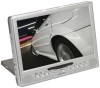
Materials Included In This Package 1) Shuttle Portable DVD Player with 10.2" LCD Monitor (P/N: 136-3886) ~ 1pc 2) Headrest Mounting Bag (P/N: 126-1324) ~ 1pc 3) Rechargeable Lithium Polymer Battery Pack 5000mAH (P/N: 136-3890) ~ 1pc 4) Remote Control (P/N: 136-3887) ~ 1pc 5) AC to DC Power Adaptor (P/N: 112-3513) ~ 1pc 6) DC Power Adaptor Cable (P/N: 112-3515) ~ 1pc 7) AV Adapter Cable (P/N: 112B3227) ~ 1pc 8) Canvas Carrying Bag (P/N: 126-1327) ~ 1pc 4
Materials Included In This Package 1) Shuttle Portable DVD Player with 10.2" LCD Monitor (P/N: 136-3886) ~ 1pc 2) Headrest Mounting Bag (P/N: 126-1324) ~ 1pc 3) Rechargeable Lithium Polymer Battery Pack 5000mAH (P/N: 136-3890) ~ 1pc 4) Remote Control (P/N: 136-3887) ~ 1pc 5) AC to DC Power Adaptor (P/N: 112-3513) ~ 1pc 6) DC Power Adaptor Cable (P/N: 112-3515) ~ 1pc 7) AV Adapter Cable (P/N: 112B3227) ~ 1pc 8) Canvas Carrying Bag (P/N: 126-1327) ~ 1pc 4
Operation Manual
Page 6
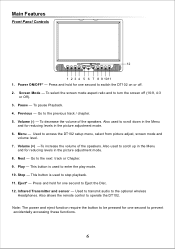
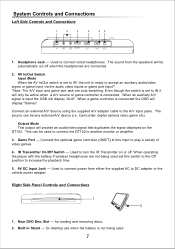
... picture adjustment mode. 6. Eject* - Go to turn the screen off . 2. To select the screen mode aspect ratio and to the next track or Chapter. 9. Also allows the remote control to the optional wireless Headphones. Power ON/OFF* - Play - Stop - Press and hold for one second to enter the play mode. 10. Used to transmit audio to operate the DT102. Main Features Front Panel Controls 12 1 2 3 4 5 6 7 8 9 10 11 1. To decrease the volume of the speakers. Menu...
... picture adjustment mode. 6. Eject* - Go to turn the screen off . 2. To select the screen mode aspect ratio and to the next track or Chapter. 9. Also allows the remote control to the optional wireless Headphones. Power ON/OFF* - Play - Stop - Press and hold for one second to enter the play mode. 10. Used to transmit audio to operate the DT102. Main Features Front Panel Controls 12 1 2 3 4 5 6 7 8 9 10 11 1. To decrease the volume of the speakers. Menu...
Operation Manual
Page 7
... to the A/V input jacks. When a game controller is not being used set to connect wired headphones. for desktop use when the battery is connected the OSD will display "Games" Connect an external A/V Source using the supplied A/V adapter cable to accept an auxiliary audio/video signal or game input via the audio video inputs or game port input**. *Note: The A/V input and game port jack are auto-switching. Camcorder, digital camera video game etc) Output Mode This output will be...
... to the A/V input jacks. When a game controller is not being used set to connect wired headphones. for desktop use when the battery is connected the OSD will display "Games" Connect an external A/V Source using the supplied A/V adapter cable to accept an auxiliary audio/video signal or game input via the audio video inputs or game port input**. *Note: The A/V input and game port jack are auto-switching. Camcorder, digital camera video game etc) Output Mode This output will be...

Operation Manual
Page 8
... the button, the subtitle language will automatically turn off . 2. PIX (Picture Select) - Each time this model. 5. Allows the user to repeat playback of a DVD or CD from disc to access the DVD root menu. 9. Turn the DT102 on and off if no 11. Angle - Volume pq - Audio - Once the desired a d j u s t m e n t bar is displayed, use the Volume Up and Down buttons to point B. 12. Display the subtitle language of a DVD. 13. Not used in a forward direction at 2, 4, 8 and 20 times the normal playback...
... the button, the subtitle language will automatically turn off . 2. PIX (Picture Select) - Each time this model. 5. Allows the user to repeat playback of a DVD or CD from disc to access the DVD root menu. 9. Turn the DT102 on and off if no 11. Angle - Volume pq - Audio - Once the desired a d j u s t m e n t bar is displayed, use the Volume Up and Down buttons to point B. 12. Display the subtitle language of a DVD. 13. Not used in a forward direction at 2, 4, 8 and 20 times the normal playback...
Operation Manual
Page 9
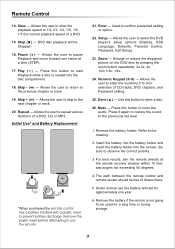
Remote Control 14. Allows the user to slow the playback speed to 1/2,1/3, 1/4, 1/5, 1/6, 1/7 the normal playback speed of a DVD. 15. Slow - Stop (
Remote Control 14. Allows the user to slow the playback speed to 1/2,1/3, 1/4, 1/5, 1/6, 1/7 the normal playback speed of a DVD. 15. Slow - Stop (
Operation Manual
Page 10
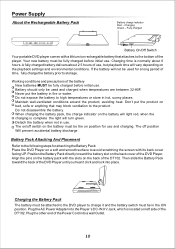
... Battery Pack directly toward the back of the DT102. Plug the AC Power Adapter into a wall Outlet. 10 Working conditions and precautions of the battery New batteries MUST be the on left side of the DVD Player until you hear it and the battery switch must be fully charged before initial use and charging. Charging the Battery Pack The battery must be attached to the DVD player to storage. Charging...
... Battery Pack directly toward the back of the DT102. Plug the AC Power Adapter into a wall Outlet. 10 Working conditions and precautions of the battery New batteries MUST be the on left side of the DVD Player until you hear it and the battery switch must be fully charged before initial use and charging. Charging the Battery Pack The battery must be attached to the DVD player to storage. Charging...
Operation Manual
Page 11
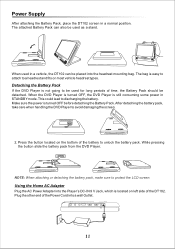
... screen. 2. Using the Home AC Adapter Plug the AC Power Adapter into a wall Outlet. Plug the other end of the Power Cord into the Player's DC-IN 9 V Jack, which is located on left side of the DT102. When used in STANDBY mode. When the DVD Player is turned OFF, the DVD Player is not going to unlock the battery pack. After detaching the battery pack, take care when handling the DVD Player...
... screen. 2. Using the Home AC Adapter Plug the AC Power Adapter into a wall Outlet. Plug the other end of the Power Cord into the Player's DC-IN 9 V Jack, which is located on left side of the DT102. When used in STANDBY mode. When the DVD Player is turned OFF, the DVD Player is not going to unlock the battery pack. After detaching the battery pack, take care when handling the DVD Player...
Operation Manual
Page 12
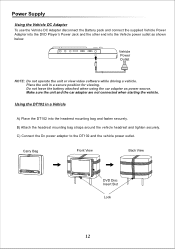
... position for viewing. Carry Bag Front View Back View DVD Disc Insert Slot Lock 12 C) Connect the Dc power adaptor to the DT102 and the vehicle power outlet. B) Attach the headrest mounting bag straps around the vehicle headrest and tighten securely. Power Supply Using the Vehicle DC Adapter To use the Vehicle DC Adapter disconnect the Battery pack and connect the supplied Vehicle Power Adapter into the DVD Player's Power Jack...
... position for viewing. Carry Bag Front View Back View DVD Disc Insert Slot Lock 12 C) Connect the Dc power adaptor to the DT102 and the vehicle power outlet. B) Attach the headrest mounting bag straps around the vehicle headrest and tighten securely. Power Supply Using the Vehicle DC Adapter To use the Vehicle DC Adapter disconnect the Battery pack and connect the supplied Vehicle Power Adapter into the DVD Player's Power Jack...
Operation Manual
Page 13
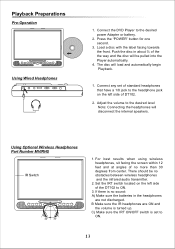
...; 1. C) Make sure the IRT ON/OFF switch is turned up. Playback Preparations Pre-Operation Using Wired Headphones 1. For best results when using wireless headphones, sit facing the screen within 12 feet and at angles of the DT102 to ON. 13 Connect the DVD Player to the desired level Note: Connecting the headphones will load and automatically begin Playback. 1. Adjust the volume to the desired power Adapter or battery. 2. Push...
...; 1. C) Make sure the IRT ON/OFF switch is turned up. Playback Preparations Pre-Operation Using Wired Headphones 1. For best results when using wireless headphones, sit facing the screen within 12 feet and at angles of the DT102 to ON. 13 Connect the DVD Player to the desired level Note: Connecting the headphones will load and automatically begin Playback. 1. Adjust the volume to the desired power Adapter or battery. 2. Push...
Operation Manual
Page 14
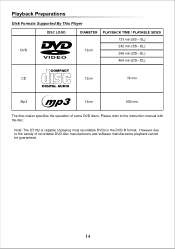
... refer to the variety of playing most recordable DVDs in the DVD-R format. However due to the instruction manual with the disc. Note: The DT102 is capable of recordable DVD disc manufacturers and software manufacturers playback cannot be guaranteed. 14 Playback Preparations Disk Formats Supported By This Player DVD DISC LOGO VIDEO DIAMETER PLAYBACK TIME / PLAYABLE SIDES 133 min (SS - SL) 484 min (DS - DL) COMPACT CD 12cm DIGITAL AUDIO 74 min Mp3 12cm...
... refer to the variety of playing most recordable DVDs in the DVD-R format. However due to the instruction manual with the disc. Note: The DT102 is capable of recordable DVD disc manufacturers and software manufacturers playback cannot be guaranteed. 14 Playback Preparations Disk Formats Supported By This Player DVD DISC LOGO VIDEO DIAMETER PLAYBACK TIME / PLAYABLE SIDES 133 min (SS - SL) 484 min (DS - DL) COMPACT CD 12cm DIGITAL AUDIO 74 min Mp3 12cm...

Operation Manual
Page 15
... Figure 2) The DVD player can also be used for a long time, disconnect the plug from the DVD player to OUT. Plug the twoprong end of the power cord to an audio amplifier. Connect the audio/video adapter cable from the outlet. Note: This requires an additional A/V cable not supplied. Please refer to the equipment's manual before connecting.Switch the AV IN/OUT switch to the audio/video inputs of the DVD player in the...
... Figure 2) The DVD player can also be used for a long time, disconnect the plug from the DVD player to OUT. Plug the twoprong end of the power cord to an audio amplifier. Connect the audio/video adapter cable from the outlet. Note: This requires an additional A/V cable not supplied. Please refer to the equipment's manual before connecting.Switch the AV IN/OUT switch to the audio/video inputs of the DVD player in the...
Operation Manual
Page 16
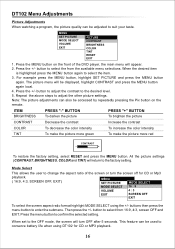
... MENU button on the remote. When the desired item is highlighted press the MENU button again to confirm the selected setting. The picture menu will return to the factory setting. Mode Select This allows the user to change the aspect ratio of the DVD player, the main menu will turn the screen off for CD or Mp3 playback. ( 16:9, 4:3, SCREEN OFF, EXIT) MENU SET PICTURE MODE SELECT MODE SELECT 16 : 9 VOLUME 4 : 3 EXIT SCREEN OFF EXIT To select the screen aspect ratio format highlight MODE SELECT using DT102 for CD or MP3 playback...
... MENU button on the remote. When the desired item is highlighted press the MENU button again to confirm the selected setting. The picture menu will return to the factory setting. Mode Select This allows the user to change the aspect ratio of the DVD player, the main menu will turn the screen off for CD or Mp3 playback. ( 16:9, 4:3, SCREEN OFF, EXIT) MENU SET PICTURE MODE SELECT MODE SELECT 16 : 9 VOLUME 4 : 3 EXIT SCREEN OFF EXIT To select the screen aspect ratio format highlight MODE SELECT using DT102 for CD or MP3 playback...

Operation Manual
Page 17
.... 17 MENU SET PICTURE MODE SELECT VOLUME EXIT NOTE: The menu will also disappear from the screen automatically if you can also be controlled by using the +/- Pressing the screen mode button will cycle through the screen aspect ratio options (16:9, 4:3, OFF ). NOTE: The volume can then control the volume using the volume +/- buttons on the DT102 will restore the picture in 16:9 mode. button to exit the menu. buttons. DT102 Menu Adjustements (Cont) NOTE: Pressing the screen mode button on the...
.... 17 MENU SET PICTURE MODE SELECT VOLUME EXIT NOTE: The menu will also disappear from the screen automatically if you can also be controlled by using the +/- Pressing the screen mode button will cycle through the screen aspect ratio options (16:9, 4:3, OFF ). NOTE: The volume can then control the volume using the volume +/- buttons on the DT102 will restore the picture in 16:9 mode. button to exit the menu. buttons. DT102 Menu Adjustements (Cont) NOTE: Pressing the screen mode button on the...
Operation Manual
Page 18
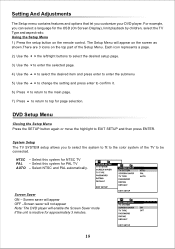
... the main page. 7) Press 5 to return to EXIT SETUP and then press ENTER. Select this system for the OSD (On Screen Display), limit playback by children, select the TV Type and aspect ratio. Using the Setup Menu 1) Press the setup button on the top part of the TV to be connected. System Setup The TV SYSTEM setup allows you customize your DVD player. For example, you can select a language for NTSC TV...
... the main page. 7) Press 5 to return to EXIT SETUP and then press ENTER. Select this system for the OSD (On Screen Display), limit playback by children, select the TV Type and aspect ratio. Using the Setup Menu 1) Press the setup button on the top part of the TV to be connected. System Setup The TV SYSTEM setup allows you customize your DVD player. For example, you can select a language for NTSC TV...

Operation Manual
Page 19
... screen aspect ratio. 4:3 PS This displays a wide picture on the screen with a portion of the left & right side removed. 4:3 LB This displays a wide picture with black bands on the upper and lower portions of the screen. 16:9 This displays a picture with bands on the aspect ratio of the screen. The bands will not lose or forget the number. Select "Rating" using 56button, then press4button to the factory-set mode. Setup TV Type The TV Type setup...
... screen aspect ratio. 4:3 PS This displays a wide picture on the screen with a portion of the left & right side removed. 4:3 LB This displays a wide picture with black bands on the upper and lower portions of the screen. 16:9 This displays a picture with bands on the aspect ratio of the screen. The bands will not lose or forget the number. Select "Rating" using 56button, then press4button to the factory-set mode. Setup TV Type The TV Type setup...

Operation Manual
Page 20
... Language Setup OSD LANGUAGE (language for on screen display) The OSD LANGUAGE setup allows you to limit the content of movie playback from ENGLISH, GERMAN SPANISH, FRENCH, or ITALIAN. Note: The subtitle selection is not available, the player will play and display on the screen display. Select "OSD" Language using 56button, then press 4button to return. G PG PG - 13 R NC - 17 ADULT Note: This feature only works on DVD's that are recorded in...
... Language Setup OSD LANGUAGE (language for on screen display) The OSD LANGUAGE setup allows you to limit the content of movie playback from ENGLISH, GERMAN SPANISH, FRENCH, or ITALIAN. Note: The subtitle selection is not available, the player will play and display on the screen display. Select "OSD" Language using 56button, then press 4button to return. G PG PG - 13 R NC - 17 ADULT Note: This feature only works on DVD's that are recorded in...
Operation Manual
Page 21
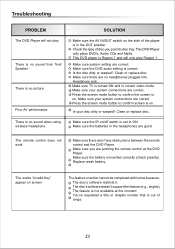
... not work Make sure there aren't any obstructions between the remote control and the DVD Player. The words "Invalid Key" appear on . Is the disc dirty or warped? Make sure there are correct. Press the screen mode button to confirm the screen is no sound when using wireless headphone Make sure system setting are correct Press the screen mode button to ON. Make sure you are good. Troubleshooting PROBLEM The DVD Player will not play...
... not work Make sure there aren't any obstructions between the remote control and the DVD Player. The words "Invalid Key" appear on . Is the disc dirty or warped? Make sure there are correct. Press the screen mode button to confirm the screen is no sound when using wireless headphone Make sure system setting are correct Press the screen mode button to ON. Make sure you are good. Troubleshooting PROBLEM The DVD Player will not play...

Operation Manual
Page 23
... removal or defacement of the factory serial number/bar code label(s). 90 DAY LIMITED WARRANTY Applies to Audiovox Video Products AUDIOVOX ELECTRONICS CORP. (the Company) warrants to the original retail purchaser of this product that should this product or any product or part thereof which vary from the date of original purchase, such defect(s) will be repaired or replaced with proof of warranty...
... removal or defacement of the factory serial number/bar code label(s). 90 DAY LIMITED WARRANTY Applies to Audiovox Video Products AUDIOVOX ELECTRONICS CORP. (the Company) warrants to the original retail purchaser of this product that should this product or any product or part thereof which vary from the date of original purchase, such defect(s) will be repaired or replaced with proof of warranty...


