
User Guide
Page 2
... 10 Internal Battery Activation and/or Replacement 11 Controls, Indicators and Connectors 12 Accessory Placement 13 Operating the Homebase 14 Preliminary Connections 14 Connecting the Power 14 Inserting the Memory Card/USB Device 14 Power On/Main Menu 15 Preliminary Checks 15 Power On/Main Menu 15 Memo Feature 16 Calendar Memos 17 Recording Calendar Memos 17 Reviewing Calendar Memos 18 Countdown Timer 19 Photo Menu 20 Photo Library Menu 21 External Media Menu 22 Settings 23 1. General Setup - General Setup -
... 10 Internal Battery Activation and/or Replacement 11 Controls, Indicators and Connectors 12 Accessory Placement 13 Operating the Homebase 14 Preliminary Connections 14 Connecting the Power 14 Inserting the Memory Card/USB Device 14 Power On/Main Menu 15 Preliminary Checks 15 Power On/Main Menu 15 Memo Feature 16 Calendar Memos 17 Recording Calendar Memos 17 Reviewing Calendar Memos 18 Countdown Timer 19 Photo Menu 20 Photo Library Menu 21 External Media Menu 22 Settings 23 1. General Setup - General Setup -
User Guide
Page 3
... likely to a power supply only of all safety and operating instructions carefully before installation, and keep these instructions and on the product. 8. Lightning and Power Surge Protection: Disconnect the unit from AC power during any openings or vents located on the unit. 1. e. Important Safety Instructions Please read all warnings listed in the User's Manual. Overloading: Do not overload wall outlets, extension cords, or integral...
... likely to a power supply only of all safety and operating instructions carefully before installation, and keep these instructions and on the product. 8. Lightning and Power Surge Protection: Disconnect the unit from AC power during any openings or vents located on the unit. 1. e. Important Safety Instructions Please read all warnings listed in the User's Manual. Overloading: Do not overload wall outlets, extension cords, or integral...

User Guide
Page 4
Introduction Your homebase allows you to: Display your digital photos from its internal memory, a memory card, or USB memory devices Record and retrieve audio messages Use the calendar to set audio and/or event reminders Display time and date Use a timer, set an alarm Leave a written message on the front of the unit or the Post-it ® pad. 4 DPF710K
Introduction Your homebase allows you to: Display your digital photos from its internal memory, a memory card, or USB memory devices Record and retrieve audio messages Use the calendar to set audio and/or event reminders Display time and date Use a timer, set an alarm Leave a written message on the front of the unit or the Post-it ® pad. 4 DPF710K
User Guide
Page 5
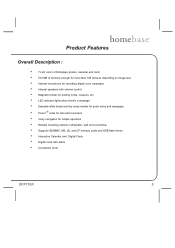
... Description : • 7-inch color LCD displays photos, calendar and clock • 512 MB of memory-enough for more than 100 pictures depending on image size • Internal microphone for recording digital voice messages • Internal speakers with volume control • Magnetic border for posting notes, coupons, etc. • LED indicator lights when there's a message • Erasable white board and dry erase marker for quick notes and messages...
... Description : • 7-inch color LCD displays photos, calendar and clock • 512 MB of memory-enough for more than 100 pictures depending on image size • Internal microphone for recording digital voice messages • Internal speakers with volume control • Magnetic border for posting notes, coupons, etc. • LED indicator lights when there's a message • Erasable white board and dry erase marker for quick notes and messages...

User Guide
Page 7
...on the refrigerator with the clear, black or white wire cover; DPF710K 7 Place the wall mount bracket in place on the back of the bracket, and firmly press and hold the bracket in the desired area...direction of the power adapter wire as shown. 2. Connect the power adapter plug to the side surface and for maximum adhesion prior to mounting your homebase to reach the AC outlet. Installation homebase Bracket Mounting Holes Refrigerator Door Front Surface Wire Post(s) Power Adapter Wire Notch DC Input Connector Power Adapter Wire Notches Refrigerator Door Seal DC Power Wire 1 inch...
...on the refrigerator with the clear, black or white wire cover; DPF710K 7 Place the wall mount bracket in place on the back of the bracket, and firmly press and hold the bracket in the desired area...direction of the power adapter wire as shown. 2. Connect the power adapter plug to the side surface and for maximum adhesion prior to mounting your homebase to reach the AC outlet. Installation homebase Bracket Mounting Holes Refrigerator Door Front Surface Wire Post(s) Power Adapter Wire Notch DC Input Connector Power Adapter Wire Notches Refrigerator Door Seal DC Power Wire 1 inch...

User Guide
Page 11
... removed for the calendar/ clock backup functions to battery orientation (+ side facing up . 2. If the unit is installed in a compartment behind the front panel of the front panel at the top and bottom edge and bow the panel out until it clears the left side by the control buttons. Remove the panel to enable battery operation 1. Insert the battery in place. 7. Control Buttons...
... removed for the calendar/ clock backup functions to battery orientation (+ side facing up . 2. If the unit is installed in a compartment behind the front panel of the front panel at the top and bottom edge and bow the panel out until it clears the left side by the control buttons. Remove the panel to enable battery operation 1. Insert the battery in place. 7. Control Buttons...
User Guide
Page 14
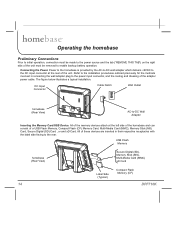
... installation. DC Input Connector Cable Notch Wall Outlet homebase (Rear View) AC-to the rear. All of the memory devices attach at the rear of the unit. Connecting the Power. All of these devices are inserted in connecting the wall adapter plug to enable backup battery operation. USB Flash Memory homebase (Rear View) Secure Digital (SD), Memory Stick (MS), Multi-Media Card (MMC) xD Card Label Side (Typical) Compact Flash Memory (CF) 14 DPF710K Operating...
... installation. DC Input Connector Cable Notch Wall Outlet homebase (Rear View) AC-to the rear. All of the memory devices attach at the rear of the unit. Connecting the Power. All of these devices are inserted in connecting the wall adapter plug to enable backup battery operation. USB Flash Memory homebase (Rear View) Secure Digital (SD), Memory Stick (MS), Multi-Media Card (MMC) xD Card Label Side (Typical) Compact Flash Memory (CF) 14 DPF710K Operating...
User Guide
Page 15
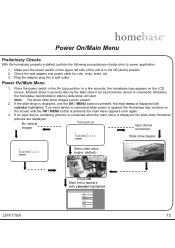
... OK / MENU button is pressed, the main menu is displayed with calendar highlighted exit mmeemmoo calendar timer photo setting DPF710K 15 If the slide show images can be erased. 2. No internal images Turn unit on the LCD screen, followed about 5 seconds later by the slide show begins (default) Press OK Main menu appears with calendar highlighted. Power On/Main Menu 1. In a few seconds, the homebase logo appears on Input device connected audiovox Slide...
... OK / MENU button is pressed, the main menu is displayed with calendar highlighted exit mmeemmoo calendar timer photo setting DPF710K 15 If the slide show images can be erased. 2. No internal images Turn unit on the LCD screen, followed about 5 seconds later by the slide show begins (default) Press OK Main menu appears with calendar highlighted. Power On/Main Menu 1. In a few seconds, the homebase logo appears on Input device connected audiovox Slide...
User Guide
Page 16
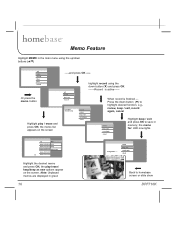
... save in memory; Memo Feature Highlight MEMO in the main menu using the down button ( ) and press OK -------Record is finished --Press the down buttons ( / ) exit memo calendar timer photo settings Or press the memo button Highlight play / erase and press OK; record review keep / exit record again cancel When record is active------ Note: Unplayed memos are displayed in green 16 Back to homebase screen or slide show DPF710K...
... save in memory; Memo Feature Highlight MEMO in the main menu using the down button ( ) and press OK -------Record is finished --Press the down buttons ( / ) exit memo calendar timer photo settings Or press the memo button Highlight play / erase and press OK; record review keep / exit record again cancel When record is active------ Note: Unplayed memos are displayed in green 16 Back to homebase screen or slide show DPF710K...
User Guide
Page 17
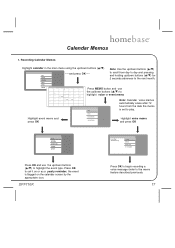
timer photo setting December 2008 Sun 1 Mon 2 Tue 3 Wed 4 Thu 5 Fri 6 Sat 7 8 9 10 11 12 13 14 15 16 17 18 19 20 Press MEMO button and use the up /down buttons ( / ) to play. the event is set it on the calendar screen by the appropriate icon. Press OK to set to highlight the event type. ok button stop record review keep / exit record again Press...
timer photo setting December 2008 Sun 1 Mon 2 Tue 3 Wed 4 Thu 5 Fri 6 Sat 7 8 9 10 11 12 13 14 15 16 17 18 19 20 Press MEMO button and use the up /down buttons ( / ) to play. the event is set it on the calendar screen by the appropriate icon. Press OK to set to highlight the event type. ok button stop record review keep / exit record again Press...
User Guide
Page 18
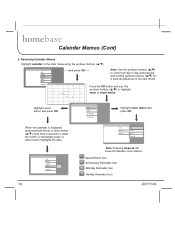
...play erase keep erase all Note: Pressing erase all will erase all calendar voice memos. Reviewing Calendar Memos Highlight calendar in the main menu using the up /down buttons ( / ) for 2 seconds advances to the next month. Note: Use the up/down buttons ( / ) to scroll from day to day and pressing and holding up /down button... press OK exit back voice memo event memo Highlight voice memo and press OK When the calendar is displayed, press and hold the up or down buttons ( / ) exit meemmoo calendar timer photo setting -----and press OK----- December 2008 Sun 1 Mon 2 Tue 3 Wed 4 Thu 5...
...play erase keep erase all Note: Pressing erase all will erase all calendar voice memos. Reviewing Calendar Memos Highlight calendar in the main menu using the up /down buttons ( / ) for 2 seconds advances to the next month. Note: Use the up/down buttons ( / ) to scroll from day to day and pressing and holding up /down button... press OK exit back voice memo event memo Highlight voice memo and press OK When the calendar is displayed, press and hold the up or down buttons ( / ) exit meemmoo calendar timer photo setting -----and press OK----- December 2008 Sun 1 Mon 2 Tue 3 Wed 4 Thu 5...
User Guide
Page 19
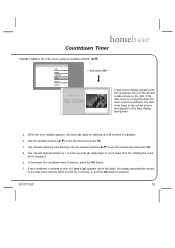
... count down buttons ( / ) exit memo calendar timer photo setting ----and press OK---- If the slide show is in the main menu using the up ! If the countdown is pressed. appears above the digits, the display automatically returns to the slide show stops at the current picture and appears in the timer display background. countdown timer 00:10:00 h m s A split screen display appears with...
... count down buttons ( / ) exit memo calendar timer photo setting ----and press OK---- If the slide show is in the main menu using the up ! If the countdown is pressed. appears above the digits, the display automatically returns to the slide show stops at the current picture and appears in the timer display background. countdown timer 00:10:00 h m s A split screen display appears with...
User Guide
Page 20
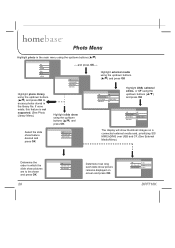
... secs DPF710K Photo Menu Highlight photo in the main menu using the up/down buttons ( / ) exit meemmoo calendar timer photo settings Highlight photo library using the up /down buttons ( / ) and press OK exit slide show order slide show time exit external media photo library slide show exit USB sd/mmc/xd/ms CF The display will show thumbnail images on a connected external media card, prioritizing SD/ MMC/xD/MS over USB and CF. (See External Media Menu) Determine...
... secs DPF710K Photo Menu Highlight photo in the main menu using the up/down buttons ( / ) exit meemmoo calendar timer photo settings Highlight photo library using the up /down buttons ( / ) and press OK exit slide show order slide show time exit external media photo library slide show exit USB sd/mmc/xd/ms CF The display will show thumbnail images on a connected external media card, prioritizing SD/ MMC/xD/MS over USB and CF. (See External Media Menu) Determine...
User Guide
Page 21
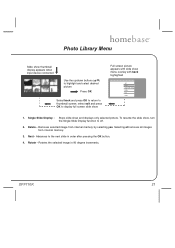
... exit and press OK to display full screen slide show Full screen picture appears with back highlighted exit back single slide display delete next rotate 1. Advances to off. 2. Rotates the selected image in order after pressing the OK button. 4. Single Slide Display - Rotate - Delete - Selecting all removes all images from internal memory by selecting yes. Next - DPF710K 21 Stops slide show , turn the Single Slide Display function to the next slide...
... exit and press OK to display full screen slide show Full screen picture appears with back highlighted exit back single slide display delete next rotate 1. Advances to off. 2. Rotates the selected image in order after pressing the OK button. 4. Single Slide Display - Rotate - Delete - Selecting all removes all images from internal memory by selecting yes. Next - DPF710K 21 Stops slide show , turn the Single Slide Display function to the next slide...
User Guide
Page 23
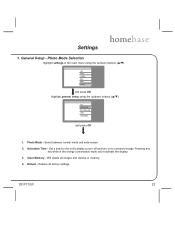
... screen. 2. Activation Time - Photo Mode Selection Highlight settings in the energy conservation mode will re-activate the display. 3. Photo Mode - Set a time for the unit's display to turn off and turn on to conserve energy. DPF710K 23 Default - Restore all images and memos in memory. 4. Settings 1. Pressing any key while in the main menu using the up/down buttons ( / ) exit meemmoo calendar timer photo settings and press OK Highlight general setup using the up/down buttons ( / ) exit general setup time / date setup alarm clock display...
... screen. 2. Activation Time - Photo Mode Selection Highlight settings in the energy conservation mode will re-activate the display. 3. Photo Mode - Set a time for the unit's display to turn off and turn on to conserve energy. DPF710K 23 Default - Restore all images and memos in memory. 4. Settings 1. Pressing any key while in the main menu using the up/down buttons ( / ) exit meemmoo calendar timer photo settings and press OK Highlight general setup using the up/down buttons ( / ) exit general setup time / date setup alarm clock display...

User Guide
Page 24
... the week. use the up /down buttons ( / ) to set the day and press OK. Wednesday - Settings (Cont) 2. Time / Date Setting a. The time / date display appears with time/date setup highlighted. Use the up /down buttons ( / ) and press OK. use the up /down buttons ( / ) to set the year and press OK. Flashing now advances to the Settings menu with the hour digit(s) flashing. i. Time/date setup is complete and the display reverts to the...
... the week. use the up /down buttons ( / ) to set the day and press OK. Wednesday - Settings (Cont) 2. Time / Date Setting a. The time / date display appears with time/date setup highlighted. Use the up /down buttons ( / ) and press OK. use the up /down buttons ( / ) to set the year and press OK. Flashing now advances to the Settings menu with the hour digit(s) flashing. i. Time/date setup is complete and the display reverts to the...

User Guide
Page 25
... alarm set To program the alarm time, use the up /down buttons ( / ) to set Clock is displayed in the split screen configuration Wednesday - The time / date display appears with the hour digit(s) flashing. The minutes digits are now flashing; use the up /down buttons ( / ) to highlight alarm set and press OK exit alarm on/off Off alarm set Note: If the alarm is also displayed on /off alarm set the hour and press OK. d. c. e. Alarm Setting In the Settings menu, highlight alarm using...
... alarm set To program the alarm time, use the up /down buttons ( / ) to set Clock is displayed in the split screen configuration Wednesday - The time / date display appears with the hour digit(s) flashing. The minutes digits are now flashing; use the up /down buttons ( / ) to highlight alarm set and press OK exit alarm on/off Off alarm set Note: If the alarm is also displayed on /off alarm set the hour and press OK. d. c. e. Alarm Setting In the Settings menu, highlight alarm using...

User Guide
Page 26
.... 17th, 2008 Clock icon displayed on the screen, highlight clock display using the up/down buttons ( / ) exit mgeenmeoral setup time / date setup alarm clock display and press OK exit off gmeenmeoral setup screen bottom edge time / date setup large centered alarm split screen clock display Select the clock presentation desired using the up/down buttons ( / ) and press OK The clock can be turned off completely (off). Clock Display In the settings menu, to display the clock on bottom of the screen, in the...
.... 17th, 2008 Clock icon displayed on the screen, highlight clock display using the up/down buttons ( / ) exit mgeenmeoral setup time / date setup alarm clock display and press OK exit off gmeenmeoral setup screen bottom edge time / date setup large centered alarm split screen clock display Select the clock presentation desired using the up/down buttons ( / ) and press OK The clock can be turned off completely (off). Clock Display In the settings menu, to display the clock on bottom of the screen, in the...
User Guide
Page 27
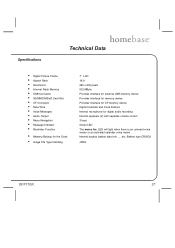
... Card Slot • CF Connector • Date/Time • Voice Messages • Audio Output • Menu Navigation • Message Indicator • Reminder Function • Memory Backup for the Clock • Image File Type Handling 7" LCD 16:9 480 x 234 pixels 512 MByte Provides interface for external USB memory device Provides interface for memory device Provides interface for CF memory device Digital Calendar and Clock Feature Internal microphone for digital audio recording Internal speakers (2) with separate volume control...
... Card Slot • CF Connector • Date/Time • Voice Messages • Audio Output • Menu Navigation • Message Indicator • Reminder Function • Memory Backup for the Clock • Image File Type Handling 7" LCD 16:9 480 x 234 pixels 512 MByte Provides interface for external USB memory device Provides interface for memory device Provides interface for CF memory device Digital Calendar and Clock Feature Internal microphone for digital audio recording Internal speakers (2) with separate volume control...
User Guide
Page 28
..., neglect, accident, or by removal or defacement of the factory serial number/bar code label(s). No person or representative is authorized to assume for installation, removal or reinstallation of the product, or to damage to digital memory/ media devices, gaming devices, discs, speakers, accessories, or electrical systems. This Warranty does not apply to any product or part thereof which vary from the...
..., neglect, accident, or by removal or defacement of the factory serial number/bar code label(s). No person or representative is authorized to assume for installation, removal or reinstallation of the product, or to damage to digital memory/ media devices, gaming devices, discs, speakers, accessories, or electrical systems. This Warranty does not apply to any product or part thereof which vary from the...


