Owners Manual
Page 2
... provide years of reliable, trouble-free service. To prevent it from falling do not spill or spray liquid of the art electronics and is unplugged from strong magnets, heat sources, direct sunlight, and excessive dust. 2. To ensure proper ventilation and proper operation, never cover or block the slots and openings with SD/MMC/MS/CF/xD memory cards and USB memory devices.
... provide years of reliable, trouble-free service. To prevent it from falling do not spill or spray liquid of the art electronics and is unplugged from strong magnets, heat sources, direct sunlight, and excessive dust. 2. To ensure proper ventilation and proper operation, never cover or block the slots and openings with SD/MMC/MS/CF/xD memory cards and USB memory devices.
Owners Manual
Page 3
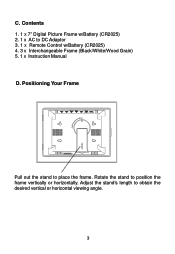
Rotate the stand to DC Adaptor 3. 1 x Remote Control w/Battery (CR2025) 4. 3 x Interchangeable Frame (Black/White/Wood Grain) 5. 1 x Instruction Manual D. Contents 1. 1 x 7" Digital Picture Frame w/Battery (CR2025) 2. 1 x AC to position the frame vertically or horizontally. C. Adjust the stand's length to place the frame. Positioning Your Frame Pull out the stand to obtain the desired vertical or horizontal viewing angle. 3
Rotate the stand to DC Adaptor 3. 1 x Remote Control w/Battery (CR2025) 4. 3 x Interchangeable Frame (Black/White/Wood Grain) 5. 1 x Instruction Manual D. Contents 1. 1 x 7" Digital Picture Frame w/Battery (CR2025) 2. 1 x AC to position the frame vertically or horizontally. C. Adjust the stand's length to place the frame. Positioning Your Frame Pull out the stand to obtain the desired vertical or horizontal viewing angle. 3

Owners Manual
Page 4
Unit View Left and Right Side Power On/Off Switch DC 9V Plug the AC adaptor SD/MMC/MS Slot Insert the SD/MMC/MS card CF Slot Insert the CF card USB Slot Insert a USB memory device Note: The USB slot can not be connected to a PC for transferring pictures from the PC to the DPF. E. Front Side IR Sensor 4
Unit View Left and Right Side Power On/Off Switch DC 9V Plug the AC adaptor SD/MMC/MS Slot Insert the SD/MMC/MS card CF Slot Insert the CF card USB Slot Insert a USB memory device Note: The USB slot can not be connected to a PC for transferring pictures from the PC to the DPF. E. Front Side IR Sensor 4
Owners Manual
Page 5
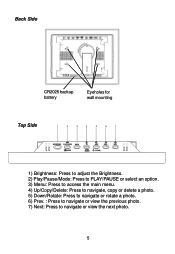
Back Side CR2025 backup battery Eyeholes for wall mounting Top Side 1 2 3 4 5 6 7 1) Brightness: Press to adjust the Brightness. 2) Play/Pause/Mode: Press to PLAY/PAUSE or select an option. 3) Menu: Press to access the main menu. 4) Up/Copy/Delete: Press to navigate, copy or delete a photo. 5) Down/Rotate: Press to navigate or rotate a photo. 6) Prev. : Press to navigate or view the previous photo. 7) Next: Press to navigate or view the next photo. 5
Back Side CR2025 backup battery Eyeholes for wall mounting Top Side 1 2 3 4 5 6 7 1) Brightness: Press to adjust the Brightness. 2) Play/Pause/Mode: Press to PLAY/PAUSE or select an option. 3) Menu: Press to access the main menu. 4) Up/Copy/Delete: Press to navigate, copy or delete a photo. 5) Down/Rotate: Press to navigate or rotate a photo. 6) Prev. : Press to navigate or view the previous photo. 7) Next: Press to navigate or view the next photo. 5
Owners Manual
Page 6
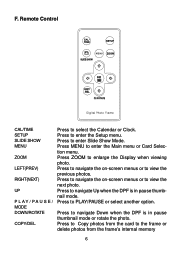
... PLAY/PAUSE or select another option. Press to enlarge the Display when viewing photo. Press to Copy photos from the card to enter the Setup menu. Press to the frame or delete photos from the frame's internal memory 6 F. Remote Control MENU Digital Photo Frame CAL/TIME SETUP SLIDE SHOW MENU ZOOM LEFT(PREV) RIGHT(NEXT) UP P L AY / PA U S E / MODE DOWN/ROTATE COPY/DEL Press to view the next photo. Press to navigate the on -screen menus or to select the Calendar or Clock...
... PLAY/PAUSE or select another option. Press to enlarge the Display when viewing photo. Press to Copy photos from the card to enter the Setup menu. Press to the frame or delete photos from the frame's internal memory 6 F. Remote Control MENU Digital Photo Frame CAL/TIME SETUP SLIDE SHOW MENU ZOOM LEFT(PREV) RIGHT(NEXT) UP P L AY / PA U S E / MODE DOWN/ROTATE COPY/DEL Press to view the next photo. Press to navigate the on -screen menus or to select the Calendar or Clock...
Owners Manual
Page 7
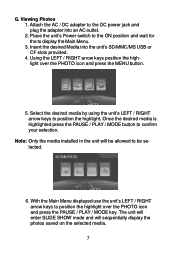
.../MS USB or CF slots provided. 4. Insert the desired Media into an AC outlet. 2. Once the desired media is highlighted press the PAUSE / PLAY / MODE button to position the highlight. Place the unit's Power switch to the ON position and wait for the to position the highlight over the PHOTO icon and press the MENU button. 5. With the Main Menu displayed use the...
.../MS USB or CF slots provided. 4. Insert the desired Media into an AC outlet. 2. Once the desired media is highlighted press the PAUSE / PLAY / MODE button to position the highlight. Place the unit's Power switch to the ON position and wait for the to position the highlight over the PHOTO icon and press the MENU button. 5. With the Main Menu displayed use the...
Owners Manual
Page 8
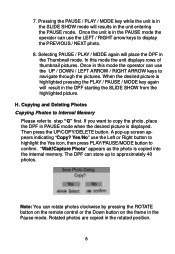
... mode. Rotated photos are copied in the DPF starting the SLIDE SHOW from the highlighted picture. In this mode the operator can use the Left or Right button to highlight the Yes icon, then press PLAY/PAUSE/MODE button to step "G" first. Copying and Deleting Photos Copying Photos to Internal Memory Please refer to confirm. Once in the Thumbnail mode. Then press the UP/COPY/DELETE button. The DPF can rotate photos clockwise by pressing the ROTATE button on the remote control...
... mode. Rotated photos are copied in the DPF starting the SLIDE SHOW from the highlighted picture. In this mode the operator can use the Left or Right button to highlight the Yes icon, then press PLAY/PAUSE/MODE button to step "G" first. Copying and Deleting Photos Copying Photos to Internal Memory Please refer to confirm. Once in the Thumbnail mode. Then press the UP/COPY/DELETE button. The DPF can rotate photos clockwise by pressing the ROTATE button on the remote control...
Owners Manual
Page 9
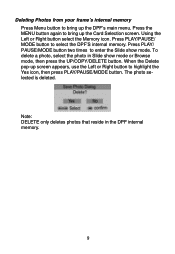
... show mode. Using the Left or Right button select the Memory icon. Press PLAY/ PAUSE/MODE button two times to enter the Slide show mode or Browse mode, then press the UP/COPY/DELETE button. To delete a photo, select the photo in the DPF internal memory. 9 The photo selected is deleted. When the Delete pop-up screen appears, use the Left or Right button to select the DPF'S internal memory. Deleting Photos from your frame's internal memory Press Menu button to bring up the Card Selection screen.
... show mode. Using the Left or Right button select the Memory icon. Press PLAY/ PAUSE/MODE button two times to enter the Slide show mode or Browse mode, then press the UP/COPY/DELETE button. To delete a photo, select the photo in the DPF internal memory. 9 The photo selected is deleted. When the Delete pop-up screen appears, use the Left or Right button to select the DPF'S internal memory. Deleting Photos from your frame's internal memory Press Menu button to bring up the Card Selection screen.
Owners Manual
Page 10
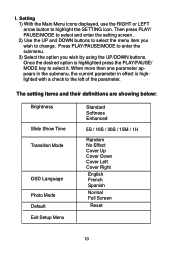
... Time Transition Mode OSD Language Photo Mode Default Exit Setup Menu Standard Softness Enhanced 5S / 10S / 30S / 15M / 1H Random No Effect Cover Up Cover Down Cover Left Cover Right English French Spanish Normal Full Screen Reset 10 Once the desired option is highlighted with a check to the left of the parameter. Then press PLAY/ PAUSE/MODE to select and enter the setting screen . 2) Use...
... Time Transition Mode OSD Language Photo Mode Default Exit Setup Menu Standard Softness Enhanced 5S / 10S / 30S / 15M / 1H Random No Effect Cover Up Cover Down Cover Left Cover Right English French Spanish Normal Full Screen Reset 10 Once the desired option is highlighted with a check to the left of the parameter. Then press PLAY/ PAUSE/MODE to select and enter the setting screen . 2) Use...
Owners Manual
Page 11
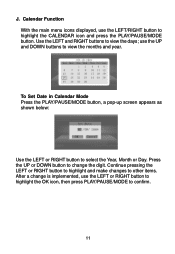
.../RIGHT button to confirm. 11 To Set Date in Calendar Mode Press the PLAY/PAUSE/MODE button, a pop-up screen appears as shown below: Use the LEFT or RIGHT button to view the days; Continue pressing the LEFT or RIGHT button to highlight and make changes to view the months and year. J. Calendar Function With the main menu icons displayed, use the UP and DOWN buttons to other items. After a change the digit.
.../RIGHT button to confirm. 11 To Set Date in Calendar Mode Press the PLAY/PAUSE/MODE button, a pop-up screen appears as shown below: Use the LEFT or RIGHT button to view the days; Continue pressing the LEFT or RIGHT button to highlight and make changes to view the months and year. J. Calendar Function With the main menu icons displayed, use the UP and DOWN buttons to other items. After a change the digit.
Owners Manual
Page 12
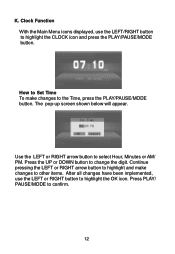
How to Set Time To make changes to other items. After all changes have been implemented, use the LEFT/RIGHT button to highlight the OK icon. The pop-up screen shown below will appear. K. Clock Function With the Main Menu icons displayed, use the LEFT or RIGHT button to highlight the CLOCK icon and press the PLAY/PAUSE/MODE button. Press the UP or DOWN button to select Hour, Minutes...
How to Set Time To make changes to other items. After all changes have been implemented, use the LEFT/RIGHT button to highlight the OK icon. The pop-up screen shown below will appear. K. Clock Function With the Main Menu icons displayed, use the LEFT or RIGHT button to highlight the CLOCK icon and press the PLAY/PAUSE/MODE button. Press the UP or DOWN button to select Hour, Minutes...
Owners Manual
Page 13
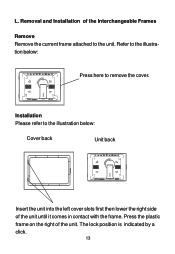
Removal and Installation of the unit. Press the plastic frame on the right of the Interchangeable Frames Remove Remove the current frame attached to the unit. L. Refer to remove the cover. The lock position is indicated by a click. 13 Installation Please refer to the illustration below : Press here to the illustration below : Cover back Unit back Insert the unit into the left cover slots first then lower the right side of the unit until it comes in contact with the frame.
Removal and Installation of the unit. Press the plastic frame on the right of the Interchangeable Frames Remove Remove the current frame attached to the unit. L. Refer to remove the cover. The lock position is indicated by a click. 13 Installation Please refer to the illustration below : Press here to the illustration below : Cover back Unit back Insert the unit into the left cover slots first then lower the right side of the unit until it comes in contact with the frame.
Owners Manual
Page 14
SPECIFICATIONS Photo format: JPEG Panel size: 7 Inch Power source: DC 9V Power consumption: 5 W Operating temperature: 41~95°F, 5~35°C Weight : .50 Kg Dimensions (W x H x D): 9.69 X 7.28 X 1.30 inches 246 X185 X 33mm 14 M.
SPECIFICATIONS Photo format: JPEG Panel size: 7 Inch Power source: DC 9V Power consumption: 5 W Operating temperature: 41~95°F, 5~35°C Weight : .50 Kg Dimensions (W x H x D): 9.69 X 7.28 X 1.30 inches 246 X185 X 33mm 14 M.

Owners Manual
Page 15
Troubleshooting Problem Solution Your digital picture frame won't turn the frame on again. * This device does not support flash cards larger than JPEG. Refer to format it first. . * Note: Some digital cameras save images in your digital picture frame contains JPEG files. (Progressive JPEG but you can try to your camera's manual if your images. The frame displays some Higher resolution pictures load more pictures slower and some cards can not be read you cannot view your photos. 15 tures or down sampling...
Troubleshooting Problem Solution Your digital picture frame won't turn the frame on again. * This device does not support flash cards larger than JPEG. Refer to format it first. . * Note: Some digital cameras save images in your digital picture frame contains JPEG files. (Progressive JPEG but you can try to your camera's manual if your images. The frame displays some Higher resolution pictures load more pictures slower and some cards can not be read you cannot view your photos. 15 tures or down sampling...

Owners Manual
Page 16
... antenna problems, to costs incurred for installation, removal or reinstallation of the product, or to damage to digital memory/media devices, gaming devices, discs, speakers, accessories, or electrical systems. This Warranty does not apply to any liability other rights which , in connection with reconditioned product (at the address shown below. This Warranty gives you specific legal rights and you . U.S.A. : AUDIOVOX ELECTRONICS CORPORATION...
... antenna problems, to costs incurred for installation, removal or reinstallation of the product, or to damage to digital memory/media devices, gaming devices, discs, speakers, accessories, or electrical systems. This Warranty does not apply to any liability other rights which , in connection with reconditioned product (at the address shown below. This Warranty gives you specific legal rights and you . U.S.A. : AUDIOVOX ELECTRONICS CORPORATION...


