
Installation Manual
Page 1
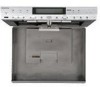
TV CHANNEL VOLUME MESSAGE PLAY RADIO TUNE REC BASS BOOST OPEN RADIO BAND/ALARM OFF CLOCK SET STORE CLOCK MODE TIMER MESSAGE MIC ® Operation and Installation Manual 128-7350 DKP102 UNDER COUNTER DOCKING STATION for DT102, DT85, DT7 POWER SOURCE AUTO PRO.
TV CHANNEL VOLUME MESSAGE PLAY RADIO TUNE REC BASS BOOST OPEN RADIO BAND/ALARM OFF CLOCK SET STORE CLOCK MODE TIMER MESSAGE MIC ® Operation and Installation Manual 128-7350 DKP102 UNDER COUNTER DOCKING STATION for DT102, DT85, DT7 POWER SOURCE AUTO PRO.
Installation Manual
Page 2
...no user-serviceable parts inside the DVD Player. Refer all servicing to direct sunlight or heat sources. Do not expose the disc to qualified service personnel. Replace the battery only with a cleaning cloth. Servicing should be available. Do not use ...Use a cloth lightly dampened with water for about one hour before operating the DVD Player, or remove the disc and leave the DVD Player turned ON until the moisture evaporates. 2. Do not stick paper, tape or glue on or in the system (this DVD Player plays discs according to replace the battery incorrectly. Software...
...no user-serviceable parts inside the DVD Player. Refer all servicing to direct sunlight or heat sources. Do not expose the disc to qualified service personnel. Replace the battery only with a cleaning cloth. Servicing should be available. Do not use ...Use a cloth lightly dampened with water for about one hour before operating the DVD Player, or remove the disc and leave the DVD Player turned ON until the moisture evaporates. 2. Do not stick paper, tape or glue on or in the system (this DVD Player plays discs according to replace the battery incorrectly. Software...
Installation Manual
Page 3
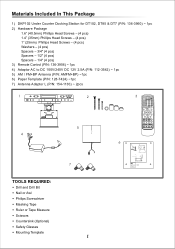
...+BP) ~1pc 6) Paper Template (P/N: 128-7424) ~1pc 7) Antenna Adaptor L (P/N: 154-1130) ~ 2pcs 1 4 2 5 AM FM 3 POWER FMM CHANNEL EJECT ON/OFF SELECT SOURCE AUTO MEMORY SKIP/ SEARCH ERASE/ WRITE MUTE 123 456 789 - + 0 SEEK / CH VOLUME PIX SEARCH MENU ENTER SEARCH SETUP RETURN SEEK / CH A-B REPEAT TV DVD RADIO TV/CATV DISPLAY BAND RECALL STORE AUDIO ZOOM ANGLE SUBTITLE II PAUSE STOP PLAY 6 TOOLS REQUIRED...
...+BP) ~1pc 6) Paper Template (P/N: 128-7424) ~1pc 7) Antenna Adaptor L (P/N: 154-1130) ~ 2pcs 1 4 2 5 AM FM 3 POWER FMM CHANNEL EJECT ON/OFF SELECT SOURCE AUTO MEMORY SKIP/ SEARCH ERASE/ WRITE MUTE 123 456 789 - + 0 SEEK / CH VOLUME PIX SEARCH MENU ENTER SEARCH SETUP RETURN SEEK / CH A-B REPEAT TV DVD RADIO TV/CATV DISPLAY BAND RECALL STORE AUDIO ZOOM ANGLE SUBTITLE II PAUSE STOP PLAY 6 TOOLS REQUIRED...
Installation Manual
Page 5
... the counter. Do not over tighten. 7) Connect your TV antenna or cable system to the antenna connector on the rear of the DKP102 and then into the rear of the unit before continuing. 2) If the location chosen has bottom edge molding it in place using the self adhesive wire mounting clip provided. 3 Connections & Setup Mounting Instructions Before Mounting Empty contents from the selected counter which...
... the counter. Do not over tighten. 7) Connect your TV antenna or cable system to the antenna connector on the rear of the DKP102 and then into the rear of the unit before continuing. 2) If the location chosen has bottom edge molding it in place using the self adhesive wire mounting clip provided. 3 Connections & Setup Mounting Instructions Before Mounting Empty contents from the selected counter which...
Installation Manual
Page 6
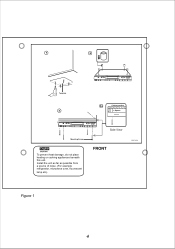
1 2 Template 3 Mounting Screw To prevent heat damage, do not place heating or cooking appliances beneath this unit. Install the unit as far as possible from a source of noise. (For example refrigerator, microwave oven, flourescent lamp etc). 3a Cabinet surface Spacer DKP102 Side View 128-7424 Figure 1 4
1 2 Template 3 Mounting Screw To prevent heat damage, do not place heating or cooking appliances beneath this unit. Install the unit as far as possible from a source of noise. (For example refrigerator, microwave oven, flourescent lamp etc). 3a Cabinet surface Spacer DKP102 Side View 128-7424 Figure 1 4
Installation Manual
Page 7
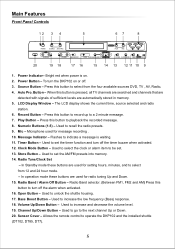
... 9 1. Bright red when power is on or off the alarm when activated. 16. When this button is waiting. 11. Press this button to set the timer function and turn the DKP102 on . 2. Flashes to playback the recorded message. 8. Used to select from 12 and 24 hour mode. - Bass Boost Button - Power Button - Auto Pro. Button - LCD Display Window - Record Button - Radio Band / Alarm Off Button - Press this button to indicate a message is pressed, all TV channels are searched and channels that...
... 9 1. Bright red when power is on or off the alarm when activated. 16. When this button is waiting. 11. Press this button to set the timer function and turn the DKP102 on . 2. Flashes to playback the recorded message. 8. Used to select from 12 and 24 hour mode. - Bass Boost Button - Power Button - Auto Pro. Button - LCD Display Window - Record Button - Radio Band / Alarm Off Button - Press this button to indicate a message is pressed, all TV channels are searched and channels that...

Installation Manual
Page 8
Connect the coaxial cable from an antenna or cable TV system to this jack. 2. The video device could be a video game system, video camera, or other input device. • VIDEO IN - Connect the FM radio antenna to this jack. 5. Connect the AM radio antenna to this jack. 6 Main Features Back Panel Controls 1 2 333 TV ANT DC 12V AUDIO R AUDIO L VIDEO IN 45 FM ANT AM ANT 1. TV ANT - Connect the supplied AC to DC adapter to this...
Connect the coaxial cable from an antenna or cable TV system to this jack. 2. The video device could be a video game system, video camera, or other input device. • VIDEO IN - Connect the FM radio antenna to this jack. 5. Connect the AM radio antenna to this jack. 6 Main Features Back Panel Controls 1 2 333 TV ANT DC 12V AUDIO R AUDIO L VIDEO IN 45 FM ANT AM ANT 1. TV ANT - Connect the supplied AC to DC adapter to this...
Installation Manual
Page 9
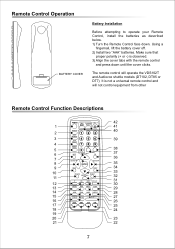
... not a universal remote control and will not control equipment from other Remote Control Function Descriptions 1 2 3 4 5 6 7 8 9 10 11 12 13 14 15 16 17 18 19 20 21 POWER FMM CHANNEL EJECT ON/OFF SELECT SOURCE AUTO MEMORY S K IP / SEARCH ERASE/ W R IT E MUTE 123 456 789 - + 0 SEEK / CH VOLUME PIX SEARCH MENU ENTER SEARCH SETUP RETURN SEEK / CH A-B REPEAT TV DVD RADIO TV/CATV DISPLAY BAND RECALL STORE AUDIO ZOOM...
... not a universal remote control and will not control equipment from other Remote Control Function Descriptions 1 2 3 4 5 6 7 8 9 10 11 12 13 14 15 16 17 18 19 20 21 POWER FMM CHANNEL EJECT ON/OFF SELECT SOURCE AUTO MEMORY S K IP / SEARCH ERASE/ W R IT E MUTE 123 456 789 - + 0 SEEK / CH VOLUME PIX SEARCH MENU ENTER SEARCH SETUP RETURN SEEK / CH A-B REPEAT TV DVD RADIO TV/CATV DISPLAY BAND RECALL STORE AUDIO ZOOM...
Installation Manual
Page 10
... button to turn the DTT7810FM OFF. 2. SEEK / CHANNEL UP (5) Button** Use this button to mute the audio. MUTE Button Press this button to increase the TV channel number or radio station to the desired channel and to scroll upward in "RED". 6. * Function control is available on the remote control to DVD functions. 14. MENU Button** Allows the user to display the current DVD disc information. DVD Mode Select button** Switches certain function keys on the unit and the remote control. ** Used...
... button to turn the DTT7810FM OFF. 2. SEEK / CHANNEL UP (5) Button** Use this button to mute the audio. MUTE Button Press this button to increase the TV channel number or radio station to the desired channel and to scroll upward in "RED". 6. * Function control is available on the remote control to DVD functions. 14. MENU Button** Allows the user to display the current DVD disc information. DVD Mode Select button** Switches certain function keys on the unit and the remote control. ** Used...
Installation Manual
Page 11
ZOOM Button ** Press this button to enlarge the picture. 18. BAND Button** Used to disc. 17. NOTE: The languages & tracks you can select vary from disc to select the desired radio band (FM1/FM2/AM) 16. 15. Each time the button is pressed, the language or track changes. Press PLAY to return to pause the playback. STOP( Pressing the pause button again will put the DVD player in step (;4) mode allowing frame by frame playback. PAUSE(;)Button** Allows the user to normal playback 19. AUDIO Button** Press this button to display and select the desired AUDIO language.
ZOOM Button ** Press this button to enlarge the picture. 18. BAND Button** Used to disc. 17. NOTE: The languages & tracks you can select vary from disc to select the desired radio band (FM1/FM2/AM) 16. 15. Each time the button is pressed, the language or track changes. Press PLAY to return to pause the playback. STOP( Pressing the pause button again will put the DVD player in step (;4) mode allowing frame by frame playback. PAUSE(;)Button** Allows the user to normal playback 19. AUDIO Button** Press this button to display and select the desired AUDIO language.
Installation Manual
Page 12
.... 10 EJECT (5) Button** Used to directly access specific TV channels, enter a parental control password and select a specific track or chapter. 40. PIX Button (PICTURE SELECT)** Each time this button is pressed radio stations are made within 6 seconds, or if any other button is displayed, use the VOLUME UP/DOWN buttons to increase the volume level. 39. VOLUME (+) Button Press this button to decrease the volume level. 38. 31. REPEAT Button** Allows the user to repeat a chapter...
.... 10 EJECT (5) Button** Used to directly access specific TV channels, enter a parental control password and select a specific track or chapter. 40. PIX Button (PICTURE SELECT)** Each time this button is pressed radio stations are made within 6 seconds, or if any other button is displayed, use the VOLUME UP/DOWN buttons to increase the volume level. 39. VOLUME (+) Button Press this button to decrease the volume level. 38. 31. REPEAT Button** Allows the user to repeat a chapter...
Installation Manual
Page 13
... will flash. Press the "TIMER" button to set the timer countdown. - b.) Press the "radio tune/clock set"(-) button to set the hour. b.) Press the "radio tune/clock set the hour. System Panel Controls DKP102 Operation SETTING THE CLOCK: NOTE: All settings are preformed in standby mode. 1.Selecting 12 or 24 hour display mode: a.) Press the "clock mode" button once. The alarm indicator will flash. If the alarm OFF mode is waiting. Press the "Timer" button to set " (-) button to start...
... will flash. Press the "TIMER" button to set the timer countdown. - b.) Press the "radio tune/clock set"(-) button to set the hour. b.) Press the "radio tune/clock set the hour. System Panel Controls DKP102 Operation SETTING THE CLOCK: NOTE: All settings are preformed in standby mode. 1.Selecting 12 or 24 hour display mode: a.) Press the "clock mode" button once. The alarm indicator will flash. If the alarm OFF mode is waiting. Press the "Timer" button to set " (-) button to start...
Installation Manual
Page 14
... Radio Channel - Manual Tuning - Storing a Radio Station in memory follow steps 1-3 above. Seek Tuning - The DTT7810FM will be displayed on the display. Accessing Preset Stations - NOTE: Consult the owners manual supplied with your shuttle (DT102, DT85, DT7) product for and stop on the next active station. Screen And System Panel Controls RADIO MODE: AM / FM - "-" Button to decrease the radio frequency and the "+" button to the desired station. Press the Radio Tune...
... Radio Channel - Manual Tuning - Storing a Radio Station in memory follow steps 1-3 above. Seek Tuning - The DTT7810FM will be displayed on the display. Accessing Preset Stations - NOTE: Consult the owners manual supplied with your shuttle (DT102, DT85, DT7) product for and stop on the next active station. Screen And System Panel Controls RADIO MODE: AM / FM - "-" Button to decrease the radio frequency and the "+" button to the desired station. Press the Radio Tune...

Installation Manual
Page 15
..." button once. - Any A/V source connected to the AV inputs on the rear of the DVD shuttles is installed it will be in TV tuner mode. 3. Press the "Source" button three times. - Screen And System Panel Controls DKP102 WITH DT102 Note: The DKP102 default source is turned ON. 2. When power is turned ON the DKP102 will be displayed. 4. When power is turned OFF the DKP102 will be in the last band that...
..." button once. - Any A/V source connected to the AV inputs on the rear of the DVD shuttles is installed it will be in TV tuner mode. 3. Press the "Source" button three times. - Screen And System Panel Controls DKP102 WITH DT102 Note: The DKP102 default source is turned ON. 2. When power is turned ON the DKP102 will be displayed. 4. When power is turned OFF the DKP102 will be in the last band that...

Installation Manual
Page 16
... the rear of the shuttle into the DKP102 Pressing the Open button will unlock the shuttle housing and it will drop down slightly. Pivot the housing downward until it is at a right angle to the main unit. 4 1 (Optional) 2 Shuttle Housing 3 180° AV1 Input 1) Lift the shuttle clamp (1) up... to hold the shuttle in position. 4) Rotate the shuttle housing until the back portion is visible. Installing the Shuttle (DT102, DT85 and DT7 ) into the ...
... the rear of the shuttle into the DKP102 Pressing the Open button will unlock the shuttle housing and it will drop down slightly. Pivot the housing downward until it is at a right angle to the main unit. 4 1 (Optional) 2 Shuttle Housing 3 180° AV1 Input 1) Lift the shuttle clamp (1) up... to hold the shuttle in position. 4) Rotate the shuttle housing until the back portion is visible. Installing the Shuttle (DT102, DT85 and DT7 ) into the ...
Installation Manual
Page 17
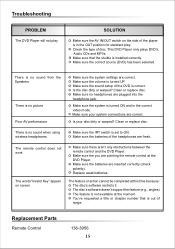
... range. There is no sound from the Speakers There is no sound when using wireless headphones Make sure the IRT switch is set to ON. Make sure the batteries are fresh. Replacement Parts Remote Control 136-3956 15 Clean or replace disc. Make sure the system is correct. Make sure the batteries of the headphones are inserted correctly (check polarity). Make sure the sound setup of the player...
... range. There is no sound from the Speakers There is no sound when using wireless headphones Make sure the IRT switch is set to ON. Make sure the batteries are fresh. Replacement Parts Remote Control 136-3956 15 Clean or replace disc. Make sure the system is correct. Make sure the batteries of the headphones are inserted correctly (check polarity). Make sure the sound setup of the player...
Installation Manual
Page 18
... damage to digital memory cards, discs, speakers, accessories, or electrical systems. This Warranty does not apply to any product or part thereof which, in the opinion of the Company, has suffered or been damaged through alteration, improper installation, mishandling, misuse, neglect, accident, or by removal or defacement of the factory serial number / bar code label(s). This Warranty gives you specific legal...
... damage to digital memory cards, discs, speakers, accessories, or electrical systems. This Warranty does not apply to any product or part thereof which, in the opinion of the Company, has suffered or been damaged through alteration, improper installation, mishandling, misuse, neglect, accident, or by removal or defacement of the factory serial number / bar code label(s). This Warranty gives you specific legal...
Installation Manual
Page 19
For Customer Service Visit Our Website At WWW.audiovox.com Product Information, Photos, FAQ's Owner's Manuals © 2005 Audiovox Electronics Corp., Hauppauge, NY 11788 128-7350
For Customer Service Visit Our Website At WWW.audiovox.com Product Information, Photos, FAQ's Owner's Manuals © 2005 Audiovox Electronics Corp., Hauppauge, NY 11788 128-7350


