
User Manual
Page 2
... viewing uses only unless otherwise authorized by Macrovision Corporation, and is applied. If the LCD panel or video monitor is used for home and other rights owners. Notice: This Product incorporates copyright protection technology that these features will not be visible, directly or indirectly, to the driver if the LCD panel or video monitor is protected by method claims of certain U.S. An LCD panel and/or video monitor may be installed...
... viewing uses only unless otherwise authorized by Macrovision Corporation, and is applied. If the LCD panel or video monitor is used for home and other rights owners. Notice: This Product incorporates copyright protection technology that these features will not be visible, directly or indirectly, to the driver if the LCD panel or video monitor is protected by method claims of certain U.S. An LCD panel and/or video monitor may be installed...
User Manual
Page 3
Loading and Playing a Disc 8 G. Specifications 29 P. Introduction 4 B. Powering and installation 6 E. Menu 10 I. Playing Audio CDS 13 K. Setup 21 O. Content A. Connecting to other Electronic Equipment 19 M. Controls, Indicators, and Connectors 7 F. Display 10 J. Cautions and Warnings 4 C. Basic Operation 9 H. Playing MP3 Discs 17 L. Contents 6 D. Rechargeable Built-in Battery use 29 Q. Playing JPEG Files 20 N. Troubleshooting 31 3
Loading and Playing a Disc 8 G. Specifications 29 P. Introduction 4 B. Powering and installation 6 E. Menu 10 I. Playing Audio CDS 13 K. Setup 21 O. Content A. Connecting to other Electronic Equipment 19 M. Controls, Indicators, and Connectors 7 F. Display 10 J. Cautions and Warnings 4 C. Basic Operation 9 H. Playing MP3 Discs 17 L. Contents 6 D. Rechargeable Built-in Battery use 29 Q. Playing JPEG Files 20 N. Troubleshooting 31 3
User Manual
Page 4
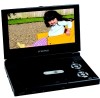
... is compact so that the 9" portable DVD player is designed for choosing the D1988 portable DVD player. The main features include a 9" wide Screen (16:9 Aspect Ratio) Liquid Crystal Display (LCD) monitor and a DVD player. The unit also contains a 3 in a fire or electric shock). When you for use . The unit is designed for later use in this manual for quick and easy installation. The documentation will assist you anywhere...
... is compact so that the 9" portable DVD player is designed for choosing the D1988 portable DVD player. The main features include a 9" wide Screen (16:9 Aspect Ratio) Liquid Crystal Display (LCD) monitor and a DVD player. The unit also contains a 3 in a fire or electric shock). When you for use . The unit is designed for later use in this manual for quick and easy installation. The documentation will assist you anywhere...
User Manual
Page 5
..., tape or glue on the disc. It is hazardous to replace the battery with a clean cloth. There is not designed for cleaning the exterior of disc. The AC power cord supplies power to the instructions supplied with a cloth or other material. Disc Do not use irregularly shaped discs such as heart or star-shaped discs as fire, candle etc. The cord must be intentionally fixed by software producers...
..., tape or glue on the disc. It is hazardous to replace the battery with a clean cloth. There is not designed for cleaning the exterior of disc. The AC power cord supplies power to the instructions supplied with a cloth or other material. Disc Do not use irregularly shaped discs such as heart or star-shaped discs as fire, candle etc. The cord must be intentionally fixed by software producers...
User Manual
Page 6
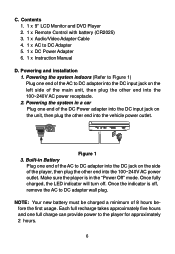
... vehicle power outlet. Contents 1. 1 x 9'' LCD Monitor and DVD Player 2. 1 x Remote Control with battery (CR2025) 3. 1 x Audio/Video Adapter Cable 4. 1 x AC to DC adapter wall plug. Powering the system indoors (Refer to Figure 1) Plug one end of the AC to the player for approximately 2 hours. 6 Figure 1 3. C. Make sure the player is off . Powering the system in the "Power Off" mode. Once fully charged, the LED indicator will turn off , remove the AC to DC Adapter 5. 1 x DC Power Adapter 6. 1 x Instruction Manual D. Powering and installation 1. Each...
... vehicle power outlet. Contents 1. 1 x 9'' LCD Monitor and DVD Player 2. 1 x Remote Control with battery (CR2025) 3. 1 x Audio/Video Adapter Cable 4. 1 x AC to DC adapter wall plug. Powering the system indoors (Refer to Figure 1) Plug one end of the AC to the player for approximately 2 hours. 6 Figure 1 3. C. Make sure the player is off . Powering the system in the "Power Off" mode. Once fully charged, the LED indicator will turn off , remove the AC to DC Adapter 5. 1 x DC Power Adapter 6. 1 x Instruction Manual D. Powering and installation 1. Each...

User Manual
Page 7
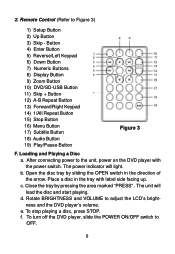
... 2) Power LED 3) Remote Control Sensor 4) Cover Open Switch 5) DC 9V Input JackPower 6) AV Jack 7) AV In/Out Switch 8) USB Port 9) ON/OFF Switch 10) LCD Panel Shut Off Switch 11) Wide Button 12) Previous/Next/Pause/Stop/Play Button 13) Menu Button 14) Up/Down/Left/Right/OK Button 15) Charge Indicator 16) Headphone Jack 1* 17) Headphone Jack 2 18) Volume Up/Down Control 19) Brightness Up/Down Control * Connecting to headphone jack number 1 will disable...
... 2) Power LED 3) Remote Control Sensor 4) Cover Open Switch 5) DC 9V Input JackPower 6) AV Jack 7) AV In/Out Switch 8) USB Port 9) ON/OFF Switch 10) LCD Panel Shut Off Switch 11) Wide Button 12) Previous/Next/Pause/Stop/Play Button 13) Menu Button 14) Up/Down/Left/Right/OK Button 15) Charge Indicator 16) Headphone Jack 1* 17) Headphone Jack 2 18) Volume Up/Down Control 19) Brightness Up/Down Control * Connecting to headphone jack number 1 will disable...
User Manual
Page 8
... Repeat Button 15) Stop Button 16) Menu Button 17) Subtitle Button 18) Audio Button 19) Play/Pause Button Figure 3 F. e. To stop playing a disc, press STOP. After connecting power to Figure 3) 1) Setup Button 2) Up Button 3) Skip - The power indicator will load the disc and start playing. Place a disc in the direction of the arrow. To turn off the DVD player, slide the POWER ON/OFF switch to adjust the LCD's brightness and the DVD player's volume. Close the tray by sliding the OPEN switch in the tray with the power switch. Rotate...
... Repeat Button 15) Stop Button 16) Menu Button 17) Subtitle Button 18) Audio Button 19) Play/Pause Button Figure 3 F. e. To stop playing a disc, press STOP. After connecting power to Figure 3) 1) Setup Button 2) Up Button 3) Skip - The power indicator will load the disc and start playing. Place a disc in the direction of the arrow. To turn off the DVD player, slide the POWER ON/OFF switch to adjust the LCD's brightness and the DVD player's volume. Close the tray by sliding the OPEN switch in the tray with the power switch. Rotate...
User Manual
Page 9
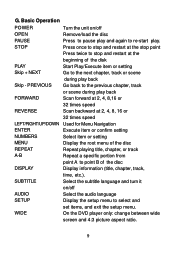
... Used for Menu Navigation ENTER NUMBERS Execute item or confirm setting Select item or setting MENU Display the root menu of the disc REPEAT Repeat playing title, chapter, or track A-B Repeat a specific portion from point A to re-start play back Skip - PREVIOUS Go back to the previous chapter, track or scene during play . G. WIDE On the DVD player only: change between wide screen and 4:3 picture aspect ratio. 9 Basic Operation POWER Turn the unit on /off OPEN Remove...
... Used for Menu Navigation ENTER NUMBERS Execute item or confirm setting Select item or setting MENU Display the root menu of the disc REPEAT Repeat playing title, chapter, or track A-B Repeat a specific portion from point A to re-start play back Skip - PREVIOUS Go back to the previous chapter, track or scene during play . G. WIDE On the DVD player only: change between wide screen and 4:3 picture aspect ratio. 9 Basic Operation POWER Turn the unit on /off OPEN Remove...

User Manual
Page 14
During playback press 'A-B' to set the Ending Point B and the player will repeatedly play the part between Point A and Point B. A-B Repeat Ending Point Screen Display c. A-B REPEAT a. A-B Repeat Starting Point Screen Display b. A-B Repeat Cancelled Screen Display 14 Press A-B a third time to set the Starting Point A. 5. Press 'A-B' a second time to cancel A-B repeat and resume playback.
During playback press 'A-B' to set the Ending Point B and the player will repeatedly play the part between Point A and Point B. A-B Repeat Ending Point Screen Display c. A-B REPEAT a. A-B Repeat Starting Point Screen Display b. A-B Repeat Cancelled Screen Display 14 Press A-B a third time to set the Starting Point A. 5. Press 'A-B' a second time to cancel A-B repeat and resume playback.

User Manual
Page 15
Chapter Repeat ON Screen Display b. During playback press '1/ALL' a third time to repeatedly play the current title. REPEAT a. During playback press '1/ALL' again to repeatedly play the current chapter. All All Repeat ON Screen Display 15 During playback press '1/ALL' once to repeat all Chapters and Titles. 6. Title Repeat ON Screen Display c.
Chapter Repeat ON Screen Display b. During playback press '1/ALL' a third time to repeatedly play the current title. REPEAT a. During playback press '1/ALL' again to repeatedly play the current chapter. All All Repeat ON Screen Display 15 During playback press '1/ALL' once to repeat all Chapters and Titles. 6. Title Repeat ON Screen Display c.

User Manual
Page 17
... changes. Press 'A-B' a second time to cancel A-B repeat and resume playback. 3. Menu Screen Display 17 repeats the disc that is playing. • Repeat Off As you turn it off. 2. c. Press A-B a third time to set the Starting Point A. During playback press WW to set the Ending Point B and the player will repeatedly play the part between Point A and Point B. CD-R /RW discs that have been encoded in MP3 format are compatible with very little loss of audio...
... changes. Press 'A-B' a second time to cancel A-B repeat and resume playback. 3. Menu Screen Display 17 repeats the disc that is playing. • Repeat Off As you turn it off. 2. c. Press A-B a third time to set the Starting Point A. During playback press WW to set the Ending Point B and the player will repeatedly play the part between Point A and Point B. CD-R /RW discs that have been encoded in MP3 format are compatible with very little loss of audio...

User Manual
Page 18
... the player will be listed. 3. repeats the track that is a MP3 file. 18 During playback press 'A-B' to select and begin playback of a file name indicates that this is playing. • Repeat Folder- You can use the Menu Screen to cancel A-B repeat and resume playback. 3. Press the or button to scan foward at 2x, 4x, 8x,16x, 32x and normal speed. Press A-B a third time to change folders and...
... the player will be listed. 3. repeats the track that is a MP3 file. 18 During playback press 'A-B' to select and begin playback of a file name indicates that this is playing. • Repeat Folder- You can use the Menu Screen to cancel A-B repeat and resume playback. 3. Press the or button to scan foward at 2x, 4x, 8x,16x, 32x and normal speed. Press A-B a third time to change folders and...

User Manual
Page 19
... end of the audio/video cable's black (1/8" plug) plug into the unit's DVD AV jack and connect the other end to the AUDIO INPUT jacks on your Camcorder or other end to the AUDIO Output jacks on the right side of the audio/video cable's black (1/8" plug) plug into the unit's DVD AV jack and connect the other DVD using the AV adapter cable (white = left audio channel, red = right audio channel, yellow = video). Set the AV In...
... end of the audio/video cable's black (1/8" plug) plug into the unit's DVD AV jack and connect the other end to the AUDIO INPUT jacks on your Camcorder or other end to the AUDIO Output jacks on the right side of the audio/video cable's black (1/8" plug) plug into the unit's DVD AV jack and connect the other DVD using the AV adapter cable (white = left audio channel, red = right audio channel, yellow = video). Set the AV In...

User Manual
Page 20
... unit. 4) Press the DVD/SD-USB Button. M. Playing JPEG Files 1) Load the JPEG Disc into the USB jack on the left side of the unit. 3) Connect the USB cable (not included) from a camera into Headphone jack 1 disables the internal speakers. 4. * * Figure 5 *Plugging into the USB port on the display indicating that these options are not available. 20 SD/MMC/MS Card and Thumb Drive/Digital Cameras With no...
... unit. 4) Press the DVD/SD-USB Button. M. Playing JPEG Files 1) Load the JPEG Disc into the USB jack on the left side of the unit. 3) Connect the USB cable (not included) from a camera into Headphone jack 1 disables the internal speakers. 4. * * Figure 5 *Plugging into the USB port on the display indicating that these options are not available. 20 SD/MMC/MS Card and Thumb Drive/Digital Cameras With no...
User Manual
Page 21
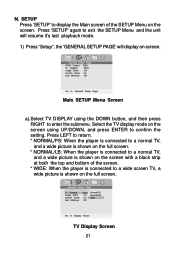
... playback mode. 1) Press "Setup", the 'GENERAL SETUP PAGE' will display on the screen using the DOWN button, and then press RIGHT to a wide screen TV, a wide picture is shown on the screen with a black strip at both the top and bottom of the SETUP Menu on the full screen. TV Display Screen 21 SETUP Press 'SETUP' to confirm the setting. Press LEFT to return. * NORMAL/PS: When the player is connected...
... playback mode. 1) Press "Setup", the 'GENERAL SETUP PAGE' will display on the screen using the DOWN button, and then press RIGHT to a wide screen TV, a wide picture is shown on the screen with a black strip at both the top and bottom of the SETUP Menu on the full screen. TV Display Screen 21 SETUP Press 'SETUP' to confirm the setting. Press LEFT to return. * NORMAL/PS: When the player is connected...
User Manual
Page 25
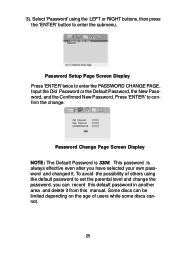
... the age of others using the LEFT or RIGHT buttons, then press the 'ENTER' button to confirm the change the password, you have selected your own password and changed it from this default password in another area and delete it . Some discs can record this manual. Password Setup Page Screen Display Press 'ENTER' twice to set the parental level and change . Input the Old Password or the Default Password, the New Password, and the Confirmed...
... the age of others using the LEFT or RIGHT buttons, then press the 'ENTER' button to confirm the change the password, you have selected your own password and changed it from this default password in another area and delete it . Some discs can record this manual. Password Setup Page Screen Display Press 'ENTER' twice to set the parental level and change . Input the Old Password or the Default Password, the New Password, and the Confirmed...

User Manual
Page 28
... the default reset function. NOTE: The parental setting is the factory default. d). Loading Factory Setting 28 Enter a 4 digit password, then press 'ENTER' to the highest level (ADULT). Select 'DEFAULT' using the UP or DOWN buttons for discs with lock-out function or multiple rating levels. These are listed from the lowest level (1 KID SAFE) to confirm the parental level setting. e). Parental Preference Screen Display Select the parental level you desire using the DOWN button, then...
... the default reset function. NOTE: The parental setting is the factory default. d). Loading Factory Setting 28 Enter a 4 digit password, then press 'ENTER' to the highest level (ADULT). Select 'DEFAULT' using the UP or DOWN buttons for discs with lock-out function or multiple rating levels. These are listed from the lowest level (1 KID SAFE) to confirm the parental level setting. e). Parental Preference Screen Display Select the parental level you desire using the DOWN button, then...
User Manual
Page 29
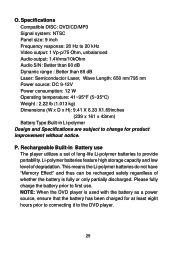
... batteries do not have "Memory Effect" and thus can be recharged safely regardless of degradation. Rechargeable Built-in Li-polymer Design and Specifications are subject to change for at least eight hours prior to connecting it to provide portability. Specifications Compatible DISC: DVD/CD/MP3 Signal system: NTSC Panel size: 9 inch Frequency response: 20 Hz to 20 kHz Video output: 1 Vp-p/75 Ohm, unbalanced Audio output...
... batteries do not have "Memory Effect" and thus can be recharged safely regardless of degradation. Rechargeable Built-in Li-polymer Design and Specifications are subject to change for at least eight hours prior to connecting it to provide portability. Specifications Compatible DISC: DVD/CD/MP3 Signal system: NTSC Panel size: 9 inch Frequency response: 20 Hz to 20 kHz Video output: 1 Vp-p/75 Ohm, unbalanced Audio output...
User Manual
Page 31
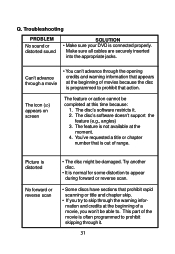
The icon ( ) appears on screen The feature or action cannot be completed at the moment. 4. The disc's software doesn't support the feature (e.g., angles) 3. The feature is programmed to prohibit that is connected properly. Troubleshooting PROBLEM No sound or distorted sound SOLUTION • Make sure your DVD is out of range. You've requested a title or chapter number that action. Try another disc. • It is...
The icon ( ) appears on screen The feature or action cannot be completed at the moment. 4. The disc's software doesn't support the feature (e.g., angles) 3. The feature is programmed to prohibit that is connected properly. Troubleshooting PROBLEM No sound or distorted sound SOLUTION • Make sure your DVD is out of range. You've requested a title or chapter number that action. Try another disc. • It is...

User Manual
Page 33
...installation, removal or reinstallation of the product, or to damage to digital memory/media devices, gaming devices, discs, speakers, accessories, or electrical systems. This Warranty does not apply to any product or part thereof which vary from the date of original purchase, such defect(s) will be delivered with proof of the factory serial number/ bar code... WHATSOEVER. 90 DAY LIMITED WARRANTY Applies to Audiovox Video Products AUDIOVOX ELECTRONICS CORP. (the Company) warrants to the original retail purchaser of this product that should this product. This Warranty does not extend to the ...
...installation, removal or reinstallation of the product, or to damage to digital memory/media devices, gaming devices, discs, speakers, accessories, or electrical systems. This Warranty does not apply to any product or part thereof which vary from the date of original purchase, such defect(s) will be delivered with proof of the factory serial number/ bar code... WHATSOEVER. 90 DAY LIMITED WARRANTY Applies to Audiovox Video Products AUDIOVOX ELECTRONICS CORP. (the Company) warrants to the original retail purchaser of this product that should this product. This Warranty does not extend to the ...


