Owners Manual
Page 2
... to the driver if the LCD panel or video monitor is used for vehicle information, system control, rear or side observation or navigation. Use of this copyright protection technology must be visible, directly or indirectly, to the rear of certain U.S. Reverse engineering or disassembly is applied. If the LCD panel or video monitor is used for television reception, video or DVD play , the LCD panel or video monitor must be installed to the operator of the...
... to the driver if the LCD panel or video monitor is used for vehicle information, system control, rear or side observation or navigation. Use of this copyright protection technology must be visible, directly or indirectly, to the rear of certain U.S. Reverse engineering or disassembly is applied. If the LCD panel or video monitor is used for television reception, video or DVD play , the LCD panel or video monitor must be installed to the operator of the...
Owners Manual
Page 4
... about one hour before operating the unit, or remove the disc and leave the unit turned on or in the system (this manual. 3. The main features include a 8" Wide Screen (16:9 Aspect Ratio) Liquid Crystal Display (LCD) monitor, DVD player and a game controller with the instructions and illustrations provided in hotels, offices, vehicles or your home. B. Installation Ensure that you for quick and easy installation. Please save this appliance...
... about one hour before operating the unit, or remove the disc and leave the unit turned on or in the system (this manual. 3. The main features include a 8" Wide Screen (16:9 Aspect Ratio) Liquid Crystal Display (LCD) monitor, DVD player and a game controller with the instructions and illustrations provided in hotels, offices, vehicles or your home. B. Installation Ensure that you for quick and easy installation. Please save this appliance...

Owners Manual
Page 5
... after playing. Remove the disc from the power source. Replace the battery only with the discs. 7. In order to the unit. Do not use liquid cleaners or aerosol cleaners. Clean the disc by wiping the disc from an open flame such as they may not be intentionally fixed by region. Regional Coding Both the DVD player and disc are coded by software producers. If the codes don't match, the disc won't play . DVD's with...
... after playing. Remove the disc from the power source. Replace the battery only with the discs. 7. In order to the unit. Do not use liquid cleaners or aerosol cleaners. Clean the disc by wiping the disc from an open flame such as they may not be intentionally fixed by region. Regional Coding Both the DVD player and disc are coded by software producers. If the codes don't match, the disc won't play . DVD's with...
Owners Manual
Page 6
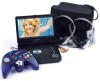
... other end into the vehicle power outlet. Powering and installation 1. Powering the system indoors (Refer to Figure 1) Plug one end of the main unit, then plug the other end into the 120V AC power outlet. 2. Powering the system in a car (refer to Figure 1) Plug one end of the AC to DC Adapter 3. 1 x Remote Control with battery (CR2025) 4. 1 x Instruction Manual 5. 1 x Audio/Video Adapter Cable 6. 1 x DC Power Adapter 7. 1 x Rechargeable Battery 8. 1 x Carry Bag With Straps...
... other end into the vehicle power outlet. Powering and installation 1. Powering the system indoors (Refer to Figure 1) Plug one end of the main unit, then plug the other end into the 120V AC power outlet. 2. Powering the system in a car (refer to Figure 1) Plug one end of the AC to DC Adapter 3. 1 x Remote Control with battery (CR2025) 4. 1 x Instruction Manual 5. 1 x Audio/Video Adapter Cable 6. 1 x DC Power Adapter 7. 1 x Rechargeable Battery 8. 1 x Carry Bag With Straps...

Owners Manual
Page 8
F. Unit View (Refer to Figure 3) Figure 3 1) LCD Panel Shut Off Switch 2) Wide Button 3) Stop Button 4) Previous Button 5) Next Button 6) Play Button 7) Menu Button 8) Up Button 9) Right Button 10) OK Button 11) Down Button 12) Left Button 13) Open Door Switch 14) IR Sensor 15) Power LED 16) Power on/off Switch 17) Brightness Up/Down Control 18) Volume Up/Down Control 19) Headphone 1* 20) Headphone 2 21) E-Port 22) AV IN/OUT Switch 23) AV Jack 24) DC 9-12V Input Jack *Using headphone jack 1 will disable the internal speakers 8 Controls, Indicators, and Connectors 1.
F. Unit View (Refer to Figure 3) Figure 3 1) LCD Panel Shut Off Switch 2) Wide Button 3) Stop Button 4) Previous Button 5) Next Button 6) Play Button 7) Menu Button 8) Up Button 9) Right Button 10) OK Button 11) Down Button 12) Left Button 13) Open Door Switch 14) IR Sensor 15) Power LED 16) Power on/off Switch 17) Brightness Up/Down Control 18) Volume Up/Down Control 19) Headphone 1* 20) Headphone 2 21) E-Port 22) AV IN/OUT Switch 23) AV Jack 24) DC 9-12V Input Jack *Using headphone jack 1 will disable the internal speakers 8 Controls, Indicators, and Connectors 1.
Owners Manual
Page 9
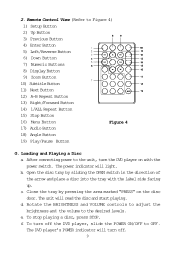
... Button 5) Left/Reverse Button 6) Down Button 7) Numeric Buttons 8) Display Button 9) Zoom Button 10) Subtitle Button 11) Next Button 12) A-B Repeat Button 13) Right/Forward Button 14) 1/ALL Repeat Button 15) Stop Button 16) Menu Button Figure 4 17) Audio Button 18) Angle Button 19) Play/Pause Button G. Close the tray by sliding the OPEN switch in the direction of the arrow and place a disc into the tray with the power switch. Remote Control View (Refer to the desired levels. Loading and Playing a Disc a. The DVD player's POWER indicator will turn the DVD player...
... Button 5) Left/Reverse Button 6) Down Button 7) Numeric Buttons 8) Display Button 9) Zoom Button 10) Subtitle Button 11) Next Button 12) A-B Repeat Button 13) Right/Forward Button 14) 1/ALL Repeat Button 15) Stop Button 16) Menu Button Figure 4 17) Audio Button 18) Angle Button 19) Play/Pause Button G. Close the tray by sliding the OPEN switch in the direction of the arrow and place a disc into the tray with the power switch. Remote Control View (Refer to the desired levels. Loading and Playing a Disc a. The DVD player's POWER indicator will turn the DVD player...
Owners Manual
Page 10
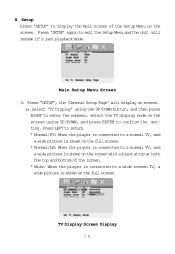
... Display Screen Display 10 Setup Press 'SETUP' to a wide screen TV, a wide picture is shown on the screen using the UP/DOWN button, and then press RIGHT to exit the Setup Menu and the unit will display on the screen. Main Setup Menu Screen 1) Press "SETUP", the 'General Setup Page' will resume it's last playback mode. Select the TV display mode on the full screen. Press LEFT to return. * Normal/PS: When the player is connected...
... Display Screen Display 10 Setup Press 'SETUP' to a wide screen TV, a wide picture is shown on the screen using the UP/DOWN button, and then press RIGHT to exit the Setup Menu and the unit will display on the screen. Main Setup Menu Screen 1) Press "SETUP", the 'General Setup Page' will resume it's last playback mode. Select the TV display mode on the full screen. Press LEFT to return. * Normal/PS: When the player is connected...
Owners Manual
Page 12
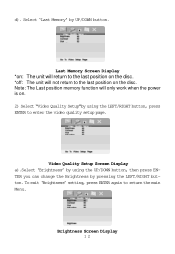
... function will not return to the last position on the disc. *off: The unit will only work when the power is on the disc. Last Memory Screen Display *on: The unit will return to the last position on . 2) Select "Video Quality Setup"by using the UP/DOWN button, then press ENTER you can change the Brightness by UP/DOWN button. To exit 'Brightness' setting...
... function will not return to the last position on the disc. *off: The unit will only work when the power is on the disc. Last Memory Screen Display *on: The unit will return to the last position on . 2) Select "Video Quality Setup"by using the UP/DOWN button, then press ENTER you can change the Brightness by UP/DOWN button. To exit 'Brightness' setting...
Owners Manual
Page 14
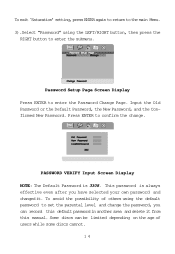
... the Password Change Page. Some discs can record this default password in another area and delete it . Password Setup Page Screen Display Press ENTER to confirm the change the password, you have selected your own password and changed it from this manual. To exit 'Saturation' setting, press ENTER again to return to the main Menu. 3).Select "Password" using the default password to enter the submenu. Input the Old Password or the Default Password, the New Password, and...
... the Password Change Page. Some discs can record this default password in another area and delete it . Password Setup Page Screen Display Press ENTER to confirm the change the password, you have selected your own password and changed it from this manual. To exit 'Saturation' setting, press ENTER again to return to the main Menu. 3).Select "Password" using the default password to enter the submenu. Input the Old Password or the Default Password, the New Password, and...
Owners Manual
Page 16
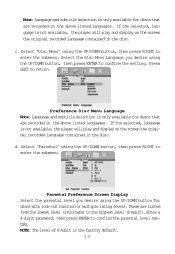
... setting. c. Parental Preference Screen Display Select the parental level you desire using the UP/DOWN button, then press RIGHT to return. These are recorded in the above listed languages. Press LEFT to enter the submenu. d. Note: Language and subtitle selection is only available for discs that are recorded in the above listed languages. Preference Disc Menu Language Note: Language and subtitle selection is the factory default. 16 Select 'Parental' using the UP/DOWN button...
... setting. c. Parental Preference Screen Display Select the parental level you desire using the UP/DOWN button, then press RIGHT to return. These are recorded in the above listed languages. Press LEFT to enter the submenu. d. Note: Language and subtitle selection is only available for discs that are recorded in the above listed languages. Preference Disc Menu Language Note: Language and subtitle selection is the factory default. 16 Select 'Parental' using the UP/DOWN button...

Owners Manual
Page 18
.../DOWN Used for Menu Navigation ENTER Execute item or confirm setting NUMBERS Select item or setting MENU Display the main menu of the disc 1/ALL REPEAT Repeat playing title, chapter, or track A-B Repeat a specific portion from point A to point B of the scene SUBTITLE Select the subtitle language and turn it on/off AUDIO Select the audio language ZOOM Enlarge an image to select and set items, and exit the setup menu. 18 ANGLE Change the viewing...
.../DOWN Used for Menu Navigation ENTER Execute item or confirm setting NUMBERS Select item or setting MENU Display the main menu of the disc 1/ALL REPEAT Repeat playing title, chapter, or track A-B Repeat a specific portion from point A to point B of the scene SUBTITLE Select the subtitle language and turn it on/off AUDIO Select the audio language ZOOM Enlarge an image to select and set items, and exit the setup menu. 18 ANGLE Change the viewing...

Owners Manual
Page 23
Press 'A-B' a second time to set the Starting Point A. A-B Repeat Off Screen Display 23 Press A-B a third time to set the Ending Point B and the player will repeatedly play the part between Point A and Point B. A-B REPEAT a. During playback press 'A-B' once to cancel A-B repeat and resume normal playback. A-B Repeat Starting Point Screen Display b. A-B Repeat Ending Point Screen Display c. 6.
Press 'A-B' a second time to set the Starting Point A. A-B Repeat Off Screen Display 23 Press A-B a third time to set the Ending Point B and the player will repeatedly play the part between Point A and Point B. A-B REPEAT a. During playback press 'A-B' once to cancel A-B repeat and resume normal playback. A-B Repeat Starting Point Screen Display b. A-B Repeat Ending Point Screen Display c. 6.

Owners Manual
Page 24
7. 1/ALL REPEAT a. Chapter Repeat Screen Display b. During playback press '1/ALL REPEAT' three times to repeatedly play the current title. During playback press '1/ALL REPEAT' once to repeat All Chapters and Titles. All Repeat Screen Display 24 During playback press '1/ALL REPEAT' twice to repeatedly play the current chapter. Title Repeat Screen Display c.
7. 1/ALL REPEAT a. Chapter Repeat Screen Display b. During playback press '1/ALL REPEAT' three times to repeatedly play the current title. During playback press '1/ALL REPEAT' once to repeat All Chapters and Titles. All Repeat Screen Display 24 During playback press '1/ALL REPEAT' twice to repeatedly play the current chapter. Title Repeat Screen Display c.
Owners Manual
Page 27
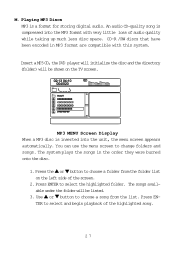
... ENTER to change folders and songs. Insert a MP3 CD, the DVD player will initialize the disc and the directory (folder) will be shown on the left side of the screen. 2. MP3 MENU Screen Display When a MP3 disc is a format for storing digital audio. M. Playing MP3 Discs MP3 is inserted into the MP3 format with this system. The system plays the songs in MP3 format are compatible with very...
... ENTER to change folders and songs. Insert a MP3 CD, the DVD player will initialize the disc and the directory (folder) will be shown on the left side of the screen. 2. MP3 MENU Screen Display When a MP3 disc is a format for storing digital audio. M. Playing MP3 Discs MP3 is inserted into the MP3 format with this system. The system plays the songs in MP3 format are compatible with very...
Owners Manual
Page 31
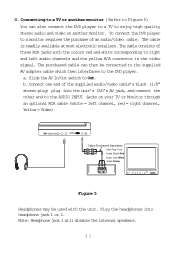
... video signal. The purchased cable can also connect the DVD player to a TV to the AUDIO INPUT jacks on another monitor. Cable Purchased Separately Jack Plug Color Audio (Right) Red Audio (Left) White Video Yellow Figure 5 Headphones may be connected to the supplied AV adapter cable which then interfaces to a monitor requires the purchase of three RCA jacks with the unit. a. To connect the DVD player to the DVD player. b. Slide the AV In/Out switch...
... video signal. The purchased cable can also connect the DVD player to a TV to the AUDIO INPUT jacks on another monitor. Cable Purchased Separately Jack Plug Color Audio (Right) Red Audio (Left) White Video Yellow Figure 5 Headphones may be connected to the supplied AV adapter cable which then interfaces to a monitor requires the purchase of three RCA jacks with the unit. a. To connect the DVD player to the DVD player. b. Slide the AV In/Out switch...
Owners Manual
Page 32
... always use . Under no circumstances short the battery terminals, store the battery in a metal container, or leave the battery in optimum condition. Please make sure you plan not to use battery or not) in an airtight container with the player to the player for a portable power supply. To charge the battery, please connect the power jack directly into the battery and leave connected until the red power indicator turns off...
... always use . Under no circumstances short the battery terminals, store the battery in a metal container, or leave the battery in optimum condition. Please make sure you plan not to use battery or not) in an airtight container with the player to the player for a portable power supply. To charge the battery, please connect the power jack directly into the battery and leave connected until the red power indicator turns off...

Owners Manual
Page 34
... feature is distorted The feature or action cannot be damaged. This part of range. • The disc might be completed at the beginning of movies because the disc is normal for some distortion to . Troubleshooting PROBLEM No sound or distorted sound SOLUTION • Make sure the DVD player is out of the movie is often programmed to prohibit that is connected properly.
... feature is distorted The feature or action cannot be damaged. This part of range. • The disc might be completed at the beginning of movies because the disc is normal for some distortion to . Troubleshooting PROBLEM No sound or distorted sound SOLUTION • Make sure the DVD player is out of the movie is often programmed to prohibit that is connected properly.
Owners Manual
Page 36
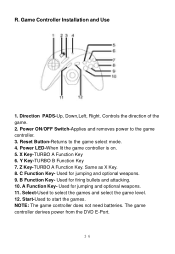
Reset Button-Returns to start the games. Power LED-When lit the game controller is on. 5. Start-Used to the game select mode. 4. Power ON/OFF Switch-Applies and removes power to select the games and select the game level. 12. X Key-TURBO A Function Key 6. C Function Key- R. Z Key-TURBO A Function Key. B Function Key- Used for jumping and optional weapons. 9. Direction PADS-Up, Down,Left, Right. Controls the direction of the game. 2. The game controller derives power from the DVD E-Port. 36...
Reset Button-Returns to start the games. Power LED-When lit the game controller is on. 5. Start-Used to the game select mode. 4. Power ON/OFF Switch-Applies and removes power to select the games and select the game level. 12. X Key-TURBO A Function Key 6. C Function Key- R. Z Key-TURBO A Function Key. B Function Key- Used for jumping and optional weapons. 9. Direction PADS-Up, Down,Left, Right. Controls the direction of the game. 2. The game controller derives power from the DVD E-Port. 36...
Owners Manual
Page 37
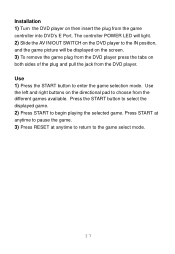
... jack from the different games available. Press START at anytime to pause the game. 3) Press RESET at anytime to return to begin playing the selected game. Use 1) Press the START button to choose from the DVD player. Use the left and right buttons on then insert the plug from the game controller into DVD's E Port. Installation 1) Turn the DVD player on the directional pad to enter the game selection mode.
... jack from the different games available. Press START at anytime to pause the game. 3) Press RESET at anytime to return to begin playing the selected game. Use 1) Press the START button to choose from the DVD player. Use the left and right buttons on then insert the plug from the game controller into DVD's E Port. Installation 1) Turn the DVD player on the directional pad to enter the game selection mode.
Owners Manual
Page 39
...Audiovox Electronics Corporation 39 128-8028 A game controller, if supplied, is authorized to assume for installation, removal or reinstallation of the product, or to damage to digital memory/media devices, gaming devices, discs, speakers, accessories, or electrical systems. This Warranty does not apply to any product or part... has suffered or been damaged through alteration, improper installation, mishandling, misuse, neglect, accident, or by removal or defacement of the factory serial number/ bar code label(s). U.S.A. : AUDIOVOX ELECTRONICS CORPORATION, 150 MARCUS BLVD. ANY ACTION FOR...
...Audiovox Electronics Corporation 39 128-8028 A game controller, if supplied, is authorized to assume for installation, removal or reinstallation of the product, or to damage to digital memory/media devices, gaming devices, discs, speakers, accessories, or electrical systems. This Warranty does not apply to any product or part... has suffered or been damaged through alteration, improper installation, mishandling, misuse, neglect, accident, or by removal or defacement of the factory serial number/ bar code label(s). U.S.A. : AUDIOVOX ELECTRONICS CORPORATION, 150 MARCUS BLVD. ANY ACTION FOR...


