
User Manual
Page 2
... in installing the system properly to a warm location, moisture may condense inside the unit. The main features include a 8" Wide Screen (16:9 Aspect Ratio) Liquid Crystal Display (LCD) monitor and a DVD player. B. Please read the entire instruction manual supplied with a cloth or other material. 2 The documentation will assist you for later use in this manual. 3. do not expose this manual proplely for selecting the D1805 portable DVD player.
... in installing the system properly to a warm location, moisture may condense inside the unit. The main features include a 8" Wide Screen (16:9 Aspect Ratio) Liquid Crystal Display (LCD) monitor and a DVD player. B. Please read the entire instruction manual supplied with a cloth or other material. 2 The documentation will assist you for later use in this manual. 3. do not expose this manual proplely for selecting the D1805 portable DVD player.
User Manual
Page 3
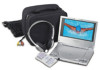
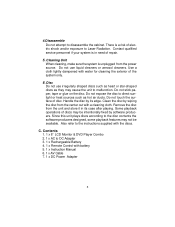
Clean the disc by software producers. Use a cloth lightly dampened with battery 5. 1 x Instruction Manual 6. 1 x AV Cable 7. 1 x DC Power Adapter 3 Do not touch the surface of electric shock and/or exposure to DC Adapter 3. 1 x Rechargeable Battery 4. 1 x Remote Control with water for cleaning the exterior of the system only. 6. Contents 1. 1 x 8'' LCD Monitor & DVD Player Combo 2. 1 x AC to Laser Radiation. There is unplugged from the center out with the discs. Handle the disc by its...
Clean the disc by software producers. Use a cloth lightly dampened with battery 5. 1 x Instruction Manual 6. 1 x AV Cable 7. 1 x DC Power Adapter 3 Do not touch the surface of electric shock and/or exposure to DC Adapter 3. 1 x Rechargeable Battery 4. 1 x Remote Control with water for cleaning the exterior of the system only. 6. Contents 1. 1 x 8'' LCD Monitor & DVD Player Combo 2. 1 x AC to Laser Radiation. There is unplugged from the center out with the discs. Handle the disc by its...
User Manual
Page 5
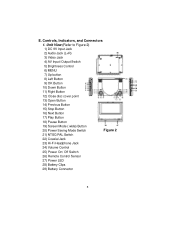
... Input Jack 2) Audio Jack (L+R) 3) Video Jack 4) AV Input /Output Switch 5) Brightness Control 6) MENU 7) Up button 8) Left Button 9) OK Button 10) Down Button 11) Right Button 12) Close disc cover point 13) Open Button 14) Previous Button 15) Stop Button 16) Next Button 17) Play Button 18) Pause Button 19) Screen Mode ( wide) Button 20) Power Saving Mode Switch Figure 2 21) NTSC/PAL Switch 22) Coaxial Jack 23) Hi-Fi Headphone Jack 24) Volume Control 25) Power On/ Off Switch 26) Remote Control Sensor 27) Power LED 28) Battery Clips 29) Battery...
... Input Jack 2) Audio Jack (L+R) 3) Video Jack 4) AV Input /Output Switch 5) Brightness Control 6) MENU 7) Up button 8) Left Button 9) OK Button 10) Down Button 11) Right Button 12) Close disc cover point 13) Open Button 14) Previous Button 15) Stop Button 16) Next Button 17) Play Button 18) Pause Button 19) Screen Mode ( wide) Button 20) Power Saving Mode Switch Figure 2 21) NTSC/PAL Switch 22) Coaxial Jack 23) Hi-Fi Headphone Jack 24) Volume Control 25) Power On/ Off Switch 26) Remote Control Sensor 27) Power LED 28) Battery Clips 29) Battery...
User Manual
Page 6
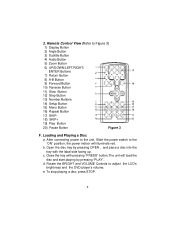
... Button 8) A-B Button 9) Forward Button 10) Reverse Button 11) Slow Button 12) Stop Button 13) Number Buttons 14) Setup Button 15) Menu Button 16) Repeat Button 17) SKIP- 18) SKIP+ 19) Play Button 20) Pause Button Figure 3 F. Remote Control View (Refer to adjust the LCD's brightness and the DVD player's volume. c. b. Close the tray with the labal side facing up. 2. After connecting power to the unit, Slide the power switch to the "ON" position, the power indicor will load the disc and start playing by pressing OPEN...
... Button 8) A-B Button 9) Forward Button 10) Reverse Button 11) Slow Button 12) Stop Button 13) Number Buttons 14) Setup Button 15) Menu Button 16) Repeat Button 17) SKIP- 18) SKIP+ 19) Play Button 20) Pause Button Figure 3 F. Remote Control View (Refer to adjust the LCD's brightness and the DVD player's volume. c. b. Close the tray with the labal side facing up. 2. After connecting power to the unit, Slide the power switch to the "ON" position, the power indicor will load the disc and start playing by pressing OPEN...
User Manual
Page 7
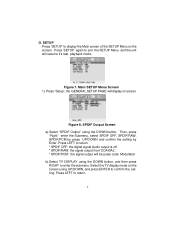
...: the digital signal Audio output is off. * SPDIF/RAW: the signal output from"COAXIAL". * SPDIF/PCM: the signal output will be pulse code Modulation b).Select TV DISPLAY using the DOWN button, Then, press "Right" enter the Submenu, select SPDIF OFF, SPDIF/RAW, SPDIF/PCM by press UP/DOWN and confirm the setting by Enter. Main SETUP Menu Screen 1) Press "Setup", the 'GENERAL SETUP PAGE' will resume it's last playback mode...
...: the digital signal Audio output is off. * SPDIF/RAW: the signal output from"COAXIAL". * SPDIF/PCM: the signal output will be pulse code Modulation b).Select TV DISPLAY using the DOWN button, Then, press "Right" enter the Submenu, select SPDIF OFF, SPDIF/RAW, SPDIF/PCM by press UP/DOWN and confirm the setting by Enter. Main SETUP Menu Screen 1) Press "Setup", the 'GENERAL SETUP PAGE' will resume it's last playback mode...

User Manual
Page 8
Figure 9. Choose Angle Mark on the full screen. TV DISPLAY Screen Display c).Select 'ANGLE MARK' using the UP/DOWN buttons and then press ENTER to confirm the setting. Press the LEFT button to return. ANGLE MARK Screen Display * ON: The screen will not display the Angle Mark NOTE: Not all discs contain above features. 8 * NORMAL/PS: When the player is connected to a normal TV, and a wide...
Figure 9. Choose Angle Mark on the full screen. TV DISPLAY Screen Display c).Select 'ANGLE MARK' using the UP/DOWN buttons and then press ENTER to confirm the setting. Press the LEFT button to return. ANGLE MARK Screen Display * ON: The screen will not display the Angle Mark NOTE: Not all discs contain above features. 8 * NORMAL/PS: When the player is connected to a normal TV, and a wide...

User Manual
Page 9
d). SCREEN SAVER Display *ON: enables screen saver *OFF: disables screen saver (off : The unit will enter the Screen Saver mode after approximately five minutes if the same image remains on the disc. 2) With no disc inside the player select "Video quality Setup"by using the LEFT/RIGHT buttons, press "enter" to enter the video quality set up page. Figure 12. Select " Last Memory" using the DOWN button. Main SETUP Menu VIDEO QUALITY...
d). SCREEN SAVER Display *ON: enables screen saver *OFF: disables screen saver (off : The unit will enter the Screen Saver mode after approximately five minutes if the same image remains on the disc. 2) With no disc inside the player select "Video quality Setup"by using the LEFT/RIGHT buttons, press "enter" to enter the video quality set up page. Figure 12. Select " Last Memory" using the DOWN button. Main SETUP Menu VIDEO QUALITY...

User Manual
Page 10
... can adjust the Hue by pressing the LEFT or RIGHT buttons. c).Select "Hue" by using the UP or DOWN buttons,then press "Enter" you can change the Brightness by pressing the LEFT or RIGHT buttons. Figure 15. CONTRAST Screen Display To exit "Contrast" Setting, press "Enter"again to return to the main Menu. 10 HUE (Tint) Screen Display To exit "Hue"Setting,press...
... can adjust the Hue by pressing the LEFT or RIGHT buttons. c).Select "Hue" by using the UP or DOWN buttons,then press "Enter" you can change the Brightness by pressing the LEFT or RIGHT buttons. Figure 15. CONTRAST Screen Display To exit "Contrast" Setting, press "Enter"again to return to the main Menu. 10 HUE (Tint) Screen Display To exit "Hue"Setting,press...

User Manual
Page 11
... the change. SATURATION(Color) Screen Display To exit "Saturation"Setting,press "Enter"again to return to the main Menu 3).With no disc inside the player ,select "password" using the UP or DOWN buttons, then press "Enter" you can adjust the Saturation by pressing the LEFT or RIGHT buttons. d).Select "Saturation " by using the LEFT or RIGHT buttons, then press the ENTER button to enter the submenu . Input...
... the change. SATURATION(Color) Screen Display To exit "Saturation"Setting,press "Enter"again to return to the main Menu 3).With no disc inside the player ,select "password" using the UP or DOWN buttons, then press "Enter" you can adjust the Saturation by pressing the LEFT or RIGHT buttons. d).Select "Saturation " by using the LEFT or RIGHT buttons, then press the ENTER button to enter the submenu . Input...

User Manual
Page 12
... the possibility of users while some discs cannot. Some discs can record this manual. Figure 17. PASSWORD VERIFY Input Screen Display 4).With no disc inside the player select 'PREFERENCES' using the UP/DOWN buttons, then press 'RIGHT' to confirm the setting. Select 'AUDIO' using the LEFT or RIGHT buttons, then press 'ENTER' to return. 12 Press LEFT to enter the preferences page. Select the audio language you can be...
... the possibility of users while some discs cannot. Some discs can record this manual. Figure 17. PASSWORD VERIFY Input Screen Display 4).With no disc inside the player select 'PREFERENCES' using the UP/DOWN buttons, then press 'RIGHT' to confirm the setting. Select 'AUDIO' using the LEFT or RIGHT buttons, then press 'ENTER' to return. 12 Press LEFT to enter the preferences page. Select the audio language you can be...

User Manual
Page 13
... Disc Menu Language you desire using the UP or DOWN buttons, then press 'RIGHT' to confirm the setting. Press 'LEFT' to return. Preference DISC MENU LANGUAGE Note: Language and subtitle selection is not available, the player will play and display on the screen the original recorded language contained in the above listed languages. Figure 19. Preference SUBTITILE LANGUAGE c. If the selected, language is only available for discs that are recorded in the disc...
... Disc Menu Language you desire using the UP or DOWN buttons, then press 'RIGHT' to confirm the setting. Press 'LEFT' to return. Preference DISC MENU LANGUAGE Note: Language and subtitle selection is not available, the player will play and display on the screen the original recorded language contained in the above listed languages. Figure 19. Preference SUBTITILE LANGUAGE c. If the selected, language is only available for discs that are recorded in the disc...

User Manual
Page 14
... 8 Adult is not affected by the default reset function. Select 'DEFAULTS' using the UP or DOWN buttons for discs with lock-out function or multiple rating levels. Figure 22. Select 'PARENTAL' using the UP or DOWN buttons , then press RIGHT to the highest level (Adult). Enter a 4 digit password, then press 'ENTER' to the factory-set mode. d. e. Press ENTER to make the setting return to confirm the parental level setting. Loading Factory Setting 14
... 8 Adult is not affected by the default reset function. Select 'DEFAULTS' using the UP or DOWN buttons for discs with lock-out function or multiple rating levels. Figure 22. Select 'PARENTAL' using the UP or DOWN buttons , then press RIGHT to the highest level (Adult). Enter a 4 digit password, then press 'ENTER' to the factory-set mode. d. e. Press ENTER to make the setting return to confirm the parental level setting. Loading Factory Setting 14
User Manual
Page 15
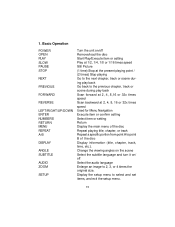
... 4 times the original size. Display the setup menu to point B of the disc Display information (title, chapter, track, time, etc.). 1. Basic Operation POWER OPEN PLAY SLOW PAUSE STOP NEXT PREVIOUS FORWARD REVERSE LEFT/RIGHT/UP/DOWN ENTER NUMBERS RETURN MENU REPEAT A-B DISPLAY ANGLE SUBTITLE AUDIO ZOOM SETUP Turn the unit on / off Remove/load the disc Start Play/Execute item or setting Play at 1/2, 1/4, 1/8 or 1/16 times speed Still Picture (1 time) Stop at the present playing point / (2 times) Stop playing Go...
... 4 times the original size. Display the setup menu to point B of the disc Display information (title, chapter, track, time, etc.). 1. Basic Operation POWER OPEN PLAY SLOW PAUSE STOP NEXT PREVIOUS FORWARD REVERSE LEFT/RIGHT/UP/DOWN ENTER NUMBERS RETURN MENU REPEAT A-B DISPLAY ANGLE SUBTITLE AUDIO ZOOM SETUP Turn the unit on / off Remove/load the disc Start Play/Execute item or setting Play at 1/2, 1/4, 1/8 or 1/16 times speed Still Picture (1 time) Stop at the present playing point / (2 times) Stop playing Go...
User Manual
Page 20
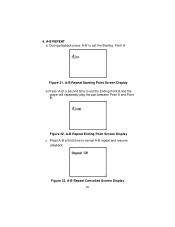
A-B Repeat Cancelled Screen Display 20 A-B Repeat Starting Point Screen Display b.Press 'A-B' a second time to cancel A-B repeat and resume playback. Figure 33. Figure 32. Press A-B a third time to set the Starting Point A. During playback press 'A-B' to set the Ending Point B and the player will repeatedly play the part between Point A and Point B. A-B Repeat Ending Point Screen Display c. Figure 31. 6. A-B REPEAT a.
A-B Repeat Cancelled Screen Display 20 A-B Repeat Starting Point Screen Display b.Press 'A-B' a second time to cancel A-B repeat and resume playback. Figure 33. Figure 32. Press A-B a third time to set the Starting Point A. During playback press 'A-B' to set the Ending Point B and the player will repeatedly play the part between Point A and Point B. A-B Repeat Ending Point Screen Display c. Figure 31. 6. A-B REPEAT a.

User Manual
Page 21
Figure 35. Title Repeat ON Screen Display c. During playback press 'REPEAT' once to repeatedly play the current chapter. 7. REPEAT a. Figure 36. All Repeat ON Screen Display 21 Chapter Repeat ON Screen Display b.During playback press 'REPEAT' again to repeatedly play the current title. During playback press 'REPEAT' a 3rd time to repeat all Chapters and Titles. Figure 34.
Figure 35. Title Repeat ON Screen Display c. During playback press 'REPEAT' once to repeatedly play the current chapter. 7. REPEAT a. Figure 36. All Repeat ON Screen Display 21 Chapter Repeat ON Screen Display b.During playback press 'REPEAT' again to repeatedly play the current title. During playback press 'REPEAT' a 3rd time to repeat all Chapters and Titles. Figure 34.
User Manual
Page 24
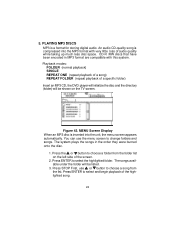
... change folders and songs. MENU Screen Display When an MP3 disc is a format for storing digital audio. The system plays the songs in MP3 format are compatible with very little loss of a specific folder) Insert an MP3 CD, the DVD player will initialize the disc and the directory (folder) will be shown on the left side of the highlighted song. 24 Playback modes: FOLDER (normal playback) SINGLE REPEAT ONE (repeat playback...
... change folders and songs. MENU Screen Display When an MP3 disc is a format for storing digital audio. The system plays the songs in MP3 format are compatible with very little loss of a specific folder) Insert an MP3 CD, the DVD player will initialize the disc and the directory (folder) will be shown on the left side of the highlighted song. 24 Playback modes: FOLDER (normal playback) SINGLE REPEAT ONE (repeat playback...
User Manual
Page 28
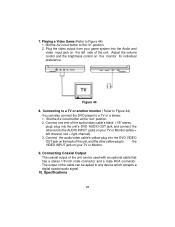
... a stereo. 1. Specifications 28 Adjust the volume control and the brightness control on your TV or Monitor (white = left side of the unit can also connect the DVD player to the AUDIO INPUT jacks on the left channel, red = right channel). 3. Connect the audio/video cable's yellow plug into the Audio and video input jack on your TV or Monitor. 9. Figure 44 8. Playing a Video Game (Refer to the "In" position. 2. 7. Connecting Coaxial Output The coaxial output of the...
... a stereo. 1. Specifications 28 Adjust the volume control and the brightness control on your TV or Monitor (white = left side of the unit can also connect the DVD player to the AUDIO INPUT jacks on the left channel, red = right channel). 3. Connect the audio/video cable's yellow plug into the Audio and video input jack on your TV or Monitor. 9. Figure 44 8. Playing a Video Game (Refer to the "In" position. 2. 7. Connecting Coaxial Output The coaxial output of the...
User Manual
Page 29
...;F) Operating humidity: 10~75% Dimensions (W x H x D):7.87 X 5.90 X1.10inches 200 x 150 x 28mm Battary Type: Li-ion 11. Disc format: DVD/CD/MP3 Color system: NTSC/PAL Screen size: 8'' Frequency response: DVD (PCM 96 kHz/24 bits ): 20 Hz to 44 kHz DVD (PCM 48 kHz): 20 Hz to 22 kHz CD: 20 Hz to first use the battery for portable power supply. NOTE: When the DVD player...
...;F) Operating humidity: 10~75% Dimensions (W x H x D):7.87 X 5.90 X1.10inches 200 x 150 x 28mm Battary Type: Li-ion 11. Disc format: DVD/CD/MP3 Color system: NTSC/PAL Screen size: 8'' Frequency response: DVD (PCM 96 kHz/24 bits ): 20 Hz to 44 kHz DVD (PCM 48 kHz): 20 Hz to 22 kHz CD: 20 Hz to first use the battery for portable power supply. NOTE: When the DVD player...

User Manual
Page 30
... you may remove the wall plug and stop charging. To charge the battery, please connect the power jack directly into the D1805 and leave the POWER switch in its best condition. cluded with desiccant or other dehumidifying agent. at least once every two months to maintain the battery in the off position. Recharge effiency will turn OFF. Using and Maintaining your batteries. 2. During this...
... you may remove the wall plug and stop charging. To charge the battery, please connect the power jack directly into the D1805 and leave the POWER switch in its best condition. cluded with desiccant or other dehumidifying agent. at least once every two months to maintain the battery in the off position. Recharge effiency will turn OFF. Using and Maintaining your batteries. 2. During this...

User Manual
Page 32
... installation, removal or reinstallation of the product, or to damage to tapes, discs, speakers, accessories, or electrical systems. This Warranty does not apply to any product or part thereof which vary from the date of incidental or consequential damage so the above limitations or exclusions may also have other rights which , in connection with proof of the factory serial number/ bar code...
... installation, removal or reinstallation of the product, or to damage to tapes, discs, speakers, accessories, or electrical systems. This Warranty does not apply to any product or part thereof which vary from the date of incidental or consequential damage so the above limitations or exclusions may also have other rights which , in connection with proof of the factory serial number/ bar code...


