User Guide
Page 1
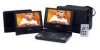
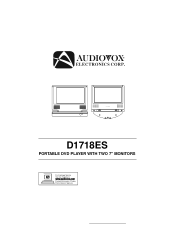
7" LCD MO NIT OR D1718ES PORTABLE DVD PLAYER WITH TWO 7" MONITORS
7" LCD MO NIT OR D1718ES PORTABLE DVD PLAYER WITH TWO 7" MONITORS

User Guide
Page 2
... Macrovision Corporation and other intellectual property rights owned by Macrovision Corporation. If the LCD panel or video monitor is used for television reception, video or DVD play that operates when the vehicle is in gear or when the parking brake is not applied must be installed to the rear of the... this copyright protection technology must be authorized by Macrovision Corporation, and is prohibited. An LCD panel or video monitor used for television reception, video or DVD play , the LCD panel or video monitor must be installed so that is applied.
... Macrovision Corporation and other intellectual property rights owned by Macrovision Corporation. If the LCD panel or video monitor is used for television reception, video or DVD play that operates when the vehicle is in gear or when the parking brake is not applied must be installed to the rear of the... this copyright protection technology must be authorized by Macrovision Corporation, and is prohibited. An LCD panel or video monitor used for television reception, video or DVD play , the LCD panel or video monitor must be installed so that is applied.

User Guide
Page 3
...of any kind on the unit. Cautions and Warnings 1. Keep the unit away from a cold to a warm location, wait for choosing the D1718ES portable DVD player. Objects and Liquids Do not push objects of the art electronics and is designed for use . Disassembly 3 The main features include a 7" ...Wide Screen (16:9 Aspect Ratio) Liquid Crystal Display (LCD) monitor and a DVD player. When you anywhere and is designed for quick and easy installation. Do not place anything heavy on or in the system (this product prior ...
...of any kind on the unit. Cautions and Warnings 1. Keep the unit away from a cold to a warm location, wait for choosing the D1718ES portable DVD player. Objects and Liquids Do not push objects of the art electronics and is designed for use . Disassembly 3 The main features include a 7" ...Wide Screen (16:9 Aspect Ratio) Liquid Crystal Display (LCD) monitor and a DVD player. When you anywhere and is designed for quick and easy installation. Do not place anything heavy on or in the system (this product prior ...
User Guide
Page 4
... as heart or star-shaped discs as they may cause the unit to play . Clean the disc by software producers. Regional Coding Both the DVD player and disc are coded by its case after playing. This unit's code is in this unit plays discs according to the instructions supplied with water...power source. These regional codes must match in its edge. Do not stick paper, tape or glue on the disc. Handle the disc by region. DVD's with a cleaning cloth. Disc Do not use liquid cleaners or aerosol cleaners. Some playback operations of electric shock and/or exposure to Laser Radiation. ...
... as heart or star-shaped discs as they may cause the unit to play . Clean the disc by software producers. Regional Coding Both the DVD player and disc are coded by its case after playing. This unit's code is in this unit plays discs according to the instructions supplied with water...power source. These regional codes must match in its edge. Do not stick paper, tape or glue on the disc. Handle the disc by region. DVD's with a cleaning cloth. Disc Do not use liquid cleaners or aerosol cleaners. Some playback operations of electric shock and/or exposure to Laser Radiation. ...
User Guide
Page 5
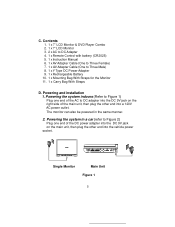
... jack on the main unit, then plug the other end into the vehicle power socket. Powering the system in the same manner. 2. C. Contents 1. 1 x 7'' LCD Monitor & DVD Player Combo 2. 1 x 7" LCD Monitor 3. 2 x AC to DC Adapter 4. 1 x Remote Control with battery (CR2025) 5. 1 x Instruction Manual 6. 1 x AV Adapter Cable (One to Three Female) 7. 1 x AV Adapter Cable (One...
... jack on the main unit, then plug the other end into the vehicle power socket. Powering the system in the same manner. 2. C. Contents 1. 1 x 7'' LCD Monitor & DVD Player Combo 2. 1 x 7" LCD Monitor 3. 2 x AC to DC Adapter 4. 1 x Remote Control with battery (CR2025) 5. 1 x Instruction Manual 6. 1 x AV Adapter Cable (One to Three Female) 7. 1 x AV Adapter Cable (One...
User Guide
Page 7
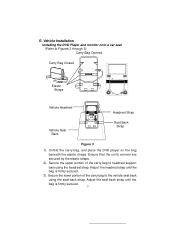
E. Vehicle Installation Installing the DVD Player and monitor onto a car seat (Refer to headrest support bars using the seat back strap. Adjust the headrest strap until the bag is firmly secured. 3). ... Bag Opened Carry Bag Closed Elastic Straps Vehicle Headrest Headrest Strap Vehicle Seat Back Seat Back Strap Figure 3 1). Unfold the carry bag, and place the DVD player on the bag beneath the elastic straps.
E. Vehicle Installation Installing the DVD Player and monitor onto a car seat (Refer to headrest support bars using the seat back strap. Adjust the headrest strap until the bag is firmly secured. 3). ... Bag Opened Carry Bag Closed Elastic Straps Vehicle Headrest Headrest Strap Vehicle Seat Back Seat Back Strap Figure 3 1). Unfold the carry bag, and place the DVD player on the bag beneath the elastic straps.
User Guide
Page 11
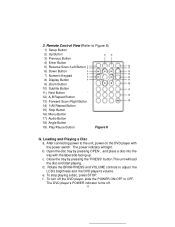
... tray by pressing the "PRESS" button.The unit will light. f. Remote Control View (Refer to adjust the LCD's brightness and the DVD player's volume. The DVD player's POWER indicator turns off the DVD player, slide the POWER ON/OFF to the unit, power on the DVD player with the label side facing up. After connecting power to OFF. d.
... tray by pressing the "PRESS" button.The unit will light. f. Remote Control View (Refer to adjust the LCD's brightness and the DVD player's volume. The DVD player's POWER indicator turns off the DVD player, slide the POWER ON/OFF to the unit, power on the DVD player with the label side facing up. After connecting power to OFF. d.
User Guide
Page 13
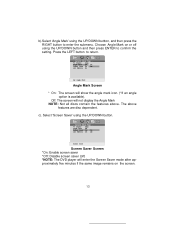
... Mark Screen * On: The screen will enter the Screen Saver mode after approximately five minutes if the same image remains on or off ) *NOTE: The DVD player will show the angle mark icon. (*If an angle option is available). The above . c). Select 'Screen Saver' using the UP/DOWN button.
... Mark Screen * On: The screen will enter the Screen Saver mode after approximately five minutes if the same image remains on or off ) *NOTE: The DVD player will show the angle mark icon. (*If an angle option is available). The above . c). Select 'Screen Saver' using the UP/DOWN button.

User Guide
Page 20
... disappear automatically after 3 seconds if the 'Display' button is divided into sections called titles and chapters. MENU A DVD is not pressed. Some DVDs only allow you play a DVD, a root menu of the disc will disappear automatically in 3 seconds. PLAYING TIME AND REMAINING TIME a. Press MENU... during playback to select disc playback options using the DVD root menu. 3. Press 'DISPLAY' again to display the Remaining Time...
... disappear automatically after 3 seconds if the 'Display' button is divided into sections called titles and chapters. MENU A DVD is not pressed. Some DVDs only allow you play a DVD, a root menu of the disc will disappear automatically in 3 seconds. PLAYING TIME AND REMAINING TIME a. Press MENU... during playback to select disc playback options using the DVD root menu. 3. Press 'DISPLAY' again to display the Remaining Time...

User Guide
Page 22
SUBTITLE During disc playback press 'SUBTITLE' to this function through the DVD menu. 22 Subtitle Screen Display * Some DVDs only allow access to select the subtitle language you desire*, with the current Subtitle Language Number (1) and the total Number of Subtitle Languages (2) displayed. To ...
SUBTITLE During disc playback press 'SUBTITLE' to this function through the DVD menu. 22 Subtitle Screen Display * Some DVDs only allow access to select the subtitle language you desire*, with the current Subtitle Language Number (1) and the total Number of Subtitle Languages (2) displayed. To ...

User Guide
Page 23
... Channel Number (1) and the total number of Audio Channels (2) displayed. Press AUDIO again to this function through the DVD menu. 5. AUDIO During playback press 'AUDIO' to normal size. Audio Language Screen Display * Some DVDs only allow access to select another audio language. Zoom Screen Display 23 4. The audio display will re turn...
... Channel Number (1) and the total number of Audio Channels (2) displayed. Press AUDIO again to this function through the DVD menu. 5. AUDIO During playback press 'AUDIO' to normal size. Audio Language Screen Display * Some DVDs only allow access to select another audio language. Zoom Screen Display 23 4. The audio display will re turn...
User Guide
Page 28
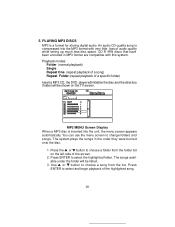
... burned onto the disc. 1. The system plays the songs in MP3 format are compatible with very little loss of a specific folder) Insert a MP3 CD, the DVD player will initialize the disc and the directory (folder) will be shown on the left side of the highlighted song. 28 Playback modes: Folder (normal playback...
... burned onto the disc. 1. The system plays the songs in MP3 format are compatible with very little loss of a specific folder) Insert a MP3 CD, the DVD player will initialize the disc and the directory (folder) will be shown on the left side of the highlighted song. 28 Playback modes: Folder (normal playback...

User Guide
Page 31
... AV INPUT jacks on the screen, the picture will be diplayed. Connect one end of the supplied audio/video adapter cable (1/8" ) plug into the unit's DVD's AV jack, and connect the other end to preview the left channel, red = right channel, Yellow = Video). 31
... AV INPUT jacks on the screen, the picture will be diplayed. Connect one end of the supplied audio/video adapter cable (1/8" ) plug into the unit's DVD's AV jack, and connect the other end to preview the left channel, red = right channel, Yellow = Video). 31

User Guide
Page 32
AV In Connecting to the AUDIO OUTPUT jacks on your Game or Camcorder through an optional RCA cable (white = left channel, red = right channel, Yellow = Video). 32 b. a. Connect one end of the supplied audio/video adapter cable (1/8") plug into the unit's DVD's AV jack, and connect the other end to a Game or Camcorder. 2. Slide the AV In/Out switch to In.
AV In Connecting to the AUDIO OUTPUT jacks on your Game or Camcorder through an optional RCA cable (white = left channel, red = right channel, Yellow = Video). 32 b. a. Connect one end of the supplied audio/video adapter cable (1/8") plug into the unit's DVD's AV jack, and connect the other end to a Game or Camcorder. 2. Slide the AV In/Out switch to In.

User Guide
Page 34
.../MP3 Signal system: NTSC Panel size: 7 inch DVD video format: Horizontal 720 pixel, vertical 480 pixel (NTSC) Frequency response: 20 Hz to 20 kHz Video output: 1 Vp-p/75 Ohm, unbalanced Audio output: 1.4Vrms/...
.../MP3 Signal system: NTSC Panel size: 7 inch DVD video format: Horizontal 720 pixel, vertical 480 pixel (NTSC) Frequency response: 20 Hz to 20 kHz Video output: 1 Vp-p/75 Ohm, unbalanced Audio output: 1.4Vrms/...
User Guide
Page 35
...full charge can be recharged safely regardless of storage, please recharge the battery at least eight hours prior to the DVD player. less of whether you plan to maximize battery life. 2. To charge the battery, please connect the power jack directly into the...you first fully charge the battery and store it to connecting it away properly. RECHARGEABLE BATTERY INSTALLATION AND USE The player utilizes a set of degradation. NOTE: When the DVD player is fully discharged, immediately recharge (regard- Using and Maintaining your batteries. 2. Ni-MH batteries feature high storage ...
...full charge can be recharged safely regardless of storage, please recharge the battery at least eight hours prior to the DVD player. less of whether you plan to maximize battery life. 2. To charge the battery, please connect the power jack directly into the...you first fully charge the battery and store it to connecting it away properly. RECHARGEABLE BATTERY INSTALLATION AND USE The player utilizes a set of degradation. NOTE: When the DVD player is fully discharged, immediately recharge (regard- Using and Maintaining your batteries. 2. Ni-MH batteries feature high storage ...
User Guide
Page 36
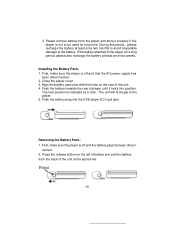
... the Battery Pack: 1. Align the battery pack pins with the holes on the left of battery and pull the battery from the player and store it locks into the DVD player DC input jack. Removing the Battery Pack: 1. Push the battery towards the rear of the unit. 4. 3. Push the battery plug... into position. Press the release button on the rear of player until it properly if the player is off and the battery plug has been ...
... the Battery Pack: 1. Align the battery pack pins with the holes on the left of battery and pull the battery from the player and store it locks into the DVD player DC input jack. Removing the Battery Pack: 1. Push the battery towards the rear of the unit. 4. 3. Push the battery plug... into position. Press the release button on the rear of player until it properly if the player is off and the battery plug has been ...


