
Owners Manual
Page 1
D1500B PORTABLE 5" LCD MONITOR AND DVD PLAYER 1
D1500B PORTABLE 5" LCD MONITOR AND DVD PLAYER 1
Owners Manual
Page 3
... prevent it from strong magnets, heat sources, direct sunlight, and excessive dust. Do not place anything 3 Caution Do not push objects of reliable, trouble-free service, and is compact so that the D1500B portable DVD player is designed for about one hour before operating the unit, or remove the disc and leave the unit turned on until the moisture evaporates. 2. Please save...
... prevent it from strong magnets, heat sources, direct sunlight, and excessive dust. Do not place anything 3 Caution Do not push objects of reliable, trouble-free service, and is compact so that the D1500B portable DVD player is designed for about one hour before operating the unit, or remove the disc and leave the unit turned on until the moisture evaporates. 2. Please save...
Owners Manual
Page 4
... playback features may be available. Remove the disc from the center out with the same or equivalent type, in order to malfunction. Since this unit plays discs according to replace the battery incorrectly. Disassemble Do not attempt to direct sunlight or heat sources. Do not expose the disc to disassemble the cabinet. Contact qualified service personnel if your system needs repair. 5. Disc Do not use...
... playback features may be available. Remove the disc from the center out with the same or equivalent type, in order to malfunction. Since this unit plays discs according to replace the battery incorrectly. Disassemble Do not attempt to direct sunlight or heat sources. Do not expose the disc to disassemble the cabinet. Contact qualified service personnel if your system needs repair. 5. Disc Do not use...

Owners Manual
Page 5
... the DC 12V jack on the unit, then plug the other end into the vehicle power outlet. C. Figure 1 5 Powering the system in a car (refer to Figure 1) Plug one end of the main unit, then plug the other end into a 120VAC power outlet. 2. Powering the system indoors (Refer to DC Adapter 3. 1 x Remote Control with battery (CR2025) 4. 1 x Rechargeable Battery 5. 1 x DC Power Adapter 6. 1 x Instruction Manual 7. 1 x Audio/Video Cable D. Powering and installation 1.
... the DC 12V jack on the unit, then plug the other end into the vehicle power outlet. C. Figure 1 5 Powering the system in a car (refer to Figure 1) Plug one end of the main unit, then plug the other end into a 120VAC power outlet. 2. Powering the system indoors (Refer to DC Adapter 3. 1 x Remote Control with battery (CR2025) 4. 1 x Rechargeable Battery 5. 1 x DC Power Adapter 6. 1 x Instruction Manual 7. 1 x Audio/Video Cable D. Powering and installation 1.

Owners Manual
Page 7
... STOP. 7 After connecting power to the unit, power on DVD player by sliding the power switch to Figure 3) 1) Setup Button 2) Up Button 3) Previous Button 4) Enter Button 5) Reverse Scan/Left Button 6) Down Button 7) Numeric Button 8) Display Button 9) Zoom Button 10) Subtitle Button 11) Next Button 12) A-B Repeat Button 13) Forward Scan/Right Keypad 14) 1/All Repeat Button 15) Stop Button 16) Menu Button 17) Audio Button 18) Pause Button 19) Play Button Figure 3 F. e. 2. Open the disc tray by pressing the "PRESS" area.The unit will light. Rotate the BRIGHTNESS and VOLUME to adjust...
... STOP. 7 After connecting power to the unit, power on DVD player by sliding the power switch to Figure 3) 1) Setup Button 2) Up Button 3) Previous Button 4) Enter Button 5) Reverse Scan/Left Button 6) Down Button 7) Numeric Button 8) Display Button 9) Zoom Button 10) Subtitle Button 11) Next Button 12) A-B Repeat Button 13) Forward Scan/Right Keypad 14) 1/All Repeat Button 15) Stop Button 16) Menu Button 17) Audio Button 18) Pause Button 19) Play Button Figure 3 F. e. 2. Open the disc tray by pressing the "PRESS" area.The unit will light. Rotate the BRIGHTNESS and VOLUME to adjust...
Owners Manual
Page 8
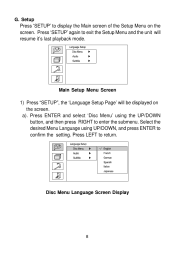
Main Setup Menu Screen 1) Press "SETUP", the 'Language Setup Page' will resume it's last playback mode. Press LEFT to exit the Setup Menu and the unit will be displayed on the screen. Press 'SETUP' again to return. a). Disc Menu Language Screen Display 8 Press ENTER and select 'Disc Menu' using UP/DOWN, and press ENTER to enter the submenu. Select the desired Menu Language using the UP/DOWN button, and then press RIGHT to confirm the setting. Setup Press 'SETUP' to display the Main screen of the Setup Menu on the screen. G.
Main Setup Menu Screen 1) Press "SETUP", the 'Language Setup Page' will resume it's last playback mode. Press LEFT to exit the Setup Menu and the unit will be displayed on the screen. Press 'SETUP' again to return. a). Disc Menu Language Screen Display 8 Press ENTER and select 'Disc Menu' using UP/DOWN, and press ENTER to enter the submenu. Select the desired Menu Language using the UP/DOWN button, and then press RIGHT to confirm the setting. Setup Press 'SETUP' to display the Main screen of the Setup Menu on the screen. G.
Owners Manual
Page 10
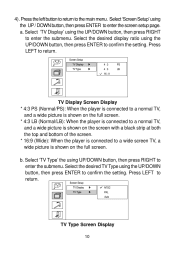
... to confirm the setting. Select the desired TV Type using the UP / DOWN button, then press ENTER to the main menu. TV Type Screen Display 10 Press the left button to return to enter the screen setup page. Select 'Screen Setup' using the UP/DOWN button, then press ENTER to enter the submenu. Press LEFT to a wide screen TV, a wide picture is shown on the screen with a black strip at both...
... to confirm the setting. Select the desired TV Type using the UP / DOWN button, then press ENTER to the main menu. TV Type Screen Display 10 Press the left button to return to enter the screen setup page. Select 'Screen Setup' using the UP/DOWN button, then press ENTER to enter the submenu. Press LEFT to a wide screen TV, a wide picture is shown on the screen with a black strip at both...

Owners Manual
Page 11
... the factory default. Input the Old Password or the Default Password, the new password and the Confirmed New Password. b. Select 'Password' using the UP/DOWN button for discs with lock-out function or multiple rating levels. These are listed from the lowest level (1 Kid Safe) to confirm the parental level setting. Enter a 4 digit password, then press ENTER to the highest level (8 Adult). Press left button to return to the main menu. Password Setup Page Screen Display...
... the factory default. Input the Old Password or the Default Password, the new password and the Confirmed New Password. b. Select 'Password' using the UP/DOWN button for discs with lock-out function or multiple rating levels. These are listed from the lowest level (1 Kid Safe) to confirm the parental level setting. Enter a 4 digit password, then press ENTER to the highest level (8 Adult). Press left button to return to the main menu. Password Setup Page Screen Display...
Owners Manual
Page 12
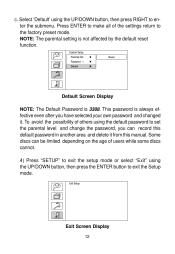
... button to exit the Setup mode. c. Some discs can record this manual. Exit Screen Display 12 Select 'Default' using the default password to set the parental level and change the password, you have selected your own password and changed it from this default password in another area and delete it . To avoid the possibility of others using the UP/DOWN button, then press RIGHT to the factory preset mode. Default Screen Display NOTE: The Default Password is not affected by the default reset function...
... button to exit the Setup mode. c. Some discs can record this manual. Exit Screen Display 12 Select 'Default' using the default password to set the parental level and change the password, you have selected your own password and changed it from this default password in another area and delete it . To avoid the possibility of others using the UP/DOWN button, then press RIGHT to the factory preset mode. Default Screen Display NOTE: The Default Password is not affected by the default reset function...
Owners Manual
Page 13
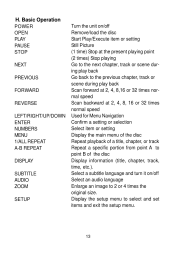
Display the setup menu to 2 or 4 times the original size. Select a subtitle language and turn it on /off Select an audio language Enlarge an image to select and set items and exit the setup menu. 13 Basic Operation POWER OPEN PLAY PAUSE STOP NEXT PREVIOUS FORWARD REVERSE LEFT/RIGHT/UP/DOWN ENTER NUMBERS MENU 1/ALL REPEAT A-B REPEAT DISPLAY SUBTITLE AUDIO ZOOM SETUP Turn the unit on /off Remove/load the disc Start Play/Execute item or setting Still Picture (1 time) Stop at the present playing point (2 times) Stop playing Go to the next...
Display the setup menu to 2 or 4 times the original size. Select a subtitle language and turn it on /off Select an audio language Enlarge an image to select and set items and exit the setup menu. 13 Basic Operation POWER OPEN PLAY PAUSE STOP NEXT PREVIOUS FORWARD REVERSE LEFT/RIGHT/UP/DOWN ENTER NUMBERS MENU 1/ALL REPEAT A-B REPEAT DISPLAY SUBTITLE AUDIO ZOOM SETUP Turn the unit on /off Remove/load the disc Start Play/Execute item or setting Still Picture (1 time) Stop at the present playing point (2 times) Stop playing Go to the next...
Owners Manual
Page 14
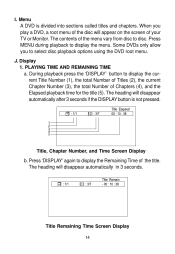
... screen of the disc will disappear automatically after 3 seconds if the DISPLAY button is divided into sections called titles and chapters. During playback press the 'DISPLAY' button to disc. Title Remaining Time Screen Display 14 When you to select disc playback options using the DVD root menu. Some DVDs only allow you play a DVD, a root menu of your TV or Monitor. The heading will disappear automatically in 3 seconds. I. Display 1. Title, Chapter Number, and Time Screen Display...
... screen of the disc will disappear automatically after 3 seconds if the DISPLAY button is divided into sections called titles and chapters. During playback press the 'DISPLAY' button to disc. Title Remaining Time Screen Display 14 When you to select disc playback options using the DVD root menu. Some DVDs only allow you play a DVD, a root menu of your TV or Monitor. The heading will disappear automatically in 3 seconds. I. Display 1. Title, Chapter Number, and Time Screen Display...
Owners Manual
Page 16
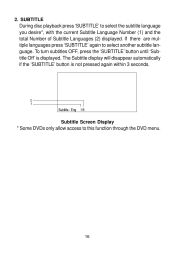
...To turn subtitles OFF, press the 'SUBTITLE' button until 'Subtitle Off' is not pressed again within 3 seconds. Subtitle Screen Display * Some DVDs only allow access to select the subtitle language you desire*, with the current Subtitle Language Number (1) and the total Number of Subtitle Languages (2) displayed. The Subtitle display will disappear automatically if the 'SUBTITLE' button is displayed. 2. SUBTITLE During disc playback press 'SUBTITLE' to this function through the DVD menu. 16 If there are multiple languages press 'SUBTITLE' again to select another subtitle language.
...To turn subtitles OFF, press the 'SUBTITLE' button until 'Subtitle Off' is not pressed again within 3 seconds. Subtitle Screen Display * Some DVDs only allow access to select the subtitle language you desire*, with the current Subtitle Language Number (1) and the total Number of Subtitle Languages (2) displayed. The Subtitle display will disappear automatically if the 'SUBTITLE' button is displayed. 2. SUBTITLE During disc playback press 'SUBTITLE' to this function through the DVD menu. 16 If there are multiple languages press 'SUBTITLE' again to select another subtitle language.

Owners Manual
Page 17
... this function through the DVD menu. 4. Audio Language Screen Display * Some DVDs only allow access to select another audio language. The audio display will return to normal size. Zoom Screen Display 17 ZOOM During playback press 'ZOOM' to select the audio language you desire*, with the current zoom multiple displayed (1) Press "zoom"one time, the picture will be enlarged 2X. (2) Press "zoom" a second time, the picture will be enlarged 4X. (3) Press "zoom" a third time, and the picture...
... this function through the DVD menu. 4. Audio Language Screen Display * Some DVDs only allow access to select another audio language. The audio display will return to normal size. Zoom Screen Display 17 ZOOM During playback press 'ZOOM' to select the audio language you desire*, with the current zoom multiple displayed (1) Press "zoom"one time, the picture will be enlarged 2X. (2) Press "zoom" a second time, the picture will be enlarged 4X. (3) Press "zoom" a third time, and the picture...
Owners Manual
Page 22
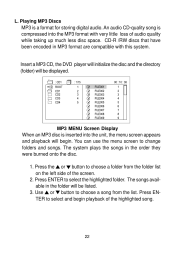
... disc. 1. You can use the menu screen to choose a song from the folder list on the left side of the screen. 2. The system plays the songs in MP3 format are compatible with very little loss of the highlighted song. 22 Playing MP3 Discs MP3 is inserted into the MP3 format with this system. MP3 MENU Screen Display When an MP3 disc is a format for storing digital audio. Use or button to change...
... disc. 1. You can use the menu screen to choose a song from the folder list on the left side of the screen. 2. The system plays the songs in MP3 format are compatible with very little loss of the highlighted song. 22 Playing MP3 Discs MP3 is inserted into the MP3 format with this system. MP3 MENU Screen Display When an MP3 disc is a format for storing digital audio. Use or button to change...
Owners Manual
Page 24
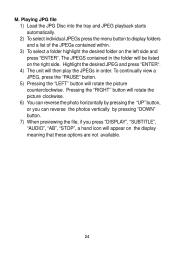
Playing JPG file 1) Load the JPG Disc into the tray and JPEG playback starts automatically. 2) To select individual JPEGs press the menu button to display folders and a list of the JPEGs contained within. 3) To select a folder highlight the desired folder on the display meaning that these options are not available. 24 Highlight the desired JPEG and press "ENTER". 4) The unit will then play the JPEGs...
Playing JPG file 1) Load the JPG Disc into the tray and JPEG playback starts automatically. 2) To select individual JPEGs press the menu button to display folders and a list of the JPEGs contained within. 3) To select a folder highlight the desired folder on the display meaning that these options are not available. 24 Highlight the desired JPEG and press "ENTER". 4) The unit will then play the JPEGs...
Owners Manual
Page 25
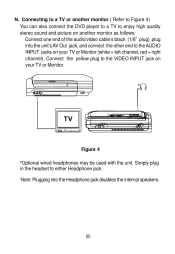
... may be used with the unit. Simply plug in the headset to enjoy high quality stereo sound and picture on your TV or Monitor (white = left channel, red = right channel). Note: Plugging into the unit's AV Out jack, and connect the other end to the VIDEO INPUT jack on another monitor as follows: Connect one end of the audio/video cable's black (1/8" plug) plug...
... may be used with the unit. Simply plug in the headset to enjoy high quality stereo sound and picture on your TV or Monitor (white = left channel, red = right channel). Note: Plugging into the unit's AV Out jack, and connect the other end to the VIDEO INPUT jack on another monitor as follows: Connect one end of the audio/video cable's black (1/8" plug) plug...
Owners Manual
Page 26
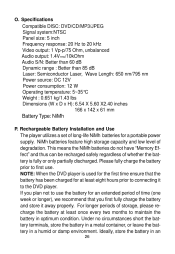
... least eight hours prior to first use the battery for a portable power supply. If you plan not to the DVD player. For longer periods of time (one week or longer), we recommend that the battery has been charged for at least once every two months to 20 kHz Video output: 1 Vp-p/75 Ohm, unbalanced Audio output: 1.4Vrms/10kOhm Audio S/N: Better than 60 dB Dynamic...
... least eight hours prior to first use the battery for a portable power supply. If you plan not to the DVD player. For longer periods of time (one week or longer), we recommend that the battery has been charged for at least once every two months to 20 kHz Video output: 1 Vp-p/75 Ohm, unbalanced Audio output: 1.4Vrms/10kOhm Audio S/N: Better than 60 dB Dynamic...
Owners Manual
Page 27
... to the player for long time. To charge the battery, connect the AC adapter power jack directly into the battery. Please remove battery from the player and store it properly if the player is fully discharged, immediately recharge (regardless of whether you plan to use only the AC adapter included with desiccant or other dehumidifying agent. Using and Maintaining your batteries. 2. During this point you always use battery or...
... to the player for long time. To charge the battery, connect the AC adapter power jack directly into the battery. Please remove battery from the player and store it properly if the player is fully discharged, immediately recharge (regardless of whether you plan to use only the AC adapter included with desiccant or other dehumidifying agent. Using and Maintaining your batteries. 2. During this point you always use battery or...

Owners Manual
Page 28
... player. 5. Installing the DVD Player Battery Removing the Battery Pack: 1. First, make sure the player is indicated by a click. Slide the battery towards the rear of battery. 4. Close the player cover. 3. Removing the DVD Player Battery 28 Align the battery pack with the player module's front edge. 4. Unplug the battery plug from the DVD player. 3. The lock position is in "Stop" mode and the AC power supply has been disconnected. 2. Press the release button on the rear of the player...
... player. 5. Installing the DVD Player Battery Removing the Battery Pack: 1. First, make sure the player is indicated by a click. Slide the battery towards the rear of battery. 4. Close the player cover. 3. Removing the DVD Player Battery 28 Align the battery pack with the player module's front edge. 4. Unplug the battery plug from the DVD player. 3. The lock position is in "Stop" mode and the AC power supply has been disconnected. 2. Press the release button on the rear of the player...

Owners Manual
Page 29
... charge for installation, removal or reinstallation of the product, or to damage to tapes, discs, speakers, accessories, or electrical systems. This Warranty does not apply to any liability other express warranties or liabilities. Some states do not allow limitations on how long an implied warranty lasts or the exclusion or limitation of the factory serial number/ bar code label(s). This Warranty does...
... charge for installation, removal or reinstallation of the product, or to damage to tapes, discs, speakers, accessories, or electrical systems. This Warranty does not apply to any liability other express warranties or liabilities. Some states do not allow limitations on how long an implied warranty lasts or the exclusion or limitation of the factory serial number/ bar code label(s). This Warranty does...


