
User Guide
Page 1
Model CMOLF License Plate Rearview Camera with Selectable Normal/Reverse Image CMOLF FEATURES: • Built Into License Plate Frame • High Resolution, 1/4" CMOS Color Camera • Compact Zinc Alloy Die Cast Body • Waterproof Housing • Waterproof Microphone • 130O Wide Angle View • Selectable Normal/Reverse Image 1 128-8104 1 of 8
Model CMOLF License Plate Rearview Camera with Selectable Normal/Reverse Image CMOLF FEATURES: • Built Into License Plate Frame • High Resolution, 1/4" CMOS Color Camera • Compact Zinc Alloy Die Cast Body • Waterproof Housing • Waterproof Microphone • 130O Wide Angle View • Selectable Normal/Reverse Image 1 128-8104 1 of 8
User Guide
Page 2
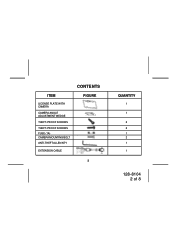
CONTENTS ITEM LICENSE PLATE WITH CAMERA CAMERA ANGLE ADJUSTMENT WEDGE THEFT-PROOF SCREWS THEFT-PROOF SCREWS FUSE (1A) CAMERA MOUNTING BOLT ANTI-THEFT ALLEN KEY EXTENSION CABLE FIGURE 2 QUANTITY 1 1 2 2 1 2 1 1 128-8104 2 of 8
CONTENTS ITEM LICENSE PLATE WITH CAMERA CAMERA ANGLE ADJUSTMENT WEDGE THEFT-PROOF SCREWS THEFT-PROOF SCREWS FUSE (1A) CAMERA MOUNTING BOLT ANTI-THEFT ALLEN KEY EXTENSION CABLE FIGURE 2 QUANTITY 1 1 2 2 1 2 1 1 128-8104 2 of 8

User Guide
Page 3
Color Camera View: Cable Connector End View: Normal/Reverse Image Jumper: The jumper is removed from the harness, the camera image will be reversed. 3 128-8104 3 of 8 With jumper installed in the harness, the camera image will be normal. When the jumper is located at the camera cable connector.
Color Camera View: Cable Connector End View: Normal/Reverse Image Jumper: The jumper is removed from the harness, the camera image will be reversed. 3 128-8104 3 of 8 With jumper installed in the harness, the camera image will be normal. When the jumper is located at the camera cable connector.

User Guide
Page 4
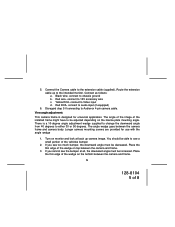
... mechanism. 2. Locate suitable location near the vehicles rear license plate to remove slack 4. Pull gently on the camera cable to remove slack 4 128-8104 4 of 8 Drill a 5/8-inch hole at selected location. Then route the camera cable connector through the hole and insert grommet into the camera license plate frame. Using the black screws provide, tighten the screws with...
... mechanism. 2. Locate suitable location near the vehicles rear license plate to remove slack 4. Pull gently on the camera cable to remove slack 4 128-8104 4 of 8 Drill a 5/8-inch hole at selected location. Then route the camera cable connector through the hole and insert grommet into the camera license plate frame. Using the black screws provide, tighten the screws with...
User Guide
Page 5
... 8 There is designed for use with the angle wedge 1. Turn on the license plate mounting angle. Black wire- connect to 12V accessory wire c. The angle wedge goes between the camera and frame. 3. Red wire- Yellow RCA- Place the thin edge of the wedge on...top between the camera frame and camera body. Connect the Camera cable to chassis ground b. Red RCA- Longer camera mounting screws are provided for universal application. connect to the extension cable (supplied). Disregard step 5 if connecting to Video input d. connect to Audiovox 4-pin camera cable. Place the...
... 8 There is designed for use with the angle wedge 1. Turn on the license plate mounting angle. Black wire- connect to 12V accessory wire c. The angle wedge goes between the camera and frame. 3. Red wire- Yellow RCA- Place the thin edge of the wedge on...top between the camera frame and camera body. Connect the Camera cable to chassis ground b. Red RCA- Longer camera mounting screws are provided for universal application. connect to the extension cable (supplied). Disregard step 5 if connecting to Video input d. connect to Audiovox 4-pin camera cable. Place the...

User Guide
Page 6
LICENSE PLATE 2. Camera Installation 1. CAMERA 6 128-8104 6 of 8 CAMERA ANGLE ADJUSTMENT WEDGE 3.
LICENSE PLATE 2. Camera Installation 1. CAMERA 6 128-8104 6 of 8 CAMERA ANGLE ADJUSTMENT WEDGE 3.