Motherboard DIY Troubleshooting Guide
Page 18
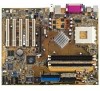
...in the socket. 3. Align a DIMM on the DIMM exactly match the notches in the BIOS are the same or set to 3GB non-ECC PC3200/2700/2100/1600 DDR.. 104 Pins ® A7N8X-X 80 Pins A7N8X-X 184-Pin DDR DIMM Sockets 1. Firmly insert the DIMM into the socket until the retaining... clips lock into a socket to operate. Make sure the notches on the socket. A DDR DIMM is keyed with more than 8 devices on each side of the module are already in only one function at a time. Visit ASUS...
...in the socket. 3. Align a DIMM on the DIMM exactly match the notches in the BIOS are the same or set to 3GB non-ECC PC3200/2700/2100/1600 DDR.. 104 Pins ® A7N8X-X 80 Pins A7N8X-X 184-Pin DDR DIMM Sockets 1. Firmly insert the DIMM into the socket until the retaining... clips lock into a socket to operate. Make sure the notches on the socket. A DDR DIMM is keyed with more than 8 devices on each side of the module are already in only one function at a time. Visit ASUS...
Motherboard DIY Troubleshooting Guide
Page 19
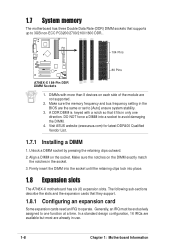
... Graphics Port (AGP) slot that they fit the AGP slot on your motherboard. ® A7N8X-X Keyed for 1.5v A7N8X-X Accelerated Graphics Port (AGP) ASUS A7N8X-X Motherboard 1-9 used - - used - - IRQ assignments for this case, IRQ assignments are swapped automatically or adjusted through the BIOS firmware. 1.8.2 Standard Interrupt Assignments IRQ Standard Function 0 System Timer 1 Keyboard Controller 2 Programmable Interrupt...
... Graphics Port (AGP) slot that they fit the AGP slot on your motherboard. ® A7N8X-X Keyed for 1.5v A7N8X-X Accelerated Graphics Port (AGP) ASUS A7N8X-X Motherboard 1-9 used - - used - - IRQ assignments for this case, IRQ assignments are swapped automatically or adjusted through the BIOS firmware. 1.8.2 Standard Interrupt Assignments IRQ Standard Function 0 System Timer 1 Keyboard Controller 2 Programmable Interrupt...

Motherboard DIY Troubleshooting Guide
Page 21
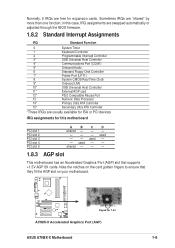
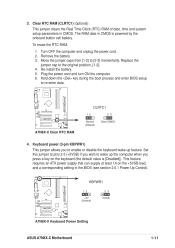
... the power cord and turn ON the computer. 6. Hold down the key during the boot process and enter BIOS setup to the original position, [1-2]. 4. Replace the jumper cap to re-enter data. ® A7N8X-X A7N8X-X Clear RTC RAM CLRTC1 12 23 Normal (Default) Clear CMOS 4. Turn... (optional) This jumper clears the Real Time Clock (RTC) RAM of date, time and system setup parameters in the BIOS (see section 2.5.1 Power Up Control). ® A7N8X-X KBPWR1 12 +5V (Default) 23 +5VSB A7N8X-X Keyboard Power Setting ASUS A7N8X-X Motherboard 1-11 The RAM data in CMOS is [Disabled]).
... the power cord and turn ON the computer. 6. Hold down the key during the boot process and enter BIOS setup to the original position, [1-2]. 4. Replace the jumper cap to re-enter data. ® A7N8X-X A7N8X-X Clear RTC RAM CLRTC1 12 23 Normal (Default) Clear CMOS 4. Turn... (optional) This jumper clears the Real Time Clock (RTC) RAM of date, time and system setup parameters in the BIOS (see section 2.5.1 Power Up Control). ® A7N8X-X KBPWR1 12 +5V (Default) 23 +5VSB A7N8X-X Keyboard Power Setting ASUS A7N8X-X Motherboard 1-11 The RAM data in CMOS is [Disabled]).
Motherboard DIY Troubleshooting Guide
Page 37
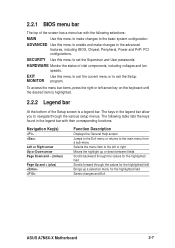
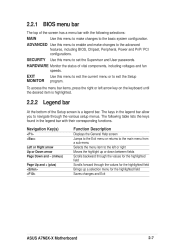
...right Moves the highlight up or down between fields Scrolls backward through the values for the highlighted field Saves changes and Exit ASUS A7N8X-X Motherboard 2-7 The keys in the legend bar with the following selections: MAIN Use this menu to enable and make changes to exit the Setup ...At the bottom of the Setup screen is a legend bar. HARDWARE Monitor the status of vital components, including voltages and fan speeds. 2.2.1 BIOS menu bar The top of the screen has a menu bar with their corresponding functions. ADVANCED Use this menu to make changes to navigate through ...
...right Moves the highlight up or down between fields Scrolls backward through the values for the highlighted field Saves changes and Exit ASUS A7N8X-X Motherboard 2-7 The keys in the legend bar with the following selections: MAIN Use this menu to enable and make changes to exit the Setup ...At the bottom of the Setup screen is a legend bar. HARDWARE Monitor the status of vital components, including voltages and fan speeds. 2.2.1 BIOS menu bar The top of the screen has a menu bar with their corresponding functions. ADVANCED Use this menu to make changes to navigate through ...

Motherboard DIY Troubleshooting Guide
Page 41
... [Auto] Select the hard disk drive type in MB. After entering the IDE hard disk drive information into BIOS, use a disk utility, such as FDISK, to the Main menu. To make changes to this sub-menu, press the key to return to partition and format new IDE hard disk drives. ASUS A7N8X-X Motherboard 2-11
... [Auto] Select the hard disk drive type in MB. After entering the IDE hard disk drive information into BIOS, use a disk utility, such as FDISK, to the Main menu. To make changes to this sub-menu, press the key to return to partition and format new IDE hard disk drives. ASUS A7N8X-X Motherboard 2-11

Motherboard DIY Troubleshooting Guide
Page 43
...the up " and "power-on" options. IRQ resources are accessed from this menu. ASUS A7N8X-X Motherboard 2-13 2.4 Advanced Menu Advanced menu items The Advanced menu accesses five important sub-menus: Advanced BIOS Features These fields set chipset and CPU functions, including system and AGP caches, boot ...management, HDD power, network "wake-up and down arrow keys and then press to automatically configure the system along with PCI/VGA properties. PnP/PCI Configuration These fields set the functional properties of the BIOS to reset data configurations and to view the desired menu...
...the up " and "power-on" options. IRQ resources are accessed from this menu. ASUS A7N8X-X Motherboard 2-13 2.4 Advanced Menu Advanced menu items The Advanced menu accesses five important sub-menus: Advanced BIOS Features These fields set chipset and CPU functions, including system and AGP caches, boot ...management, HDD power, network "wake-up and down arrow keys and then press to automatically configure the system along with PCI/VGA properties. PnP/PCI Configuration These fields set the functional properties of the BIOS to reset data configurations and to view the desired menu...

A7N8X-X User's Manual
Page 18
A DDR DIMM is keyed with more than 8 devices on each side of the module are not supported. 2. Align a DIMM on the ...A7N8X-X 184-Pin DDR DIMM Sockets 1. DIMMs with a notch so that supports up to [Auto] ensure system stability. 3. Firmly insert the DIMM into the socket until the retaining clips lock into a socket to operate. Unlock a DIMM socket by pressing the retaining clips outward. 2. Visit ASUS website (www.asus... to avoid damaging the DIMM. 4. Make sure the memory frequency and bus frequency setting in the BIOS are already in use. 1-8 Chapter 1: Motherboard Information
A DDR DIMM is keyed with more than 8 devices on each side of the module are not supported. 2. Align a DIMM on the ...A7N8X-X 184-Pin DDR DIMM Sockets 1. DIMMs with a notch so that supports up to [Auto] ensure system stability. 3. Firmly insert the DIMM into the socket until the retaining clips lock into a socket to operate. Unlock a DIMM socket by pressing the retaining clips outward. 2. Visit ASUS website (www.asus... to avoid damaging the DIMM. 4. Make sure the memory frequency and bus frequency setting in the BIOS are already in use. 1-8 Chapter 1: Motherboard Information

A7N8X-X User's Manual
Page 19
...expansion cards. IRQ assignments for this case, IRQ assignments are swapped automatically or adjusted through the BIOS firmware. 1.8.2 Standard Interrupt Assignments IRQ 0 1 2 3* 4* 5* 6 7* 8 9* 10...Primary Ultra ATA Controller Secondary Ultra ATA Controller *These IRQs are usually available for 1.5v A7N8X-X Accelerated Graphics Port (AGP) ASUS A7N8X-X Motherboard 1-9 C - - used shared - PCI slot 1 PCI slot 2 PCI slot...- used - - Note the notches on your motherboard. ® A7N8X-X Keyed for ISA or PCI devices. Normally, 6 IRQs are "shared" by more than one function; in this ...
...expansion cards. IRQ assignments for this case, IRQ assignments are swapped automatically or adjusted through the BIOS firmware. 1.8.2 Standard Interrupt Assignments IRQ 0 1 2 3* 4* 5* 6 7* 8 9* 10...Primary Ultra ATA Controller Secondary Ultra ATA Controller *These IRQs are usually available for 1.5v A7N8X-X Accelerated Graphics Port (AGP) ASUS A7N8X-X Motherboard 1-9 C - - used shared - PCI slot 1 PCI slot 2 PCI slot...- used - - Note the notches on your motherboard. ® A7N8X-X Keyed for ISA or PCI devices. Normally, 6 IRQs are "shared" by more than one function; in this ...
A7N8X-X User's Manual
Page 21
... battery. 3. Plug the power cord and turn ON the computer. 6. KBPWR1 1 2 +5V (Default) ® 2 3 +5VSB A7N8X-X A7N8X-X Keyboard Power Setting ASUS A7N8X-X Motherboard 1-11 Replace the jumper cap to re-enter data. Hold down the key during the boot process and enter BIOS setup to the original position, [1-2]. 4. Re-install the battery. 5. CLRTC1 1 2 ® 2 3 Clear CMOS...
... battery. 3. Plug the power cord and turn ON the computer. 6. KBPWR1 1 2 +5V (Default) ® 2 3 +5VSB A7N8X-X A7N8X-X Keyboard Power Setting ASUS A7N8X-X Motherboard 1-11 Replace the jumper cap to re-enter data. Hold down the key during the boot process and enter BIOS setup to the original position, [1-2]. 4. Re-install the battery. 5. CLRTC1 1 2 ® 2 3 Clear CMOS...
A7N8X-X User's Manual
Page 37
... left or right Moves the highlight up a selection menu for the highlighted field Saves changes and Exit ASUS A7N8X-X Motherboard 2-7 2.2.1 BIOS menu bar The top of the screen has a menu bar with their corresponding functions. Navigation Key(s) Left or Right arrow Up or Down arrow Page Down and - (minus) Page Up and + (plus) Function...
... left or right Moves the highlight up a selection menu for the highlighted field Saves changes and Exit ASUS A7N8X-X Motherboard 2-7 2.2.1 BIOS menu bar The top of the screen has a menu bar with their corresponding functions. Navigation Key(s) Left or Right arrow Up or Down arrow Page Down and - (minus) Page Up and + (plus) Function...

A7N8X-X User's Manual
Page 41
After entering the IDE hard disk drive information into BIOS, use a disk utility, such as FDISK, to determine the correct value. Configuration options... data from the hard disk. Refer to the drive documentation or on this sub-menu, press the key to return to active. After making your selections on the drive label for this field, set the ...entries for configuring the fields below. Make sure to [CHS]. Select [CHS] to make changes to this information. ASUS A7N8X-X Motherboard 2-11 [Manual] & [CHS] Settings Manually enter the number of the hard drive is necessary for ...
After entering the IDE hard disk drive information into BIOS, use a disk utility, such as FDISK, to determine the correct value. Configuration options... data from the hard disk. Refer to the drive documentation or on this sub-menu, press the key to return to active. After making your selections on the drive label for this field, set the ...entries for configuring the fields below. Make sure to [CHS]. Select [CHS] to make changes to this information. ASUS A7N8X-X Motherboard 2-11 [Manual] & [CHS] Settings Manually enter the number of the hard drive is necessary for ...

A7N8X-X User's Manual
Page 43
ASUS A7N8X-X Motherboard 2-13 Power Management Setup These fields set the functional properties of the ACPI, system power management, HDD power, network "wake-up and down arrow keys and then press to automatically configure the system along with PCI/VGA properties. To access the menu bar items... boot devices, security and operational modes. 2.4 Advanced Menu Advanced menu items The Advanced menu accesses five important sub-menus: Advanced BIOS Features These fields set the functional properties of CPU caches, as well as serial, game, midi and parallel addresses. Advanced Chipset...
ASUS A7N8X-X Motherboard 2-13 Power Management Setup These fields set the functional properties of the ACPI, system power management, HDD power, network "wake-up and down arrow keys and then press to automatically configure the system along with PCI/VGA properties. To access the menu bar items... boot devices, security and operational modes. 2.4 Advanced Menu Advanced menu items The Advanced menu accesses five important sub-menus: Advanced BIOS Features These fields set the functional properties of CPU caches, as well as serial, game, midi and parallel addresses. Advanced Chipset...


