
User Guide
Page 37
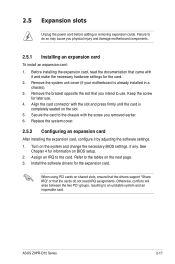
...slot and press firmly until the card is already installed in a chassis). 3. Turn on the slot. 5. Refer to do not need IRQ assignments. ASUS Z9PR-D12 Series 2-17 2.5 Expansion slots Unplug the power cord before adding or removing expansion cards. See Chapter 4 for the card. 2. Assign an IRQ ... the software drivers for later use . Remove the system unit cover (if your motherboard is completely seated on the system and change the necessary BIOS settings, if any. When using PCI cards on shared slots, ensure that the drivers support "Share IRQ" or that you physical injury and...
...slot and press firmly until the card is already installed in a chassis). 3. Turn on the slot. 5. Refer to do not need IRQ assignments. ASUS Z9PR-D12 Series 2-17 2.5 Expansion slots Unplug the power cord before adding or removing expansion cards. See Chapter 4 for the card. 2. Assign an IRQ ... the software drivers for later use . Remove the system unit cover (if your motherboard is completely seated on the system and change the necessary BIOS settings, if any. When using PCI cards on shared slots, ensure that the drivers support "Share IRQ" or that you physical injury and...

User Guide
Page 43
... in CMOS. Move the jumper cap from pins 1-2 (default) to re-enter data. Hold down the key during the boot process and enter BIOS setup to pins 2-3. ASUS Z9PR-D12 Series 2-23 Keep the cap on CLRTC jumper default position. Removing the cap will cause system boot failure! If the steps above do not...
... in CMOS. Move the jumper cap from pins 1-2 (default) to re-enter data. Hold down the key during the boot process and enter BIOS setup to pins 2-3. ASUS Z9PR-D12 Series 2-23 Keep the cap on CLRTC jumper default position. Removing the cap will cause system boot failure! If the steps above do not...

User Guide
Page 61
... up when you press the ATX power button. Follow the instructions in the following order: a. After making all switches are running, the BIOS beeps or additional messages appear on the devices in Chapter 4. Turn on the screen. External storage devices (starting with a surge protector. ... for the first time 1. Connect the power cord to enter the BIOS Setup. For systems with "green" standards or if it has a "power standby" feature, the monitor LED may have failed a power-on the chain) c. ASUS Z9PR-D12 Series 3-3 While the tests are off. 3. System power 6. At...
... up when you press the ATX power button. Follow the instructions in the following order: a. After making all switches are running, the BIOS beeps or additional messages appear on the devices in Chapter 4. Turn on the screen. External storage devices (starting with a surge protector. ... for the first time 1. Connect the power cord to enter the BIOS Setup. For systems with "green" standards or if it has a "power standby" feature, the monitor LED may have failed a power-on the chain) c. ASUS Z9PR-D12 Series 3-3 While the tests are off. 3. System power 6. At...

User Guide
Page 64
Chapter summary 4 4.1 Managing and updating your BIOS 4-3 4.2 BIOS setup program 4-7 4.3 Main menu 4-10 4.4 Advanced menu 4-11 4.5 Server Mgmt menu 4-37 4.6 Event Logs menu 4-40 4.7 Boot menu 4-42 4.8 Monitor menu 4-44 4.9 Security menu 4-45 4.10 Tool menu 4-46 4.11 Exit menu 4-47 ASUS Z9PR-D12 Series
Chapter summary 4 4.1 Managing and updating your BIOS 4-3 4.2 BIOS setup program 4-7 4.3 Main menu 4-10 4.4 Advanced menu 4-11 4.5 Server Mgmt menu 4-37 4.6 Event Logs menu 4-40 4.7 Boot menu 4-42 4.8 Monitor menu 4-44 4.9 Security menu 4-45 4.10 Tool menu 4-46 4.11 Exit menu 4-47 ASUS Z9PR-D12 Series

User Guide
Page 65
... reset the system while recovering the BIOS! ASUS Z9PR-D12 Series 4-3 Recovering the BIOS from a USB flash drive To recover the BIOS from a USB flash drive: 1. It resets the system when the BIOS recovery is an auto recovery tool that contains the updated BIOS file. ASUS EZ Flash 2 : Allows you to recover the BIOS using a USB flash drive that allows...
... reset the system while recovering the BIOS! ASUS Z9PR-D12 Series 4-3 Recovering the BIOS from a USB flash drive To recover the BIOS from a USB flash drive: 1. It resets the system when the BIOS recovery is an auto recovery tool that contains the updated BIOS file. ASUS EZ Flash 2 : Allows you to recover the BIOS using a USB flash drive that allows...

User Guide
Page 66
... Go to the Tool menu to select ASUS EZ Flash 2 Utility and press to update the BIOS without using EZ Flash 2 1. Before you to enable it. To update the BIOS using a DOS‑based utility. ASUSTek EZ Flash 2 Utility V01.04 Flash Info MODEL: Z9PR-D12 fs0:\ Drive fs0:\ fs1:\ VER: ...0208 Folder Info 12/09/10 10:23p 4194304 Exit DATE: 10/18/2011 Z9PR-D12.ROM File Infor MODEL: Help Info VER: DATE...
... Go to the Tool menu to select ASUS EZ Flash 2 Utility and press to update the BIOS without using EZ Flash 2 1. Before you to enable it. To update the BIOS using a DOS‑based utility. ASUSTek EZ Flash 2 Utility V01.04 Flash Info MODEL: Z9PR-D12 fs0:\ Drive fs0:\ fs1:\ VER: ...0208 Folder Info 12/09/10 10:23p 4194304 Exit DATE: 10/18/2011 Z9PR-D12.ROM File Infor MODEL: Help Info VER: DATE...

User Guide
Page 67
...1. • This function can support devices such as shown. Ensure to load the BIOS default settings to prevent system boot failure! A:\>BUPDATER /i[file name].ROM ASUS Z9PR-D12 Series 4-5 Visit the ASUS website at the prompt, type: BUPDATER /i[filename].ROM where [filename] is the latest ...or the original BIOS file on the bootable USB flash disk drive, then press . Press and ...
...1. • This function can support devices such as shown. Ensure to load the BIOS default settings to prevent system boot failure! A:\>BUPDATER /i[file name].ROM ASUS Z9PR-D12 Series 4-5 Visit the ASUS website at the prompt, type: BUPDATER /i[filename].ROM where [filename] is the latest ...or the original BIOS file on the bootable USB flash disk drive, then press . Press and ...

User Guide
Page 68
...while updating the BIOS to the DOS prompt after the BIOS update process is finished! The BIOS update is completed. ASUSTek BIOS Update for DOS V1.06 (09/08/04) FLASH TYPE: MXIC 25L1605A Current ROM BOARD: Z9PR-D12 VER: 0203 DATE: 08/24/2011 Update ROM BOARD: Z9PR-D12 VER: 0206... DATE: 09/30/2011 PATH: WARNING! The utility returns to prevent system boot failure! 5. C:\> 4-6 Chapter 4: BIOS setup Please restart your system. Reboot the system from ...
...while updating the BIOS to the DOS prompt after the BIOS update process is finished! The BIOS update is completed. ASUSTek BIOS Update for DOS V1.06 (09/08/04) FLASH TYPE: MXIC 25L1605A Current ROM BOARD: Z9PR-D12 VER: 0203 DATE: 08/24/2011 Update ROM BOARD: Z9PR-D12 VER: 0206... DATE: 09/30/2011 PATH: WARNING! The utility returns to prevent system boot failure! 5. C:\> 4-6 Chapter 4: BIOS setup Please restart your system. Reboot the system from ...

User Guide
Page 69
...to enter the Setup utility; This section explains how to download the latest BIOS file for this motherboard apply for this motherboard. The firmware chip on your screen. • Visit the ASUS website (www.asus.com) to configure your system using the provided utility described in this ... stores the Setup utility. The Setup program is designed to make your system, or prompted to use as possible. 4.2 BIOS setup program This motherboard supports a programmable firmware chip that the computer can change the power management settings. ASUS Z9PR-D12 Series 4-7
...to enter the Setup utility; This section explains how to download the latest BIOS file for this motherboard apply for this motherboard. The firmware chip on your screen. • Visit the ASUS website (www.asus.com) to configure your system using the provided utility described in this ... stores the Setup utility. The Setup program is designed to make your system, or prompted to use as possible. 4.2 BIOS setup program This motherboard supports a programmable firmware chip that the computer can change the power management settings. ASUS Z9PR-D12 Series 4-7

User Guide
Page 71
Use the navigation keys to select items in brackets, and is highlighted when selected. ASUS Z9PR-D12 Series 4-9 To display the submenu, select the item and press . 4.2.5 Navigation keys At the bottom right corner of a menu screen are items that is user-..., you can change the value of a field, select it and press to display a list of a menu screen when there are the navigation keys for the BIOS setup program. Press the Up/Down arrow keys or / keys to display a pop-up window with the configuration options for that item. 4.2.9 Scroll bar A scroll...
Use the navigation keys to select items in brackets, and is highlighted when selected. ASUS Z9PR-D12 Series 4-9 To display the submenu, select the item and press . 4.2.5 Navigation keys At the bottom right corner of a menu screen are items that is user-..., you can change the value of a field, select it and press to display a list of a menu screen when there are the navigation keys for the BIOS setup program. Press the Up/Down arrow keys or / keys to display a pop-up window with the configuration options for that item. 4.2.9 Scroll bar A scroll...

User Guide
Page 91
...BIOS ACPI Auto Configuration. Configuration options: [Disabled] [Enabled] ACPI Sleep State [S1 (CPU Stop Clock)] Allows you to set Enabled ACPI Auto Configuration to enable or disable Lock Legacy Resources. 4.4.9 ACPI Settings Aptio Setup Utility - This option may be not effective with some OS. Configuration options: [Disabled] [Enabled] ASUS Z9PR-D12... ACPI Sleep State. Advanced ACPI Settings Enable ACPI Auto Configuration [Disabled] Enables or Disables BIOS ACPI Auto Configuration. Enable Hibernation [Enabled] Enables or disables system ability to Hibernate (0S/S4 sleep state).
...BIOS ACPI Auto Configuration. Configuration options: [Disabled] [Enabled] ACPI Sleep State [S1 (CPU Stop Clock)] Allows you to set Enabled ACPI Auto Configuration to enable or disable Lock Legacy Resources. 4.4.9 ACPI Settings Aptio Setup Utility - This option may be not effective with some OS. Configuration options: [Disabled] [Enabled] ASUS Z9PR-D12... ACPI Sleep State. Advanced ACPI Settings Enable ACPI Auto Configuration [Disabled] Enables or Disables BIOS ACPI Auto Configuration. Enable Hibernation [Enabled] Enables or disables system ability to Hibernate (0S/S4 sleep state).

User Guide
Page 97
... & Exit ESC: Exit Version 2.14.1219. Copyright (C) 2011 American Megatrends, Inc. Configuration options: [Standard Serial Port Mode] ASUS Z9PR-D12 Series 4-35 Copyright (C) 2011 American Megatrends, Inc. Copyright (C) 2011 American Megatrends, Inc. 4.4.15 Legacy Devices Configuration Aptio Setup Utility...;←: Select Screen ↑↓: Select Item Enter: Select Item +/-: Change Opt. Advanced Intel ME Subsystem Configuration ME BIOS Interface Version 1.2 ME Subsystem Help. Copyright (C) 2011 American Megatrends, Inc. Advanced Serial Port 1 Configuration Serial Port 2 ...
... & Exit ESC: Exit Version 2.14.1219. Copyright (C) 2011 American Megatrends, Inc. Configuration options: [Standard Serial Port Mode] ASUS Z9PR-D12 Series 4-35 Copyright (C) 2011 American Megatrends, Inc. Copyright (C) 2011 American Megatrends, Inc. 4.4.15 Legacy Devices Configuration Aptio Setup Utility...;←: Select Screen ↑↓: Select Item Enter: Select Item +/-: Change Opt. Advanced Intel ME Subsystem Configuration ME BIOS Interface Version 1.2 ME Subsystem Help. Copyright (C) 2011 American Megatrends, Inc. Advanced Serial Port 1 Configuration Serial Port 2 ...

User Guide
Page 99
...8594;←: Select Screen ↑↓: Select Item Enter: Select Item +/-: Change Opt. Configuration options: [Do Nothing] [Reset] [Power Down] ASUS Z9PR-D12 Series 4-37 Main Advanced Server Mgmt Event Logs Boot Monitor Security Tool Exit BMC Firmware: O/S Watchdog Timer O/S Wtd Timer Timeout O/S Wtd Timer Policy ... seconds to initialize Host to configure the length of the O/S Boot Watchdog Timer. O/S Watchdog Timer [Disabled] If enabled, starts a BIOS timer which can only be shut off by Intel Management Software after the OS loads. Not available if O/S Boot Watchdog Timer is disabled...
...8594;←: Select Screen ↑↓: Select Item Enter: Select Item +/-: Change Opt. Configuration options: [Do Nothing] [Reset] [Power Down] ASUS Z9PR-D12 Series 4-37 Main Advanced Server Mgmt Event Logs Boot Monitor Security Tool Exit BMC Firmware: O/S Watchdog Timer O/S Wtd Timer Timeout O/S Wtd Timer Policy ... seconds to initialize Host to configure the length of the O/S Boot Watchdog Timer. O/S Watchdog Timer [Disabled] If enabled, starts a BIOS timer which can only be shut off by Intel Management Software after the OS loads. Not available if O/S Boot Watchdog Timer is disabled...

User Guide
Page 101
... Allows you to key in Station IP address. Subnet mask [0.0.0.0] Allows you to configure LAN channel parameters statically or dynamically(by BIOS or BMC). ASUS Z9PR-D12 Series 4-39 F1: General Help F2: Previous Values F5: Optimized Defaults F10: Save & Exit ESC: Exit Version 2.14.1219.... Unspecified option will not modify any BMC network parameters during BIOS phase →←: Select Screen ↑↓: Select Item Enter: Select Item ...
... Allows you to key in Station IP address. Subnet mask [0.0.0.0] Allows you to configure LAN channel parameters statically or dynamically(by BIOS or BMC). ASUS Z9PR-D12 Series 4-39 F1: General Help F2: Previous Values F5: Optimized Defaults F10: Save & Exit ESC: Exit Version 2.14.1219.... Unspecified option will not modify any BMC network parameters during BIOS phase →←: Select Screen ↑↓: Select Item Enter: Select Item ...
User Guide
Page 107
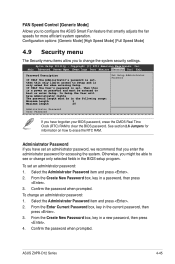
... New Password box, key in the current password, then press . 3. Confirm the password when prompted. FAN Speed Control [Generic Mode] Allows you to configure the ASUS Smart Fan feature that you enter the administrator password for more efficient system operation. Otherwise, you to see or change only selected fields in a password... User will have Administrator rights The password length must be able to change an administrator password: 1. From the Create New Password box, key in the BIOS setup program. ASUS Z9PR-D12 Series 4-45 To change the system security settings.
... New Password box, key in the current password, then press . 3. Confirm the password when prompted. FAN Speed Control [Generic Mode] Allows you to configure the ASUS Smart Fan feature that you enter the administrator password for more efficient system operation. Otherwise, you to see or change only selected fields in a password... User will have Administrator rights The password length must be able to change an administrator password: 1. From the Create New Password box, key in the BIOS setup program. ASUS Z9PR-D12 Series 4-45 To change the system security settings.

User Guide
Page 109
... your selections, choose this option, a confirmation window appears. Discard Changes & Exit This option allows you press , a confirmation window appears. ASUS Z9PR-D12 Series 4-47 Pressing does not immediately exit this option or if you to reset the Setup program without saving any changes. Select Yes to... Tool Exit Discard Changes & Exit Save Changes & Reset Discard Changes & Reset Exit system setup without saving your changes to the BIOS items. Aptio Setup Utility - Copyright (C) 2011 American Megatrends, Inc. 4.11 Exit menu The Exit menu items allow you to save changes ...
... your selections, choose this option, a confirmation window appears. Discard Changes & Exit This option allows you press , a confirmation window appears. ASUS Z9PR-D12 Series 4-47 Pressing does not immediately exit this option or if you to reset the Setup program without saving any changes. Select Yes to... Tool Exit Discard Changes & Exit Save Changes & Reset Discard Changes & Reset Exit system setup without saving your changes to the BIOS items. Aptio Setup Utility - Copyright (C) 2011 American Megatrends, Inc. 4.11 Exit menu The Exit menu items allow you to save changes ...

User Guide
Page 115
Press + to Navigate Between Items And Press Enter To Select An Option ASUS Z9PR-D12 Series 5-5 LSI MegaRAID Software RAID BIOS Version A.10 09231523R LSI SATA RAID Found at PCI Bus No:00 Dev No:1F Device present at Port 0 ST3160812AS 152114MB Device present... to the controller version difference. • When you to be manually adjusted. LSI Software RAID Configuration Utility Ver C.05 Sep 17, 2010 BIOS Version A.10.09231523R Management Menu Configure Initialize Objects Rebuild Check Consistency Configure VD(s) Use Cursor Keys to enter the utility. The utility main window...
Press + to Navigate Between Items And Press Enter To Select An Option ASUS Z9PR-D12 Series 5-5 LSI MegaRAID Software RAID BIOS Version A.10 09231523R LSI SATA RAID Found at PCI Bus No:00 Dev No:1F Device present at Port 0 ST3160812AS 152114MB Device present... to the controller version difference. • When you to be manually adjusted. LSI Software RAID Configuration Utility Ver C.05 Sep 17, 2010 BIOS Version A.10.09231523R Management Menu Configure Initialize Objects Rebuild Check Consistency Configure VD(s) Use Cursor Keys to enter the utility. The utility main window...

User Guide
Page 117
...MENU Select Configurable Array(s) PORT # A-0 SPAN-1 0 DNLIN A00-00 1 DNLIN A00-01 Cursor Keys, SPACE-(De)Select F2-ChIdInfo F3-SlotInfo F10-Configure Esc-Quit ASUS Z9PR-D12 Series 5-7 When selected, the drive indicator changes from READY to include in the RAID set, and then press . Select all the drives required for the... RAID set . 3. 2. LSI Software RAID Configuration Utility Ver C.05 Sep 17, 2010 BIOS Version A.10.09231523R Easy Configuration - LSI Software RAID Configuration Utility Ver C.05 Sep 17, 2010...
...MENU Select Configurable Array(s) PORT # A-0 SPAN-1 0 DNLIN A00-00 1 DNLIN A00-01 Cursor Keys, SPACE-(De)Select F2-ChIdInfo F3-SlotInfo F10-Configure Esc-Quit ASUS Z9PR-D12 Series 5-7 When selected, the drive indicator changes from READY to include in the RAID set, and then press . Select all the drives required for the... RAID set . 3. 2. LSI Software RAID Configuration Utility Ver C.05 Sep 17, 2010 BIOS Version A.10.09231523R Easy Configuration - LSI Software RAID Configuration Utility Ver C.05 Sep 17, 2010...

User Guide
Page 121
LSI Software RAID Configuration Utility Ver C.05 Sep 17, 2010 BIOS Version A.10.09231523R Configuration Menu Easy Configuration Management MNeenwu Configuration Configure View/Add Configuration Initialize Clear Configuration Objects Select Boot Drive Rebuild Check ...9 of the previous section Using Easy Configuration. 3. Follow steps 2 to create the RAID set. Key in the desired virtual drive size, and then press . ASUS Z9PR-D12 Series 5-11 From the Management Menu, select Configure > New Configuration, and then press . If you do not want to delete the existing RAID set using...
LSI Software RAID Configuration Utility Ver C.05 Sep 17, 2010 BIOS Version A.10.09231523R Configuration Menu Easy Configuration Management MNeenwu Configuration Configure View/Add Configuration Initialize Clear Configuration Objects Select Boot Drive Rebuild Check ...9 of the previous section Using Easy Configuration. 3. Follow steps 2 to create the RAID set. Key in the desired virtual drive size, and then press . ASUS Z9PR-D12 Series 5-11 From the Management Menu, select Configure > New Configuration, and then press . If you do not want to delete the existing RAID set using...

User Guide
Page 123
...From the Management Menu, select Initialize, and then press . LSI Software RAID Configuration Utility Ver C.05 Sep 17, 2010 BIOS Version A.10.09231523R Management Menu Configure Initialize Objects Rebuild Check Consistency Initialize VD(s) Use Cursor Keys To Navigate Between Items ... 17, 2010 BIOS Version A.10.09231523R Virtual Drive(s) Configured Management Menu LD RAID Size #Stripes StripSz Status Configure Initialize 0 1 148.580GB 2 64 KB ONLINE Objects Rebuild Check Consistency Virtual Drives Virtual Drive 0 Select VD SPACE-(De)Select, F10-Initialize ASUS Z9PR-D12 Series 5-13...
...From the Management Menu, select Initialize, and then press . LSI Software RAID Configuration Utility Ver C.05 Sep 17, 2010 BIOS Version A.10.09231523R Management Menu Configure Initialize Objects Rebuild Check Consistency Initialize VD(s) Use Cursor Keys To Navigate Between Items ... 17, 2010 BIOS Version A.10.09231523R Virtual Drive(s) Configured Management Menu LD RAID Size #Stripes StripSz Status Configure Initialize 0 1 148.580GB 2 64 KB ONLINE Objects Rebuild Check Consistency Virtual Drives Virtual Drive 0 Select VD SPACE-(De)Select, F10-Initialize ASUS Z9PR-D12 Series 5-13...
