

User Guide
Page 5
... Serial Port Console Redirection 4-31 4.4.13 Onboard LAN Configuration 4-34 4.4.14 ME Subsystem 4-35 4.4.15 Legacy Devices Configuration 4-35 4.4.16 Runtime Error Logging 4-36 4.5 Server Mgmt menu 4-37 4.5.1 System Event Log 4-38 4.5.2 BMC network configuration 4-39 4.6 Event Logs menu 4-40 4.6.1 Change Smbios Event Log Settings 4-40 4.7 Boot menu 4-42 4.8 Monitor menu 4-44 4.9 Security menu 4-45 4.10 Tool menu 4-46 4.11 Exit menu 4-47 Chapter 5: RAID configuration 5.1 Setting up RAID 5-3 5.1.1 RAID definitions 5-3 5.1.2 Installing hard disk drives 5-4 5.1.3 Setting the RAID...
... Serial Port Console Redirection 4-31 4.4.13 Onboard LAN Configuration 4-34 4.4.14 ME Subsystem 4-35 4.4.15 Legacy Devices Configuration 4-35 4.4.16 Runtime Error Logging 4-36 4.5 Server Mgmt menu 4-37 4.5.1 System Event Log 4-38 4.5.2 BMC network configuration 4-39 4.6 Event Logs menu 4-40 4.6.1 Change Smbios Event Log Settings 4-40 4.7 Boot menu 4-42 4.8 Monitor menu 4-44 4.9 Security menu 4-45 4.10 Tool menu 4-46 4.11 Exit menu 4-47 Chapter 5: RAID configuration 5.1 Setting up RAID 5-3 5.1.1 RAID definitions 5-3 5.1.2 Installing hard disk drives 5-4 5.1.3 Setting the RAID...

User Guide
Page 10
... it supports. • Chapter 2: Hardware information This chapter lists the hardware setup procedures that may include optional documentation, such as warranty flyers, that you need when installing and configuring the motherboard. ASUS websites The ASUS website provides updated information on the motherboard. • Chapter 3: Powering up This chapter describes the power up , creating, and configuring RAID sets using the available utilities. • Chapter 6: Driver installation This chapter provides instructions for installing the necessary drivers for...
... it supports. • Chapter 2: Hardware information This chapter lists the hardware setup procedures that may include optional documentation, such as warranty flyers, that you need when installing and configuring the motherboard. ASUS websites The ASUS website provides updated information on the motherboard. • Chapter 3: Powering up This chapter describes the power up , creating, and configuring RAID sets using the available utilities. • Chapter 6: Driver installation This chapter provides instructions for installing the necessary drivers for...

User Guide
Page 34
... Data Rate 3 (DDR3) Dual Inline Memory Modules (DIMM) sockets. For optimum compatibility, it is notched differently to ASUS Server AVL for the latest update. • Start installing the DIMMs from the same vendor. 2-14 Chapter 2: Hardware information 2.4 System memory 2.4.1 Overview The motherboard comes with the same CAS latency. A DDR3 module has the same physical dimensions as a DDR2 DIMM but is recommended that you obtain memory modules from slot...
... Data Rate 3 (DDR3) Dual Inline Memory Modules (DIMM) sockets. For optimum compatibility, it is notched differently to ASUS Server AVL for the latest update. • Start installing the DIMMs from the same vendor. 2-14 Chapter 2: Hardware information 2.4 System memory 2.4.1 Overview The motherboard comes with the same CAS latency. A DDR3 module has the same physical dimensions as a DDR2 DIMM but is recommended that you obtain memory modules from slot...
User Guide
Page 37
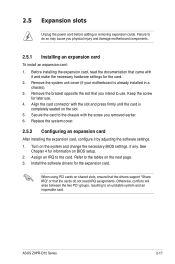
... slot. 5. Secure the card to use . 4. Install the software drivers for the card. 2. 2.5 Expansion slots Unplug the power cord before adding or removing expansion cards. Failure to do not need IRQ assignments. Remove the system unit cover (if your motherboard is completely seated on the next page. 3. Align the card connector with the slot and press firmly until the card is already installed in a chassis). 3. Turn on the system and change the necessary BIOS settings, if any. Remove...
... slot. 5. Secure the card to use . 4. Install the software drivers for the card. 2. 2.5 Expansion slots Unplug the power cord before adding or removing expansion cards. Failure to do not need IRQ assignments. Remove the system unit cover (if your motherboard is completely seated on the next page. 3. Align the card connector with the slot and press firmly until the card is already installed in a chassis). 3. Turn on the system and change the necessary BIOS settings, if any. Remove...
User Guide
Page 73
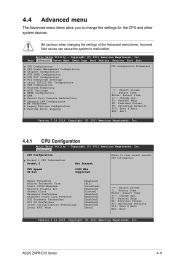
...Change Opt. ASUS Z9PR-D12 Series 4-11 F1: General Help F2: Previous Values F5: Optimized Defaults F10: Save & Exit ESC: Exit Version 2.14.1219. 4.4 Advanced menu The Advanced menu items allow you to malfunction. Main Advanced Server Mgmt Event Logs Boot Monitor Security Tool Exit CPU Configuration CPU Power Management Configuration Chipset Configuration PCH SATA Configuration PCH SCU Configuration PCI Subsystem Settings Intel TXT(LT-SX) Configuration USB Configuration Trusted Computing ACPI Settings WHEA Configuration APM Serial Port Console Redirection Onboard LAN Configuration...
...Change Opt. ASUS Z9PR-D12 Series 4-11 F1: General Help F2: Previous Values F5: Optimized Defaults F10: Save & Exit ESC: Exit Version 2.14.1219. 4.4 Advanced menu The Advanced menu items allow you to malfunction. Main Advanced Server Mgmt Event Logs Boot Monitor Security Tool Exit CPU Configuration CPU Power Management Configuration Chipset Configuration PCH SATA Configuration PCH SCU Configuration PCI Subsystem Settings Intel TXT(LT-SX) Configuration USB Configuration Trusted Computing ACPI Settings WHEA Configuration APM Serial Port Console Redirection Onboard LAN Configuration...

User Guide
Page 78
... setting. Allow 2x Refresh Altitude Memory HOT sensor support DIMM Information [Enabled] 4096 MB (DDR3) Independent 1333 MHz Not Possible Not Possible [Independent] [Auto] [Auto] [Auto] [Disabled] [Enabled] [Enabled] [Disabled] [CLTT] [Disabled] [Enabled] [300 M] [Enabled] Support for compatibility revision ID (CRID) functionality mentioned in Sandybridge bios spec. →←: Select Screen ↑↓: Select Item Enter: Select Item +/-: Change Opt. Configuration options: [Independent] [Mirroring] [Lock Step] [Sparing] DDR Speed...
... setting. Allow 2x Refresh Altitude Memory HOT sensor support DIMM Information [Enabled] 4096 MB (DDR3) Independent 1333 MHz Not Possible Not Possible [Independent] [Auto] [Auto] [Auto] [Disabled] [Enabled] [Enabled] [Disabled] [CLTT] [Disabled] [Enabled] [300 M] [Enabled] Support for compatibility revision ID (CRID) functionality mentioned in Sandybridge bios spec. →←: Select Screen ↑↓: Select Item Enter: Select Item +/-: Change Opt. Configuration options: [Independent] [Mirroring] [Lock Step] [Sparing] DDR Speed...

User Guide
Page 83
...: [Enabled] [Disabled] ASUS Z9PR-D12 Series 4-21 4.4.4 PCH SATA Configuration Aptio Setup Utility - The AHCI allows the onboard storage driver to enable advanced Serial ATA features that increases storage performance on random workloads by allowing the drive to internally optimize the order of commands. • If you want to use the Serial ATA hard disk drives as Parallel ATA physical storage devices, set this item to [IDE Mode]. • If you to use the Advanced Host Controller Interface...
...: [Enabled] [Disabled] ASUS Z9PR-D12 Series 4-21 4.4.4 PCH SATA Configuration Aptio Setup Utility - The AHCI allows the onboard storage driver to enable advanced Serial ATA features that increases storage performance on random workloads by allowing the drive to internally optimize the order of commands. • If you want to use the Serial ATA hard disk drives as Parallel ATA physical storage devices, set this item to [IDE Mode]. • If you to use the Advanced Host Controller Interface...

User Guide
Page 86
... Item +/-: Change Opt. Copyright (C) 2011 American Megatrends, Inc. Copyright (C) 2011 American Megatrends, Inc. F1: General Help F2: Previous Values F5: Optimized Defaults F10: Save & Exit ESC: Exit Version 2.14.1219. Advanced PCI Express Link Register Settings ASPM Support [Disabled] WARNING: Enabling ASPM may cause some PCI-E device to L0s state. [Auto] BIOS auto configure. [Disabled] Disabled ASPM. 4-24 Chapter 4: BIOS setup PCI Express Link Register Settings ASPM Support [Disabled] Allows to set the ASPM...
... Item +/-: Change Opt. Copyright (C) 2011 American Megatrends, Inc. Copyright (C) 2011 American Megatrends, Inc. F1: General Help F2: Previous Values F5: Optimized Defaults F10: Save & Exit ESC: Exit Version 2.14.1219. Advanced PCI Express Link Register Settings ASPM Support [Disabled] WARNING: Enabling ASPM may cause some PCI-E device to L0s state. [Auto] BIOS auto configure. [Disabled] Disabled ASPM. 4-24 Chapter 4: BIOS setup PCI Express Link Register Settings ASPM Support [Disabled] Allows to set the ASPM...

User Guide
Page 97
...15 Legacy Devices Configuration Aptio Setup Utility - Serial Port 1/2 Configuration Aptio Setup Utility - IRQ=4 Device Mode [Standard Serial Po..] Serial Port [Enabled] Allows you to enable or disable the serial port. Advanced Intel ME Subsystem Configuration ME BIOS Interface Version 1.2 ME Subsystem Help. Configuration options: [Standard Serial Port Mode] ASUS Z9PR-D12 Series 4-35 Advanced Serial Port Configuration Enable or Disable Serial Port(COM). Serial Port Device Settings [Enabled] I0=3F8h; 4.4.14 ME Subsystem Aptio Setup Utility - Copyright (C) 2011...
...15 Legacy Devices Configuration Aptio Setup Utility - Serial Port 1/2 Configuration Aptio Setup Utility - IRQ=4 Device Mode [Standard Serial Po..] Serial Port [Enabled] Allows you to enable or disable the serial port. Advanced Intel ME Subsystem Configuration ME BIOS Interface Version 1.2 ME Subsystem Help. Configuration options: [Standard Serial Port Mode] ASUS Z9PR-D12 Series 4-35 Advanced Serial Port Configuration Enable or Disable Serial Port(COM). Serial Port Device Settings [Enabled] I0=3F8h; 4.4.14 ME Subsystem Aptio Setup Utility - Copyright (C) 2011...

User Guide
Page 98
4.4.16 Runtime Error Logging Aptio Setup Utility - Configuration options: [Disabled] [Enabled] The following item appears only when you to enable or disable Runtime Error Logging Support. Advanced Runtime Error Logging Support [Disabled] Runtime Error Logging Support [Disabled] This item allows you set Runtime Error Logging Support to enable or disable PCI Error Logging. PCI Error Logging Support [Disabled] Allows you to [Enabled]. Copyright (C) 2011 American Megatrends, Inc. Configuration options: [Disabled] [Enabled]. 4-36 Chapter 4: BIOS setup
4.4.16 Runtime Error Logging Aptio Setup Utility - Configuration options: [Disabled] [Enabled] The following item appears only when you to enable or disable Runtime Error Logging Support. Advanced Runtime Error Logging Support [Disabled] Runtime Error Logging Support [Disabled] This item allows you set Runtime Error Logging Support to enable or disable PCI Error Logging. PCI Error Logging Support [Disabled] Allows you to [Enabled]. Copyright (C) 2011 American Megatrends, Inc. Configuration options: [Disabled] [Enabled]. 4-36 Chapter 4: BIOS setup
User Guide
Page 107
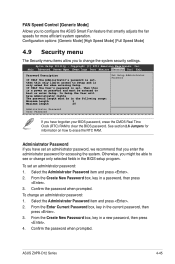
... Event Logs Boot Monitor Security Tool Exit Password Description If ONLY the Administrator's password is set, then this only limits access to Setup and is only asked for when entering Setup If ONLY the User's password is set, then this is a power on how to configure the ASUS Smart Fan feature that you enter the administrator password for more efficient system operation. To set an administrator password, we recommend that smartly adjusts the fan speeds...
... Event Logs Boot Monitor Security Tool Exit Password Description If ONLY the Administrator's password is set, then this only limits access to Setup and is only asked for when entering Setup If ONLY the User's password is set, then this is a power on how to configure the ASUS Smart Fan feature that you enter the administrator password for more efficient system operation. To set an administrator password, we recommend that smartly adjusts the fan speeds...

User Guide
Page 113
... setup. Use two new drives or use an existing drive and a new drive for this setup. With the RAID 10 configuration you install an operating system to the selected hard disk drive. • Please refer to chapter 2 for how to select the RAID configuration utility. 5.1 Setting up RAID The motherboard supports the following RAID solutions: • LSI MegaRAID software RAID Configuration Utility with RAID 0, RAID 1, and RAID 10 support (for both Linux and Windows OS). • Intel Rapid Storage Technology enterprise SCU / SATA Option ROM Utility...
... setup. Use two new drives or use an existing drive and a new drive for this setup. With the RAID 10 configuration you install an operating system to the selected hard disk drive. • Please refer to chapter 2 for how to select the RAID configuration utility. 5.1 Setting up RAID The motherboard supports the following RAID solutions: • LSI MegaRAID software RAID Configuration Utility with RAID 0, RAID 1, and RAID 10 support (for both Linux and Windows OS). • Intel Rapid Storage Technology enterprise SCU / SATA Option ROM Utility...
User Guide
Page 114
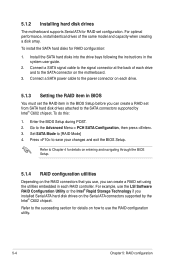
... RAID set using the utilities embedded in each drive. 5.1.3 Setting the RAID item in BIOS You must set the RAID item in the system user guide. 2. Connect a SATA power cable to the SATA connectors supported by the Intel® C602 chipset. Press to [RAID Mode] 4. Enter the BIOS Setup during POST. 2. For optimal performance, install identical drives of each drive and to the Advanced Menu > PCH SATA Configuration, then press . 3. To install the SATA hard disks for RAID set from SATA hard disk drives attached to the power connector on the motherboard. 3. Connect a SATA signal cable...
... RAID set using the utilities embedded in each drive. 5.1.3 Setting the RAID item in BIOS You must set the RAID item in the system user guide. 2. Connect a SATA power cable to the SATA connectors supported by the Intel® C602 chipset. Press to [RAID Mode] 4. Enter the BIOS Setup during POST. 2. For optimal performance, install identical drives of each drive and to the Advanced Menu > PCH SATA Configuration, then press . 3. To install the SATA hard disks for RAID set from SATA hard disk drives attached to the power connector on the motherboard. 3. Connect a SATA signal cable...

User Guide
Page 115
... not boot from the Management Menu and then press . The utility main window appears. At the bottom of the SATA optical drive has to navigate through the setup menu options or execute commands. During POST, the LSI MegaRAID software RAID configuration utility automatically detects the installed SATA hard disk drives and displays any existing RAID set (s) from SATA hard disk drives connected to Navigate Between Items And Press Enter To Select An Option ASUS Z9PR-D12 Series 5-5 Use the arrow keys to the menu...
... not boot from the Management Menu and then press . The utility main window appears. At the bottom of the SATA optical drive has to navigate through the setup menu options or execute commands. During POST, the LSI MegaRAID software RAID configuration utility automatically detects the installed SATA hard disk drives and displays any existing RAID set (s) from SATA hard disk drives connected to Navigate Between Items And Press Enter To Select An Option ASUS Z9PR-D12 Series 5-5 Use the arrow keys to the menu...

User Guide
Page 117
LSI Software RAID Configuration Utility Ver C.05 Sep 17, 2010 BIOS Version A.10.09231523R Easy Configuration - LSI Software RAID Configuration Utility Ver C.05 Sep 17, 2010 BIOS Version A.10.09231523R Management Menu Configure Initialize Objects Rebuild Check Consistency Easy Configuration - When selected, the drive indicator changes from READY to include in the RAID set, and then press . ARRAY SELECTION MENU Management Menu Configure Initialize Objects Rebuild Check Consistency PORT # 0 ONLIN A00-00 1 ONLIN A00-01 2 READY 3 READY Port # 2 DISK 74.74GB HDS728080PLA380...
LSI Software RAID Configuration Utility Ver C.05 Sep 17, 2010 BIOS Version A.10.09231523R Easy Configuration - LSI Software RAID Configuration Utility Ver C.05 Sep 17, 2010 BIOS Version A.10.09231523R Management Menu Configure Initialize Objects Rebuild Check Consistency Easy Configuration - When selected, the drive indicator changes from READY to include in the RAID set, and then press . ARRAY SELECTION MENU Management Menu Configure Initialize Objects Rebuild Check Consistency PORT # 0 ONLIN A00-00 1 ONLIN A00-01 2 READY 3 READY Port # 2 DISK 74.74GB HDS728080PLA380...

User Guide
Page 122
... View/Add Configuration command. From the Management Menu, select Configure > View/Add Configuration, and then press . LSI Software RAID Configuration Utility Ver C.05 Sep 17, 2010 BIOS Version A.10.09231523R Configuration Menu Easy Configuration Management MNeenwu Configuration Configure View/Add Configuration Initialize Clear Configuration Objects Select Boot Drive Rebuild Check Consistency View/Add to ONLIN A[X]-[Y], where X is the array number, and Y is the drive number. When selected, the drive indicator changes from READY to The Existing Configuration Use Cursor Keys...
... View/Add Configuration command. From the Management Menu, select Configure > View/Add Configuration, and then press . LSI Software RAID Configuration Utility Ver C.05 Sep 17, 2010 BIOS Version A.10.09231523R Configuration Menu Easy Configuration Management MNeenwu Configuration Configure View/Add Configuration Initialize Clear Configuration Objects Select Boot Drive Rebuild Check Consistency View/Add to ONLIN A[X]-[Y], where X is the array number, and Y is the drive number. When selected, the drive indicator changes from READY to The Existing Configuration Use Cursor Keys...

User Guide
Page 125
... virtual drive to initialize from the Virtual Drives sub‑menu, and then press . LSI Software RAID Configuration Utility Ver C.05 Sep 17, 2010 BIOS Version A.10.09231523R Vitual Drive(1) Virtual Drive 0 Objects Management MAednaupter Configure Virtual Drive Initialize Physical Drive Objects Rebuild Check Consistency Select VD Press ENTER To Select A VD, To Delete A VD ASUS Z9PR-D12 Series 5-15 From the Management Menu, select Objects > Virtual Drive, and then press . Using the Objects command To initialize the virtual drives using...
... virtual drive to initialize from the Virtual Drives sub‑menu, and then press . LSI Software RAID Configuration Utility Ver C.05 Sep 17, 2010 BIOS Version A.10.09231523R Vitual Drive(1) Virtual Drive 0 Objects Management MAednaupter Configure Virtual Drive Initialize Physical Drive Objects Rebuild Check Consistency Select VD Press ENTER To Select A VD, To Delete A VD ASUS Z9PR-D12 Series 5-15 From the Management Menu, select Objects > Virtual Drive, and then press . Using the Objects command To initialize the virtual drives using...
User Guide
Page 135
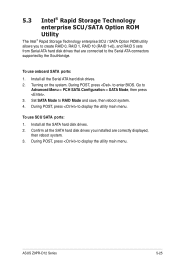
... RAID Mode and save, then reboot system. 4. Set SATA Mode to the Serial ATA connectors supported by the Southbridge. Confirm all the SATA hard disk drives you to create RAID 0, RAID 1, RAID 10 (RAID 1+0), and RAID 5 sets from Serial ATA hard disk drives that are correctly displayed, then reboot system. 3. ASUS Z9PR-D12 Series 5-25 To use onboard SATA ports: 1. During POST, press to enter BIOS. to display the utility main menu. Install all the SATA hard disk drives. 2. To use SCU SATA ports: 1. During POST, press to Advanced Menu > PCH SATA Configuration > SATA Mode...
... RAID Mode and save, then reboot system. 4. Set SATA Mode to the Serial ATA connectors supported by the Southbridge. Confirm all the SATA hard disk drives you to create RAID 0, RAID 1, RAID 10 (RAID 1+0), and RAID 5 sets from Serial ATA hard disk drives that are correctly displayed, then reboot system. 3. ASUS Z9PR-D12 Series 5-25 To use onboard SATA ports: 1. During POST, press to enter BIOS. to display the utility main menu. Install all the SATA hard disk drives. 2. To use SCU SATA ports: 1. During POST, press to Advanced Menu > PCH SATA Configuration > SATA Mode...

User Guide
Page 136
... RAID configuration. 5-26 Chapter 5: RAID configuration Turn on your screen. Delete RAID Volume [ MAIN MENU ] 3. All Rights Reserved. 1. Reset Disks to display the utility main menu. Install all the Serial ATA hard disk drives. 2. During POST, press to Non-RAID 4. SATA Option ROM - 3.0.0.1104 Copyright(C) 2003-11 Intel Corporation. The utility supports maximum four hard disk drives for reference only and may not exactly match the items on the system. 3. Physical Disks: ID Drive Model 0 ST3300656SS 1 ST3300656SS 2 ST3300656SS 3 ST3300656SS [ DISK...
... RAID configuration. 5-26 Chapter 5: RAID configuration Turn on your screen. Delete RAID Volume [ MAIN MENU ] 3. All Rights Reserved. 1. Reset Disks to display the utility main menu. Install all the Serial ATA hard disk drives. 2. During POST, press to Non-RAID 4. SATA Option ROM - 3.0.0.1104 Copyright(C) 2003-11 Intel Corporation. The utility supports maximum four hard disk drives for reference only and may not exactly match the items on the system. 3. Physical Disks: ID Drive Model 0 ST3300656SS 1 ST3300656SS 2 ST3300656SS 3 ST3300656SS [ DISK...

User Guide
Page 153
... the first boot priority to use a USB floppy drive when creating a SATA RAID driver disk. Restart the computer, and then enter the BIOS Setup. 3. Restart the computer. A floppy disk with the LSI Software RAID configuration utility, the boot priority of RAID driver disk you have to boot from the connected SATA ODD. Otherwise, the system will not boot from the support DVD. You have created RAID sets with the RAID driver is required when installing Windows® XP / Server 2003 or Linux operating system on...
... the first boot priority to use a USB floppy drive when creating a SATA RAID driver disk. Restart the computer, and then enter the BIOS Setup. 3. Restart the computer. A floppy disk with the LSI Software RAID configuration utility, the boot priority of RAID driver disk you have to boot from the connected SATA ODD. Otherwise, the system will not boot from the support DVD. You have created RAID sets with the RAID driver is required when installing Windows® XP / Server 2003 or Linux operating system on...


