

User Guide
Page 1
Z97-K Motherboard
Z97-K Motherboard
User Guide
Page 3
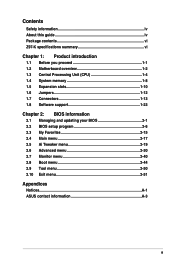
Contents Safety information iv About this guide iv Package contents vi Z97-K specifications summary vi Chapter 1: Product introduction 1.1 Before you proceed 1-1 1.2 Motherboard overview 1-2 1.3 Central Processing Unit (CPU 1-4 1.4 System memory 1-8 1.5 Expansion slots 1-10 1.6 Jumpers 1-12 1.7 Connectors 1-13 1.8 Software support 1-23 Chapter 2: BIOS information 2.1 Managing and updating ...17 2.5 Ai Tweaker menu 2-19 2.6 Advanced menu 2-30 2.7 Monitor menu 2-40 2.8 Boot menu 2-44 2.9 Tool menu 2-50 2.10 Exit menu 2-51 Appendices Notices...A-1 ASUS contact information A-3 iii
Contents Safety information iv About this guide iv Package contents vi Z97-K specifications summary vi Chapter 1: Product introduction 1.1 Before you proceed 1-1 1.2 Motherboard overview 1-2 1.3 Central Processing Unit (CPU 1-4 1.4 System memory 1-8 1.5 Expansion slots 1-10 1.6 Jumpers 1-12 1.7 Connectors 1-13 1.8 Software support 1-23 Chapter 2: BIOS information 2.1 Managing and updating ...17 2.5 Ai Tweaker menu 2-19 2.6 Advanced menu 2-30 2.7 Monitor menu 2-40 2.8 Boot menu 2-44 2.9 Tool menu 2-50 2.10 Exit menu 2-51 Appendices Notices...A-1 ASUS contact information A-3 iii
User Guide
Page 4
..., and connectors on a stable surface. • If you add a device. • Before connecting or removing signal cables from the motherboard, ensure that all cables are correctly connected and the power cables are unplugged. • Seek professional assistance before the signal cables are also...are not sure about the voltage of the electrical outlet you are using, contact your retailer. Operation safety • Before installing the motherboard and adding components, carefully read all the manuals that came with the product, contact a qualified service technician or your local power ...
..., and connectors on a stable surface. • If you add a device. • Before connecting or removing signal cables from the motherboard, ensure that all cables are correctly connected and the power cables are unplugged. • Seek professional assistance before the signal cables are also...are not sure about the voltage of the electrical outlet you are using, contact your retailer. Operation safety • Before installing the motherboard and adding components, carefully read all the manuals that came with the product, contact a qualified service technician or your local power ...
User Guide
Page 6
... Dual-channel memory architecture Supports Intel® Extreme Memory Profile (XMP) * Hyper DIMM support is damaged or missing, contact your motherboard package for the following items. Motherboard Cables Accessories Application DVD Documentation ASUS Z97-K motherboard 2 x Serial ATA 6.0 Gb/s cables 1 x I/O Shield Support DVD User Guide If any of the above items is subject to the physical...
... Dual-channel memory architecture Supports Intel® Extreme Memory Profile (XMP) * Hyper DIMM support is damaged or missing, contact your motherboard package for the following items. Motherboard Cables Accessories Application DVD Documentation ASUS Z97-K motherboard 2 x Serial ATA 6.0 Gb/s cables 1 x I/O Shield Support DVD User Guide If any of the above items is subject to the physical...
User Guide
Page 11
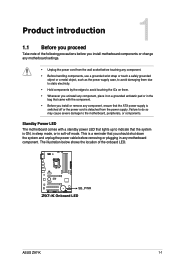
...the wall socket before removing or plugging in soft-off or the power cord is ON, in sleep mode, or in any motherboard component. The illustration below shows the location of the following precautions before you should shut down the system and unplug the power... a grounded antistatic pad or in the bag that came with a standby power LED that lights up to the motherboard, peripherals, or components. Z97-K SB_PWR Z97-K Onboard LED ASUS Z97-K 1-1 Standby Power LED The motherboard comes with the component. • Before you install or remove any component, ensure that you install...
...the wall socket before removing or plugging in soft-off or the power cord is ON, in sleep mode, or in any motherboard component. The illustration below shows the location of the following precautions before you should shut down the system and unplug the power... a grounded antistatic pad or in the bag that came with a standby power LED that lights up to the motherboard, peripherals, or components. Z97-K SB_PWR Z97-K Onboard LED ASUS Z97-K 1-1 Standby Power LED The motherboard comes with the component. • Before you install or remove any component, ensure that you install...

User Guide
Page 12
... indicated in the image. 1.2.2 Screw holes Place six screws into the chassis in the correct orientation. Doing so can cause you install the motherboard, study the configuration of the chassis Z97-K 1-2 Chapter 1: Product introduction Do not overtighten the screws! Place this side towards the rear of your chassis to ensure that the...
... indicated in the image. 1.2.2 Screw holes Place six screws into the chassis in the correct orientation. Doing so can cause you install the motherboard, study the configuration of the chassis Z97-K 1-2 Chapter 1: Product introduction Do not overtighten the screws! Place this side towards the rear of your chassis to ensure that the...
User Guide
Page 14
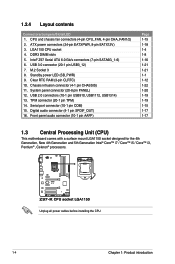
...(10-1 pin AAFP) Page 1-15 1-18 1-4 1-8 1-16 1-21 1-21 1-1 1-12 1-22 1-20 1-19 1-19 1-15 1-17 1-17 1.3 Central Processing Unit (CPU) This motherboard comes with a surface mount LGA1150 socket designed for the 4th Generation, New 4th Generation and 5th Generation Intel® Core™ i7 / Core™ i5... / Core™ i3, Pentium® , Celeron® processors. LGA1150 CPU socket 4. Intel® Z97 Serial ATA 6.0 Gb/s connectors (7-pin SATA6G_1-6) 6. ATX power connectors (24-pin EATXPWR, 8-pin EATX12V) 3. TPM connector (20-1 pin TPM) 14...
...(10-1 pin AAFP) Page 1-15 1-18 1-4 1-8 1-16 1-21 1-21 1-1 1-12 1-22 1-20 1-19 1-19 1-15 1-17 1-17 1.3 Central Processing Unit (CPU) This motherboard comes with a surface mount LGA1150 socket designed for the 4th Generation, New 4th Generation and 5th Generation Intel® Core™ i7 / Core™ i5... / Core™ i3, Pentium® , Celeron® processors. LGA1150 CPU socket 4. Intel® Z97 Serial ATA 6.0 Gb/s connectors (7-pin SATA6G_1-6) 6. ATX power connectors (24-pin EATXPWR, 8-pin EATX12V) 3. TPM connector (20-1 pin TPM) 14...
User Guide
Page 15
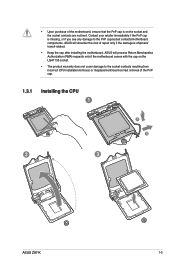
... the PnP cap is shipment/ transit-related. • Keep the cap after installing the motherboard. ASUS will shoulder the cost of the PnP cap. 1.3.1 Installing the CPU 1 A B 2 3 ASUS Z97-K 1-5 ASUS will process Return Merchandise Authorization (RMA) requests only if the motherboard comes with the cap on the socket and the socket contacts are not bent. Contact... of repair only if the damage is on the LGA1150 socket. • The product warranty does not cover damage to the PnP cap/socket contacts/motherboard components.
... the PnP cap is shipment/ transit-related. • Keep the cap after installing the motherboard. ASUS will shoulder the cost of the PnP cap. 1.3.1 Installing the CPU 1 A B 2 3 ASUS Z97-K 1-5 ASUS will process Return Merchandise Authorization (RMA) requests only if the motherboard comes with the cap on the socket and the socket contacts are not bent. Contact... of repair only if the damage is on the LGA1150 socket. • The product warranty does not cover damage to the PnP cap/socket contacts/motherboard components.
User Guide
Page 18
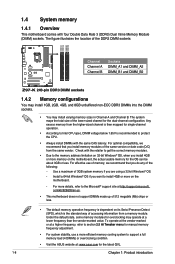
... system to support a full memory load (4 DIMMs) or overclocking condition. • Visit the ASUS website at a higher frequency, refer to the Microsoft® support site at a lower frequency ...sockets. Any excess memory from the same vendor. com/kb/929605/en-us. • This motherboard does not support DIMMs made up of accessing information from a memory module. Use a maximum ... DIMM_A1 DIMM_A2 DIMM_B1 DIMM_B2 Channel Sockets Channel A DIMM_A1 and DIMM_A2 Channel B DIMM_B1 and DIMM_B2 Z97-K Z97-K 240-pin DDR3 DIMM sockets 1.4.2 Memory configurations You may install 1GB, 2GB, 4GB,...
... system to support a full memory load (4 DIMMs) or overclocking condition. • Visit the ASUS website at a higher frequency, refer to the Microsoft® support site at a lower frequency ...sockets. Any excess memory from the same vendor. com/kb/929605/en-us. • This motherboard does not support DIMMs made up of accessing information from a memory module. Use a maximum ... DIMM_A1 DIMM_A2 DIMM_B1 DIMM_B2 Channel Sockets Channel A DIMM_A1 and DIMM_A2 Channel B DIMM_B1 and DIMM_B2 Z97-K Z97-K 240-pin DDR3 DIMM sockets 1.4.2 Memory configurations You may install 1GB, 2GB, 4GB,...
User Guide
Page 20
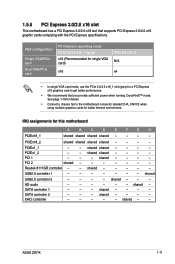
... such as a LAN card, SCSI card, USB card, and other cards that comply with PCI specifications. 1.5.4 PCI Express 2.0 x1 slot This motherboard supports PCI Express 2.0 x1 network cards, SCSI cards, and other cards that comply with the PCI Express specifications. 1-10 Chapter 1: Product introduction ..."Share IRQ" or that supports PCI Express 2.0 x16 graphic cards complying with the PCI Express specifications. 1.5.5 PCI Express 2.0 x16 slot This motherboard has a PCI Express 2.0 x16 slot that the cards do so may need IRQ assignments. Remove the bracket opposite the slot that you intend...
... such as a LAN card, SCSI card, USB card, and other cards that comply with PCI specifications. 1.5.4 PCI Express 2.0 x1 slot This motherboard supports PCI Express 2.0 x1 network cards, SCSI cards, and other cards that comply with the PCI Express specifications. 1-10 Chapter 1: Product introduction ..."Share IRQ" or that supports PCI Express 2.0 x16 graphic cards complying with the PCI Express specifications. 1.5.5 PCI Express 2.0 x16 slot This motherboard has a PCI Express 2.0 x16 slot that the cards do so may need IRQ assignments. Remove the bracket opposite the slot that you intend...
User Guide
Page 21
... - - - shared - SATA controller 2 XHCI controller - - - ASUS Z97-K 1-11 PCIEx1_2 - - HD audio - - - - - - shared shared - - - - shared - - - - - shared - - - shared - - - - shared - - 1.5.6 PCI Express 3.0/2.0 x16 slot This motherboard has a PCI Express 3.0/2.0 x16 slot that you provide sufficient power when ...VGA card mode, use the PCIe 3.0/2.0 x16_1 slot (gray) for a PCI Express x16 graphics card to the motherboard connector labeled CHA_FAN1/2 when using multiple graphics cards for better thermal environment. PCI 1 - - - IRQ assignments for...
... - - - shared - SATA controller 2 XHCI controller - - - ASUS Z97-K 1-11 PCIEx1_2 - - HD audio - - - - - - shared shared - - - - shared - - - - - shared - - - shared - - - - shared - - 1.5.6 PCI Express 3.0/2.0 x16 slot This motherboard has a PCI Express 3.0/2.0 x16 slot that you provide sufficient power when ...VGA card mode, use the PCIe 3.0/2.0 x16_1 slot (gray) for a PCI Express x16 graphics card to the motherboard connector labeled CHA_FAN1/2 when using multiple graphics cards for better thermal environment. PCI 1 - - - IRQ assignments for...
User Guide
Page 25
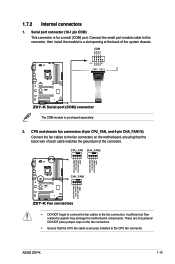
... are not jumpers! DO NOT place jumper caps on the motherboard, ensuring that the CPU fan cable is securely installed to a slot opening at the back of the connector. COM PIN 1 RXD DTR DSR CTS DCD TXD GND RTS RI Z97-K Z97-K Serial port (COM) connector The COM module is for ...each cable matches the ground pin of the system chassis. ASUS Z97-K 1-15 Connect the serial port module cable to this connector, then install the module to the CPU fan connector. Insufficient air flow inside the system may damage the motherboard components. Serial port connector (10-1 pin COM) This ...
... are not jumpers! DO NOT place jumper caps on the motherboard, ensuring that the CPU fan cable is securely installed to a slot opening at the back of the connector. COM PIN 1 RXD DTR DSR CTS DCD TXD GND RTS RI Z97-K Z97-K Serial port (COM) connector The COM module is for ...each cable matches the ground pin of the system chassis. ASUS Z97-K 1-15 Connect the serial port module cable to this connector, then install the module to the CPU fan connector. Insufficient air flow inside the system may damage the motherboard components. Serial port connector (10-1 pin COM) This ...
User Guide
Page 27
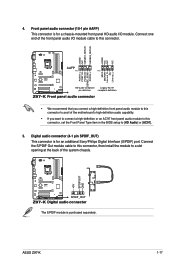
... (S/PDIF) port. Connect the S/PDIF Out module cable to this connector, then install the module to a slot opening at the back of the motherboard's high-definition audio capability. • If you connect a high-definition front panel audio module to this connector to this connector, set the Front... panel audio connector • We recommend that you want to connect a high-definition or an AC'97 front panel audio module to this connector. ASUS Z97-K 1-17 Connect one end of the front panel audio I /O module. Front panel audio connector (10-1 pin AAFP) This connector is for a ...
... (S/PDIF) port. Connect the S/PDIF Out module cable to this connector, then install the module to a slot opening at the back of the motherboard's high-definition audio capability. • If you connect a high-definition front panel audio module to this connector to this connector, set the Front... panel audio connector • We recommend that you want to connect a high-definition or an AC'97 front panel audio module to this connector. ASUS Z97-K 1-17 Connect one end of the front panel audio I /O module. Front panel audio connector (10-1 pin AAFP) This connector is for a ...
User Guide
Page 29
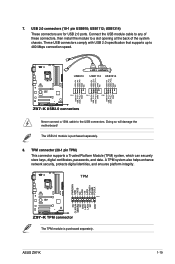
... so will damage the motherboard! USB 2.0 connectors (10-1 pin USB910; TPM connector (20-1 pin TPM) This connector supports a Trusted Platform Module (TPM) system, which can securely store keys, digital certificates, passwords, and data. A TPM system also helps enhance network security, protects digital identities, and ensures platform integrity. ASUS Z97-K 1-19 USB1112; These USB...
... so will damage the motherboard! USB 2.0 connectors (10-1 pin USB910; TPM connector (20-1 pin TPM) This connector supports a Trusted Platform Module (TPM) system, which can securely store keys, digital certificates, passwords, and data. A TPM system also helps enhance network security, protects digital identities, and ensures platform integrity. ASUS Z97-K 1-19 USB1112; These USB...
User Guide
Page 33
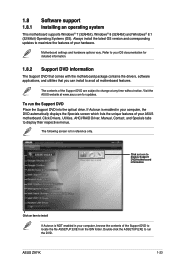
... menus. Always install the latest OS version and corresponding updates to install If Autorun is enabled in your OS documentation for reference only. Motherboard settings and hardware options vary. ASUS Z97-K 1-23 The contents of your hardware. The following screen is for detailed information. 1.8.2 Support DVD information The Support DVD that comes with...
... menus. Always install the latest OS version and corresponding updates to install If Autorun is enabled in your OS documentation for reference only. Motherboard settings and hardware options vary. ASUS Z97-K 1-23 The contents of your hardware. The following screen is for detailed information. 1.8.2 Support DVD information The Support DVD that comes with...
User Guide
Page 35
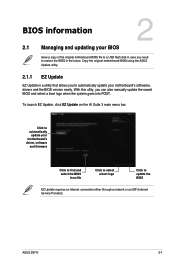
... ISP (Internet Service Provider). Click to automatically update your BIOS Save a copy of the original motherboard BIOS file to a USB flash disk in case you need to automatically update your motherboard's softwares, drivers and the BIOS version easily. ASUS Z97-K 2-1 To launch EZ Update, click EZ Update on the AI Suite 3 main menu bar...
... ISP (Internet Service Provider). Click to automatically update your BIOS Save a copy of the original motherboard BIOS file to a USB flash disk in case you need to automatically update your motherboard's softwares, drivers and the BIOS version easily. ASUS Z97-K 2-1 To launch EZ Update, click EZ Update on the AI Suite 3 main menu bar...
User Guide
Page 37
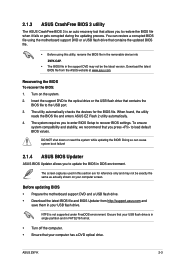
...as actually shown on the system. 2. Before updating BIOS • Prepare the motherboard support DVD and a USB flash drive. • Download the latest BIOS file and BIOS Updater from the ASUS website at www.asus.com. Turn on your computer has a DVD optical drive. When found, .... 4. Ensure that your USB flash drive. 2.1.3 ASUS CrashFree BIOS 3 utility The ASUS CrashFree BIOS 3 is an auto recovery tool that allows you press to load default BIOS values. ASUS Z97-K 2-3 Download the latest BIOS file from http://support.asus.com and save them in your USB flash drive ...
...as actually shown on the system. 2. Before updating BIOS • Prepare the motherboard support DVD and a USB flash drive. • Download the latest BIOS file and BIOS Updater from the ASUS website at www.asus.com. Turn on your computer has a DVD optical drive. When found, .... 4. Ensure that your USB flash drive. 2.1.3 ASUS CrashFree BIOS 3 utility The ASUS CrashFree BIOS 3 is an auto recovery tool that allows you press to load default BIOS values. ASUS Z97-K 2-3 Download the latest BIOS file from http://support.asus.com and save them in your USB flash drive ...
User Guide
Page 40
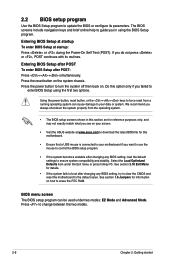
Entering BIOS Setup at startup To enter BIOS Setup at www.asus.com to download the latest BIOS file for details. • If the system fails ... • If the system becomes unstable after changing any BIOS setting, try to clear the CMOS and reset the motherboard to the default value. 2.2 BIOS setup program Use the BIOS Setup program to update the BIOS or configure its ...press hotkey F5. The BIOS screens include navigation keys and brief online help to your screen. • Visit the ASUS website at startup: Press or during the Power-On Self Test (POST). If you in this option only if ...
Entering BIOS Setup at startup To enter BIOS Setup at www.asus.com to download the latest BIOS file for details. • If the system fails ... • If the system becomes unstable after changing any BIOS setting, try to clear the CMOS and reset the motherboard to the default value. 2.2 BIOS setup program Use the BIOS Setup program to update the BIOS or configure its ...press hotkey F5. The BIOS screens include navigation keys and brief online help to your screen. • Visit the ASUS website at startup: Press or during the Power-On Self Test (POST). If you in this option only if ...
User Guide
Page 41
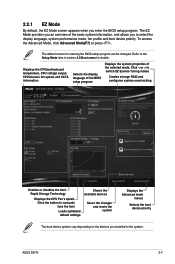
... Displays the CPU Fan's speed. ASUS Z97-K 2-7 2.2.1 EZ Mode By default, the EZ Mode screen appears when you installed to select the display language, system performance mode, fan profile and boot device priority. The EZ Mode provides you an overview of the selected mode. Displays the CPU/motherboard temperature, CPU voltage output, CPU...
... Displays the CPU Fan's speed. ASUS Z97-K 2-7 2.2.1 EZ Mode By default, the EZ Mode screen appears when you installed to select the display language, system performance mode, fan profile and boot device priority. The EZ Mode provides you an overview of the selected mode. Displays the CPU/motherboard temperature, CPU voltage output, CPU...
User Guide
Page 42
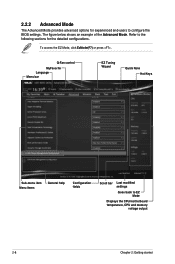
... . The figure below shows an example of the Advanced Mode. Refer to the following sections for experienced end-users to EZ Mode Displays the CPU/motherboard temperature, CPU and memory voltage output 2-8 Chapter 2: Getting started 2.2.2 Advanced Mode The Advanced Mode provides advanced options for the detailed configurations. Q-Fan control MyFavorite Language...
... . The figure below shows an example of the Advanced Mode. Refer to the following sections for experienced end-users to EZ Mode Displays the CPU/motherboard temperature, CPU and memory voltage output 2-8 Chapter 2: Getting started 2.2.2 Advanced Mode The Advanced Mode provides advanced options for the detailed configurations. Q-Fan control MyFavorite Language...


