User Guide
Page 5
... 4-26 4.4.6 Power On Configuration 4-27 4.4.7 Event Log Configuration 4-28 4.4.8 Hardware Monitor 4-28 4.4.9 PCI Express Configuration 4-29 4.4.10 ACPI Configuration 4-30 4.5 Server menu 4-32 4.5.1 Remote Access Configuration 4-32 4.6 Boot menu 4-34 4.6.1 Boot Device Priority 4-34 4.6.2 Boot Settings Configuration 4-35 4.6.3 Security 4-36 4.7 Exit menu 4-38 Exit and Save Changes 4-38 Exit and Discard Changes 4-38 Discard Changes 4-38 Load Setup Defaults 4-38 Chapter 5: RAID configuration 5.1 Setting up RAID 5-3 5.1.1 RAID definitions 5-3 5.1.2 Installing hard disk drives...
... 4-26 4.4.6 Power On Configuration 4-27 4.4.7 Event Log Configuration 4-28 4.4.8 Hardware Monitor 4-28 4.4.9 PCI Express Configuration 4-29 4.4.10 ACPI Configuration 4-30 4.5 Server menu 4-32 4.5.1 Remote Access Configuration 4-32 4.6 Boot menu 4-34 4.6.1 Boot Device Priority 4-34 4.6.2 Boot Settings Configuration 4-35 4.6.3 Security 4-36 4.7 Exit menu 4-38 Exit and Save Changes 4-38 Exit and Discard Changes 4-38 Discard Changes 4-38 Load Setup Defaults 4-38 Chapter 5: RAID configuration 5.1 Setting up RAID 5-3 5.1.1 RAID definitions 5-3 5.1.2 Installing hard disk drives...

User Guide
Page 6
... Linux Enterprise Server OS 6-17 6.2 Intel chipset device software installation 6-19 6.3 LAN driver installation 6-23 6.4 Display driver installation 6-27 6.5 Mellanox ConnectX DDR PCI Gen2 Channel Adapter driver installation 6-30 6.5.1 Windows operating system 6-30 6.5.2 Red Hat® Enterprise Linux OS 6-34 6.6 Management applications and utilities installation 6-37 6.6.1 Running the support DVD 6-37 6.6.2 Drivers menu 6-37 6.6.3 Utilities menu 6-38 6.6.4 Make disk menu 6-38 6.6.5 Contact information 6-38 Reference information A.1 Z8NH-D12 block diagram A-3 A.2 Z8PH-D12/IFB...
... Linux Enterprise Server OS 6-17 6.2 Intel chipset device software installation 6-19 6.3 LAN driver installation 6-23 6.4 Display driver installation 6-27 6.5 Mellanox ConnectX DDR PCI Gen2 Channel Adapter driver installation 6-30 6.5.1 Windows operating system 6-30 6.5.2 Red Hat® Enterprise Linux OS 6-34 6.6 Management applications and utilities installation 6-37 6.6.1 Running the support DVD 6-37 6.6.2 Drivers menu 6-37 6.6.3 Utilities menu 6-38 6.6.4 Make disk menu 6-38 6.6.5 Contact information 6-38 Reference information A.1 Z8NH-D12 block diagram A-3 A.2 Z8PH-D12/IFB...
User Guide
Page 9
... motherboard and the new technologies it supports. • Chapter 2: Hardware information This chapter lists the hardware setup procedures that you need when installing and configuring the motherboard. Refer to when configuring the motherboard. ix ASUS websites The ASUS website provides updated information on the motherboard. • Chapter 3: Powering up This chapter describes the power up , creating, and configuring RAID sets using the available utilities. • Chapter 6: Driver installation This chapter provides instructions for installing the necessary drivers...
... motherboard and the new technologies it supports. • Chapter 2: Hardware information This chapter lists the hardware setup procedures that you need when installing and configuring the motherboard. Refer to when configuring the motherboard. ix ASUS websites The ASUS website provides updated information on the motherboard. • Chapter 3: Powering up This chapter describes the power up , creating, and configuring RAID sets using the available utilities. • Chapter 6: Driver installation This chapter provides instructions for installing the necessary drivers...
User Guide
Page 15
Thank you start installing the motherboard, and hardware devices on it another standout in your package with the list below. 1.2 Package contents Check your retailer. 1.1 Welcome! ASUS Z8NH-D12 Series 1-3 Before you for the following items. Application CD Support CD Documentation User Guide Packing Qty. Standard Bulk Pack Z8NH-D12 Series 1 1 10pcs per carton If any of ASUS quality motherboards! The motherboard delivers a host of new features and...
Thank you start installing the motherboard, and hardware devices on it another standout in your package with the list below. 1.2 Package contents Check your retailer. 1.1 Welcome! ASUS Z8NH-D12 Series 1-3 Before you for the following items. Application CD Support CD Documentation User Guide Packing Qty. Standard Bulk Pack Z8NH-D12 Series 1 1 10pcs per carton If any of ASUS quality motherboards! The motherboard delivers a host of new features and...

User Guide
Page 36
... 2: Hardware information Turn on shared slots, ensure that the drivers support "Share IRQ" or that came with it by adjusting the software settings. 1. When using PCI cards on the system and change the necessary BIOS settings, if any. Remove the system unit cover (if your motherboard is completely seated on the slot. 5. Assign an IRQ to unplug the power cord before adding or removing expansion cards. Keep the screw for the expansion card.
... 2: Hardware information Turn on shared slots, ensure that the drivers support "Share IRQ" or that came with it by adjusting the software settings. 1. When using PCI cards on the system and change the necessary BIOS settings, if any. Remove the system unit cover (if your motherboard is completely seated on the slot. 5. Assign an IRQ to unplug the power cord before adding or removing expansion cards. Keep the screw for the expansion card.
User Guide
Page 43
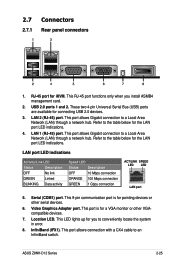
... (LAN) through a network hub. Video Graphics Adapter port. InfiniBand (IFX1). This port is for the LAN port LED indications. 4. 2.7 Connectors 2.7.1 Rear panel connectors 1. This 9-pin communication port is for a VGA monitor or other serial devices. 6. Refer to conveniently locate the system in error. 8. Serial (COM1) port. Location LED. ASUS Z8NH-D12 Series 2-25 RJ-45 port for the LAN port LED indications. This LED lights up for connecting USB 2.0 devices. 3. These two 4-pin Universal Serial Bus (USB) ports are available for you install ASMB4 management...
... (LAN) through a network hub. Video Graphics Adapter port. InfiniBand (IFX1). This port is for the LAN port LED indications. 4. 2.7 Connectors 2.7.1 Rear panel connectors 1. This 9-pin communication port is for a VGA monitor or other serial devices. 6. Refer to conveniently locate the system in error. 8. Serial (COM1) port. Location LED. ASUS Z8NH-D12 Series 2-25 RJ-45 port for the LAN port LED indications. This LED lights up for connecting USB 2.0 devices. 3. These two 4-pin Universal Serial Bus (USB) ports are available for you install ASMB4 management...

User Guide
Page 67
... if the device supports multi-sector transfer feature. The BIOS automatically detects the values opposite the dimmed items (Device, Vendor, Size, LBA Mode, Block Mode, PIO Mode, Async DMA, Ultra DMA, and S.M.A.R.T. Configuration options: [Auto] [Disabled] [Enabled] 32Bit Data Transfer [Enabled] Enables or disables 32-bit data transfer. Configuration options: [Disabled] [Enabled] ASUS Z8NH-D12 Series 4-11 When set to [Disabled], the data transfer from and to the device occurs multiple sectors at a time. monitoring). Configuration options: [Disabled] [Auto...
... if the device supports multi-sector transfer feature. The BIOS automatically detects the values opposite the dimmed items (Device, Vendor, Size, LBA Mode, Block Mode, PIO Mode, Async DMA, Ultra DMA, and S.M.A.R.T. Configuration options: [Auto] [Disabled] [Enabled] 32Bit Data Transfer [Enabled] Enables or disables 32-bit data transfer. Configuration options: [Disabled] [Enabled] ASUS Z8NH-D12 Series 4-11 When set to [Disabled], the data transfer from and to the device occurs multiple sectors at a time. monitoring). Configuration options: [Disabled] [Auto...
User Guide
Page 68
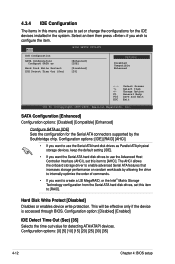
... internally optimize the order of commands. • If you want to use the Advanced Host Controller Interface (AHCI), set this item to create a LSI MegaRAID, or the Intel® Matrix Storage Technology configuration from the Serial ATA hard disk drives, set or change the configurations for detecting ATA/ATAPI devices. The AHCI allows the onboard storage driver to configure the item. 4.3.4 IDE Configuration The items in the system. Main BIOS SETUP UTILITY IDE Configuration SATA Configuration Configure SATA as Hard Disk...
... internally optimize the order of commands. • If you want to use the Advanced Host Controller Interface (AHCI), set this item to create a LSI MegaRAID, or the Intel® Matrix Storage Technology configuration from the Serial ATA hard disk drives, set or change the configurations for detecting ATA/ATAPI devices. The AHCI allows the onboard storage driver to configure the item. 4.3.4 IDE Configuration The items in the system. Main BIOS SETUP UTILITY IDE Configuration SATA Configuration Configure SATA as Hard Disk...
User Guide
Page 72
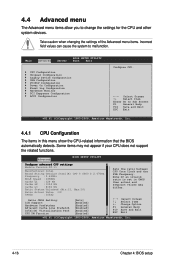
... and the FSB Frequency. Some items may differ. Take caution when changing the settings of the Advanced menu items. Incorrect field values can cause the system to change the settings for the CPU and other system devices. Main Advanced Server BIOS SETUP UTILITY Boot Exit CPU Configuration Chipset Configuration Legacy Device Configuration USB Configuration PCIPnP Configuration Power On Configuration Event Log Configuration Hardware Monitor PCI Exppress Configuration ACPI Configuration Configure CPU. ←→ Select Screen ↑↓ Select Item Enter Go to...
... and the FSB Frequency. Some items may differ. Take caution when changing the settings of the Advanced menu items. Incorrect field values can cause the system to change the settings for the CPU and other system devices. Main Advanced Server BIOS SETUP UTILITY Boot Exit CPU Configuration Chipset Configuration Legacy Device Configuration USB Configuration PCIPnP Configuration Power On Configuration Event Log Configuration Hardware Monitor PCI Exppress Configuration ACPI Configuration Configure CPU. ←→ Select Screen ↑↓ Select Item Enter Go to...
User Guide
Page 81
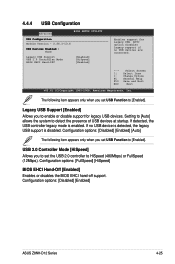
...: [Disabled] [Enabled] ASUS Z8NH-D12 Series 4-25 If detected, the USB controller legacy mode is disabled. USB 2.0 Controller Mode [HiSpeed] Allows you to detect the presence of USB devices at startup. Configuration options: [Disabled] [Enabled] [Auto] The following item appears only when you set USB Function to [Enabled]. 4.4.4 USB Configuration Advanced BIOS SETUP UTILITY USB Configuration Module Version - 2.24.3-13.4 USB Devices Enabled : None Legacy USB Support USB 2.0 Controller Mode BIOS EHCI Hand-Off [Enabled] [HiSpeed] [Enabled] Enables support for legacy USB...
...: [Disabled] [Enabled] ASUS Z8NH-D12 Series 4-25 If detected, the USB controller legacy mode is disabled. USB 2.0 Controller Mode [HiSpeed] Allows you to detect the presence of USB devices at startup. Configuration options: [Disabled] [Enabled] [Auto] The following item appears only when you set USB Function to [Enabled]. 4.4.4 USB Configuration Advanced BIOS SETUP UTILITY USB Configuration Module Version - 2.24.3-13.4 USB Devices Enabled : None Legacy USB Support USB 2.0 Controller Mode BIOS EHCI Hand-Off [Enabled] [HiSpeed] [Enabled] Enables support for legacy USB...
User Guide
Page 85
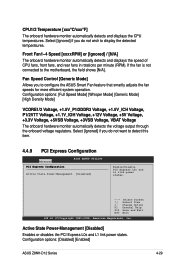
...Ignored] / [N/A] The onboard hardware monitor automatically detects and displays the speed of CPU fans, front fans, and rear fans in rotations per minute (RPM). CPU1/2 Temperature [xxxºC/xxxºF] The onboard hardware monitor automatically detects and displays the CPU temperatures. Fan Speed Control [Generic Mode] Allows you to the motherboard, the field shows [N/A]. Active State Power-Management [Disabled] Enables or disables the PCI Express L0s and L1 link power states. Configuration options: [Disabled] [Enabled] ASUS Z8NH-D12 Series 4-29 Change Option F1 General Help...
...Ignored] / [N/A] The onboard hardware monitor automatically detects and displays the speed of CPU fans, front fans, and rear fans in rotations per minute (RPM). CPU1/2 Temperature [xxxºC/xxxºF] The onboard hardware monitor automatically detects and displays the CPU temperatures. Fan Speed Control [Generic Mode] Allows you to the motherboard, the field shows [N/A]. Active State Power-Management [Disabled] Enables or disables the PCI Express L0s and L1 link power states. Configuration options: [Disabled] [Enabled] ASUS Z8NH-D12 Series 4-29 Change Option F1 General Help...
User Guide
Page 91
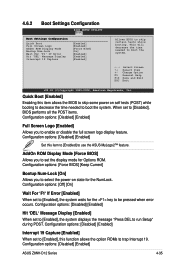
... to skip certain tests while booting. Configuration options: [Disabled] [Enabled] ASUS Z8NH-D12 Series 4-35 AddOn ROM Display Mode [Force BIOS] Allows you to be pressed when error occurs. This will decrease the time needed to run Setup" during POST. Configuration options: [Disabled] [Enabled] Interrupt 19 Capture [Enabled] When set to [Enabled], the system displays the message "Press DEL to boot the system. 4.6.2 Boot Settings Configuration BIOS SETUP UTILITY Boot Boot Settings Configuration Quick Boot Full Screen Logo AddOn ROM Display Mode Bootup Num-Lock Wait...
... to skip certain tests while booting. Configuration options: [Disabled] [Enabled] ASUS Z8NH-D12 Series 4-35 AddOn ROM Display Mode [Force BIOS] Allows you to be pressed when error occurs. This will decrease the time needed to run Setup" during POST. Configuration options: [Disabled] [Enabled] Interrupt 19 Capture [Enabled] When set to [Enabled], the system displays the message "Press DEL to boot the system. 4.6.2 Boot Settings Configuration BIOS SETUP UTILITY Boot Boot Settings Configuration Quick Boot Full Screen Logo AddOn ROM Display Mode Bootup Num-Lock Wait...

User Guide
Page 93
... you have set to [Setup], BIOS checks for user password both when accessing Setup and booting the system. After you set a password, this item to selected fields, such as in the Setup utility. To change to any field. [Limited] allows changes only to set or change password. Select the Change User Password item and press . 2. The message "Password Installed" appears after you set your password successfully. To set to disable password. Configuration options: [Setup] [Always] ASUS Z8NH-D12 Series 4-37 When set a User Password: 1. Change User Password Select this...
... you have set to [Setup], BIOS checks for user password both when accessing Setup and booting the system. After you set a password, this item to selected fields, such as in the Setup utility. To change to any field. [Limited] allows changes only to set or change password. Select the Change User Password item and press . 2. The message "Password Installed" appears after you set your password successfully. To set to disable password. Configuration options: [Setup] [Always] ASUS Z8NH-D12 Series 4-37 When set a User Password: 1. Change User Password Select this...
User Guide
Page 97
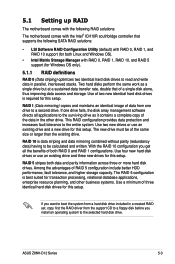
... data from the support CD to a floppy disk before you install an operating system to the selected hard disk drive. 5.1 Setting up RAID The motherboard comes with the following SATA RAID solutions: • LSI Software RAID Configuration Utility (default) with RAID 0, RAID 1, and RAID 10 support (for this setup. If one drive fails, the disk array management software directs all the benefits of the data in a created RAID set, copy first the RAID driver from one drive to the surviving drive as a single drive but at a sustained data...
... data from the support CD to a floppy disk before you install an operating system to the selected hard disk drive. 5.1 Setting up RAID The motherboard comes with the following SATA RAID solutions: • LSI Software RAID Configuration Utility (default) with RAID 0, RAID 1, and RAID 10 support (for this setup. If one drive fails, the disk array management software directs all the benefits of the data in a created RAID set, copy first the RAID driver from one drive to the surviving drive as a single drive but at a sustained data...
User Guide
Page 98
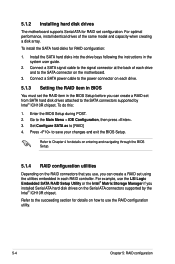
... for RAID configuration: 1. 5.1.2 Installing hard disk drives The motherboard supports Serial ATA for RAID set from SATA hard disk drives attached to the SATA connectors supported by the Intel® ICH10R chipset. Connect a SATA power cable to the power connector on the Serial ATA connectors supported by Intel® ICH10R chipset. Refer to [RAID] 4. For example, use the LSI Logic Embedded SATA RAID Setup Utility or the Intel® Matrix Storage Manager if you installed Serial ATA hard disk drives on each drive. 5.1.3 Setting the RAID item in BIOS You must set the RAID item...
... for RAID configuration: 1. 5.1.2 Installing hard disk drives The motherboard supports Serial ATA for RAID set from SATA hard disk drives attached to the SATA connectors supported by the Intel® ICH10R chipset. Connect a SATA power cable to the power connector on the Serial ATA connectors supported by Intel® ICH10R chipset. Refer to [RAID] 4. For example, use the LSI Logic Embedded SATA RAID Setup Utility or the Intel® Matrix Storage Manager if you installed Serial ATA hard disk drives on each drive. 5.1.3 Setting the RAID item in BIOS You must set the RAID item...
User Guide
Page 99
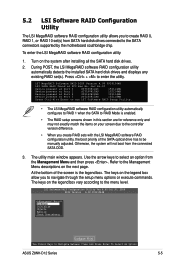
... the LSI MegaRAID software RAID configuration utility 1. Use the arrow keys to enter the utility. At the bottom of the SATA optical drive has to be manually adjusted. During POST, the LSI MegaRAID software RAID configuration utility automatically detects the installed SATA hard disk drives and displays any existing RAID set (s) from SATA hard disk drives connected to the SATA connectors supported by the motherboard southbridge chip. LSI MegaRAID Software RAID BIOS Version A.08 09161344R LSI SATA RAID Found at PCI Bus No: Dev No:1F Device present at Port 0 ST3160812AS 152114MB...
... the LSI MegaRAID software RAID configuration utility 1. Use the arrow keys to enter the utility. At the bottom of the SATA optical drive has to be manually adjusted. During POST, the LSI MegaRAID software RAID configuration utility automatically detects the installed SATA hard disk drives and displays any existing RAID set (s) from SATA hard disk drives connected to the SATA connectors supported by the motherboard southbridge chip. LSI MegaRAID Software RAID BIOS Version A.08 09161344R LSI SATA RAID Found at PCI Bus No: Dev No:1F Device present at Port 0 ST3160812AS 152114MB...
User Guide
Page 101
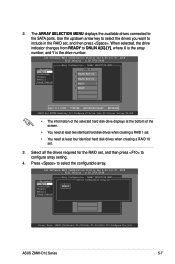
... SATA ports. LSI Software RAID Configuration Utility Ver A.60 Jul 30, 2008 BIOS Version A.08.09161344R Management Menu Configure Initialize Objects Rebuild Check Consistency Easy Configuration - Select all the drives required for the RAID set, and then press to ONLIN A[X]-[Y], where X is the array number, and Y is the drive number. ARRAY SELECTION MENU Select Configurable Array(s) PORT # A-0 SPAN-1 0 DNLIN A00-00 1 DNLIN A00-01 Cursor Keys, SPACE-(De)Select F2-ChIdInfo F3-SlotInfo F10-Configure Esc-Quit ASUS Z8NH-D12...
... SATA ports. LSI Software RAID Configuration Utility Ver A.60 Jul 30, 2008 BIOS Version A.08.09161344R Management Menu Configure Initialize Objects Rebuild Check Consistency Easy Configuration - Select all the drives required for the RAID set, and then press to ONLIN A[X]-[Y], where X is the array number, and Y is the drive number. ARRAY SELECTION MENU Select Configurable Array(s) PORT # A-0 SPAN-1 0 DNLIN A00-00 1 DNLIN A00-01 Cursor Keys, SPACE-(De)Select F2-ChIdInfo F3-SlotInfo F10-Configure Esc-Quit ASUS Z8NH-D12...
User Guide
Page 106
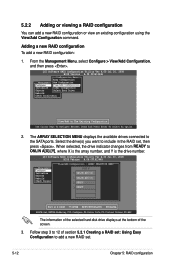
... or viewing a RAID configuration You can add a new RAID configuration or view an existing configuration using the View/Add Configuration command. LSI Software RAID Configuration Utility Ver A.60 Jul 30, 2008 BIOS Version A.08.09161344R Configuration Menu Easy Configuration Management MNeenwu Configuration Configure View/Add Configuration Initialize Clear Configuration Objects Select Boot Drive Rebuild Check Consistency View/Add to ONLIN A[X]-[Y], where X is the array number, and Y is the drive number. LSI Software RAID Configuration Utility Ver A.60 Jul 30, 2008 BIOS Version A.08...
... or viewing a RAID configuration You can add a new RAID configuration or view an existing configuration using the View/Add Configuration command. LSI Software RAID Configuration Utility Ver A.60 Jul 30, 2008 BIOS Version A.08.09161344R Configuration Menu Easy Configuration Management MNeenwu Configuration Configure View/Add Configuration Initialize Clear Configuration Objects Select Boot Drive Rebuild Check Consistency View/Add to ONLIN A[X]-[Y], where X is the array number, and Y is the drive number. LSI Software RAID Configuration Utility Ver A.60 Jul 30, 2008 BIOS Version A.08...
User Guide
Page 109
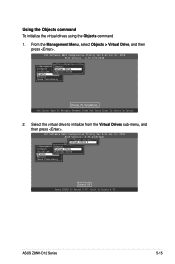
... 2008 BIOS Version A.08.09161344R Vitual Drive(1) Virtual Drive 0 Objects Management MAednaupter Configure Virtual Drive Initialize Physical Drive Objects Rebuild Check Consistency Select VD Press ENTER To Select A VD, To Delete A VD ASUS Z8NH-D12 Series 5-15 From the Management Menu, select Objects > Virtual Drive, and then press . LSI Software RAID Configuration Utility Ver A.60 Jul 30, 2008 BIOS Version A.08.09161344R Objects Management MAednaupter Configure Virtual Drive Initialize Physical Drive Objects Rebuild Check Consistency Change VD Parameters Use Cursor Keys To...
... 2008 BIOS Version A.08.09161344R Vitual Drive(1) Virtual Drive 0 Objects Management MAednaupter Configure Virtual Drive Initialize Physical Drive Objects Rebuild Check Consistency Select VD Press ENTER To Select A VD, To Delete A VD ASUS Z8NH-D12 Series 5-15 From the Management Menu, select Objects > Virtual Drive, and then press . LSI Software RAID Configuration Utility Ver A.60 Jul 30, 2008 BIOS Version A.08.09161344R Objects Management MAednaupter Configure Virtual Drive Initialize Physical Drive Objects Rebuild Check Consistency Change VD Parameters Use Cursor Keys To...
User Guide
Page 119
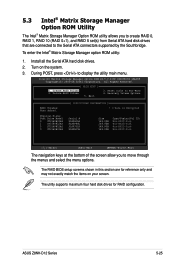
... Type/Status(Vol ID) Non-RAID Disk Non-RAID Disk Non-RAID Disk Non-RAID Disk [↑↓]-Select [ESC]-Exit [ENTER]-Select Menu The navigation keys at the bottom of the screen allow you to create RAID 0, RAID 1, RAID 10 (RAID 0+1), and RAID 5 set(s) from Serial ATA hard disk drives that are for RAID configuration. To enter the Intel® Matrix Storage Manager option ROM utility: 1. Create RAID Volume 2. All Rights Reserved. [ MAIN MENU ] 1. Delete RAID Volume 5. Reset Disks to display the utility main menu...
... Type/Status(Vol ID) Non-RAID Disk Non-RAID Disk Non-RAID Disk Non-RAID Disk [↑↓]-Select [ESC]-Exit [ENTER]-Select Menu The navigation keys at the bottom of the screen allow you to create RAID 0, RAID 1, RAID 10 (RAID 0+1), and RAID 5 set(s) from Serial ATA hard disk drives that are for RAID configuration. To enter the Intel® Matrix Storage Manager option ROM utility: 1. Create RAID Volume 2. All Rights Reserved. [ MAIN MENU ] 1. Delete RAID Volume 5. Reset Disks to display the utility main menu...


