User Manual
Page 29
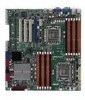
MIO PCIE slot 4. Clear RTC RAM (CLRTC1) 2. IDE control setting (3-pin IDE_SW1) 6. DDR3 voltage control setting (4-pin LVDDR3_SEL1; Force BIOS recovery setting (3-pin RECOVERY1) Rear panel connectors 1. LAN...16 2-21 2-21 2-21 Page 2-25 2-26 2-26 2-27 2-27 2-28 2-28 2-29 2-29 2-30 Page 2-31 2-31 2-31 2-31 2-31 2-31 2-31 2-31 ASUS Z8PE-D12 Series 2-9 PCI Express x 16 slots 5. CPU Fan and Chassis Fan control setting (3-pin CPUFAN_SEL1, CHAFAN_SEL1) 4. PCI-X Slot control setting (3-pin PCIX_SPEED1) 7. LVDDR3_SEL2) 8. USB 2.0 ...
MIO PCIE slot 4. Clear RTC RAM (CLRTC1) 2. IDE control setting (3-pin IDE_SW1) 6. DDR3 voltage control setting (4-pin LVDDR3_SEL1; Force BIOS recovery setting (3-pin RECOVERY1) Rear panel connectors 1. LAN...16 2-21 2-21 2-21 Page 2-25 2-26 2-26 2-27 2-27 2-28 2-28 2-29 2-29 2-30 Page 2-31 2-31 2-31 2-31 2-31 2-31 2-31 2-31 ASUS Z8PE-D12 Series 2-9 PCI Express x 16 slots 5. CPU Fan and Chassis Fan control setting (3-pin CPUFAN_SEL1, CHAFAN_SEL1) 4. PCI-X Slot control setting (3-pin PCIX_SPEED1) 7. LVDDR3_SEL2) 8. USB 2.0 ...
User Manual
Page 45
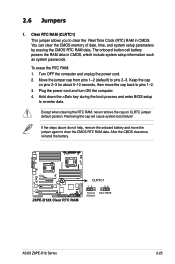
...during the boot process and enter BIOS setup to clear the CMOS RTC RAM data. Except when clearing the RTC RAM, never remove the cap on pins 2-3 for about 5-10 seconds, then move the jumper again to re-enter data. ASUS Z8PE-D12 Series 2-25 If the steps above do not help, remove the ...onboard battery and move the cap back to pins 1-2. 3. Plug the power cord and turn ON the computer. 4. Clear RTC RAM (CLRTC1) This jumper allows you to pins 2-3. The ...
...during the boot process and enter BIOS setup to clear the CMOS RTC RAM data. Except when clearing the RTC RAM, never remove the cap on pins 2-3 for about 5-10 seconds, then move the jumper again to re-enter data. ASUS Z8PE-D12 Series 2-25 If the steps above do not help, remove the ...onboard battery and move the cap back to pins 1-2. 3. Plug the power cord and turn ON the computer. 4. Clear RTC RAM (CLRTC1) This jumper allows you to pins 2-3. The ...

User Manual
Page 73
4.2 BIOS setup program This motherboard supports a programmable Low-Pin Count (LPC) chip that the computer can recognize these changes and record them in the CMOS RAM of your computer in the future. This requires...your BIOS. If you can update using the navigation keys. • The default BIOS settings for this motherboard apply for this utility. See section 4.8 Exit Menu. • The BIOS setup screens shown in section...program, you to reconfigure your system using this motherboard. Select the Load Setup Defaults item under the Exit Menu. ASUS Z8PE-D12 Series 4-7
4.2 BIOS setup program This motherboard supports a programmable Low-Pin Count (LPC) chip that the computer can recognize these changes and record them in the CMOS RAM of your computer in the future. This requires...your BIOS. If you can update using the navigation keys. • The default BIOS settings for this motherboard apply for this utility. See section 4.8 Exit Menu. • The BIOS setup screens shown in section...program, you to reconfigure your system using this motherboard. Select the Load Setup Defaults item under the Exit Menu. ASUS Z8PE-D12 Series 4-7

User Manual
Page 104
...Installed. The Supervisor Password item on how to change the supervisor password. 4.6.4 Security The Security menu items allow you to erase the RTC RAM. 4-38 Chapter 4: BIOS setup Change Supervisor Password Change User Password ←→ Select Screen ↑↓ Select Item Enter Change ...F1 General Help F10 Save and Exit ESC Exit v02.61 (C)Copyright 1985-2008, American Megatrends, Inc. After you set a Supervisor Password: 1. From the password box, type a password composed of ...
...Installed. The Supervisor Password item on how to change the supervisor password. 4.6.4 Security The Security menu items allow you to erase the RTC RAM. 4-38 Chapter 4: BIOS setup Change Supervisor Password Change User Password ←→ Select Screen ↑↓ Select Item Enter Change ...F1 General Help F10 Save and Exit ESC Exit v02.61 (C)Copyright 1985-2008, American Megatrends, Inc. After you set a Supervisor Password: 1. From the password box, type a password composed of ...

User Manual
Page 106
...←→ Select Screen ↑↓ Select Item Enter Go to Sub Screen F1 General Help F10 Save and Exit ESC Exit v02.61 (C)Copyright 1985-2008, American Megatrends, Inc. 4.7 Exit menu The Exit menu items allow you made and restore the previously saved values. Select...this option from this option, a confirmation window appears. Discard Changes This option allows you to discard the selections you to the non-volatile RAM. 4-40 Chapter 4: BIOS setup If you attempt to exit the Setup program without saving your changes, the program prompts you with a ...
...←→ Select Screen ↑↓ Select Item Enter Go to Sub Screen F1 General Help F10 Save and Exit ESC Exit v02.61 (C)Copyright 1985-2008, American Megatrends, Inc. 4.7 Exit menu The Exit menu items allow you made and restore the previously saved values. Select...this option from this option, a confirmation window appears. Discard Changes This option allows you to discard the selections you to the non-volatile RAM. 4-40 Chapter 4: BIOS setup If you attempt to exit the Setup program without saving your changes, the program prompts you with a ...


