
User Manual
Page 1
Z8NR-D12 Motherboard
Z8NR-D12 Motherboard

User Manual
Page 3
... Contents...iii Notices...vii Safety information viii About this guide ix Z8NR-D12 specifications summary xi Chapter 1: Product introduction 1.1 Welcome 1-1 1.2 Package contents 1-1 1.3 Serial number label 1-2 1.4 Special features 1-2 1.4.1 Product highlights 1-2 1.4.2 Innovative ASUS features 1-4 Chapter 2: Hardware information 2.1 Before you proceed 2-1 2.2 Motherboard overview 2-2 2.2.1 Placement direction 2-2 2.2.2 Screw holes 2-2 2.2.3 Motherboard layouts 2-3 2.2.4 Layout contents 2-4 2.3 Central Processing Unit (CPU 2-6 2.3.1 Installing the CPU...
... Contents...iii Notices...vii Safety information viii About this guide ix Z8NR-D12 specifications summary xi Chapter 1: Product introduction 1.1 Welcome 1-1 1.2 Package contents 1-1 1.3 Serial number label 1-2 1.4 Special features 1-2 1.4.1 Product highlights 1-2 1.4.2 Innovative ASUS features 1-4 Chapter 2: Hardware information 2.1 Before you proceed 2-1 2.2 Motherboard overview 2-2 2.2.1 Placement direction 2-2 2.2.2 Screw holes 2-2 2.2.3 Motherboard layouts 2-3 2.2.4 Layout contents 2-4 2.3 Central Processing Unit (CPU 2-6 2.3.1 Installing the CPU...
User Manual
Page 8
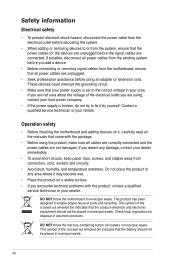
... Avoid dust, humidity, and temperature extremes. DO NOT throw the mercury-containing button cell battery in municipal waste. viii DO NOT throw the motherboard in municipal waste. This product has been designed to enable proper reuse of the crossed out wheeled bin indicates that came with the product, ...the package. • Before using the product, make sure all power cables are not damaged. Operation safety • Before installing the motherboard and adding devices on a stable surface. • If you add a device. • Before connecting or removing signal cables from the...
... Avoid dust, humidity, and temperature extremes. DO NOT throw the mercury-containing button cell battery in municipal waste. viii DO NOT throw the motherboard in municipal waste. This product has been designed to enable proper reuse of the crossed out wheeled bin indicates that came with the product, ...the package. • Before using the product, make sure all power cables are not damaged. Operation safety • Before installing the motherboard and adding devices on a stable surface. • If you add a device. • Before connecting or removing signal cables from the...

User Manual
Page 9
...are also provided. • Chapter 5: RAID configuration This chapter provides instructions for setting up sequence and ways of the motherboard and the new technologies it supports. • Chapter 2: Hardware information This chapter lists the hardware setup procedures that you ... setup This chapter tells how to change system settings through the BIOS Setup menus. Refer to the ASUS contact information. 2. ASUS websites The ASUS website provides updated information on the motherboard. • Chapter 3: Powering up This chapter describes the power up , creating, and configuring RAID...
...are also provided. • Chapter 5: RAID configuration This chapter provides instructions for setting up sequence and ways of the motherboard and the new technologies it supports. • Chapter 2: Hardware information This chapter lists the hardware setup procedures that you ... setup This chapter tells how to change system settings through the BIOS Setup menus. Refer to the ASUS contact information. 2. ASUS websites The ASUS website provides updated information on the motherboard. • Chapter 3: Powering up This chapter describes the power up , creating, and configuring RAID...

User Manual
Page 13
This chapter describes the motherboard features and the new technologies it supports. 1Product introduction
This chapter describes the motherboard features and the new technologies it supports. 1Product introduction
User Manual
Page 15
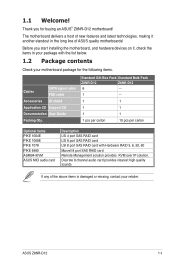
...port SAS RAID card with the list below. 1.2 Package contents Check your motherboard package for buying an ASUS® Z8NR-D12 motherboard! Before you for the following items. Cables SATA signal cable FDD cable ...ASUS quality motherboards! Thank you start installing the motherboard, and hardware devices on it another standout in your retailer. The motherboard delivers a host of the above items is damaged or missing, contact your package with Hardware RAID 5, 6, 50, 60 Marvell 8 port SAS RAID card Remote Management solution provides KVM over IP solution. ASUS Z8NR-D12...
...port SAS RAID card with the list below. 1.2 Package contents Check your motherboard package for buying an ASUS® Z8NR-D12 motherboard! Before you for the following items. Cables SATA signal cable FDD cable ...ASUS quality motherboards! Thank you start installing the motherboard, and hardware devices on it another standout in your retailer. The motherboard delivers a host of the above items is damaged or missing, contact your package with Hardware RAID 5, 6, 50, 60 Marvell 8 port SAS RAID card Remote Management solution provides KVM over IP solution. ASUS Z8NR-D12...

User Manual
Page 16
... as the figure below. DDR3 memory support The Z8NR-D12 supports UDIMM and RDIMM DDR3 memory that features data transfer rates of 1333/1066 MHZ to meet the higher bandwidth requirements of the product, ASUS Technical Support team members can then offer a quicker... and satisfying solution to your problems. Z8NR-D12 xxM0Axxxxxxx Made in China 合格 1.4 Special features 1.4.1 Product highlights Latest processor technology This motherboard supports the latest Intel Xeon 5500 ...
... as the figure below. DDR3 memory support The Z8NR-D12 supports UDIMM and RDIMM DDR3 memory that features data transfer rates of 1333/1066 MHZ to meet the higher bandwidth requirements of the product, ASUS Technical Support team members can then offer a quicker... and satisfying solution to your problems. Z8NR-D12 xxM0Axxxxxxx Made in China 合格 1.4 Special features 1.4.1 Product highlights Latest processor technology This motherboard supports the latest Intel Xeon 5500 ...

User Manual
Page 17
... Queuing (NCQ), Power Management (PM) Implementation Algorithm, and Hot Swap. ASUS Z8NR-D12 1-3 The Serial ATA II specification provides twice the bandwidth of the current Serial ATA products with a host of system memory for your computer to PCIe 1.0 devices. 82574L LAN Solution The motherboard comes with dual Gigabit LAN controllers and ports which provide...
... Queuing (NCQ), Power Management (PM) Implementation Algorithm, and Hot Swap. ASUS Z8NR-D12 1-3 The Serial ATA II specification provides twice the bandwidth of the current Serial ATA products with a host of system memory for your computer to PCIe 1.0 devices. 82574L LAN Solution The motherboard comes with dual Gigabit LAN controllers and ports which provide...

User Manual
Page 19
It includes description of the jumpers and connectors on the motherboard. 2 Hardware information This chapter lists the hardware setup procedures that you have to perform when installing system components.
It includes description of the jumpers and connectors on the motherboard. 2 Hardware information This chapter lists the hardware setup procedures that you have to perform when installing system components.

User Manual
Page 20
Chapter summary 2 2.1 Before you proceed 2-1 2.2 Motherboard overview 2-2 2.3 Central Processing Unit (CPU 2-6 2.4 System memory 2-11 2.5 Expansion slots 2-14 2.6 Jumpers 2-18 2.7 Connectors 2-23 ASUS Z8NR-D12
Chapter summary 2 2.1 Before you proceed 2-1 2.2 Motherboard overview 2-2 2.3 Central Processing Unit (CPU 2-6 2.4 System memory 2-11 2.5 Expansion slots 2-14 2.6 Jumpers 2-18 2.7 Connectors 2-23 ASUS Z8NR-D12

User Manual
Page 21
... off or the power cord is detached from the wall socket before touching any motherboard settings. • Unplug the power cord from the power supply. ASUS Z8NR-D12 2-1 2.1 Before you proceed Take note of the following precautions before you install motherboard components or change any component. • Use a grounded wrist strap or touch a safely grounded...
... off or the power cord is detached from the wall socket before touching any motherboard settings. • Unplug the power cord from the power supply. ASUS Z8NR-D12 2-1 2.1 Before you proceed Take note of the following precautions before you install motherboard components or change any component. • Use a grounded wrist strap or touch a safely grounded...

User Manual
Page 22
... this side towards the rear of the chassis as indicated in an SSI EEB compliant chassis. 2.2 Motherboard overview Before you install the motherboard, study the configuration of your chassis to ensure that the motherboard fits into the chassis in the correct orientation. The edge with external ports goes to the rear part of the chassis...
... this side towards the rear of the chassis as indicated in an SSI EEB compliant chassis. 2.2 Motherboard overview Before you install the motherboard, study the configuration of your chassis to ensure that the motherboard fits into the chassis in the correct orientation. The edge with external ports goes to the rear part of the chassis...

User Manual
Page 23
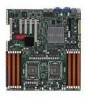
2.2.3 Motherboard layouts ASUS Z8NR-D12 2-3
2.2.3 Motherboard layouts ASUS Z8NR-D12 2-3

User Manual
Page 26
...of repair only if the damage is shipment/transit-related. • Keep the cap after installing the motherboard. ASUS will process Return Merchandise Authorization (RMA) requests only if the motherboard comes with installation instructions for the Intel® Xeon® Dual/Quad Core processor. • Your ...heatsink. If the instructions in this section do not match the CPU documentation, follow the latter. • Upon purchase of the motherboard, ensure that the socket box is facing towards you see any damage to the socket contacts resulting from incorrect CPU installation/removal,...
...of repair only if the damage is shipment/transit-related. • Keep the cap after installing the motherboard. ASUS will process Return Merchandise Authorization (RMA) requests only if the motherboard comes with installation instructions for the Intel® Xeon® Dual/Quad Core processor. • Your ...heatsink. If the instructions in this section do not match the CPU documentation, follow the latter. • Upon purchase of the motherboard, ensure that the socket box is facing towards you see any damage to the socket contacts resulting from incorrect CPU installation/removal,...

User Manual
Page 31
Follow the table above for CPU2. 2.4 System memory 2.4.1 Overview The motherboard comes with twelve (12) Double Data Rate 3 (DDR3) Dual Inline Memory Modules (DIMM) sockets. ASUS Z8NR-D12 2-11 The figure illustrates the location of the DDR3 DIMM sockets: Recommended CPU1 memory configuration Mode Sockets DIMM_C1 DIMM_C2 DIMM_B1 DIMM_B2 2 DIMMs 3 DIMMs 4 DIMMs 6 DIMMs ...
Follow the table above for CPU2. 2.4 System memory 2.4.1 Overview The motherboard comes with twelve (12) Double Data Rate 3 (DDR3) Dual Inline Memory Modules (DIMM) sockets. ASUS Z8NR-D12 2-11 The figure illustrates the location of the DDR3 DIMM sockets: Recommended CPU1 memory configuration Mode Sockets DIMM_C1 DIMM_C2 DIMM_B1 DIMM_B2 2 DIMMs 3 DIMMs 4 DIMMs 6 DIMMs ...

User Manual
Page 32
... you obtain memory modules from the higher-sized channel is then mapped for single-channel operation. • Due to the Qualified Vendors List on the ASUS web site. • You may install 512 MB, 1 GB, 2 GB, 4 GB and 8GB registered DIMMs or Unbuffered DIMM with the same CAS latency. For... optimum compatibility, we recommend that you install a 64-bit Windows OS when having 4GB or more memory on the motherboard. • This motherboard does not support memory modules made up of the lower-sized channel for the OS can be about 3GB or less. Refer to the...
... you obtain memory modules from the higher-sized channel is then mapped for single-channel operation. • Due to the Qualified Vendors List on the ASUS web site. • You may install 512 MB, 1 GB, 2 GB, 4 GB and 8GB registered DIMMs or Unbuffered DIMM with the same CAS latency. For... optimum compatibility, we recommend that you install a 64-bit Windows OS when having 4GB or more memory on the motherboard. • This motherboard does not support memory modules made up of the lower-sized channel for the OS can be about 3GB or less. Refer to the...

User Manual
Page 33
... force. 2. Simultaneously press the retaining clips outward to remove a DIMM. 2 1. ASUS Z8NR-D12 2-13 Remove the DIMM from the socket. DO NOT force a DIMM into the socket until the retaining clips snap back in only one direction. 2.4.3 Installing a DIMM Ensure to both the motherboard and the components. 1. Failure to do so may cause severe...
... force. 2. Simultaneously press the retaining clips outward to remove a DIMM. 2 1. ASUS Z8NR-D12 2-13 Remove the DIMM from the socket. DO NOT force a DIMM into the socket until the retaining clips snap back in only one direction. 2.4.3 Installing a DIMM Ensure to both the motherboard and the components. 1. Failure to do so may cause severe...

User Manual
Page 34
Remove the bracket opposite the slot that you physical injury and damage motherboard components. 2.5.1 Installing an expansion card To install an expansion card: 1. Align the card connector with the slot and press firmly until the card is already ... and the expansion cards that came with the screw you may cause you intend to install expansion cards. Remove the system unit cover (if your motherboard is completely seated on the next page. 3. Failure to do so may need to use . 4. Assign an IRQ to unplug the power cord before adding...
Remove the bracket opposite the slot that you physical injury and damage motherboard components. 2.5.1 Installing an expansion card To install an expansion card: 1. Align the card connector with the slot and press firmly until the card is already ... and the expansion cards that came with the screw you may cause you intend to install expansion cards. Remove the system unit cover (if your motherboard is completely seated on the next page. 3. Failure to do so may need to use . 4. Assign an IRQ to unplug the power cord before adding...

User Manual
Page 37
2.5.8 Installing ASUS PIKE RAID card Follow the steps below to install an optional ASUS RAID card on your motherboard. 1. Snap the I Button slot on the motherboard. 2. Align the golden fingers of the RAID card with the PIKE RAID card slot. 3. Locate the I Button in place. ASUS Z8NR-D12 2-17 Ensure that it is completely seated on the PIKE RAID card slot. 2.5.9 Installing i Button Follow the steps below to install an optional i Button on your motherboard. 1. Insert the RAID card into the PIKE RAID card slot. Locate the PIKE RAID card slot on the motherboard. 2.
2.5.8 Installing ASUS PIKE RAID card Follow the steps below to install an optional ASUS RAID card on your motherboard. 1. Snap the I Button slot on the motherboard. 2. Align the golden fingers of the RAID card with the PIKE RAID card slot. 3. Locate the I Button in place. ASUS Z8NR-D12 2-17 Ensure that it is completely seated on the PIKE RAID card slot. 2.5.9 Installing i Button Follow the steps below to install an optional i Button on your motherboard. 1. Insert the RAID card into the PIKE RAID card slot. Locate the PIKE RAID card slot on the motherboard. 2.

User Manual
Page 40
...jumper caps over pins 1-2 if you create disk arrays. otherwise, place the jumper caps to pins 2-3 to I_BTN1 slot and install an optional ASUS PIKE RAID card. 5. RAID configuration utility selection (3-pin RAID_SEL1) This jumper allows you to select the RAID configuration utility to use when you ...install a PIKE RAID card to the motherboard and want to use the Intel® Matrix Storage Manager. 2-20 Chapter 2: Hardware information Place the jumper caps on pins 2-3 to create...
...jumper caps over pins 1-2 if you create disk arrays. otherwise, place the jumper caps to pins 2-3 to I_BTN1 slot and install an optional ASUS PIKE RAID card. 5. RAID configuration utility selection (3-pin RAID_SEL1) This jumper allows you to select the RAID configuration utility to use when you ...install a PIKE RAID card to the motherboard and want to use the Intel® Matrix Storage Manager. 2-20 Chapter 2: Hardware information Place the jumper caps on pins 2-3 to create...


