User Guide
Page 3
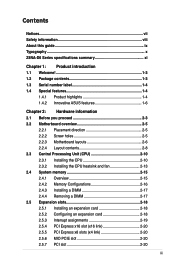
... ix Typography x Z8NA-D6 Series specifications summary xi Chapter 1: Product introduction 1.1 Welcome 1-3 1.2 Package contents 1-3 1.3 Serial number label 1-4 1.4 Special features 1-4 1.4.1 Product highlights 1-4 1.4.2 Innovative ASUS features 1-6 Chapter 2: Hardware information 2.1 Before you proceed 2-3 2.2 Motherboard overview 2-5 2.2.1 Placement direction 2-5 2.2.2 Screw holes 2-5 2.2.3 Motherboard layouts 2-6 2.2.4 Layout contents 2-8 2.3 Central Processing Unit (CPU 2-10 2.3.1 Installing the CPU 2-10 2.3.2 Installing the CPU heatsink and fan...
... ix Typography x Z8NA-D6 Series specifications summary xi Chapter 1: Product introduction 1.1 Welcome 1-3 1.2 Package contents 1-3 1.3 Serial number label 1-4 1.4 Special features 1-4 1.4.1 Product highlights 1-4 1.4.2 Innovative ASUS features 1-6 Chapter 2: Hardware information 2.1 Before you proceed 2-3 2.2 Motherboard overview 2-5 2.2.1 Placement direction 2-5 2.2.2 Screw holes 2-5 2.2.3 Motherboard layouts 2-6 2.2.4 Layout contents 2-8 2.3 Central Processing Unit (CPU 2-10 2.3.1 Installing the CPU 2-10 2.3.2 Installing the CPU heatsink and fan...
User Guide
Page 32
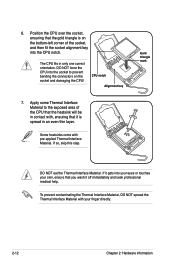
...that it off immediately and seek professional medical help. DO NOT force the CPU into the CPU notch. If so, skip this step. Some heatsinks come with , ensuring that you wash it is on the bottom‑left corner of the socket, and then fit the socket alignment key ... Thermal Interface Material. The CPU fits in contact with pre-applied Thermal Interface Material. Position the CPU over the socket, ensuring that the heatsink will be in only one correct orientation. Apply some Thermal Interface Material to prevent bending the connectors on the socket and damaging the CPU! ...
...that it off immediately and seek professional medical help. DO NOT force the CPU into the CPU notch. If so, skip this step. Some heatsinks come with , ensuring that you wash it is on the bottom‑left corner of the socket, and then fit the socket alignment key ... Thermal Interface Material. The CPU fits in contact with pre-applied Thermal Interface Material. Position the CPU over the socket, ensuring that the heatsink will be in only one correct orientation. Apply some Thermal Interface Material to prevent bending the connectors on the socket and damaging the CPU! ...
User Guide
Page 33
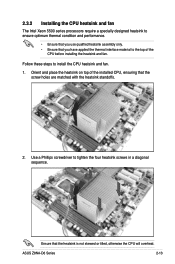
.... • Ensure that you use qualified heatsink assembly only. • Ensure that you have applied the thermal interface material to install the CPU heatsink and fan. 1. Orient and place the heatsink on top of the CPU before installing the heatsink and fan. Follow these steps to the ...top of the installed CPU, ensuring that the heatsink is not skewed or tilted, otherwise the CPU will overheat. Use a Phillips screwdriver to tighten the four heatsink screws in a diagonal sequence. ASUS Z8NA-...
.... • Ensure that you use qualified heatsink assembly only. • Ensure that you have applied the thermal interface material to install the CPU heatsink and fan. 1. Orient and place the heatsink on top of the CPU before installing the heatsink and fan. Follow these steps to the ...top of the installed CPU, ensuring that the heatsink is not skewed or tilted, otherwise the CPU will overheat. Use a Phillips screwdriver to tighten the four heatsink screws in a diagonal sequence. ASUS Z8NA-...
