User Guide
Page 3
Contents Notices...vii Safety information viii About this guide ix Typography x Z8NA-D6 Series specifications summary xi Chapter 1: Product introduction 1.1 Welcome 1-3 1.2 Package contents 1-3 1.3 Serial number label 1-4 1.4 Special features 1-4 1.4.1 Product highlights 1-4 1.4.2 Innovative ASUS features 1-6 Chapter 2: Hardware information 2.1 Before you proceed 2-3 2.2 Motherboard overview 2-5 2.2.1 Placement direction 2-5 2.2.2 Screw holes 2-5 2.2.3 Motherboard layouts 2-6 2.2.4 Layout contents 2-8 2.3 Central Processing Unit (CPU 2-10 2.3.1 Installing the CPU...
Contents Notices...vii Safety information viii About this guide ix Typography x Z8NA-D6 Series specifications summary xi Chapter 1: Product introduction 1.1 Welcome 1-3 1.2 Package contents 1-3 1.3 Serial number label 1-4 1.4 Special features 1-4 1.4.1 Product highlights 1-4 1.4.2 Innovative ASUS features 1-6 Chapter 2: Hardware information 2.1 Before you proceed 2-3 2.2 Motherboard overview 2-5 2.2.1 Placement direction 2-5 2.2.2 Screw holes 2-5 2.2.3 Motherboard layouts 2-6 2.2.4 Layout contents 2-8 2.3 Central Processing Unit (CPU 2-10 2.3.1 Installing the CPU...
User Guide
Page 11
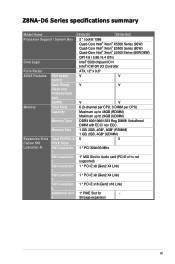
... Name Z8NA-D6 Z8NA-D6C Processor Support / System Bus 2 * socket 1366 Quad-Core Intel® Xeon® X5500 Series (95W) Quad-Core Intel® Xeon® E5500 Series (80W) Quad-Core Intel® Xeon® L5500 Series (60W/38W) Core Logic QPI 4.8 / 5.86 / 6.4 GT/s Intel® 5500 chipset I/O H Intel® ICH10R I/O Controller Form Factor ATX, 12" x 9.6" ASUS Features...
... Name Z8NA-D6 Z8NA-D6C Processor Support / System Bus 2 * socket 1366 Quad-Core Intel® Xeon® X5500 Series (95W) Quad-Core Intel® Xeon® E5500 Series (80W) Quad-Core Intel® Xeon® L5500 Series (60W/38W) Core Logic QPI 4.8 / 5.86 / 6.4 GT/s Intel® 5500 chipset I/O H Intel® ICH10R I/O Controller Form Factor ATX, 12" x 9.6" ASUS Features...
User Guide
Page 12
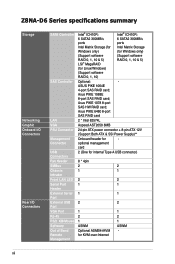
...Aspeed AST2050 8MB 24-pin ATX power connector + 8-pin ATX 12V (Support Both ATX & SSI Power Supply)** Onboard header for Linux/Windows) (Support software RAID 0, 1, 10) Optional: - ASUS PIKE 1064E 4-port SAS RAID card; Z8NA-D6 Series specifications summary Storage Networking Graphic... Storage Windows only) (for Windows only) (Support software (Support software RAID 0, 1, 10 & 5) LSI® MegaRAID RAID 0, 1, 10 & 5) (for - xii Asus PIKE 1078 8-port SAS HW RAID card; optional management card 2 (One for internal Type A USB connector) 8 * 4pin 2 2 1 1 2 2 1 1 1...
...Aspeed AST2050 8MB 24-pin ATX power connector + 8-pin ATX 12V (Support Both ATX & SSI Power Supply)** Onboard header for Linux/Windows) (Support software RAID 0, 1, 10) Optional: - ASUS PIKE 1064E 4-port SAS RAID card; Z8NA-D6 Series specifications summary Storage Networking Graphic... Storage Windows only) (for Windows only) (Support software (Support software RAID 0, 1, 10 & 5) LSI® MegaRAID RAID 0, 1, 10 & 5) (for - xii Asus PIKE 1078 8-port SAS HW RAID card; optional management card 2 (One for internal Type A USB connector) 8 * 4pin 2 2 1 1 2 2 1 1 1...
User Guide
Page 13
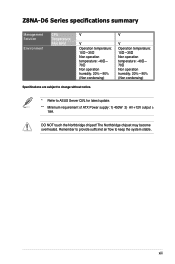
Z8NA-D6 Series specifications summary Management Solution Environment CPU Temperature FAN RPM V V V Operation temperature: 10℃-35℃ Non operation temperature: -40℃- 70℃ Non operation humidity: ... condensing) Specifications are subject to change without notice. * Refer to keep the system stable. Remember to provide sufficinet air flow to ASUS Server QVL for latest update. ** Minimum requirement of ATX Power supply: 1) 450W 2) All +12V output ≥ 18A. The Northbridge chipset may become overheated. DO NOT touch the Northbridge chipset! xiii...
Z8NA-D6 Series specifications summary Management Solution Environment CPU Temperature FAN RPM V V V Operation temperature: 10℃-35℃ Non operation temperature: -40℃- 70℃ Non operation humidity: ... condensing) Specifications are subject to change without notice. * Refer to keep the system stable. Remember to provide sufficinet air flow to ASUS Server QVL for latest update. ** Minimum requirement of ATX Power supply: 1) 450W 2) All +12V output ≥ 18A. The Northbridge chipset may become overheated. DO NOT touch the Northbridge chipset! xiii...

User Guide
Page 17
... damaged or missing, contact your retailer. 1.1 Welcome! Discrete 7.1 channel audio card provides clearest high quality sounds ASUS Z8NA-D6 Series 1-3 Standard Gift Box Pack Standard Bulk Pack Z8NA-D6 series Z8NA-D6 series 6 -- 1 1 1 1 1 1 1pcs per carton 10pcs per carton If any of ASUS quality motherboards! Before you for the following items. Cables SATA data cable Accessories IO shield Application CD Support CD...
... damaged or missing, contact your retailer. 1.1 Welcome! Discrete 7.1 channel audio card provides clearest high quality sounds ASUS Z8NA-D6 Series 1-3 Standard Gift Box Pack Standard Bulk Pack Z8NA-D6 series Z8NA-D6 series 6 -- 1 1 1 1 1 1 1pcs per carton 10pcs per carton If any of ASUS quality motherboards! Before you for the following items. Cables SATA data cable Accessories IO shield Application CD Support CD...
User Guide
Page 18
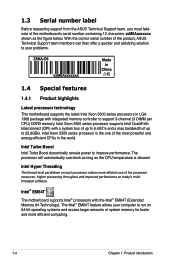
... the product, ASUS Technical Support team members can then offer a quicker and satisfying solution to your computer to improve performance. The Intel® EM64T feature allows your problems. Z8NA-D6 xxM0Axxxxxxx Made in China 合格 1.4 Special features 1.4.1 Product highlights Latest processor technology This motherboard supports the latest Intel Xeon 5500 series processors in the...
... the product, ASUS Technical Support team members can then offer a quicker and satisfying solution to your computer to improve performance. The Intel® EM64T feature allows your problems. Z8NA-D6 xxM0Axxxxxxx Made in China 合格 1.4 Special features 1.4.1 Product highlights Latest processor technology This motherboard supports the latest Intel Xeon 5500 series processors in the...
User Guide
Page 19
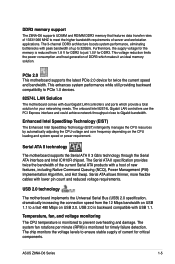
... to prevent overheating and damage. ASUS Z8NA-D6 Series 1-5 The onboard Intel 82574L Gigabit LAN controllers use the PCI Express interface and could achieve network throughput close to meet the higher bandwidth requirements of server and workstation applications. USB 2.0 technology The motherboard implements the Universal Serial Bus (... system performance, eliminating bottlenecks with lower pin count and reduced voltage requirements. DDR3 memory support The Z8NA-D6 supports UDIMM and RDIMM DDR3 memory that features data transfer rates of 1333/1066 MHZ to Gigabit bandwidth.
... to prevent overheating and damage. ASUS Z8NA-D6 Series 1-5 The onboard Intel 82574L Gigabit LAN controllers use the PCI Express interface and could achieve network throughput close to meet the higher bandwidth requirements of server and workstation applications. USB 2.0 technology The motherboard implements the Universal Serial Bus (... system performance, eliminating bottlenecks with lower pin count and reduced voltage requirements. DDR3 memory support The Z8NA-D6 supports UDIMM and RDIMM DDR3 memory that features data transfer rates of 1333/1066 MHZ to Gigabit bandwidth.

User Guide
Page 22
Chapter summary 2 2.1 Before you proceed 2-3 2.2 Motherboard overview 2-6 2.3 Central Processing Unit (CPU 2-11 2.4 System memory 2-16 2.5 Expansion slots 2-19 2.6 Jumpers 2-25 2.7 Connectors 2-30 ASUS Z8NA-D6 Series
Chapter summary 2 2.1 Before you proceed 2-3 2.2 Motherboard overview 2-6 2.3 Central Processing Unit (CPU 2-11 2.4 System memory 2-16 2.5 Expansion slots 2-19 2.6 Jumpers 2-25 2.7 Connectors 2-30 ASUS Z8NA-D6 Series
User Guide
Page 23
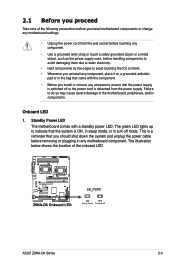
... The green LED lights up to indicate that you install or remove any motherboard component. The illustration below shows the location of the following precautions before you install motherboard components or change any motherboard settings. • Unplug the power cord from the wall socket before touching ...do so may cause severe damage to the motherboard, peripherals, and/or components. This is a reminder that the system is ON, in sleep mode, or in soft-off or the power cord is switched off mode. 2.1 Before you proceed Take note of the onboard LED ASUS Z8NA-D6 Series 2-3
... The green LED lights up to indicate that you install or remove any motherboard component. The illustration below shows the location of the following precautions before you install motherboard components or change any motherboard settings. • Unplug the power cord from the wall socket before touching ...do so may cause severe damage to the motherboard, peripherals, and/or components. This is a reminder that the system is ON, in sleep mode, or in soft-off or the power cord is switched off mode. 2.1 Before you proceed Take note of the onboard LED ASUS Z8NA-D6 Series 2-3
User Guide
Page 25
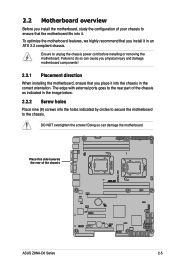
... to the chassis. Doing so can cause you physical injury and damage motherboard components! 2.2.1 Placement direction When installing the motherboard, ensure that you place it into the chassis in an ATX 2.2 compliant chassis. Place this side towards the rear of the chassis ASUS Z8NA-D6 Series 2-5 The edge with external ports goes to the rear part of...
... to the chassis. Doing so can cause you physical injury and damage motherboard components! 2.2.1 Placement direction When installing the motherboard, ensure that you place it into the chassis in an ATX 2.2 compliant chassis. Place this side towards the rear of the chassis ASUS Z8NA-D6 Series 2-5 The edge with external ports goes to the rear part of...
User Guide
Page 30
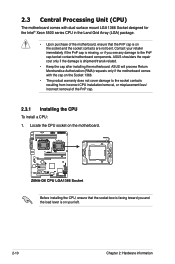
...cap is on the socket and the socket contacts are not bent. ASUS will process Return Merchandise Authorization (RMA) requests only if the motherboard comes with dual surface mount LGA 1366 Socket designed for the Intel® Xeon 5500 series CPU in the Land Grid Array (LGA) package. • ...retailer immediately if the PnP cap is missing, or if you see any damage to the PnP cap/socket contacts/motherboard components. Contact your left. 2-10 Chapter 2: Hardware information ASUS shoulders the repair cost only if the damage is shipment/transit-related. • Keep the cap after installing ...
...cap is on the socket and the socket contacts are not bent. ASUS will process Return Merchandise Authorization (RMA) requests only if the motherboard comes with dual surface mount LGA 1366 Socket designed for the Intel® Xeon 5500 series CPU in the Land Grid Array (LGA) package. • ...retailer immediately if the PnP cap is missing, or if you see any damage to the PnP cap/socket contacts/motherboard components. Contact your left. 2-10 Chapter 2: Hardware information ASUS shoulders the repair cost only if the damage is shipment/transit-related. • Keep the cap after installing ...
User Guide
Page 31
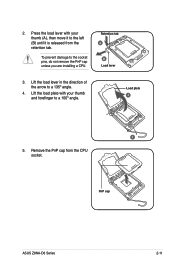
Remove the PnP cap from the retention tab. 2. PnP cap ASUS Z8NA-D6 Series 2-11 Lift the load lever in the direction of the arrow to the socket pins, do not remove the PnP cap unless you are installing a CPU. Retention tab A B Load lever 3. To prevent damage to a 135º angle. 4. Lift the load plate with your thumb and forefinger to the left (B) until it to a 100º angle. Load plate 4 3 5. Press the load lever with your thumb (A), then move it is released from the CPU socket.
Remove the PnP cap from the retention tab. 2. PnP cap ASUS Z8NA-D6 Series 2-11 Lift the load lever in the direction of the arrow to the socket pins, do not remove the PnP cap unless you are installing a CPU. Retention tab A B Load lever 3. To prevent damage to a 135º angle. 4. Lift the load plate with your thumb and forefinger to the left (B) until it to a 100º angle. Load plate 4 3 5. Press the load lever with your thumb (A), then move it is released from the CPU socket.
User Guide
Page 33
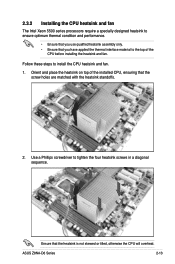
2.3.2 Installing the CPU heatsink and fan The Intel Xeon 5500 series processors require a specially designed heatsink to ensure optimum thermal condition and performance. • Ensure that you use qualified heatsink assembly only. • Ensure that you ... the screw holes are matched with the heatsink standoffs. 2. Orient and place the heatsink on top of the CPU before installing the heatsink and fan. ASUS Z8NA-D6 Series 2-13 Follow these steps to tighten the four heatsink screws in a diagonal sequence. Use a Phillips screwdriver to install the CPU heatsink and fan. 1.
2.3.2 Installing the CPU heatsink and fan The Intel Xeon 5500 series processors require a specially designed heatsink to ensure optimum thermal condition and performance. • Ensure that you use qualified heatsink assembly only. • Ensure that you ... the screw holes are matched with the heatsink standoffs. 2. Orient and place the heatsink on top of the CPU before installing the heatsink and fan. ASUS Z8NA-D6 Series 2-13 Follow these steps to tighten the four heatsink screws in a diagonal sequence. Use a Phillips screwdriver to install the CPU heatsink and fan. 1.
User Guide
Page 35
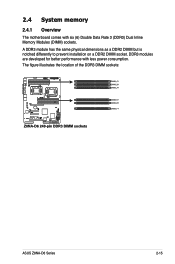
A DDR3 module has the same physical dimensions as a DDR2 DIMM but is notched differently to prevent installation on a DDR2 DIMM socket. DDR3 modules are developed for better performance with six (6) Double Data Rate 3 (DDR3) Dual Inline Memory Modules (DIMM) sockets. The figure illustrates the location of the DDR3 DIMM sockets: ASUS Z8NA-D6 Series 2-15 2.4 System memory 2.4.1 Overview The motherboard comes with less power consumption.
A DDR3 module has the same physical dimensions as a DDR2 DIMM but is notched differently to prevent installation on a DDR2 DIMM socket. DDR3 modules are developed for better performance with six (6) Double Data Rate 3 (DDR3) Dual Inline Memory Modules (DIMM) sockets. The figure illustrates the location of the DDR3 DIMM sockets: ASUS Z8NA-D6 Series 2-15 2.4 System memory 2.4.1 Overview The motherboard comes with less power consumption.
User Guide
Page 37
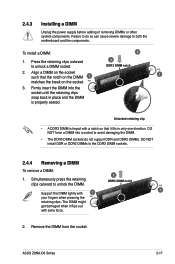
...; The DDR3 DIMM sockets do so can cause severe damage to unlock the DIMM. 2 DDR3 DIMM notch Support the DIMM lightly with extra force. 2. ASUS Z8NA-D6 Series 2-17 Press the retaining clips outward to the DDR3 DIMM sockets. 2.4.4 Removing a DIMM To remove a DIMM: 1. 2.4.3 Installing a DIMM Unplug the ... that it flips out with 1 1 your fingers when pressing the retaining clips. Simultaneously press the retaining clips outward to both the motherboard and the components. The DIMM might get damaged when it fits in place and the DIMM is keyed with a notch so that ...
...; The DDR3 DIMM sockets do so can cause severe damage to unlock the DIMM. 2 DDR3 DIMM notch Support the DIMM lightly with extra force. 2. ASUS Z8NA-D6 Series 2-17 Press the retaining clips outward to the DDR3 DIMM sockets. 2.4.4 Removing a DIMM To remove a DIMM: 1. 2.4.3 Installing a DIMM Unplug the ... that it flips out with 1 1 your fingers when pressing the retaining clips. Simultaneously press the retaining clips outward to both the motherboard and the components. The DIMM might get damaged when it fits in place and the DIMM is keyed with a notch so that ...

User Guide
Page 39
... Mouse Port 13 8 Numeric Data Processor 14* 9 Primary IDE Channel 15* 10 Secondary IDE Channel * These IRQs are usually available for ISA or PCI devices. ASUS Z8NA-D6 Series 2-19 2.5.3 Interrupt assignments Standard Interrupt assignments IRQ Priority Standard function 0 1 System Timer 1 2 Keyboard Controller 2 -
... Mouse Port 13 8 Numeric Data Processor 14* 9 Primary IDE Channel 15* 10 Secondary IDE Channel * These IRQs are usually available for ISA or PCI devices. ASUS Z8NA-D6 Series 2-19 2.5.3 Interrupt assignments Standard Interrupt assignments IRQ Priority Standard function 0 1 System Timer 1 2 Keyboard Controller 2 -

User Guide
Page 41
Ensure that it is completely seated on your motherboard. 1. Insert the RAID card into the PIKE RAID card slot. 2.5.9 Installing an ASUS PIKE RAID card (Z8NA-D6 model only) Follow the steps below to install an optional ASUS RAID card on the PIKE RAID card slot. Align the golden fingers of the RAID card with the PIKE RAID card slot. 3. ASUS Z8NA-D6 Series 2-21 Locate the PIKE RAID card slot on the motherboard. 2.
Ensure that it is completely seated on your motherboard. 1. Insert the RAID card into the PIKE RAID card slot. 2.5.9 Installing an ASUS PIKE RAID card (Z8NA-D6 model only) Follow the steps below to install an optional ASUS RAID card on the PIKE RAID card slot. Align the golden fingers of the RAID card with the PIKE RAID card slot. 3. ASUS Z8NA-D6 Series 2-21 Locate the PIKE RAID card slot on the motherboard. 2.
User Guide
Page 43
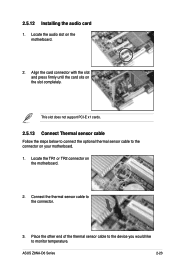
...you would like to the connector on the motherboard. 2. ASUS Z8NA-D6 Series 2-23 2.5.12 Installing the audio card 1. Locate the audio slot on the slot completely. Align the card connector with the slot and press firmly until the card sits on the motherboard. 2. This slot does not support PCI-E... x1 cards. 2.5.13 Connect Thermal sensor cable Follow the steps below to connect the optional thermal sensor cable to monitor temperature. Locate the TR1 or TR2 connector on your motherboard. 1. Connect the thermal...
...you would like to the connector on the motherboard. 2. ASUS Z8NA-D6 Series 2-23 2.5.12 Installing the audio card 1. Locate the audio slot on the slot completely. Align the card connector with the slot and press firmly until the card sits on the motherboard. 2. This slot does not support PCI-E... x1 cards. 2.5.13 Connect Thermal sensor cable Follow the steps below to connect the optional thermal sensor cable to monitor temperature. Locate the TR1 or TR2 connector on your motherboard. 1. Connect the thermal...
User Guide
Page 45
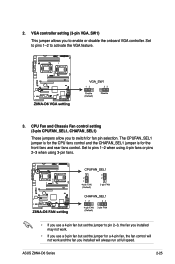
... for a 4-pin fan, the fan control will not work and the fan you use a 4-pin fan but set the jumper to activate the VGA feature. 3. ASUS Z8NA-D6 Series 2-25 Set to pins 1-2 to pin 2-3, the fan you installed may not work. • If you use a 3-pin fan but set the jumper for the...
... for a 4-pin fan, the fan control will not work and the fan you use a 4-pin fan but set the jumper to activate the VGA feature. 3. ASUS Z8NA-D6 Series 2-25 Set to pins 1-2 to pin 2-3, the fan you installed may not work. • If you use a 3-pin fan but set the jumper for the...

User Guide
Page 47
6. iBTN RAID setting (3-pin IBTN_SEL1) (Z8NA-D6 model only) This jumper allows you place the iBTN to adjust the DIMM voltage. Set to pins 1-2 to select 1.5V BIOS control, pins 2-3 to select 1.... utility to select 1.35V Force. Place the jumper caps on pins 1-2 if you install a PIKE RAID card to the motherboard and want to use when you to I_BTN1 slot and install an optional ASUS PIKE RAID card. 7. ASUS Z8NA-D6 Series 2-27 DDR3 voltage control setting (4-pin LVDDR3_SEL1; LVDDR3_SEL2) These jumpers allow you create disk arrays.
6. iBTN RAID setting (3-pin IBTN_SEL1) (Z8NA-D6 model only) This jumper allows you place the iBTN to adjust the DIMM voltage. Set to pins 1-2 to select 1.5V BIOS control, pins 2-3 to select 1.... utility to select 1.35V Force. Place the jumper caps on pins 1-2 if you install a PIKE RAID card to the motherboard and want to use when you to I_BTN1 slot and install an optional ASUS PIKE RAID card. 7. ASUS Z8NA-D6 Series 2-27 DDR3 voltage control setting (4-pin LVDDR3_SEL1; LVDDR3_SEL2) These jumpers allow you create disk arrays.
