Z87-K User's Manual
Page 11
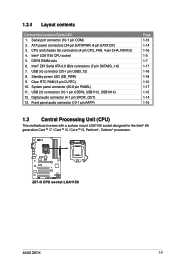
...; i7 / Core™ i5 / Core™ i3, Pentium® , Celeron® processors. USB 2.0 connectors (10-1 pin USB78, USB1112, USB1314) 12. Z87-K Z87-K CPU socket LGA1150 ASUS Z87-K 1-3 1.2.4 Layout contents Connectors/Jumpers/Slots/LED 1. Clear RTC RAM (3-pin CLRTC) 10. Serial port connector (10-1 pin COM) 2. USB 3.0 connector (20-1 pin USB3_12) 8. DDR3 DIMM slots 6. Intel®...
...; i7 / Core™ i5 / Core™ i3, Pentium® , Celeron® processors. USB 2.0 connectors (10-1 pin USB78, USB1112, USB1314) 12. Z87-K Z87-K CPU socket LGA1150 ASUS Z87-K 1-3 1.2.4 Layout contents Connectors/Jumpers/Slots/LED 1. Clear RTC RAM (3-pin CLRTC) 10. Serial port connector (10-1 pin COM) 2. USB 3.0 connector (20-1 pin USB3_12) 8. DDR3 DIMM slots 6. Intel®...

Z87-K User's Manual
Page 18
... Express specifications. shared - - - - - - - - shared - - - - - shared - - - - - - - shared - - - - - - 1.6 Jumpers 1. You can clear the CMOS memory of date, time, and system setup parameters by erasing the CMOS RTC RAM data. IRQ assignments for this motherboard IGD Audio Controller EHCI 1 Controller EHCI 2 Controller XHCI Controller SATA Controller PCIE x16_1 PCIE x16_2 PCIE x1_1 PCIE x1_2...
... Express specifications. shared - - - - - - - - shared - - - - - shared - - - - - - - shared - - - - - - 1.6 Jumpers 1. You can clear the CMOS memory of date, time, and system setup parameters by erasing the CMOS RTC RAM data. IRQ assignments for this motherboard IGD Audio Controller EHCI 1 Controller EHCI 2 Controller XHCI Controller SATA Controller PCIE x16_1 PCIE x16_2 PCIE x1_1 PCIE x1_2...
Z87-K User's Manual
Page 19
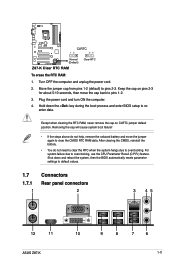
... the steps above do not need to clear the RTC when the system hangs due to default values. 1.7 1.7.1 1 Connectors Rear panel connectors 2 3 45 12 11 ASUS Z87-K 10 9 8 7 6 1-11 For system failure due to pins 2-3. Plug the power cord and turn ON the computer. 4. Shut down the key during the boot process... CMOS, reinstall the battery. • You do not help, remove the onboard battery and move the cap back to re- Except when clearing the RTC RAM, never remove the cap on pins 2-3 for about 5-10 seconds, then move the jumper again to clear the CMOS RTC...
... the steps above do not need to clear the RTC when the system hangs due to default values. 1.7 1.7.1 1 Connectors Rear panel connectors 2 3 45 12 11 ASUS Z87-K 10 9 8 7 6 1-11 For system failure due to pins 2-3. Plug the power cord and turn ON the computer. 4. Shut down the key during the boot process... CMOS, reinstall the battery. • You do not help, remove the onboard battery and move the cap back to re- Except when clearing the RTC RAM, never remove the cap on pins 2-3 for about 5-10 seconds, then move the jumper again to clear the CMOS RTC...

Z87-K User's Manual
Page 33
...any BIOS setting, load the default settings to ensure system compatibility and stability. Entering BIOS Setup at startup To enter BIOS Setup at www.asus.com to download the latest BIOS file for reference purposes only, and may not exactly match what you see on how to enter BIOS Setup.... • Ensure that a USB mouse is connected to your motherboard if you failed to erase the RTC RAM. BIOS menu screen The BIOS setup program can cause damage to your screen. • Visit the ASUS website at startup: • Press during the Power-On Self Test (POST). 2.2 BIOS setup program Use...
...any BIOS setting, load the default settings to ensure system compatibility and stability. Entering BIOS Setup at startup To enter BIOS Setup at www.asus.com to download the latest BIOS file for reference purposes only, and may not exactly match what you see on how to enter BIOS Setup.... • Ensure that a USB mouse is connected to your motherboard if you failed to erase the RTC RAM. BIOS menu screen The BIOS setup program can cause damage to your screen. • Visit the ASUS website at startup: • Press during the Power-On Self Test (POST). 2.2 BIOS setup program Use...

Z87-K User's Manual
Page 38
See section 1.6 Jumpers for information on how to erase the RTC RAM. • The Administrator or User Password items on top of the screen show Installed. From the Create New Password ... as in a new password, then press . 4. After you have forgotten your BIOS password, erase the CMOS Real Time Clock (RTC) RAM to create/confirm the password. After you have set a password, these items show the default Not Installed. Select the User Password item and... follow the same steps as in changing a user password, but press when prompted to clear the BIOS password. ASUS Z87-K 2-11
See section 1.6 Jumpers for information on how to erase the RTC RAM. • The Administrator or User Password items on top of the screen show Installed. From the Create New Password ... as in a new password, then press . 4. After you have forgotten your BIOS password, erase the CMOS Real Time Clock (RTC) RAM to create/confirm the password. After you have set a password, these items show the default Not Installed. Select the User Password item and... follow the same steps as in changing a user password, but press when prompted to clear the BIOS password. ASUS Z87-K 2-11


