Z170-WS User Guide for English
Page 2
... the name, model number and version, as the corresponding binary/object code. Offer to infringe. Such software in this manual may or may obtain it from https://www.asus.com/support/ or (2) for backup purposes, without intent to Provide Source Code of these licenses are included in obtaining ... the same license as stated in the About Box of their respective companies, and are used only for which is defaced or missing. ASUS PROVIDES THIS MANUAL "AS IS" WITHOUT WARRANTY OF ANY KIND, EITHER EXPRESS OR IMPLIED, INCLUDING BUT NOT LIMITED TO THE IMPLIED WARRANTIES OR CONDITIONS OF...
... the name, model number and version, as the corresponding binary/object code. Offer to infringe. Such software in this manual may or may obtain it from https://www.asus.com/support/ or (2) for backup purposes, without intent to Provide Source Code of these licenses are included in obtaining ... the same license as stated in the About Box of their respective companies, and are used only for which is defaced or missing. ASUS PROVIDES THIS MANUAL "AS IS" WITHOUT WARRANTY OF ANY KIND, EITHER EXPRESS OR IMPLIED, INCLUDING BUT NOT LIMITED TO THE IMPLIED WARRANTIES OR CONDITIONS OF...
Z170-WS User Guide for English
Page 5
... Chapter 4: Software Support 4.1 Installing an operating system 4-1 4.1.1 Windows® 7 and USB 3.0 driver for 100 Series 4-1 4.2 Support DVD information 4-8 4.2.1 Running the support DVD 4-8 4.2.2 Obtaining the software manuals 4-9 4.3 Software information 4-10 4.4 AI Suite 3...4-10 4.4.1 Ai Charger 4-14 4.4.2 USB 3.1 Boost 4-15 4.4.3 EZ Update 4-16 4.4.4 USB BIOS Flashback 4-18 4.4.5 Push Notice 4-20 4.4.6 System Information 4-23...
... Chapter 4: Software Support 4.1 Installing an operating system 4-1 4.1.1 Windows® 7 and USB 3.0 driver for 100 Series 4-1 4.2 Support DVD information 4-8 4.2.1 Running the support DVD 4-8 4.2.2 Obtaining the software manuals 4-9 4.3 Software information 4-10 4.4 AI Suite 3...4-10 4.4.1 Ai Charger 4-14 4.4.2 USB 3.1 Boost 4-15 4.4.3 EZ Update 4-16 4.4.4 USB BIOS Flashback 4-18 4.4.5 Push Notice 4-20 4.4.6 System Information 4-23...
Z170-WS User Guide for English
Page 7
... and the power cables are not damaged. If you add a device. • Before connecting or removing signal cables from the motherboard, ensure that all the manuals that came with the product, contact a qualified service technician or your dealer immediately. • To avoid short circuits, keep paper clips, screws, and staples away...
... and the power cables are not damaged. If you add a device. • Before connecting or removing signal cables from the motherboard, ensure that all the manuals that came with the product, contact a qualified service technician or your dealer immediately. • To avoid short circuits, keep paper clips, screws, and staples away...
Z170-WS User Guide for English
Page 9
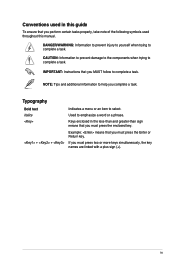
.... Example: means that you complete a task. DANGER/WARNING: Information to prevent injury to yourself when trying to emphasize a word or a phrase. Keys enclosed in this manual. Conventions used in the less-than and greater-than sign means that you perform certain tasks properly, take note of the following symbols used throughout...
.... Example: means that you complete a task. DANGER/WARNING: Information to prevent injury to yourself when trying to emphasize a word or a phrase. Keys enclosed in this manual. Conventions used in the less-than and greater-than sign means that you perform certain tasks properly, take note of the following symbols used throughout...
Z170-WS User Guide for English
Page 16
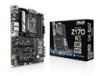
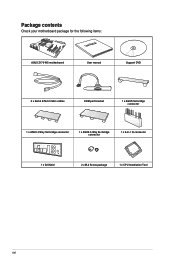
Package contents Check your motherboard package for the following items: User Manual ASUS Z170-WS motherboard User manual Support DVD 6 x Serial ATA 6.0 Gb/s cables COM port bracket 1 x ASUS SLI bridge connector 1 x ASUS 4-Way SLI bridge connector 1 x ASUS 3-Way SLI bridge connector 1 x 2-in-1 Q-connector 1 x Q-Shield 2 x M.2 Screw package 1 x CPU Installation Tool xvi
Package contents Check your motherboard package for the following items: User Manual ASUS Z170-WS motherboard User manual Support DVD 6 x Serial ATA 6.0 Gb/s cables COM port bracket 1 x ASUS SLI bridge connector 1 x ASUS 4-Way SLI bridge connector 1 x ASUS 3-Way SLI bridge connector 1 x 2-in-1 Q-connector 1 x Q-Shield 2 x M.2 Screw package 1 x CPU Installation Tool xvi
Z170-WS User Guide for English
Page 26
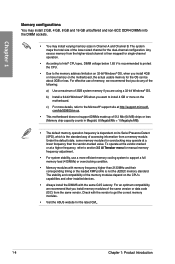
...install the DIMMS with the same CAS Latency. The stability and compatibility of the memory modules depend on the motherboard, the actual usable memory for manual memory frequency adjustment. • For system stability, use of memory, we recommend that you do any of the following: a) Use a ...GB or more details, refer to the Microsoft® support site at a higher frequency, refer to get the correct memory modules. • Visit the ASUS website for the dual-channel configuration. Chapter 1 Memory configurations You may install 2 GB, 4 GB, 8 GB and 16 GB unbuffered and non‑...
...install the DIMMS with the same CAS Latency. The stability and compatibility of the memory modules depend on the motherboard, the actual usable memory for manual memory frequency adjustment. • For system stability, use of memory, we recommend that you do any of the following: a) Use a ...GB or more details, refer to the Microsoft® support site at a higher frequency, refer to get the correct memory modules. • Visit the ASUS website for the dual-channel configuration. Chapter 1 Memory configurations You may install 2 GB, 4 GB, 8 GB and 16 GB unbuffered and non‑...

Z170-WS User Guide for English
Page 31
... begin automatic memory compatibility tuning for successful boot. Replace the DIMMs with the motherboard may cause system boot failure, and the DRAM_LED near the MemOK! Z170-WS 1-13 button does not function under Windows® OS environment. • During the tuning process, the system loads and tests failsafe memory settings.... default settings. • We recommend that are not compatible with ones recommended in the Memory QVL (Qualified Vendors Lists) in this user manual or at www.asus.com. • If you download and update to boot and load the BIOS default settings. MemOK!
... begin automatic memory compatibility tuning for successful boot. Replace the DIMMs with the motherboard may cause system boot failure, and the DRAM_LED near the MemOK! Z170-WS 1-13 button does not function under Windows® OS environment. • During the tuning process, the system loads and tests failsafe memory settings.... default settings. • We recommend that are not compatible with ones recommended in the Memory QVL (Qualified Vendors Lists) in this user manual or at www.asus.com. • If you download and update to boot and load the BIOS default settings. MemOK!
Z170-WS User Guide for English
Page 43
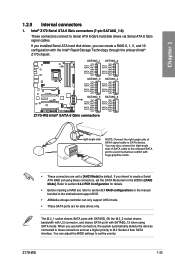
Z170-WS 1-25 the M.2_2 socket shares bandwidth with U.2 connector, and shares SATA ports...Mode] by default. When you intend to create a Serial ATA RAID set to section 5.1 RAID configurations or the manual bundled in the BIOS to these connectors, set the priority. You can create a RAID 0, 1, 5, and 10 configuration with SATA6G_56...; 1.2.9 Internal connectors 1. Intel® Z170 Serial ATA 6 Gb/s connectors (7-pin SATA6G_1-6) These connectors connect to section 3.6.4 PCH Configuration for data drives only. If...
Z170-WS 1-25 the M.2_2 socket shares bandwidth with U.2 connector, and shares SATA ports...Mode] by default. When you intend to create a Serial ATA RAID set to section 5.1 RAID configurations or the manual bundled in the BIOS to these connectors, set the priority. You can create a RAID 0, 1, 5, and 10 configuration with SATA6G_56...; 1.2.9 Internal connectors 1. Intel® Z170 Serial ATA 6 Gb/s connectors (7-pin SATA6G_1-6) These connectors connect to section 3.6.4 PCH Configuration for data drives only. If...
Z170-WS User Guide for English
Page 75
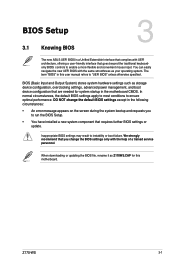
... you change the default BIOS settings except in the motherboard CMOS. Chapter 3: BIOS Setup BIOS Setup 3.1 Knowing BIOS 3 The new ASUS UEFI BIOS is a Unified Extensible Interface that complies with the help of a trained service personnel. BIOS (Basic Input and Output System...same smoothness as storage device configuration, overclocking settings, advanced power management, and boot device configuration that are needed for this user manual refers to enable a more flexible and convenient mouse input. Inappropriate BIOS settings may result to ensure optimal performance. In normal ...
... you change the default BIOS settings except in the motherboard CMOS. Chapter 3: BIOS Setup BIOS Setup 3.1 Knowing BIOS 3 The new ASUS UEFI BIOS is a Unified Extensible Interface that complies with the help of a trained service personnel. BIOS (Basic Input and Output System...same smoothness as storage device configuration, overclocking settings, advanced power management, and boot device configuration that are needed for this user manual refers to enable a more flexible and convenient mouse input. Inappropriate BIOS settings may result to ensure optimal performance. In normal ...
Z170-WS User Guide for English
Page 77
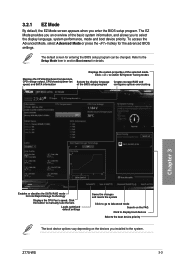
...properties of the BIOS setup program configures system overclocking Chapter 3 Enables or disables the SATA RAID mode for details. Click the button to manually tune the fans Loads optimized default settings Saves the changes and resets the system Click to go to Advanced mode Search on the FAQ...and boot device priority. To access the Advanced Mode, select Advanced Mode or press the hotkey for entering the BIOS setup program can be changed. Z170-WS 3-3 Click < or > to the Setup Mode item in section Boot menu for Intel Rapid Storage Technology Displays the CPU Fan's speed. Refer...
...properties of the BIOS setup program configures system overclocking Chapter 3 Enables or disables the SATA RAID mode for details. Click the button to manually tune the fans Loads optimized default settings Saves the changes and resets the system Click to go to Advanced mode Search on the FAQ...and boot device priority. To access the Advanced Mode, select Advanced Mode or press the hotkey for entering the BIOS setup program can be changed. Z170-WS 3-3 Click < or > to the Setup Mode item in section Boot menu for Intel Rapid Storage Technology Displays the CPU Fan's speed. Refer...
Z170-WS User Guide for English
Page 79
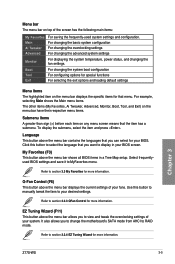
... button above the menu bar allows you want to your BIOS. It also allows you can select for your desired settings. Click this button to manually tweak the fans to display in a Tree Map setup. Refer to RAID mode. EZ Tuning Wizard (F11) This button above the menu bar contains... item on top of your BIOS screen. Q-Fan Control (F6) This button above the menu bar shows all BIOS items in your fans. Chapter 3 Z170-WS 3-5 My Favorites (F3) This button above the menu bar displays the current settings of the screen has the following main items: My Favorites Main Ai...
... button above the menu bar allows you want to your BIOS. It also allows you can select for your desired settings. Click this button to manually tweak the fans to display in a Tree Map setup. Refer to RAID mode. EZ Tuning Wizard (F11) This button above the menu bar contains... item on top of your BIOS screen. Q-Fan Control (F6) This button above the menu bar shows all BIOS items in your fans. Chapter 3 Z170-WS 3-5 My Favorites (F3) This button above the menu bar displays the current settings of the screen has the following main items: My Favorites Main Ai...
Z170-WS User Guide for English
Page 81
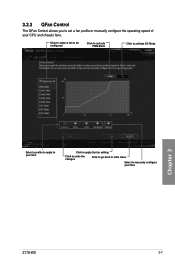
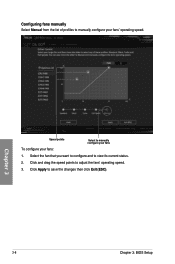
Click to select a fan to be configured Click to activate PWM Mode Click to activate DC Mode Chapter 3 Select a profile to apply to your fans Click to apply the fan setting Click to undo the changes Click to go back to main menu Select to set a fan profile or manually configure the operating speed of your fans Z170-WS 3-7 3.2.3 QFan Control The QFan Control allows you to manually configure your CPU and chassis fans.
Click to select a fan to be configured Click to activate PWM Mode Click to activate DC Mode Chapter 3 Select a profile to apply to your fans Click to apply the fan setting Click to undo the changes Click to go back to main menu Select to set a fan profile or manually configure the operating speed of your fans Z170-WS 3-7 3.2.3 QFan Control The QFan Control allows you to manually configure your CPU and chassis fans.
Z170-WS User Guide for English
Page 82
Click Apply to adjust the fans' operating speed. 3. Chapter 3 Speed points Select to manually configure your fans To configure your fans' operating speed. Click and drag the speed points to save the changes then click Exit (ESC). 3-8 Chapter 3: BIOS Setup Configuring fans manually Select Manual from the list of profiles to manually configure your fans: 1. Select the fan that you want to configure and to view its current status. 2.
Click Apply to adjust the fans' operating speed. 3. Chapter 3 Speed points Select to manually configure your fans To configure your fans' operating speed. Click and drag the speed points to save the changes then click Exit (ESC). 3-8 Chapter 3: BIOS Setup Configuring fans manually Select Manual from the list of profiles to manually configure your fans: 1. Select the fan that you want to configure and to view its current status. 2.
Z170-WS User Guide for English
Page 90
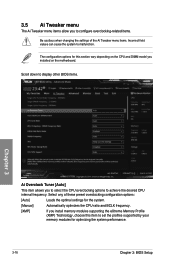
... the system performance. 3-16 Chapter 3: BIOS Setup The configuration options for this item to set the profiles supported by your memory modules for the system. [Manual] Automatically optimizes the CPU ratio and BCLK frequency. [XMP] If you to select the CPU overclocking options to achieve the desired CPU internal frequency. Scroll...
... the system performance. 3-16 Chapter 3: BIOS Setup The configuration options for this item to set the profiles supported by your memory modules for the system. [Manual] Automatically optimizes the CPU ratio and BCLK frequency. [XMP] If you to select the CPU overclocking options to achieve the desired CPU internal frequency. Scroll...

Z170-WS User Guide for English
Page 91
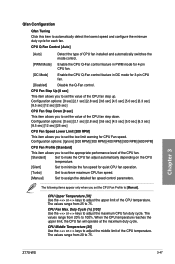
... Core Ratio [Auto] This item allows you set the Ai Overclocking Tuner to [Manual]. Chapter 3 Z170-WS 3-17 The following item appears only when you to set the CPU core ratio limit per core or synchronize automatically to all cores. ASUS MultiCore Enhancement [Auto] [Auto] This item allows you to maximize the oveclocking performance...
... Core Ratio [Auto] This item allows you set the Ai Overclocking Tuner to [Manual]. Chapter 3 Z170-WS 3-17 The following item appears only when you to set the CPU core ratio limit per core or synchronize automatically to all cores. ASUS MultiCore Enhancement [Auto] [Auto] This item allows you to maximize the oveclocking performance...
Z170-WS User Guide for English
Page 92
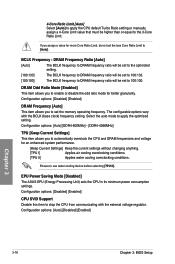
... the odd ratio mode for more Core Ratio Limit, do not set the less Core Ratio Limit to [Auto]. EPU Power Saving Mode [Disabled] The ASUS EPU (Energy Processing Unit) sets the CPU in its minimum power consumption settings. DRAM Odd Ratio Mode [Enabled] This item allows you assign a value for... be higher than or equal to the 3-Core Ratio Limit. 4-Core Ratio Limit [Auto] Select [Auto] to apply the CPU default Turbo Ratio setting or manually assign a 4-Core Limit value that must be set to 100:100.
... the odd ratio mode for more Core Ratio Limit, do not set the less Core Ratio Limit to [Auto]. EPU Power Saving Mode [Disabled] The ASUS EPU (Energy Processing Unit) sets the CPU in its minimum power consumption settings. DRAM Odd Ratio Mode [Enabled] This item allows you assign a value for... be higher than or equal to the 3-Core Ratio Limit. 4-Core Ratio Limit [Auto] Select [Auto] to apply the CPU default Turbo Ratio setting or manually assign a 4-Core Limit value that must be set to 100:100.
Z170-WS User Guide for English
Page 98
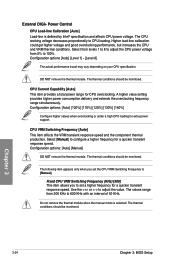
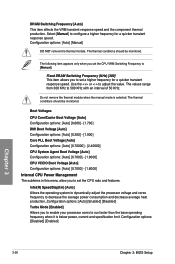
... CPU VRM Switching Frequency (KHz) [500] This item allows you set a higher frequency for a quicker transient response speed. Use the or to [Manual]. The thermal conditions should be monitored. Configuration options [Auto] [Level 1] - [Level 8] The actual performance boost may vary depending on your CPU ...specification. DO NOT remove the thermal module. The thermal conditions should be monitored. Do not remove the thermal module when the manual mode is defined by Intel® specification and affects CPU power voltage. Higher load-line calibration could get higher voltage and good...
... CPU VRM Switching Frequency (KHz) [500] This item allows you set a higher frequency for a quicker transient response speed. Use the or to [Manual]. The thermal conditions should be monitored. Configuration options [Auto] [Level 1] - [Level 8] The actual performance boost may vary depending on your CPU ...specification. DO NOT remove the thermal module. The thermal conditions should be monitored. Do not remove the thermal module when the manual mode is defined by Intel® specification and affects CPU power voltage. Higher load-line calibration could get higher voltage and good...
Z170-WS User Guide for English
Page 100
... selected. Configuration options: [Auto] [Enabled] [Disabled] Turbo Mode [Enabled] Allows you set the CPU ratio and features. Configuration options: [Auto] [Manual] DO NOT remove the thermal module. The following item appears only when you to enable your processor cores to... [Manual]. The thermal conditions should be monitored. Do not remove the thermal module when the manual mode is below power, current and specification limit. Use the or to configure a higher frequency ...
... selected. Configuration options: [Auto] [Enabled] [Disabled] Turbo Mode [Enabled] Allows you set the CPU ratio and features. Configuration options: [Auto] [Manual] DO NOT remove the thermal module. The following item appears only when you to enable your processor cores to... [Manual]. The thermal conditions should be monitored. Do not remove the thermal module when the manual mode is below power, current and specification limit. Use the or to configure a higher frequency ...
Z170-WS User Guide for English
Page 103
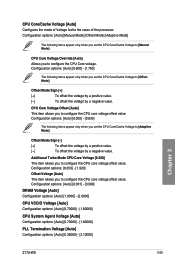
...System Agent Voltage [Auto] Configuration options: [Auto] [0.70000] - [1.80000] PLL Termination Voltage [Auto] Configuration options: [Auto] [0.36000] - [2.10000] Chapter 3 Z170-WS 3-29 CPU Core Voltage Override [Auto] Allows you set the CPU Core/Cache Voltage to [Offset Mode]. Configuration options: [Auto] [0.600] - [1.700] The ...following items appear only when you to [Manual Mode]. Additional Turbo Mode CPU Core Voltage [0.250] This item allows you set the CPU Core/Cache Voltage to configure the ...
...System Agent Voltage [Auto] Configuration options: [Auto] [0.70000] - [1.80000] PLL Termination Voltage [Auto] Configuration options: [Auto] [0.36000] - [2.10000] Chapter 3 Z170-WS 3-29 CPU Core Voltage Override [Auto] Allows you set the CPU Core/Cache Voltage to [Offset Mode]. Configuration options: [Auto] [0.600] - [1.700] The ...following items appear only when you to [Manual Mode]. Additional Turbo Mode CPU Core Voltage [0.250] This item allows you set the CPU Core/Cache Voltage to configure the ...
Z170-WS User Guide for English
Page 121
...range from 20 to 75. When the CPU temperature reaches the upper limit, the CPU fan will operate at the maximum duty cycle. Chapter 3 Z170-WS 3-47 CPU Middle Temperature [25] Use the or keys to adjust the maximum CPU fan duty cycle. Duty Cycle (%) [100] Use the ... Up [0 sec] This item allows you to set the low limit warning for quiet CPU fan operation. [Turbo] Set to achieve maximum CPU fan speed. [Manual] Set to assign the detailed fan speed control parameters. Configuration options: [0 sec] [2.1 sec] [2.8 sec] [3.6 sec] [4.5 sec] [5.0 sec] [6.3 sec] [8.5 sec] [12 sec] [...
...range from 20 to 75. When the CPU temperature reaches the upper limit, the CPU fan will operate at the maximum duty cycle. Chapter 3 Z170-WS 3-47 CPU Middle Temperature [25] Use the or keys to adjust the maximum CPU fan duty cycle. Duty Cycle (%) [100] Use the ... Up [0 sec] This item allows you to set the low limit warning for quiet CPU fan operation. [Turbo] Set to achieve maximum CPU fan speed. [Manual] Set to assign the detailed fan speed control parameters. Configuration options: [0 sec] [2.1 sec] [2.8 sec] [3.6 sec] [4.5 sec] [5.0 sec] [6.3 sec] [8.5 sec] [12 sec] [...


