

User Guide
Page 12
.... BCLK/PCIE frequency tuning from 80 MHz to 300 MHz at 0.001 V increment - ASUS Fan Xpert 3 - vCCSA: Adjustable CPU System Agent voltage at 0.001 V increment - EZ XMP Quiet Thermal Design - X99-PRO specifications summary ASUS Special Features ASUS Quiet Thermal Solution ASUS Exclusive Overclocking Features Rear Panel I/O Ports Internal I /O - 3x more durable corrosionresistant coating USB 3.0 Boost USB...
.... BCLK/PCIE frequency tuning from 80 MHz to 300 MHz at 0.001 V increment - ASUS Fan Xpert 3 - vCCSA: Adjustable CPU System Agent voltage at 0.001 V increment - EZ XMP Quiet Thermal Design - X99-PRO specifications summary ASUS Special Features ASUS Quiet Thermal Solution ASUS Exclusive Overclocking Features Rear Panel I/O Ports Internal I /O - 3x more durable corrosionresistant coating USB 3.0 Boost USB...

User Guide
Page 24
...Windows® OS. com/kb/929605/en-us. • The default memory operation frequency is dependent on the motherboard, the actual usable memory for overclocking may install varying memory sizes in Channel A, Channel B, Channel C, and Channel D. The system maps the total size of the DIMM fan may vary... 3GB system memory if you want to install 4 GB or more efficient memory cooling system to support a full memory load (8 DIMMs) or overclocking condition. • Always install the DIMMS with the vendor to the motherboard. For an optimum compatibility, we recommend that you do any of ...
...Windows® OS. com/kb/929605/en-us. • The default memory operation frequency is dependent on the motherboard, the actual usable memory for overclocking may install varying memory sizes in Channel A, Channel B, Channel C, and Channel D. The system maps the total size of the DIMM fan may vary... 3GB system memory if you want to install 4 GB or more efficient memory cooling system to support a full memory load (8 DIMMs) or overclocking condition. • Always install the DIMMS with the vendor to the motherboard. For an optimum compatibility, we recommend that you do any of ...

User Guide
Page 32
... allow you to fine-tune performance when working on button that allows you to power up or wake up when the system is ideal for overclockers and gamers who continually change settings to enhance system performance. 1. Reset button Press the reset button to reboot the system. Chapter 1 1-16 Chapter 1: Product introduction...
... allow you to fine-tune performance when working on button that allows you to power up or wake up when the system is ideal for overclockers and gamers who continually change settings to enhance system performance. 1. Reset button Press the reset button to reboot the system. Chapter 1 1-16 Chapter 1: Product introduction...
User Guide
Page 33
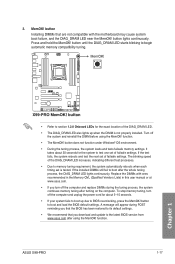
...boot up when the DIMM is tested. If the installed DIMMs still fail to boot and load the BIOS default settings. ASUS X99-PRO 1-17 Chapter 1 If the test fails, the system reboots and test the next set is not properly installed. Replace the...QVL (Qualified Vendors Lists) in this user manual or at www.asus.com. • If you that the BIOS has been restored to the latest BIOS version from www.asus.com after using the MemOK! button Installing DIMMs that you download... you turn off the computer and unplug the power cord for the system to BIOS overclocking, press the MemOK!
...boot up when the DIMM is tested. If the installed DIMMs still fail to boot and load the BIOS default settings. ASUS X99-PRO 1-17 Chapter 1 If the test fails, the system reboots and test the next set is not properly installed. Replace the...QVL (Qualified Vendors Lists) in this user manual or at www.asus.com. • If you that the BIOS has been restored to the latest BIOS version from www.asus.com after using the MemOK! button Installing DIMMs that you download... you turn off the computer and unplug the power cord for the system to BIOS overclocking, press the MemOK!

User Guide
Page 36
The EZ XMP LED (XLED1) lights up when you to section 1.2.8 Onboard LEDs. For the location of the EZ XMP LED, refer to enhance the DIMM's speed and performance. 6. Chapter 1 1-20 Chapter 1: Product introduction EZ XMP switch Enable this switch to overclock the installed DIMMs, allowing you enable the EZ XMP switch.
The EZ XMP LED (XLED1) lights up when you to section 1.2.8 Onboard LEDs. For the location of the EZ XMP LED, refer to enhance the DIMM's speed and performance. 6. Chapter 1 1-20 Chapter 1: Product introduction EZ XMP switch Enable this switch to overclock the installed DIMMs, allowing you enable the EZ XMP switch.
User Guide
Page 37
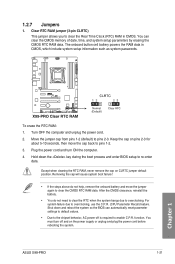
...not help, remove the onboard battery and move the cap back to overclocking. To erase the RTC RAM: 1. Turn OFF the computer and unplug the power cord. 2. Keep the cap on CLRTC jumper default position. ASUS X99-PRO 1-21 Chapter 1 Shut down the key during the boot process and ...enter BIOS setup to clear the Real Time Clock (RTC) RAM in CMOS, which include system setup information such as system passwords. Move the jumper cap from pins 1-2 (default) to overclocking, use the ...
...not help, remove the onboard battery and move the cap back to overclocking. To erase the RTC RAM: 1. Turn OFF the computer and unplug the power cord. 2. Keep the cap on CLRTC jumper default position. ASUS X99-PRO 1-21 Chapter 1 Shut down the key during the boot process and ...enter BIOS setup to clear the Real Time Clock (RTC) RAM in CMOS, which include system setup information such as system passwords. Move the jumper cap from pins 1-2 (default) to overclocking, use the ...

User Guide
Page 38
CPU Over Voltage jumper (3-pin CPU_OV) The CPU Over Voltage jumper allows you to pins 1-2. To go back to its default CPU voltage setting, insert the jumper to set a higher CPU voltage for a flexible overclocking system, depending on the type of the installed CPU. To gain more CPU voltage setting, insert the jumper to pins 2-3. Chapter 1 1-22 Chapter 1: Product introduction 2.
CPU Over Voltage jumper (3-pin CPU_OV) The CPU Over Voltage jumper allows you to pins 1-2. To go back to its default CPU voltage setting, insert the jumper to set a higher CPU voltage for a flexible overclocking system, depending on the type of the installed CPU. To gain more CPU voltage setting, insert the jumper to pins 2-3. Chapter 1 1-22 Chapter 1: Product introduction 2.

User Guide
Page 77
...instability or boot failure. The term "BIOS" in this motherboard. Inappropriate BIOS settings may result to ensure optimal performance. Chapter 3 ASUS X99-PRO 3-1 We strongly recommend that you to run the BIOS Setup. • You have installed a new system component that requires further ...except in the motherboard CMOS. BIOS (Basic Input and Output System) stores system hardware settings such as storage device configuration, overclocking settings, advanced power management, and boot device configuration that are needed for this user manual refers to enable a more flexible...
...instability or boot failure. The term "BIOS" in this motherboard. Inappropriate BIOS settings may result to ensure optimal performance. Chapter 3 ASUS X99-PRO 3-1 We strongly recommend that you to run the BIOS Setup. • You have installed a new system component that requires further ...except in the motherboard CMOS. BIOS (Basic Input and Output System) stores system hardware settings such as storage device configuration, overclocking settings, advanced power management, and boot device configuration that are needed for this user manual refers to enable a more flexible...
User Guide
Page 79
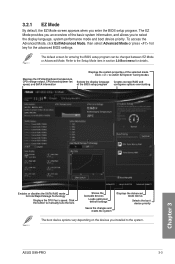
To access the Advanced Mode, click Exit/Advanced Mode, then select Advanced Mode or press hot key for details. ASUS X99-PRO 3-3 The EZ Mode provides you an overview of the basic system information, and allows you installed to the Setup Mode item in section 3.8 Boot menu.../motherboard temperature, CPU voltage output, CPU/chassis/power fan speed, and SATA information Displays the system properties of the BIOS setup program configures system overclocking Chapter 3 Enables or disables the SATA RAID mode for entering the BIOS setup program can be changed between EZ Mode or Advanced Mode.
To access the Advanced Mode, click Exit/Advanced Mode, then select Advanced Mode or press hot key for details. ASUS X99-PRO 3-3 The EZ Mode provides you an overview of the basic system information, and allows you installed to the Setup Mode item in section 3.8 Boot menu.../motherboard temperature, CPU voltage output, CPU/chassis/power fan speed, and SATA information Displays the system properties of the BIOS setup program configures system overclocking Chapter 3 Enables or disables the SATA RAID mode for entering the BIOS setup program can be changed between EZ Mode or Advanced Mode.
User Guide
Page 81
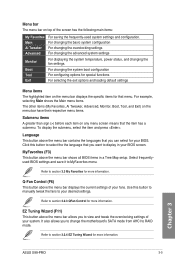
... for more information. Refer to section 3.3 My Favorites for more information. For changing the basic system configuration For changing the overclocking settings For changing the advanced system settings Monitor For displaying the system temperature, power status, and changing the fan settings. Language This...it to RAID mode. It also allows you can select for that you to display in a Tree Map setup. Chapter 3 ASUS X99-PRO 3-5 Boot For changing the system boot configuration Tool For configuring options for special functions Exit For selecting the exit options and ...
... for more information. Refer to section 3.3 My Favorites for more information. For changing the basic system configuration For changing the overclocking settings For changing the advanced system settings Monitor For displaying the system temperature, power status, and changing the fan settings. Language This...it to RAID mode. It also allows you can select for that you to display in a Tree Map setup. Chapter 3 ASUS X99-PRO 3-5 Boot For changing the system boot configuration Tool For configuring options for special functions Exit For selecting the exit options and ...
User Guide
Page 85
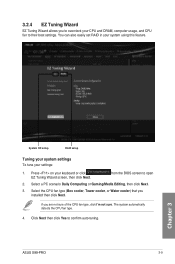
... Next. 3. Press on your CPU and DRAM, computer usage, and CPU fan to their best settings. ASUS X99-PRO 3-9 Chapter 3 from the BIOS screen to confirm auto-tuning. 3.2.4 EZ Tuning Wizard EZ Tuning Wizard allows you to overclock your keyboard or click EZ Tuning Wizard screen, then click Next. Click Next then click Yes...
... Next. 3. Press on your CPU and DRAM, computer usage, and CPU fan to their best settings. ASUS X99-PRO 3-9 Chapter 3 from the BIOS screen to confirm auto-tuning. 3.2.4 EZ Tuning Wizard EZ Tuning Wizard allows you to overclock your keyboard or click EZ Tuning Wizard screen, then click Next. Click Next then click Yes...
User Guide
Page 91
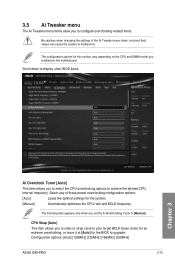
... on the motherboard. Configuration options: [Auto] [100MHz] [125MHz] [166MHz] [250MHz] ASUS X99-PRO 3-15 Scroll down to display other BIOS items. Chapter 3 Ai Overclock Tuner [Auto] This item allows you to select a strap close to your target BCLK (base clock) for an extreme overclocking, or leave it at [Auto] for the system. [Manual] Automatically optimizes...
... on the motherboard. Configuration options: [Auto] [100MHz] [125MHz] [166MHz] [250MHz] ASUS X99-PRO 3-15 Scroll down to display other BIOS items. Chapter 3 Ai Overclock Tuner [Auto] This item allows you to select a strap close to your target BCLK (base clock) for an extreme overclocking, or leave it at [Auto] for the system. [Manual] Automatically optimizes...

User Guide
Page 92
...when the BCLK (base clock) frequency is set to the 2-Core Ratio Limit. ASUS MultiCore Enhancement [Auto] [Auto] This item allows you to maximize the oveclocking performance optimized by default for a better overclocking capability. CPU Core Ratio [Auto] This item allows you to set the CPU ... to default core ratio settings. Chapter 3 3-16 Chapter 3: BIOS setup Source Clock Tuner [Auto] This item allows you to start overclocking the system from 100 MHz. Initial BCLK Frequency [Auto] This item allows you to select the source clock based on the CPU specification...
...when the BCLK (base clock) frequency is set to the 2-Core Ratio Limit. ASUS MultiCore Enhancement [Auto] [Auto] This item allows you to maximize the oveclocking performance optimized by default for a better overclocking capability. CPU Core Ratio [Auto] This item allows you to set the CPU ... to default core ratio settings. Chapter 3 3-16 Chapter 3: BIOS setup Source Clock Tuner [Auto] This item allows you to start overclocking the system from 100 MHz. Initial BCLK Frequency [Auto] This item allows you to select the source clock based on the CPU specification...

User Guide
Page 94
...]. Configuration options: [Auto] [Enabled] [Disabled] BCLK Frequency: DRAM Frequency Ratio [Auto] This item allows you to set to get the extreme overclocking capability. Configuration options: [Keep Current Settings] [Ratio Tuning] [BCLK + Ratio Tuning] Ensure that you installed an efficient CPU fan for K-SKU ...CPUs to 100:133. EPU Power Saving Mode [Disabled] The ASUS EPU (Energy Processing Unit) sets the CPU in this item to adjust the value. Configuration options: [DDR4-800MHz] [DDR4-1000MHz] [DDR4-...
...]. Configuration options: [Auto] [Enabled] [Disabled] BCLK Frequency: DRAM Frequency Ratio [Auto] This item allows you to set to get the extreme overclocking capability. Configuration options: [Keep Current Settings] [Ratio Tuning] [BCLK + Ratio Tuning] Ensure that you installed an efficient CPU fan for K-SKU ...CPUs to 100:133. EPU Power Saving Mode [Disabled] The ASUS EPU (Energy Processing Unit) sets the CPU in this item to adjust the value. Configuration options: [DDR4-800MHz] [DDR4-1000MHz] [DDR4-...

User Guide
Page 100
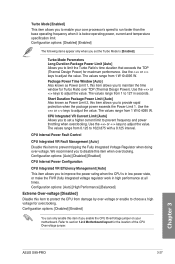
...: [Auto] [Ignore] [Enable] External Digi+ Power Control CPU Input Boot Voltage [Auto] This item allows you to set a higher CPU input boot voltage for better overclocking capability. CPU Load-line Calibration [Auto] Load-line is defined by Intel® specification and affects CPU power voltage. The values range from 0% to 125... Voltage (CHA/CHB/CHC/CHD) [Auto] Use or to adjust the eventual voltages of 0.01 V. Higher load-line calibration could get higher voltage and good overclocking performance, but increases the CPU and VRM thermal conditions.
...: [Auto] [Ignore] [Enable] External Digi+ Power Control CPU Input Boot Voltage [Auto] This item allows you to set a higher CPU input boot voltage for better overclocking capability. CPU Load-line Calibration [Auto] Load-line is defined by Intel® specification and affects CPU power voltage. The values range from 0% to 125... Voltage (CHA/CHB/CHC/CHD) [Auto] Use or to adjust the eventual voltages of 0.01 V. Higher load-line calibration could get higher voltage and good overclocking performance, but increases the CPU and VRM thermal conditions.

User Guide
Page 102
... Configuration options: [100%] [110%] [120%] [130%] [140%] DRAM AB/CD Switching Frequency [Auto] This item affects the overclocking range and system stability. Use the or to dynamically adjust the processor voltage and cores frequency which decreases the average power consumption the ... [120%] [130%] [140%] CPU Power Thermal Control [130] A higher temperature brings a wider CPU power thermal range and extends the overclocking tolerance to manually set a fixed DRAM switching frequency for an enhanced system stability. The thermal conditions should be monitored. Set this menu allow you...
... Configuration options: [100%] [110%] [120%] [130%] [140%] DRAM AB/CD Switching Frequency [Auto] This item affects the overclocking range and system stability. Use the or to dynamically adjust the processor voltage and cores frequency which decreases the average power consumption the ... [120%] [130%] [140%] CPU Power Thermal Control [130] A higher temperature brings a wider CPU power thermal range and extends the overclocking tolerance to manually set a fixed DRAM switching frequency for an enhanced system stability. The thermal conditions should be monitored. Set this menu allow you...
User Guide
Page 103
...Limit [Auto] Also known as Power Limit 1, this item allows you to prevent frequency and power throttling when overclocking. CPU Integrated VR Current Limit [Auto] Allows you set a higher current limit to improve the power rating ...CPU is below operating power, current and temperature specification limit. We recommend you to maintain the time window for overclocking. Configuration options: [Auto] [Disabled] [Enabled] CPU Internal Power Configuration CPU Integrated VR Efficiency Management [Auto]... Power) for the location of the CPU Overvoltage jumper. Chapter 3 ASUS X99-PRO 3-27
...Limit [Auto] Also known as Power Limit 1, this item allows you to prevent frequency and power throttling when overclocking. CPU Integrated VR Current Limit [Auto] Allows you set a higher current limit to improve the power rating ...CPU is below operating power, current and temperature specification limit. We recommend you to maintain the time window for overclocking. Configuration options: [Auto] [Disabled] [Enabled] CPU Internal Power Configuration CPU Integrated VR Efficiency Management [Auto]... Power) for the location of the CPU Overvoltage jumper. Chapter 3 ASUS X99-PRO 3-27

User Guide
Page 104
... controller and power control unit (PCU). Fully Manual Mode [Disabled] Enable this item to 0.999 V at 0.001 V increment. This ASUS exclusive mode provides the optimum voltage adjusting capability for the CPU core, cache, and system agent voltages. You can adjust these voltages separately... the amount of voltage fed to the system agent of Voltage fed to [Offset Mode]. Setting a high system agent voltage may enhance the overclocking capability. Increase the voltage when configuring a high CPU core frequency. Offset Mode Sign [+] [+] To offset the voltage by a positive value....
... controller and power control unit (PCU). Fully Manual Mode [Disabled] Enable this item to 0.999 V at 0.001 V increment. This ASUS exclusive mode provides the optimum voltage adjusting capability for the CPU core, cache, and system agent voltages. You can adjust these voltages separately... the amount of voltage fed to the system agent of Voltage fed to [Offset Mode]. Setting a high system agent voltage may enhance the overclocking capability. Increase the voltage when configuring a high CPU core frequency. Offset Mode Sign [+] [+] To offset the voltage by a positive value....

User Guide
Page 106
... only when you to configure the input voltage for the PCH (platform controller hub). CPU Input Voltage [Auto] This item allows you overclock your system. Disable this item when you to set the voltage for the system memory slots on the left and right. Use the ...CPU SVID Support [Auto] Set this item to 1.90 V at 0.010 V increment. Disabling this item prevents the CPU from 0.80 V to [Enabled] when overclocking. SVID Voltage Override[Auto] This item allows you set the main power supply for the PCH (platform controller hub). Configuration options: [Auto] [Disabled] [Enabled]...
... only when you to configure the input voltage for the PCH (platform controller hub). CPU Input Voltage [Auto] This item allows you overclock your system. Disable this item when you to set the voltage for the system memory slots on the left and right. Use the ...CPU SVID Support [Auto] Set this item to 1.90 V at 0.010 V increment. Disabling this item prevents the CPU from 0.80 V to [Enabled] when overclocking. SVID Voltage Override[Auto] This item allows you set the main power supply for the PCH (platform controller hub). Configuration options: [Auto] [Disabled] [Enabled]...

User Guide
Page 107
... Reference Offset Value [Auto] This item allows you to enhance the BCLK overclocking capability or reduce the EMI (electromagnetic disturbance) generated by a negative value. Configuration options: [Auto] [1] - [20] CPU Spread Spectrum [Auto] This item...Disabled] to 3.098278 V with a 0.006602 V interval. You can use the or keys to adjust the value. Configuration options: [Auto] [Disabled] [Enabled] Chapter 3 ASUS X99-PRO 3-31 PLL Reference Offset Mode Sign [+] [+] To offset the voltage by a positive value. [-] To offset the voltage by the BCLK. You can use the or...
... Reference Offset Value [Auto] This item allows you to enhance the BCLK overclocking capability or reduce the EMI (electromagnetic disturbance) generated by a negative value. Configuration options: [Auto] [1] - [20] CPU Spread Spectrum [Auto] This item...Disabled] to 3.098278 V with a 0.006602 V interval. You can use the or keys to adjust the value. Configuration options: [Auto] [Disabled] [Enabled] Chapter 3 ASUS X99-PRO 3-31 PLL Reference Offset Mode Sign [+] [+] To offset the voltage by a positive value. [-] To offset the voltage by the BCLK. You can use the or...


